Workflow Engine
The workflow engine admin panel is used to define the workflow and decide on how each business segment’s application should move across various stages and task.It is used for configuring following things for the combination of each business segment and a request type.
- Basic Elements
- Approval Matrix
- User profile Configuration
- Stages and Task associated through the workflow engine.
View
After selecting the workflow engine template from the workflow module, the User lands on the screen where the user can view already added/existing workflow along with the Add workflow button.

Admin users can view the below details of already added workflows:
- Workflow Code
- Workflow Title
- Operational Business Segment
- Request Type
- Status
- Actions (Edit and Delete)
Add
The user can click on the Add workflow button to add a new workflow for a combination of Operational business segment and Request Type. Users can enter details in the below fields and click on the save button. As the user saves, it is displayed on the view screen. If the user wants to cancel the adding workflow, the user can click on cancel. The user views a pop-up saying “Are you sure you want to cancel. All unsaved data gets discarded” with a yes/no option.
The Add workflow screen contains four sections:

Basic Element
| Screen name | Field names | Description | Mandatory/non mandatory | Field type |
|---|---|---|---|---|
| Workflow engine (Basic Element) | Workflow Title | Name of the workflow | Mandatory | Alpha Numeric |
| Operational Business segment | To select business segment for which this workflow is defined.Values of this field is getting fetched from Admin Panel>Organization Structure>Operational Business Segment | Mandatory | Dropdown | |
| status | Status is to mention if the workflow which is being created as Active or Inactive, By default, Status will remain as Active till the time User completes to capture all the details needed to complete the workflow engine configuration. Once the Admin User captures all the required details, then User has to manually change the status of workflow to active from Inactive. | Mandatory | Dropdown | |
| Request Type | This field is used to select the type of request for which the workflow is being configured. A particular workflow always has to be created for a combination of a operational business segment and Request type. Date for this field is getting fetched from Admin Panel>Workflow> Workflow Activity Setup (New name : Request Type setup) > Request Type (Column) | Mandatory | Dropdown |
The system validates if a workflow is already added to the OBS/Request type and displays an appropriate message.
User Profile Configuration

- The user profile configuration setup screen is used to configure the user profiles who are going to take part in that workflow.
- User needs to fill in below fields and add. The role of each user is also mentioned.
| Screen name | Field names | Description | Mandatory/non mandatory | Field type |
|---|---|---|---|---|
| Workflow engine (User Profile Configuration) | Workflow Title | The value in this field auto-populates based on the name provided for the workflow in the basic elements tab | Mandatory | Auto populated |
| On-Screen Name Display | This is to mention the display name in the user panel workflow diagram under the blue header.Based on the value selected in this field, the User Profile Name should be seen in the User Panel > Workflow section (of the respective Credit Application) | Mandatory | Alpha Numeric | |
| Sequence | This is to mention seniority /authority level of users. .System Validates that there should not be duplication in sequence. | Mandatory | Numerical | |
| Category | It is a radio button with option as User profile or Committee | |||
| User Profile | Displays the list of user profiles who are going to be part of that workflow.User Profile or Committee (based on the above selection, it should show one of this field).If the Category is "User Profile", all User Profiles should be as configured in "User ID Management > User Profile" should be shown in the User Profile field. If the Category is "Committee", then all Credit Committees as configured in Credit Committee screen is be shown. | Mandatory | Dropdown | |
| Start | It defines that the user profile that is selected is going to be the starter of the credit application for that business segment workflow | Optional | Check box | |
| Reviewer | It defines that the user profile that is selected is going to be the reviewer of the credit application for that business segment workflow | Optional | Check box | |
| Approver | It defines that the user profile that is selected is going to be the approver of the credit application for that business segment workflow | Optional | Check box | |
| Is CAD approver | It defines that the user profile that is selected is going to be the CAD approver of the credit application for that business segment workflow | Optional | Check box | |
| Is CAD Starter | It defines that the user profile that is selected is going to be the CAD starter of the credit application for that business segment workflow | Optional | Check box | |
| Restrict Prospect Customer | It defines for a particular user profile type when this checkbox is marked as Yes, Then the System will not allow the user to take any further action for that BCA wherein the customer is selected as Prospect | Optional | Check box |
- All the added user profile configurations will be listed below with the following details in a table,
- Sequence No
- User Profile
- Approving User Profile
- Approver
- Action (edit and Delete)
- User can also edit and delete the added user profile configurations by clicking on the edit and delete icon.
- User can add multiple user profiles for the workflow by clicking on the Add user profile configuration button
Approval Matrix

This tab is used to arrive at the appropriate approvers based on few following criteria. The criteria gets changed automatically as per the selection made at the request type in the basic elements.
For the Request types selected as New/Amend/Renew/Onboard Credit application,the system shows the following criteria/fields(Mandatory) depending on the appropriate approving authority,

- Workflow Tittle : Value in this field gets auto-populated depending on the name provided for the workflow in the basic elements tab.
- Approver : This field is a dropdown value and it shows only Approver user profiles and Credit committees which has been added in the User Profile configuration screen.
- Level : This field is used to tag level of the Approver. This helps to identify based on the proposed exposure of the credit application to which Approver the application should be sent for approval.
- For example : Tagging different Levels to different Approver user profiles- This field denotes Approval request should be sent to Level 1 user first and if Level 2 user is added in the workflow, the request should be sent to Level 2 user. (Ex1: if CM is tagged as Level 1 user for 0-5M and SCM is tagged as Level 2 user for same 0-5M then first request should be approved by Level 1 user and then by Level 2 user. Ex2: If CM is tagged as Level 1 user for 0-5M and SCM is tagged as Level 1 user for same 5M-10M, then based on the Proposed exposure of the credit application, system should forward credit application to respective Approver in this for upto 5M, application should be sent to CM for Approval and if the proposed exposure is between 5-10M, then application should be sent to SCM for Approval).
- Tagging same Level to different Approver user profiles- System should allow to add same Level (Ex:1) to different user profile but there should be a validation to validate if the approval criteria is not same. (Ex: system should not allow to add CM user profile as approver for 0-5M and again SCM/Credit Commitee user profile as approver for 0-5M).
- Proposed exposure Min Amount : This is used to define the mimiumn exposure amount for which approval is required from the above Users.
- Proposed exposure Max. Amount : This is used to define the maximum exposure amount for which approval is required from the above Users.
For Request types selected as Document deferral application, System will show following criteria based on which the appropriate approving authority can be arrived.
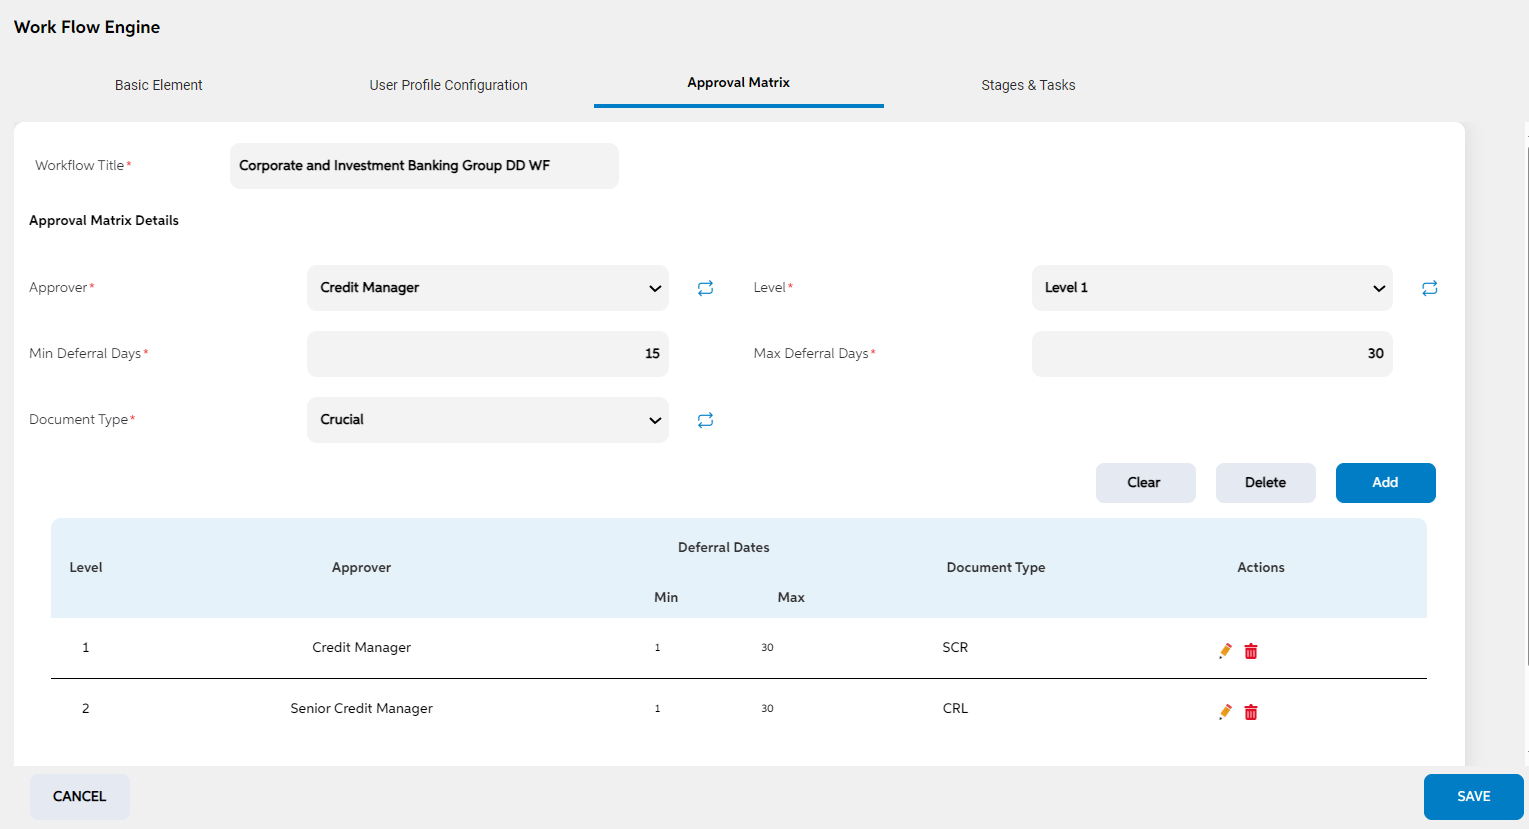
- Workflow Tittle: Value in this field should auto-populated based on the name provided for the workflow in the basic elements tab
- Approver : This field is a dropdown value and it shows only Approver user profiles and Credit committees which has been added in the User Profile configuration screen .
- Level: This field is used to tag level of the Approver. This helps to identify based on the proposed exposure of the credit application to which Approver the application should be sent for approval.
- Min Deferral Days : It is used to define minimum days for document deferral.
- Max Deferral Days : It is used to define maximum days for document deferral.
- Document Type
For Request types selected as Document Waiver application, System will show following criteria/fields(Mandatory) based on which the appropriate approving authority can be arrived.

- Workflow Title: Value in this field should auto-populated based on the name provided for the workflow in the basic elements tab
- Approver : This field is a dropdown value and it shows only Approver user profiles and Credit committees which has been added in the User Profile configuration screen.
- Level: This field is used to tag level of the Approver. This helps to identify based on the proposed exposure of the credit application to which Approver the application should be sent for approval.
- Document Type
For Request types selected as Review date extension, System will show following criteria based on which the appropriate approving authority can be arrived.

- Workflow Tittle: Value in this field should auto-populated based on the name provided for the workflow in the basic elements tab
- Approver : This field is a dropdown value and it shows only Approver user profiles and Credit committees which has been added in the User Profile configuration screen .
- Level: This field is used to tag level of the Approver. This helps to identify based on the proposed exposure of the credit application to which Approver the application should be sent for approval.
- Min Extension Days
- Max Extension Days
For Request types selected as Excess over limit, System will show following criteria/fields ( Mandatory) based on which the appropriate approving authority can be arrived.

- Workflow Tittle: Value in this field should auto-populated based on the name provided for the workflow in the basic elements tab
- Approver : This field is a dropdown value and it shows only Approver user profiles and Credit committees which has been added in the User Profile configuration screen .
- Level: This field is used to tag level of the Approver. This helps to identify based on the proposed exposure of the credit application to which Approver the application should be sent for approval.
- Min Excess Amount : Min. excess amount for which the above approved approval is needed.
- Max Excess Amount : Max. excess amount for which the above approved approval is needed.
- Min Requested Days : No. of min days for which the excess over limit is being requested.
- Max Requested Days : No. of max days for which the excess over limit is being requested.
- User will have the option to add multiple approval conditions or the range of approval condition based on exposure or days for the credit application by clicking the add button for different activities.
- As the above details are filled and the add button is clicked,The user views all the added approval configurations in a tabular form depending upon the table form.The columns of the table display as per the fields captured.
- User can edit the details by clicking on the already added approvers. Once it is clicked, details are prefilled. When the user clicks on the clear button all the values in the above-mentioned fields will be cleared.
- When the user clicks on the delete button the approval matrix will be deleted.
Deciding Actions
- Deciding Action functionality has been removed from the admin panel. wherein now User will not be able to forward or revert an application based on the deciding actions as configured in this tab. Functionality for forwarding and reverting applications from both the CLOS User and CLOS Admin Panel has been removed.
Stages & Tasks

- We have introduced a new Tab instead of deciding action called “ Stages & Tasks” providing functionality to manage stages within the workflow for an application. Various tasks can be configured by the user under each stage. Now the applications is being solely owned by the Application Owner, only tasks being created and assigned to different users involved as per the configurations made in the workflow.
The users can add, edit, delete stages, and associate tasks with each stage.This tab consists of the following fields,
In the Workflow Management>Workflow Engine>Stage & task Tab, We have following fields.
- Work flow Title : Value of this field will get auto-populated from the data captured in Work flow title of Basic elements Tab.
- Stage Name : It is mandatory field with dropdown values. Users select stages from a dropdown menu (data populated from the “Stage Master” Screen).
- Sequence : It is a mandatory field.Users input numeric values for the sequence of stages. Validation ensures uniqueness of stages and sequences within the workflow. Based on the sequence number tagged to the stage, Stages should be shown in the respective credit application's workflow section.
All the added stage under this Stages & task tab is shown to the user in a tabular form with following Columns:
- Sequence No
- Stage Name
- Actions (Edit and delete icons) : Allows users to edit or delete stages by clicking on the respective buttons. The system validates that there are no duplicate sequences within the workflow before allowing edits or deletions
- Tasks (List and Add icon_
- List Icon : On click of this Icon, A Pop-up screen is displayed with all the tasks added/to this stage. User should see the following columns in the pop-up.

- Add task Icon : On click of this Icon, User should be navigated to another screen allowing User to add a new task to selected stage.
- List Icon : On click of this Icon, A Pop-up screen is displayed with all the tasks added/to this stage. User should see the following columns in the pop-up.
Once all the details are added and including stages and tasks. On Clicking Save in the Stages and Task tab of workflow, all the captured details across all tabs should be saved and workflow should be created/updated. User has to manullay go to the view page of workflow engine and click on edit. And Admin User has to change the status from Inactive to Active. Only then the configured workflow will be applicable in the User panel.
Currently, In the System/CLOS the following Stages/Tasks are configured.However, the Bank can configure their own stages/task as per their policy.
| Workflow | Stages | Tasks | User Profile | ||
|---|---|---|---|---|---|
| OBS | Activity Type | Stages | Sequence | Task Name | |
| CIBG FI AGRI | New Credit Application Amend Credit Application Renew Credit Application Onboard existing Facility | Initiation | 1 |
Application Submission, Auto task |
RM |
| Credit Packaging | 2 |
1. Capture Deals and Facilities (0) 2. Capture Collateral Details (1) 3. Link Collateral to Facilities (2) 4. Capture Exceptions (0) 5. Capture Financial Details (0) 6. Get Bureau Score(0) 7. Get Credit Rating(0) 8. Capture ORR Details (0) 9. Capture Other details (0) 10. Mandatory Form Validation(3) 11. Review Deals and Facilities (4) 12. Review Collateral Details (4) 13. Review Collateral Linkage (4) 14. Review Exceptions (4) 15. Review Financial Details (4) 16. Review ORR Details (4) 17. Review Other details (4) 18. Review Bank Guarantee Formats (5) |
CO | ||
| Underwriting | 3 | 19. Capture Decision for CM (Proposed exposure <5M) (0) 19. Approve Exception(1) 20. Capture Decision for SCM (Proposed exposure 5-10M) (0) 21. Capture Decision by Committee (Proposed exposure >10M) - Capture Decision for CM1 (0) - Capture Decision for CM2 (0) - Capture Decision for CM3 (1) - Capture Decision for SCM1 (2) 22. Generate Offer Letter(Conditional) | Approver: CM1/CM2/CM3 SCM1 | ||
| Offer Acceptance | 4 | 23. Capture Offer Acceptance/Rejection (0) | CAD Officer | ||
| Due-Diligence | 5 | 24. Review Documents (0) 25. Review Credit proposal (0) 26. Fulfilment (1) 27. Deal/Facility Creation Successful (2) | CAD Approver | ||
| Complete | 6 | No Tasks | |||
| Withdrawn | - | No Tasks | |||
| CIBG FI AGRI | Document Deferral | Initiation | 1 | Capture Document Defferal details (0) | RM |
| Verification | 2 | Review Document Defferal details (0) | CO | ||
| Decision | 3 | Approve/Reject Document Defferal details (0) | Approver: SCM1 | ||
| Complete | 4 | Document Defferal Approved (0) | - | ||
| Complete | 4 | Document Defferal rejected (0) | - | ||
| Withdrawn | - | No Tasks | - | ||
| CIBG FI AGRI | Document Waiver | Initiation | 1 | Capture Document Waiver details (0) | RM |
| Verification | 2 | Review Document Waiver details (0) | CO | ||
| Decision | 3 | Approve/Reject Document Waiver details (0) | Approver: SCM1 | ||
| Complete | 4 | Document Waiver Approved (0) | - | ||
| Complete | 4 | Document Waiver Rejected (0) | - | ||
| Withdrawn | - | No Tasks | - | ||
| CIBG FI AGRI | Excess Over Limit | Initiation | 1 | Capture Excess Over limit details (0) | RM |
| Verification | 2 | Review Excess Over limits details (0) | CO | ||
| Decision | 3 | Approve/Reject Excess Over limit details (0) | Approver: SCM1 | ||
| Complete | 4 | Excess Over limit Approved (0) | - | ||
| Complete | 4 | Excess Over limit Rejected (0) | - | ||
| Withdrawn | - | No Tasks | - | ||
| CIBG FI AGRI | Review Date Extension | Initiation | 1 | Capture Review Date Extension details (0) | RM |
| Verification | 2 | Review Date Extension details (0) | CO | ||
| Decision | 3 | Approve/reject Review Date Extension details (0) | Approver: SCM1 | ||
| Complete | 4 | Review Date Extension Approved (0) | - | ||
| Complete | 4 | Review Date Externsion Rejected (0) | - | ||
| Withdrawn | - | No Tasks | - | ||
Please refer to the excel sheet for more details regarding the configuration of stages, tasks, status.
Task Screen:
From Admin Panel>Workflow>Workflow Engine>Stages & Task tab, Admin User can add a task to a particular stage from where the admin user has clicked “+” icon. On Click of “+” icon, admin user will be navigated to another screen wherein admin user can add a task and its associated rules
This screen consists of the following fields:
- Workflow tittle : It would get auto-populated from Basic elements
- Stage Name : Data for this field gets auto populated from previous screen and shows the respective stage name from where the user has initiated to add a new task
Task Details Section
- Task name : It is a dropdown & mandatory field. Value of this dropdown is fetched from Task Master Screen.
- Task priority: This field define the priority of the tasks which is being configured. Primarily for categorization purposed. It is a dropdown field. Values of this dropdown field is hardcoded as 1. Low 2. Medium 3. High. (Mandatory field.)
- Task TAT : It is a user input field and accepts numeric values only. The value entered in this field is considered as Days always.
- Task Classification : It is a dropdown field with following values 1. Mandatory & 2. Optional. User will not be able to waive a mandatory type of task in user panel. Tasks which has been categorized as Mandatory should must be actioned upon by user in the User panel app.
- Landing Page : Landing page for a task defines the page/form where user in User panel will be navigated to perform an action when the user selects a particular task. This should be a dropdown field and its values currently should be fetched from Admin Panel>Credit policy Management>Form Rights as per the business segments. Note: If for the select user profile, the form is not enabled in form rights, then system should automatically enable this form to the user profile in the form rights.
- Task Dependency : This field describe the level or dependency of Task. It is a user input field. User define Tasks dependency Level. Within a Stage, Tasks with a higher dependency level should only be created when all the tasks with prior(lesser) dependency levels gets completed. For example, assuming there are two tasks, task A with Dependency 0 & Task B with Dependency 1. Hence, Task B will get created when Task A gets completed. In case of multiple tasks tagged to dependency 0, all tasks with dependency 0 should be completed only then Task B with dependency 1 will be created. User can configure the task dependency levels in a sequential order. For example, User is allowed to create all the tasks with zero dependency first, then add tasks with 1 dependency and then tasks with level 2 dependency. System should validate if atleast 1 task for the previous dependency is added. However user should be allowed to add tasks with any of the dependency in which tasks are already created later in the workflow too.
- Task Description : It is a free text field to capture short description about the expected action that has to be performed by a user in user panel for a particular task.
- Task type : It is a dropdown field. Different Values for this dropdown field is mentioned below:
- Auto Task : Auto Task are task which does not require any user intervention. These types of tasks get auto created by system as per the workflow – task dependency rule and on fulfilment of certain conditions (if added any). And should get auto closed/completed on fulfilment of associated validation rules. In the scenario, where Auto-Task does not get completed (fail to get completed) due to non availability of required data or technical issue in getting the data, then the remedy user should re-trigger the task manually. For ever Auto Task, Admin user while configuring an auto task should define a remdy user so that such auto task can get assigned to such fallback user and fallback user can retrigger the tasks manually. Hence Whenever User selects tast type as Auto task, "Remedy User" field is shown in the Task assignment section.
- Manual Task: Manual Task are simple task which may or may not need any task creation condition but will defintely not need any "Task closure validation". This type of tasks must be used when the Bank user may or may not want to add any task creation condition or task closure validation while creating and closing this task in the workflow. This type of tasks has to be actioned upon by users in User panel manually. For this type of Task, system will not perform any validation checks when user completes /closes the task in User Panel.
- ManualReview: Manual Task are task which may or may not need task creation condition but will need task closure validation. This type of tasks must be used when the Bank user may or may not want to add any task creation condition but want to add task closure validation while creating and closing this task in the workflow. This type of tasks must be actioned upon by users in User panel manually. These types of tasks should be created as per the workflow – task dependency rule only when the associated task creation condition (if added) have been met, however if no task creation condition is added, than these tasks should just be created as per the workflow – task dependency rule. These types of tasks should be closed/completed only when the associated validation rules have been complied or fulfilled.
- Decision Task - This task should be used only for adding Decision related tasks in the workflow. Based on the approval matrix, this decision task should be generated and assigned to respective Approvers in the workflow. In case of credit committee, multiple decision task should be generated and assigned to each committee member and Secretary of the credit committee.
- Complex Task - This task needs some technical expertise and hence should be used only when Bank wants to add task which need complex rules to be setup. When Complex task is added by a Bank user, the corresponding fabric workflow should be configured in BPMN from backend. Hence unless the corresponding fabric workflow is created for these complex tasks, these tasks though added by user in the workflow admin screen (Workflow Engine screen) for a workflow, will not be shown in the respective eligible application's users in CLOS user panel. While adding complex task, technical user will be able to view text box field allowing him/her to write the conditions/validation codes to execute the task in the workflow. While adding Complex Task business user has to describe the expected conditions and validations for this complex task in the text box field as shown in the UI, Technical user should be able to edit the workflow and add the required condition/validation and also add fabric workflow. Note: The Complex task should not be shown in User panel until the technical team/user has completed the code related to condition and validations as submitted the business user from front end. Techincal User should take concurrence from business user for the added conditions/validations for the complex task and then this task should only be made available in the User panel. A note should be shown above Task Rules in the UI "This type of task needs a Fabric workflow configuration in back-end".
Task Assignment Rules: This section allow user to define parameters for assigning a task to a particular user profile. This section have following fields (All fields are mandatory fields):
Below fields should be shown for all Task Types except "Decision Task".
- Task For: It is a dropdown value. Value for this dropdown should be “Application” or “Product”. By default, it allow user to configure a task either for an application however user should be allowed to select product in this field if required. In case user selects “Task For” as Product, then 2 more fields is shown to User i.e the Product Type and Product
- Product Type : This field is displayed only when user selects “Task for” as Product. This will be a dropdown field and value of this field is fetched from Admin panel>Facility Setup>” facility type field”. In addition to the values fetched from facility type, “All” value is also displayed and by default All is shown however user is allowed to select the single/multiple Product Type as required. This is a multi-selection field.
- Product: This field is displayed only when user selects “Task for” as Product. It is a dropdown field and values of this field is fetched from Admin panel > Facility Setup. In addition to the values fetched from facility setup “All” value is also displayed and by default All is shown however user is allowed to select the single/multiple Products as required. This should be a multi selection field.
-
System has a validation and dynamically shows values in the Product Field as per the selection made in the Product type field. And currently in the CLOS Application, "Review Bank Guarantee Format" task has been added for Product Type Non-Funded and for Product Bank Guarantee.
- Assigned To : This field display values 1. Starter 2. Reviewer 3. Approver 4. Is CAD starter 5. Is CAD approver 6. Committee as shown in the User Profile Configuration tab Based on the value selected in this field (other than Committee), the corresponding mapped User profiles from user profile configuration tab is shown in User Profile . If Committee is selected, Committee field should be displayed, displaying the committees added in the User Profile Configuration tab.
- Assigned to (Remedy User) - This field is displays only for Auto Task. This field display values,
- Starter
- Reviewer
- Approver
- Is CAD starter
- Is CAD approver
- User Profile (Remedy User) - This field is displayed only for Auto Task. The user can capture to whom this task should be assigned when the auto task fails.
Below fields alone is applicable for Task Type - "Decision Task".
- Task For: It is a non-editable field and “Application” is the default value which is auto-populated in it.
- Assigned to: This is a non-editable field and it displays "Approval Matrix" by default.
Below Validations has been added when adding any of the above task types:
- System does not allow user to add the same task with the same User profile or Committee. In other words, once a task is added for a particular user profile or Committee, system does not allow the user to add the same task to the same User Profile or committee again. System display message “This Task is already added for this user profile/committee”. (i.e., when Task Name and User Profile or committee is same, it display a message).
- System does not restrict user from adding different tasks with same dependency level across different user profiles for in the same Stage So within the same stage, User while adding task could add Tasks with same dependency to multiple user profiles. In such case, the tasks will be created in Parallel and will be shown in the Unclaimed Tasks of respective User Profiles.
Task Creation Condition
It is an optional section – It is shown only when user checks the “Task creation condition” checkbox. This Sections allows user to configure task creation conditions if required for a task. Currently user is allowed to add only one condition. In order words, Tasks with Creation condition added will be created in user panel only when the associated condition is fulfilled. Following fields are displayed in this section when this section is checked and all the below fields are Mandatory:
- Form : It is a dropdown field. Values of this field is fetched from the Admin Panel>Form Rights as per the business segment selected.
- Field : It is a dropdown field with only fields (as required) is fetched from the selected Form. System at backend has a mapping of the Form/field to table.
- Operand : It is dropdown field with Values as 1. Equals 2. More Than 3. Less Than.
- Value: It is either a drop down or User Input field as per the field selected. Ex: if I select Collateral Type in Field, then system should display all the collateral types as shown in the admin panel > Collateral Type > Collateral Type field.
Task Closure Validation
This section is shown only for Task Type - Manual task with Validation /Auto task This section allows user to add validation rules for closure of Task. In order words, Tasks with validation rules added will allowed to be closed in user panel only when the associated validation rule is fulfilled.. Following fields are displayed in this section and all the below fields are Mandatory:
- Form : It is a dropdown field. Values of this field is being fetched from the Admin Panel>Form Rights as per the business segment selected.
- Field : It is a dropdown field with only fields (as required) to be fetched from the selected Form.
- Operand : It is a dropdown field with Values as 1. Equals 2. More Than 3. Less Than.
- Value: It is either a drop down or User Input field as per the field selected. Ex: if I select Collateral Type in Field, then system should display all the collateral types as shown in the admin panel > Collateral Type > Collateral Type field.
All the added/saved tasks under a stage is shown under “ Stages & Tab “ Screen>Task Column >List Icon.
The user can edit/delete the already added task. However, any edit/delete of task is only applicable for application getting initiated newly in the user panel for the respective OBS and Request types. All task creation condition and closure validations is applicable when editing the Task.
Edit
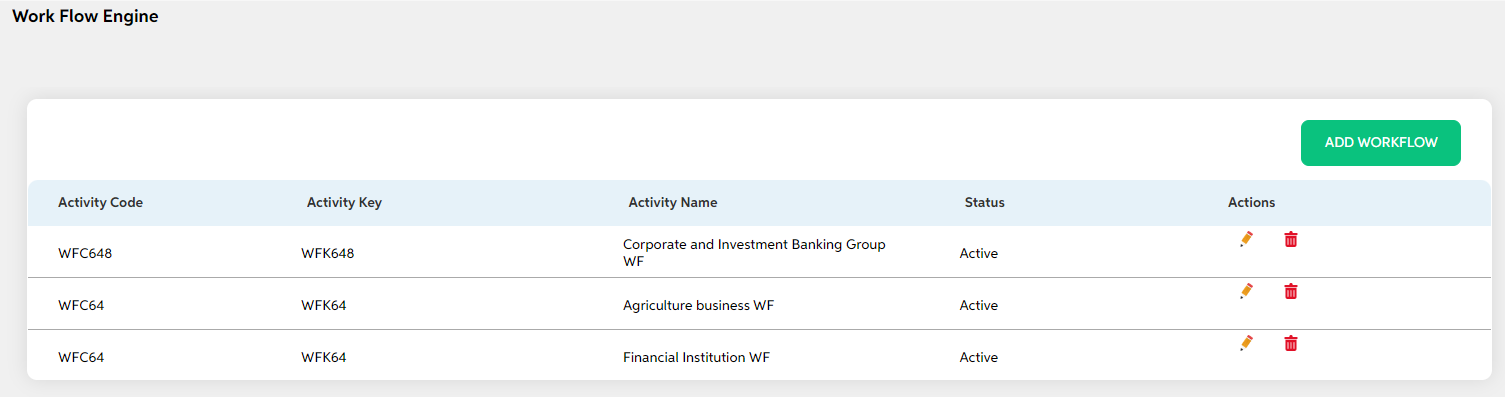
The user can edit the details of the already added workflow by clicking on the edit icon under the actions tab on the view page and saving the changes. Users can cancel the changes made by clicking on the cancel button. The user views a pop-up saying “Are you sure you want to cancel. All unsaved data gets discarded” with a yes/no option.
System should perform a validation and and display a message "Changes will be applicable only for New applications".
Delete
If the user wants to delete any Workflow, then the user can click on the delete icon under the actions tab. The user views a pop-up for confirmation “Are you sure you want to delete it?” with a yes/no option/ User can choose to clock on yes and delete it.
Prerequisites Configuration
| Screens to Configure (as Pre-requisite) | Screen name | Reflection in the user panel | Reflection in the admin panel |
|---|---|---|---|
The above screens are prerequisite for workflow engine screen |
Workflow Engine | It is reflected in the user panel Workflow and application is moved based on the configurations done here | NA |
In this topic