UTF Transfer
The Create Transfers feature is used for unified transfers flow. You can initiate a new fund transfer to your own account in the same bank, recipients in the same bank, recipients in other banks that you have added, recipients in international banks, and Pay a Person recipients.
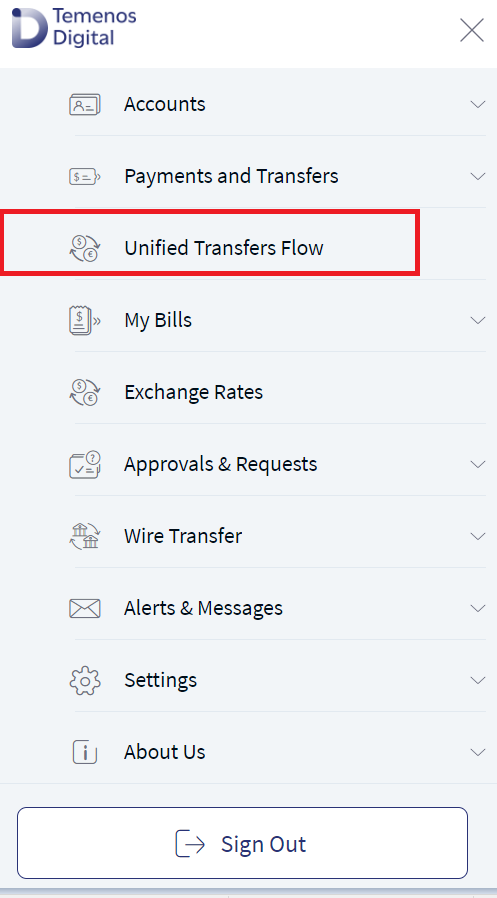
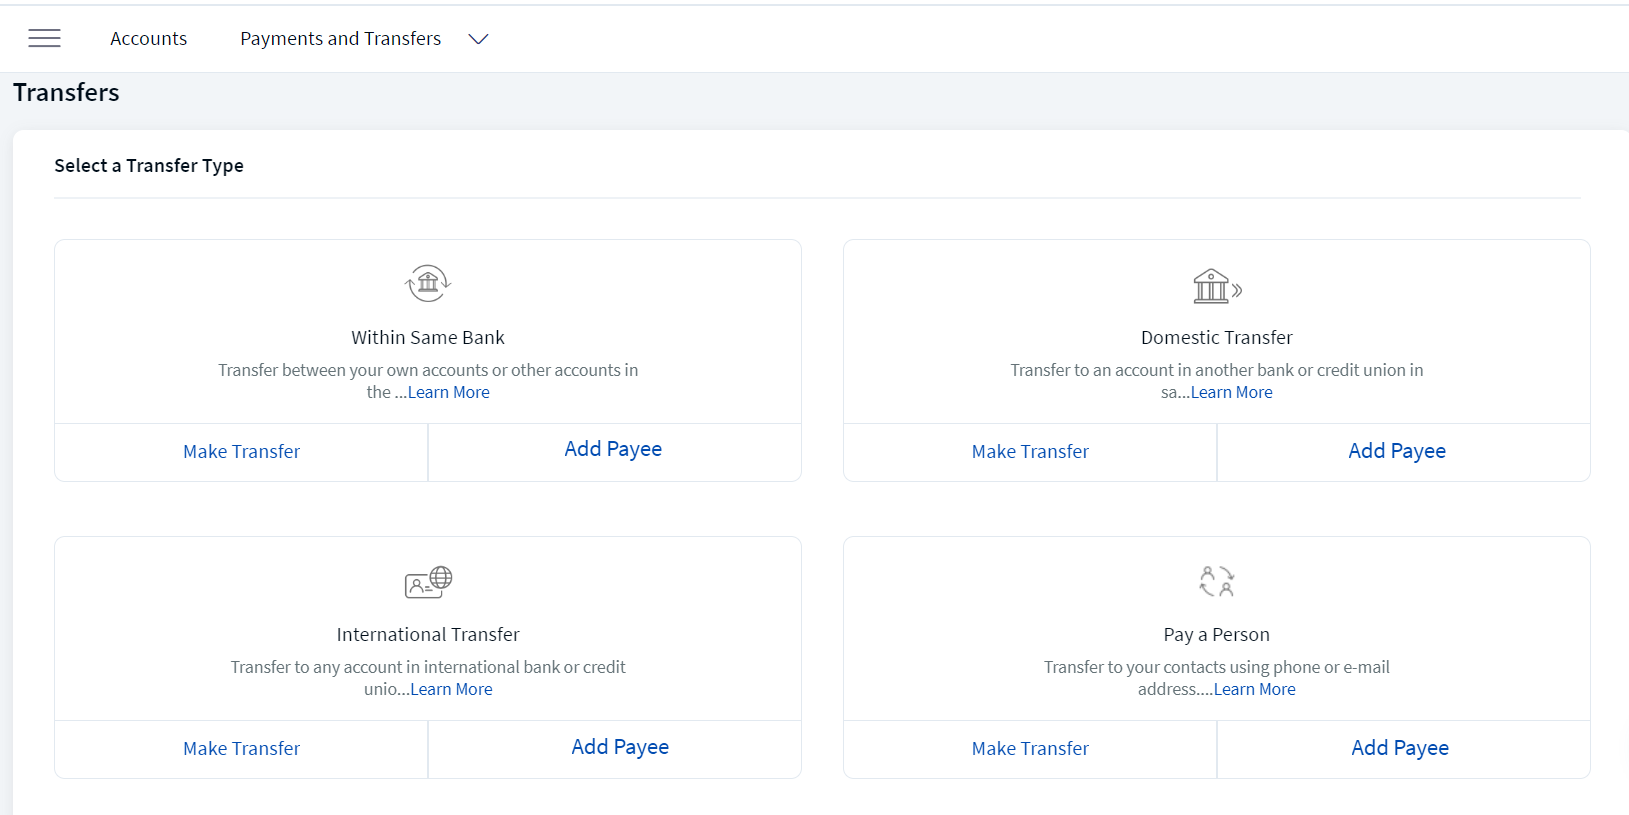
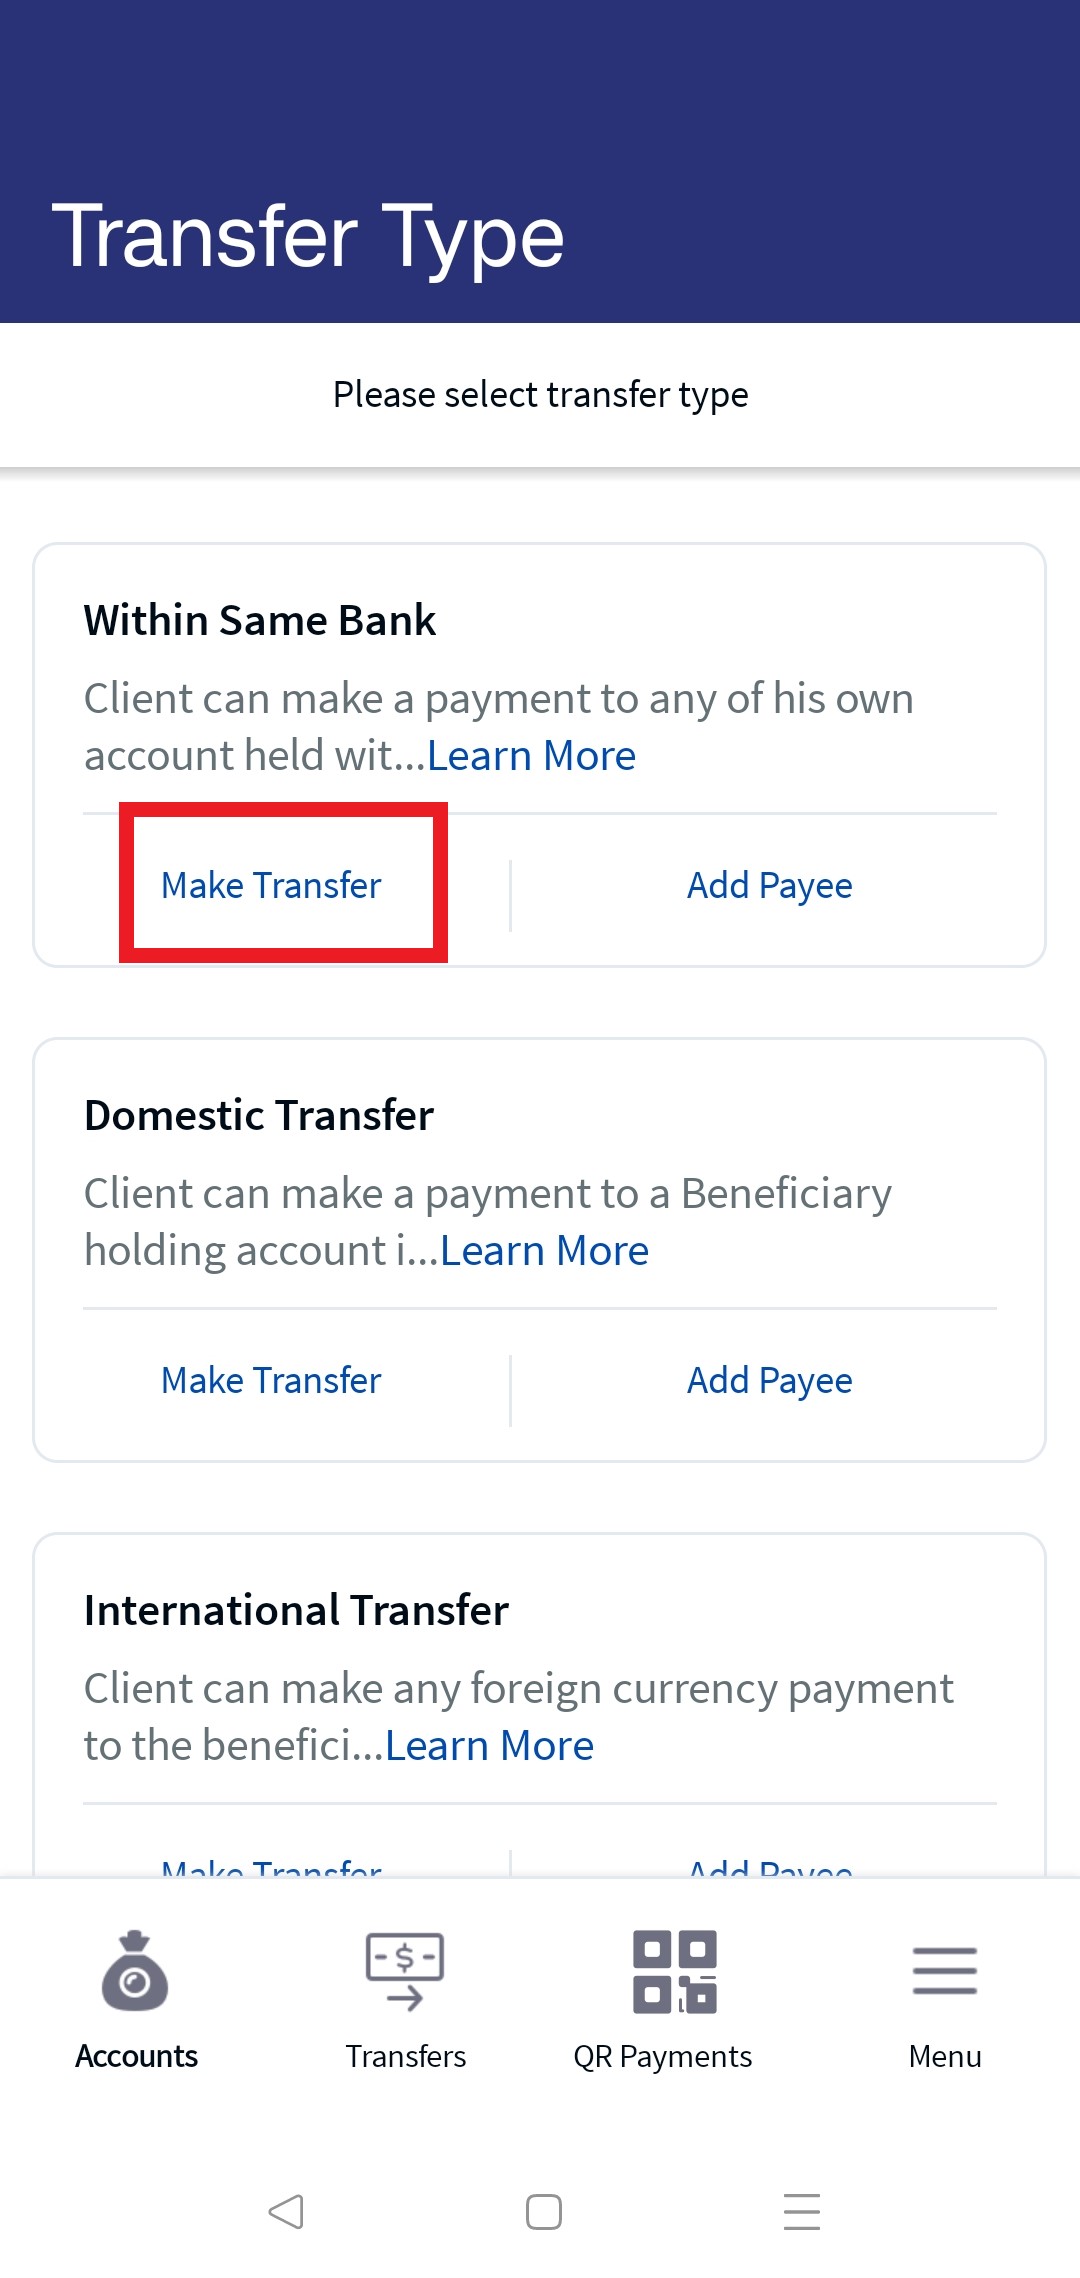
Web Channel : Side Menu > Unified Transfer Flow. The transfers screen appears with the list of transfer types. Select Make Transfer for a transfer type to perform a transfer.
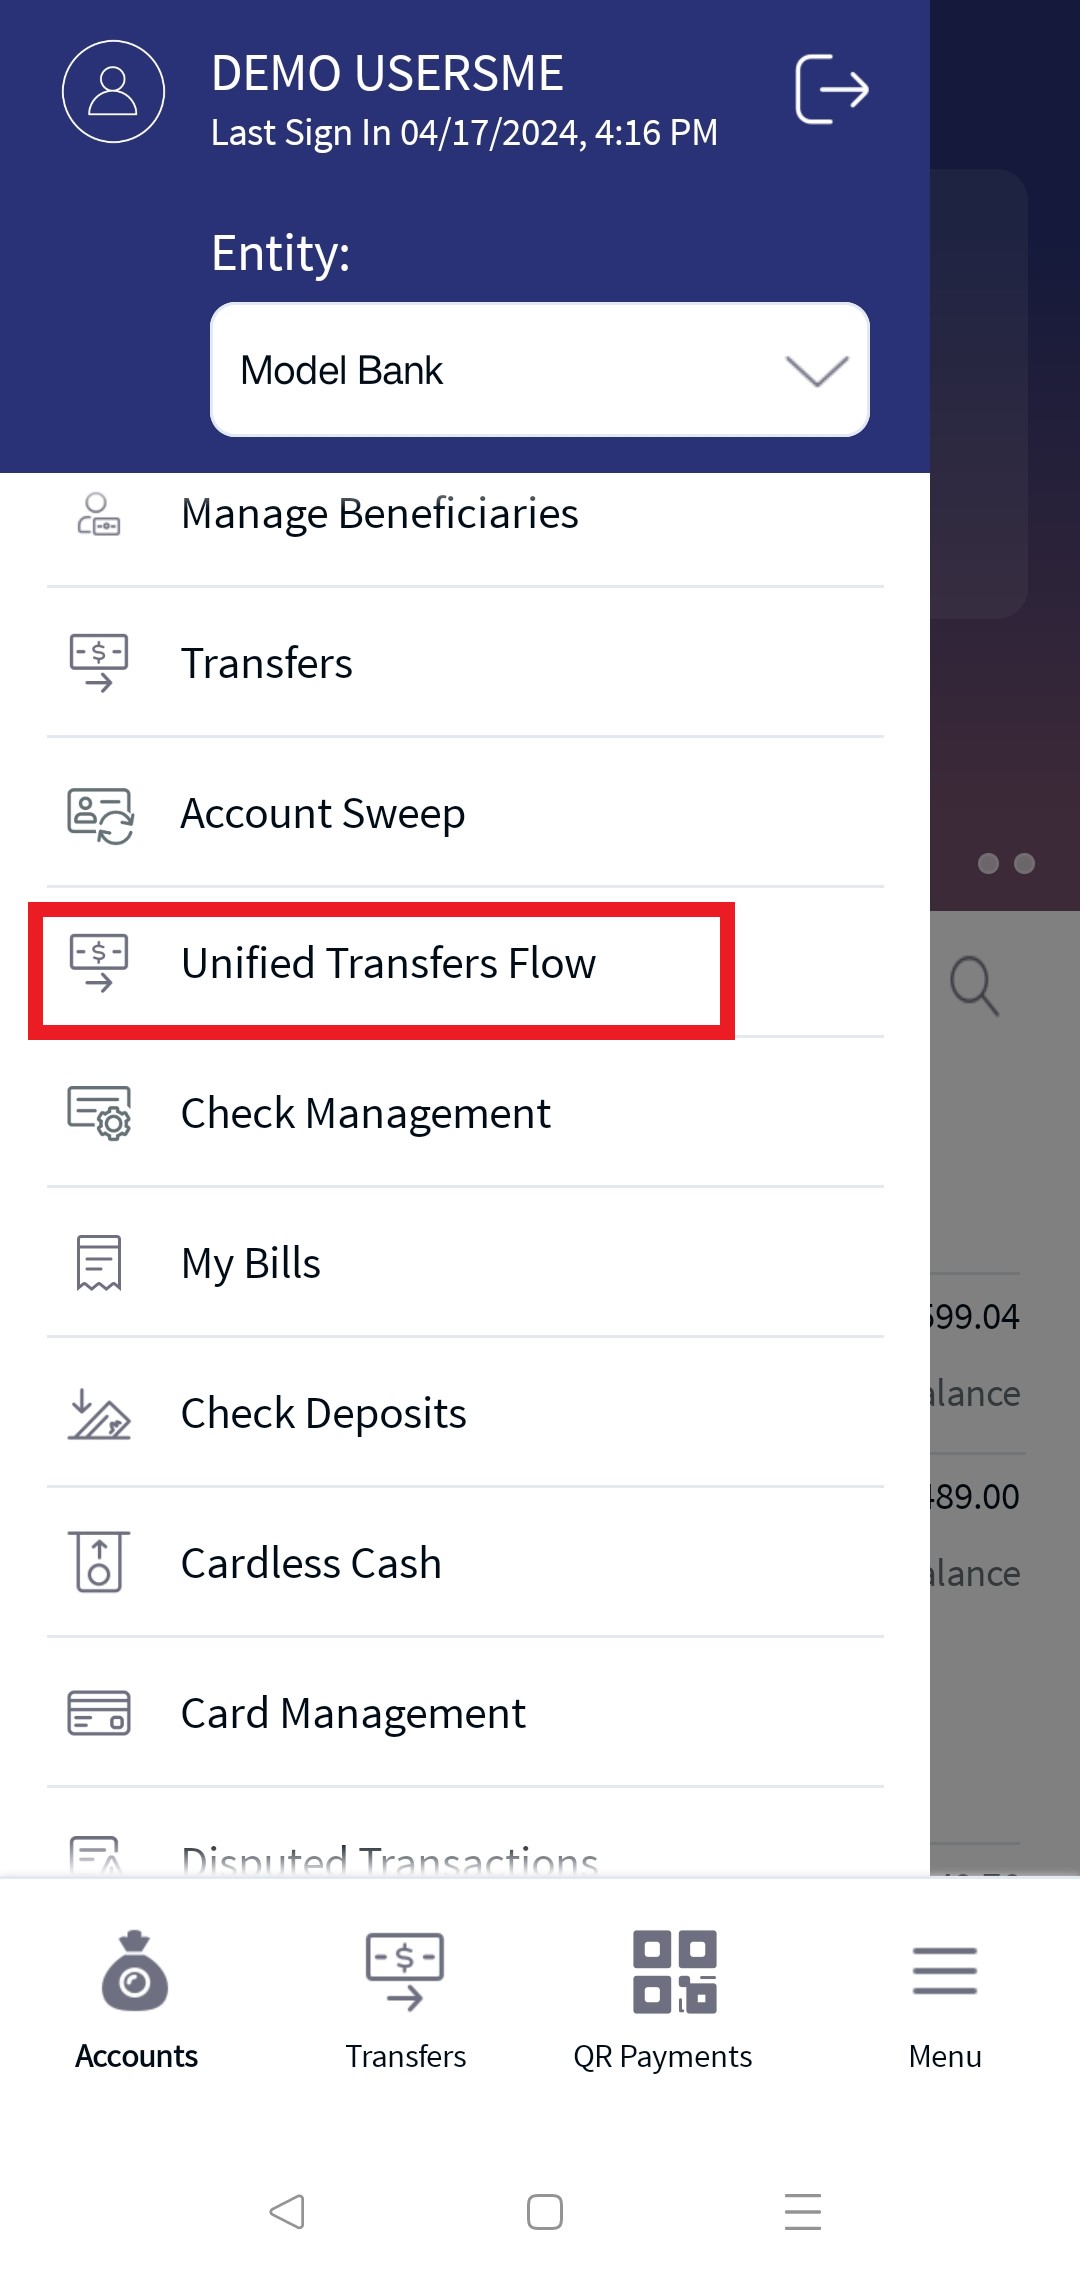
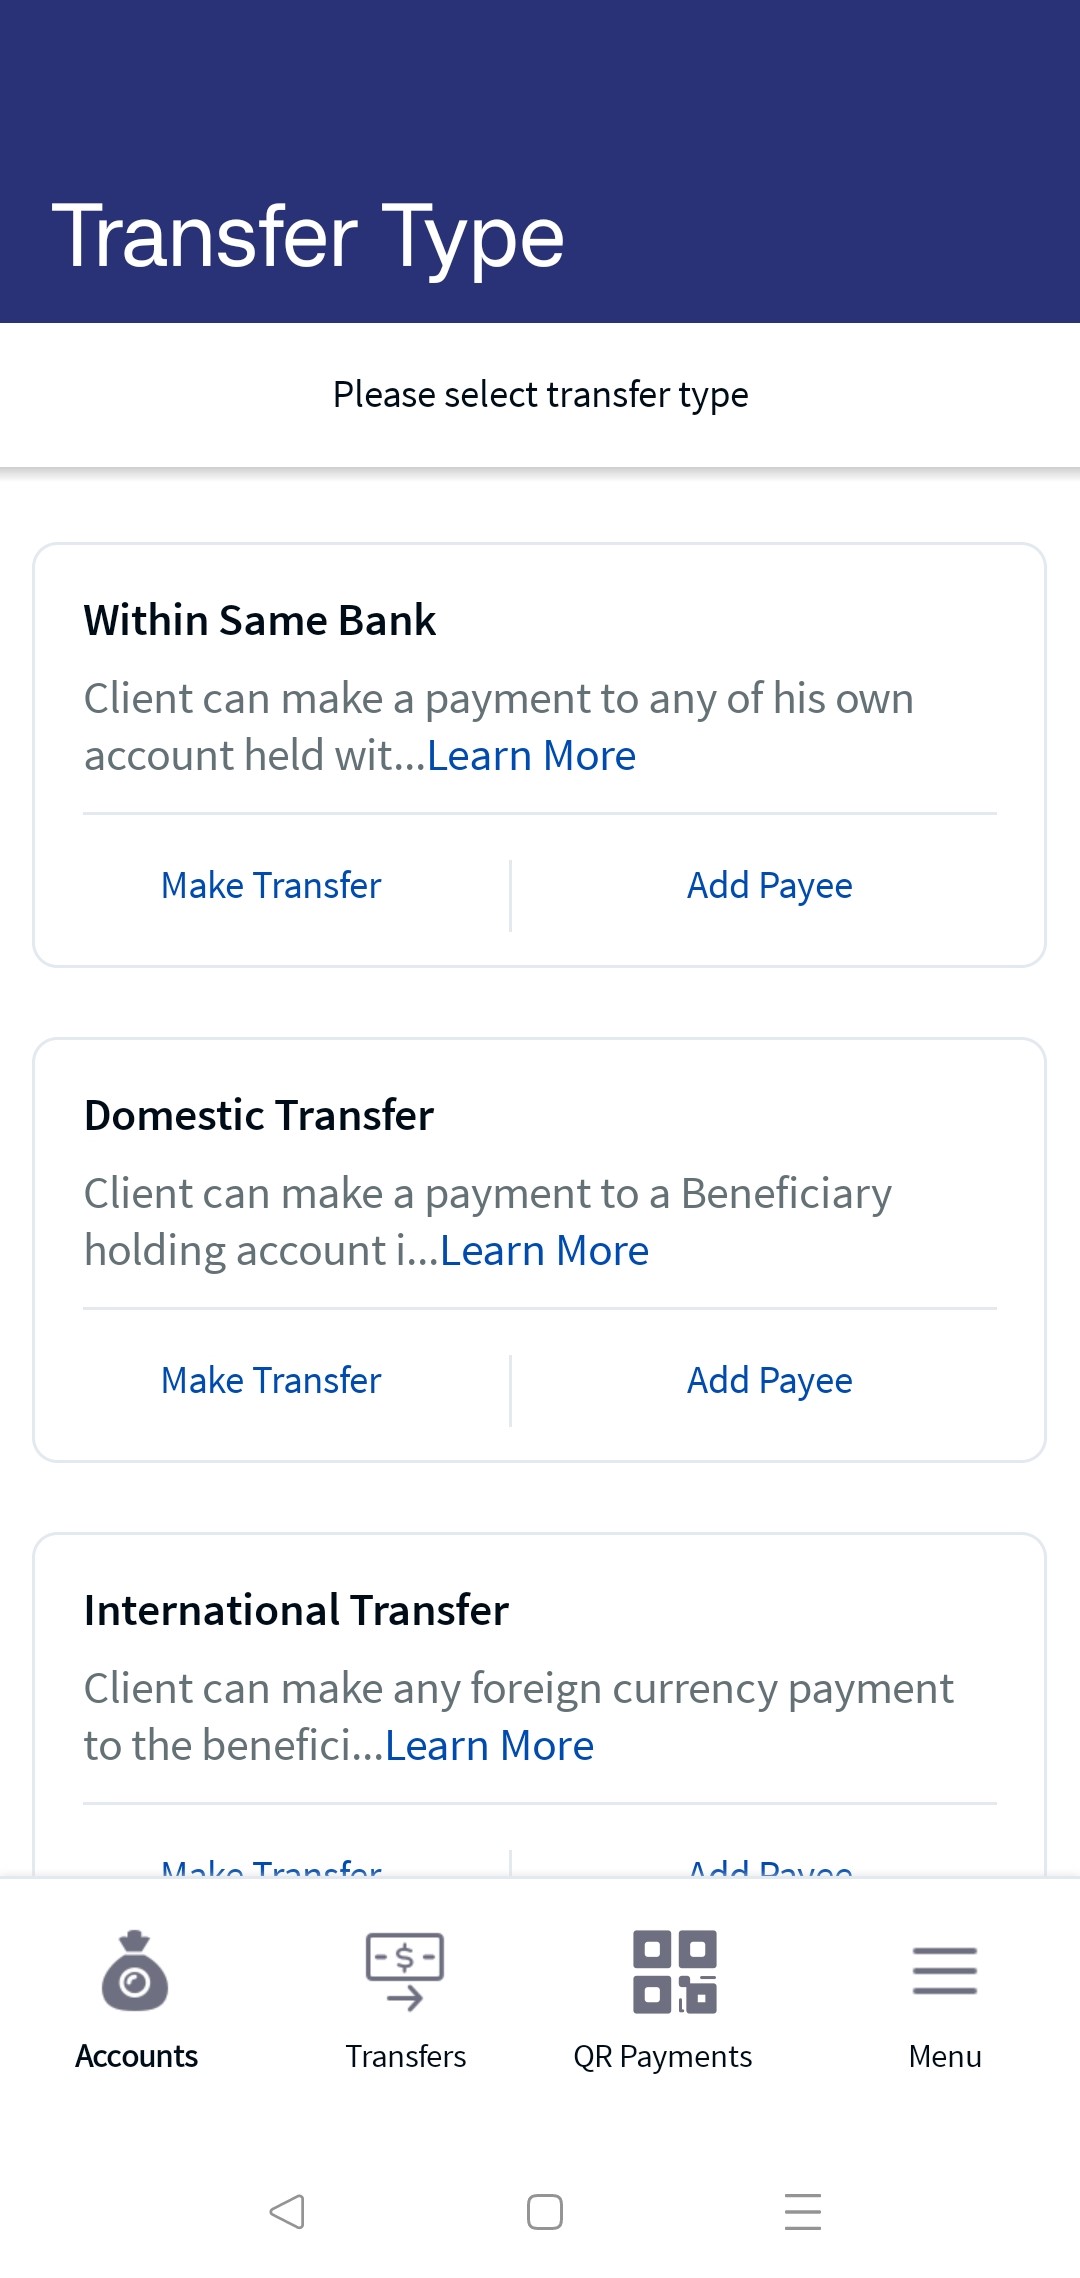
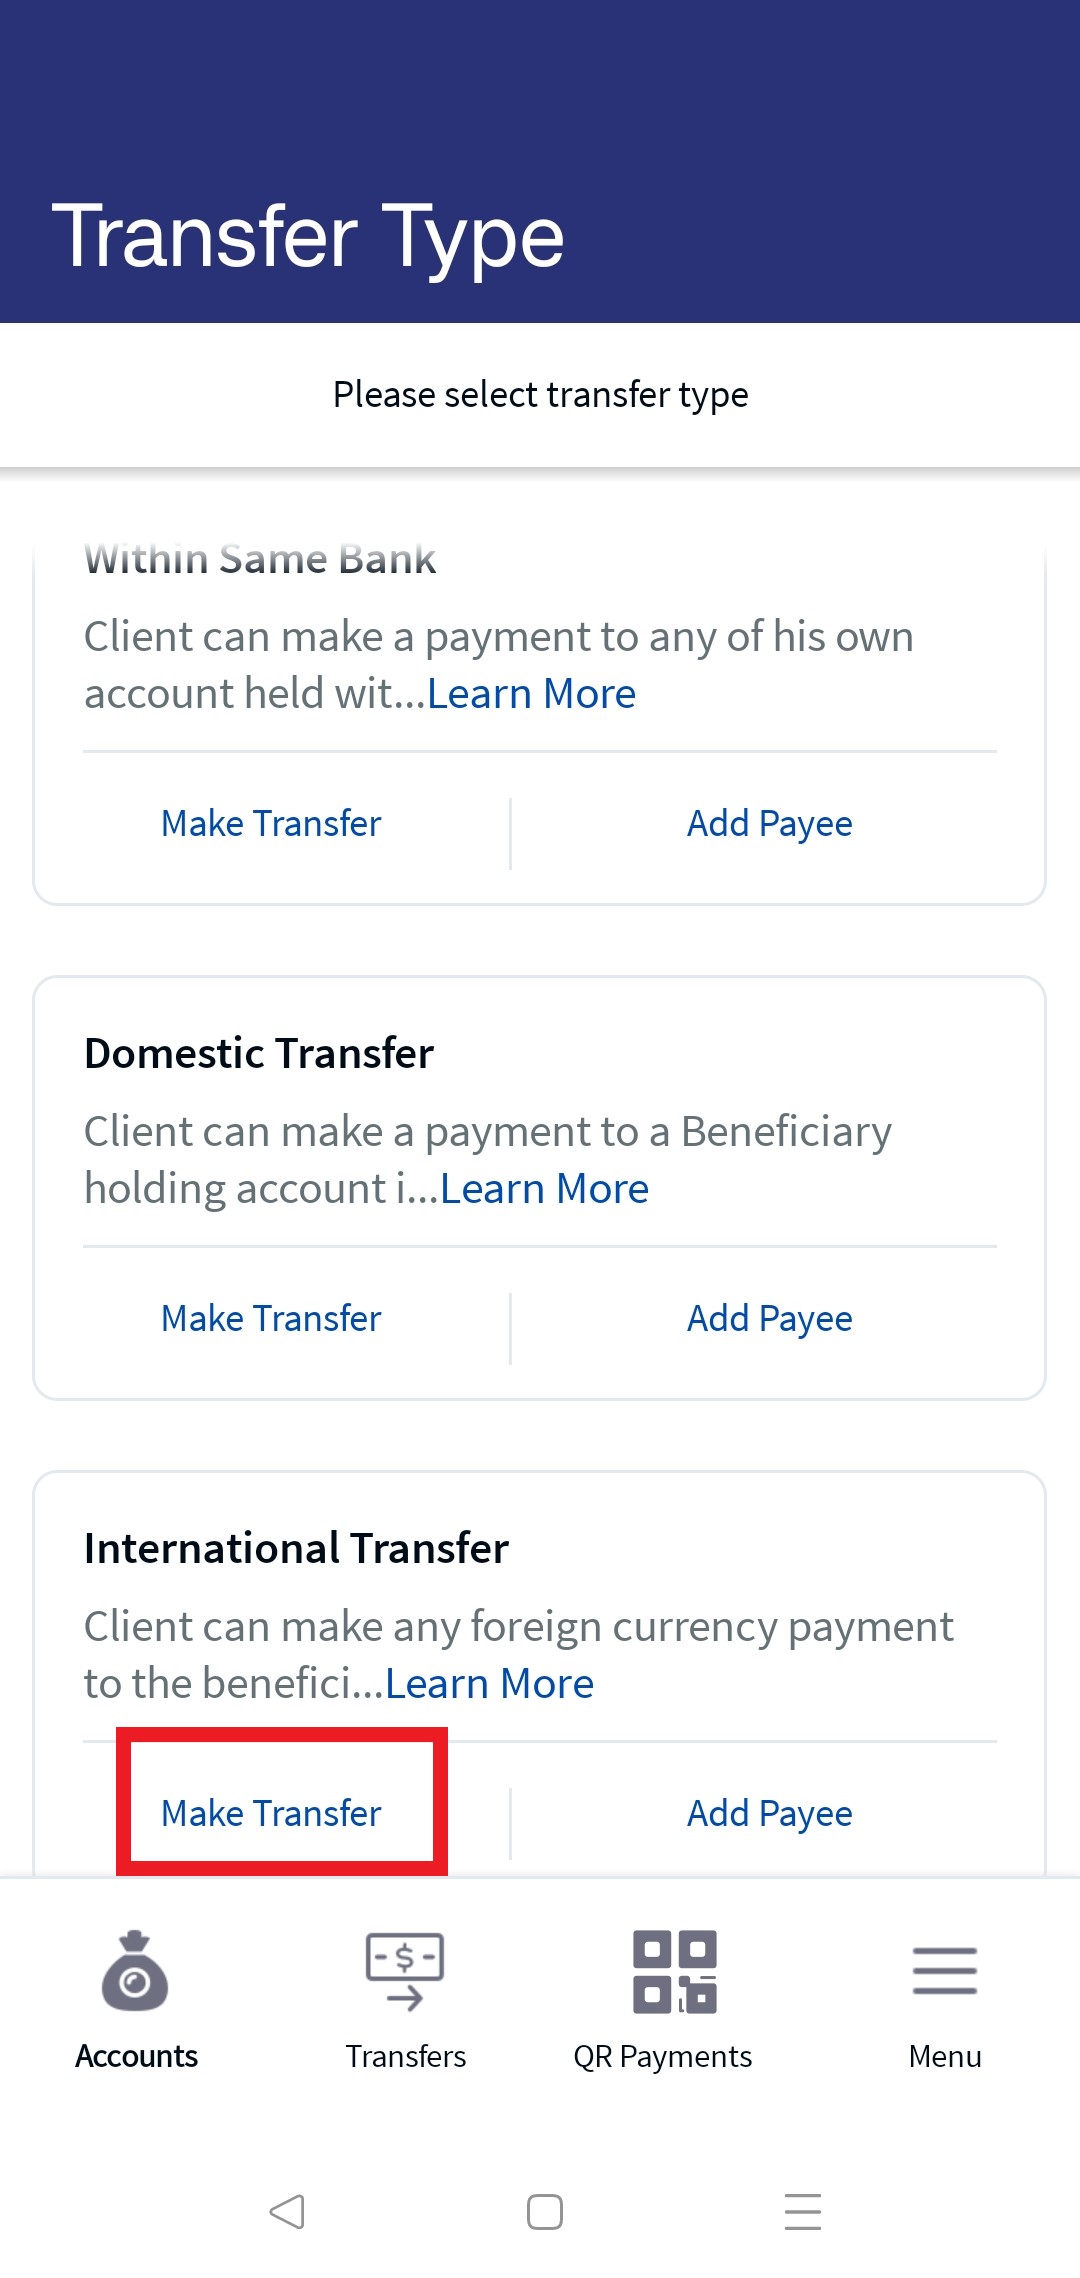
Mobile Native: Hamburger Menu > Unified Transfers Flow
- Funds can be transferred to eligible accounts only. Eligibility is decided by the account type maintained by the bank and is controlled from the core banking system.
- SEPA, INSTANT Payments are end to end Integrated.
- The implementation configuration is needed for ACH, FEDWIRE, CHAPS, FASTER PAYMENTS, RINGS, and BISERA. In the application, these are kept as a placeholder.
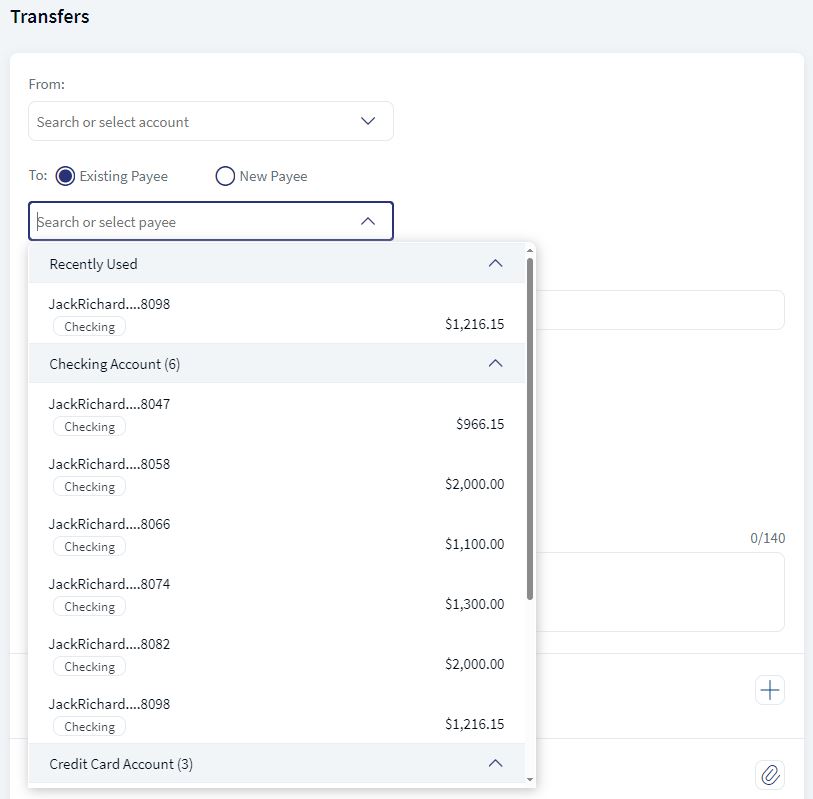
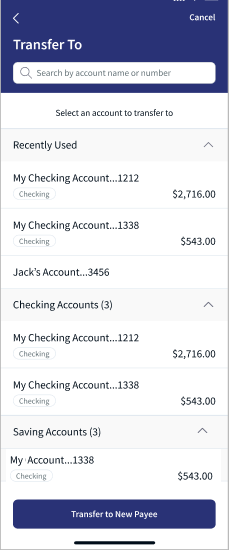
In UTF transfer page, From and To account fields are combo box fields for all types of transfers. The application displays From field place holder value as Search or select account with favorites accounts added in its drop down and To field place holder value as Search or select payee with recently used added in its drop down. The user can search using account name or account number or select an account from the drop down list.
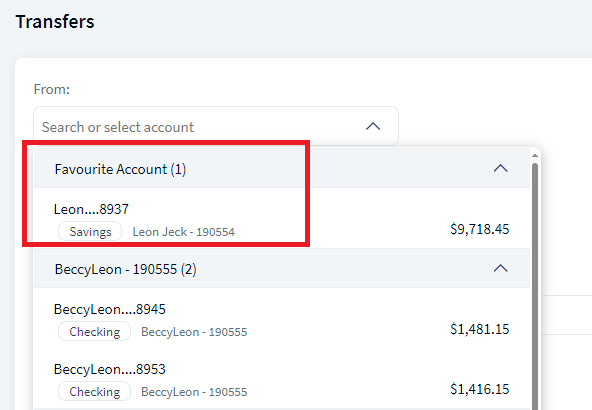
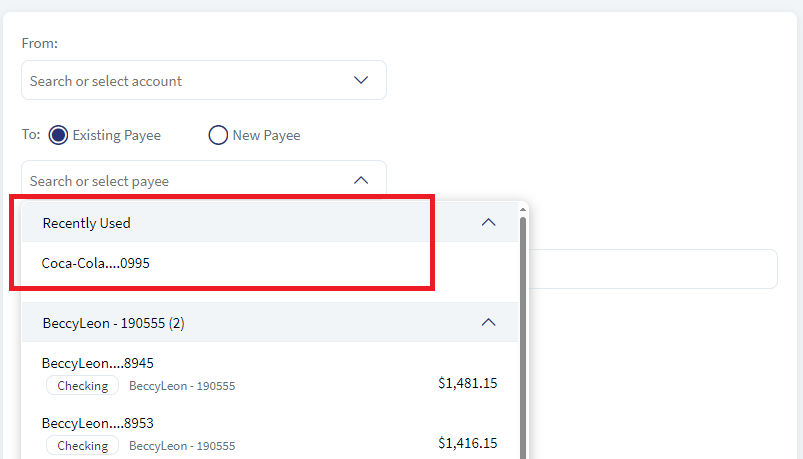
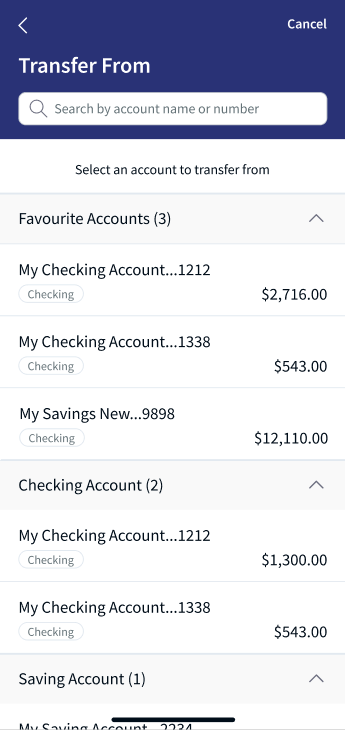
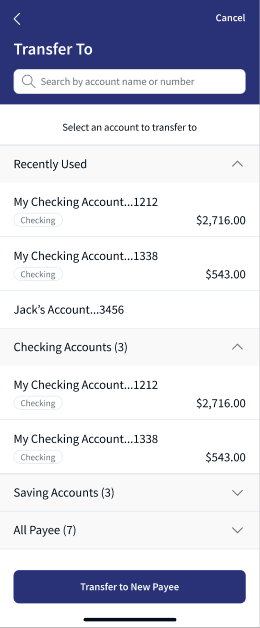
- After selecting From account, the application displays available balance next to the field.
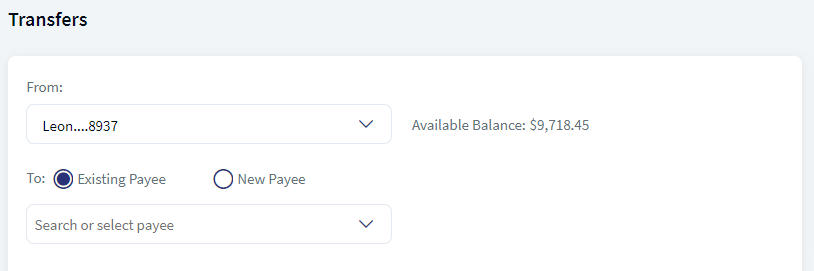
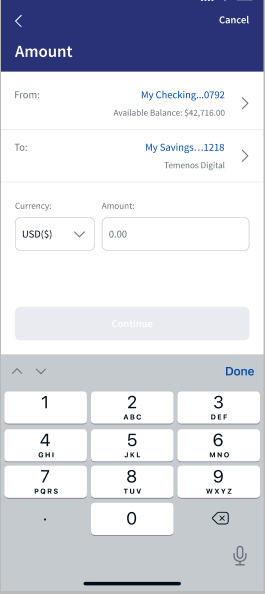
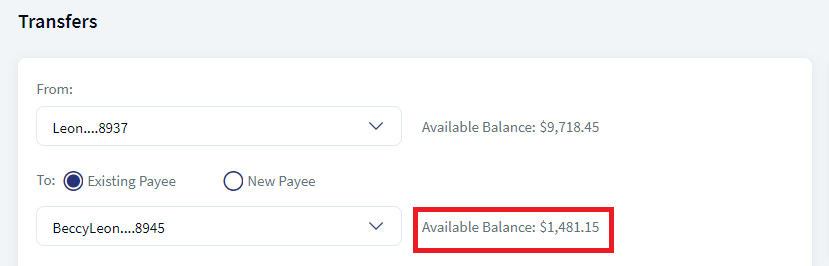
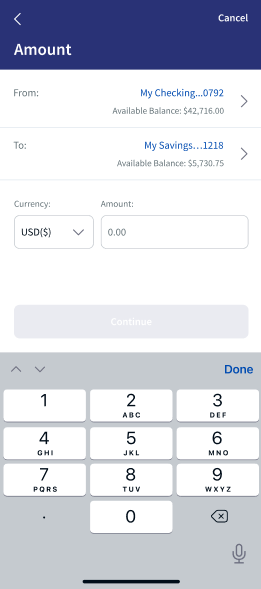
- After selecting the To account, the application displays
- available balance next to the field when transferring money to own accounts.
- bank name next to the field in the case of same bank or domestic or international transfer.
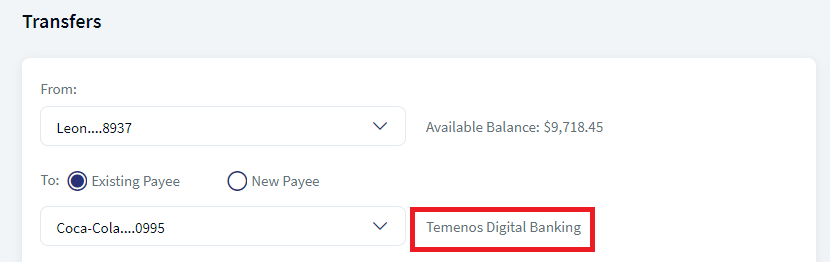
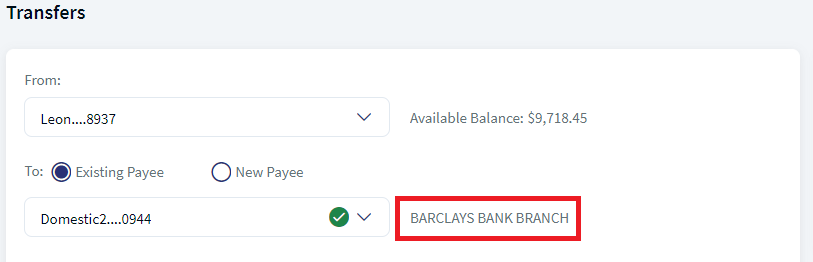
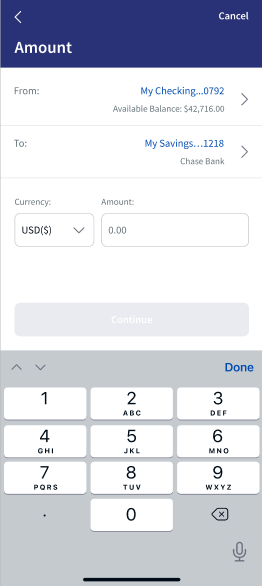
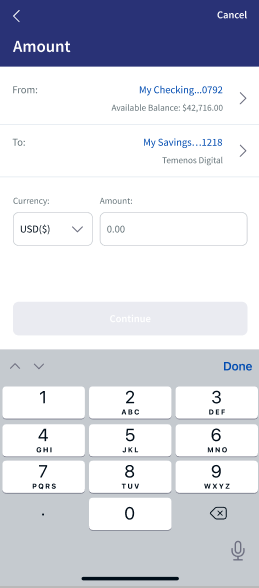
- available balance next to the field when transferring money to own accounts.
The application displays different drop down screens to the user based on the contract. See Account listing and Customer listing dashboard for more information on users having large number of accounts and contracts. In Spotlight, the bank needs to configure the system configurations (Bundle DBP - ACCOUNTS_COUNT_COMPACT_DASHBOARD) to enable the different views and (Bundle DBP - RECENTLY_USED_ACCOUNTS_LENGTH) to configure to display recently used accounts.
The following scenarios are applicable for Same Bank, Domestic, International, and Pay a Person Transfer.
Scenario 1: The user having access to single customer ID and have less accounts
| Field Name | Description |
|---|---|
| From | Displays account with their available balances grouped by account types (Favorite, Savings, Current, and many more). If no accounts are marked as favorite the application does not display this category.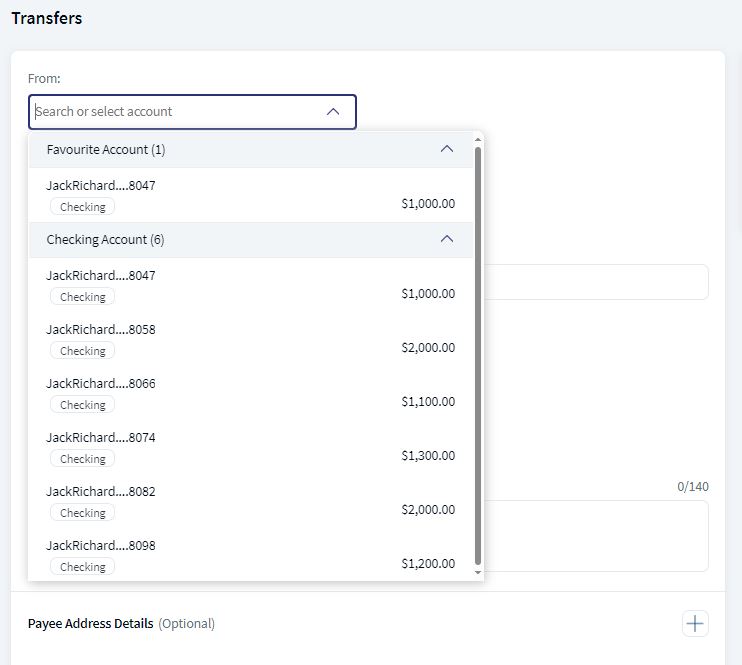 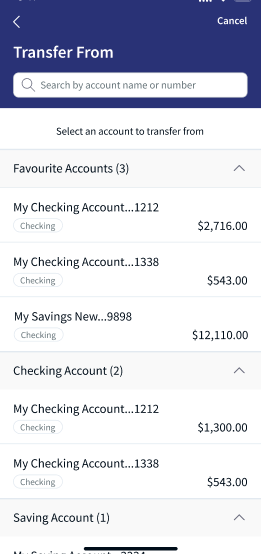 |
| To |
If there are no transactions, the application does not display Recently used category.
|
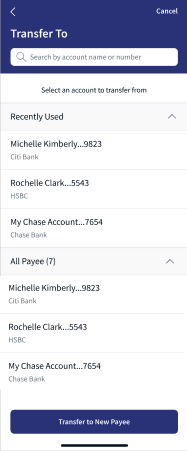
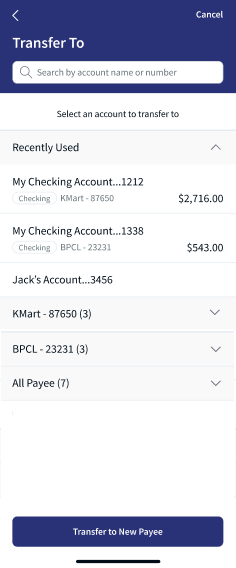
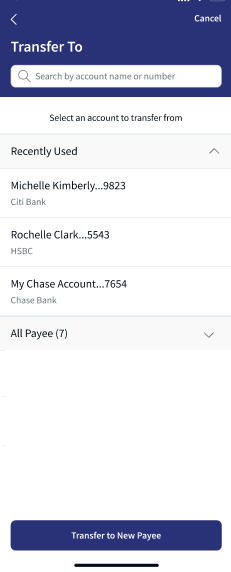
Scenario 2: The user having access to single customer ID and have more accounts
| Field Name | Description |
|---|---|
| From | Displays accounts grouped by account types (Favorite, Savings, Current, and many more). By default, the application displays favorite account as expanded and rest all account types are collapsed. If there are no favorite accounts, then one of the account types is expanded and rest all account types are collapsed.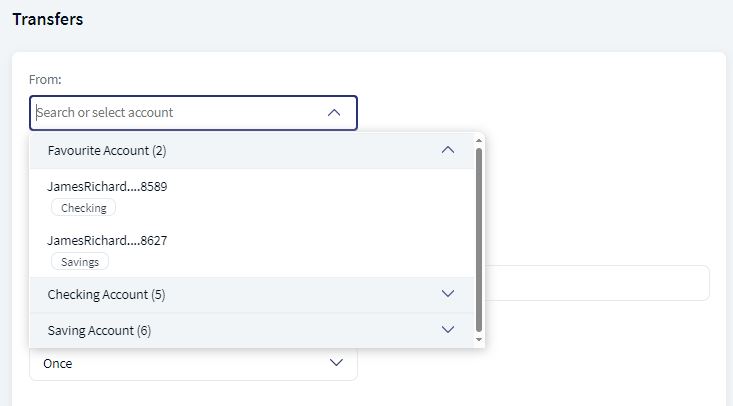 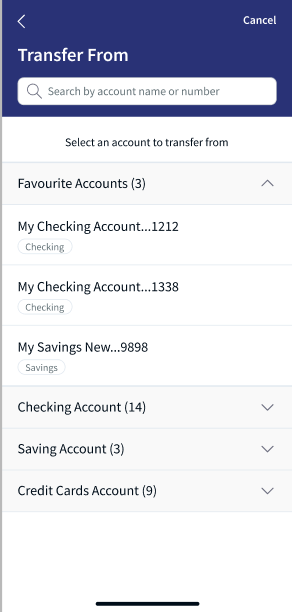 |
| To |
|
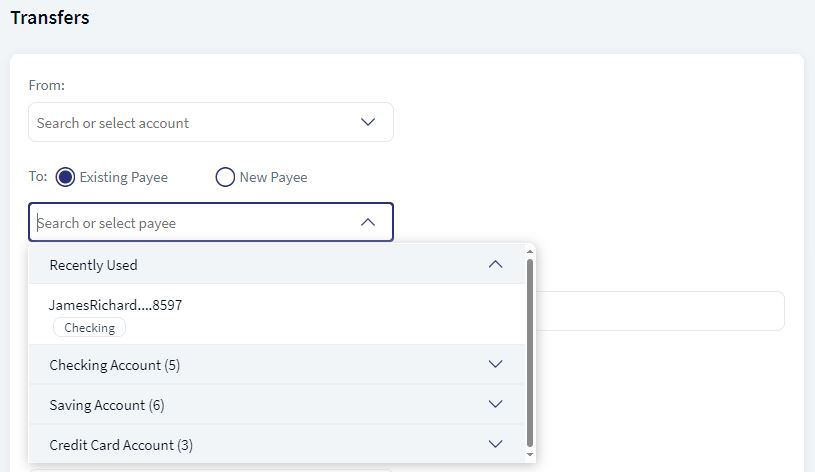
Scenario 3: The user having access to multiple customer IDs and have less accounts
| Field Name | Description |
|---|---|
| From | Displays accounts with their available balances grouped by favorite accounts and customer name with ID. If no accounts are marked as favorite the application does not display this category.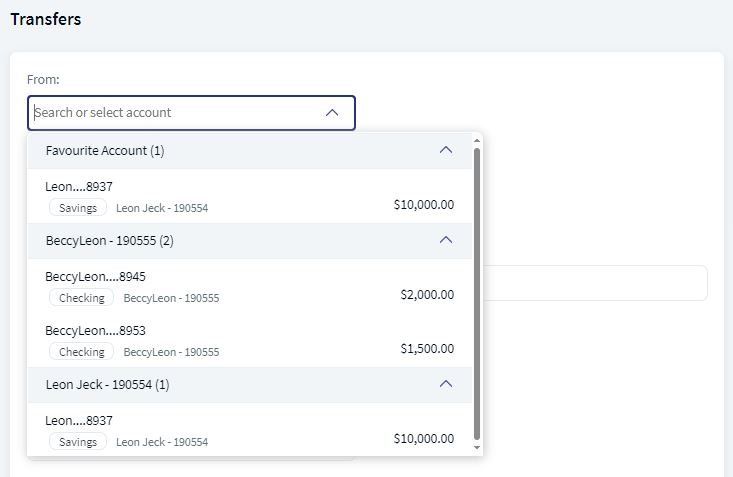 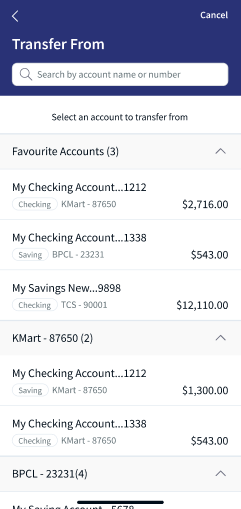 |
| To |
If there are no transactions, the application does not display Recently used category.
|
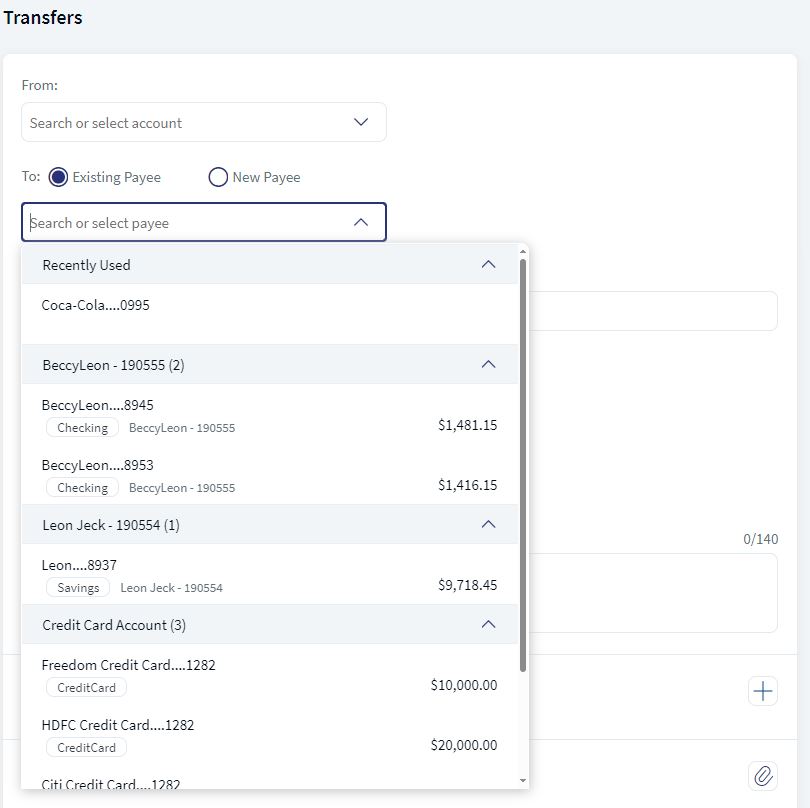
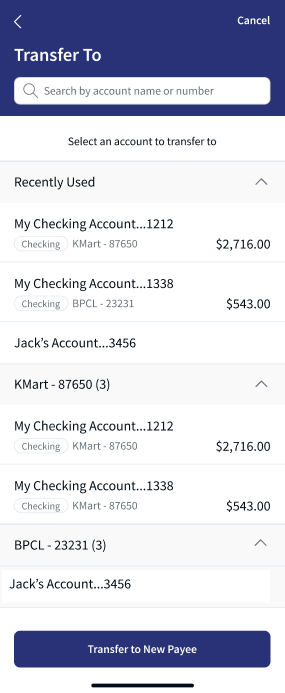
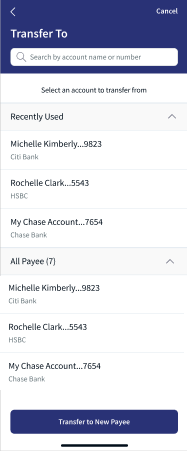
Scenario 4: The user having access to multiple customer IDs and have more accounts
| Field Name | Description |
|---|---|
| From | Displays accounts grouped by favorite accounts and customer name with ID. By default, the application displays favorite account as expanded and rest all customer accounts are collapsed. If there are no favorite accounts, then primary customer accounts is expanded and rest all customer accounts are collapsed.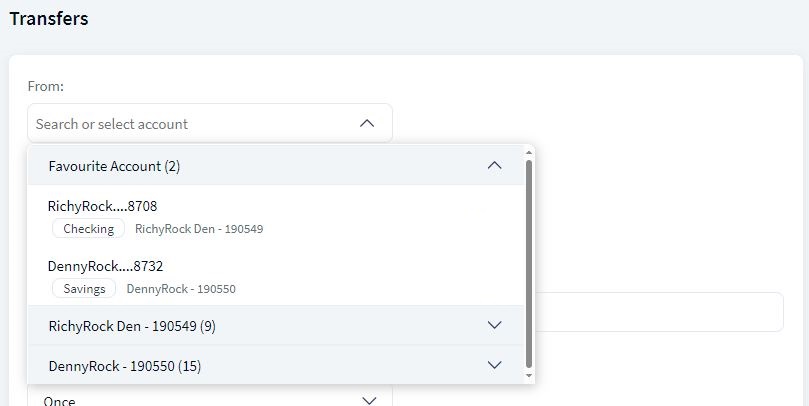 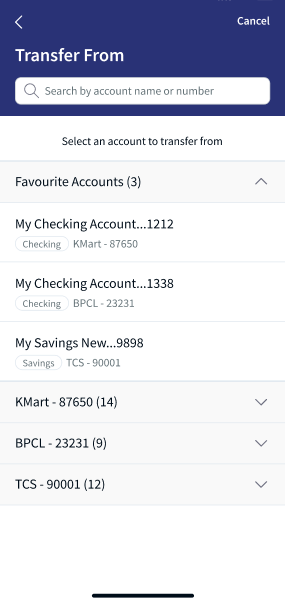 |
| To |
|
Same Bank Transfer
You can initiate a fund transfer within a same bank to your own account or to recipients within the same bank.
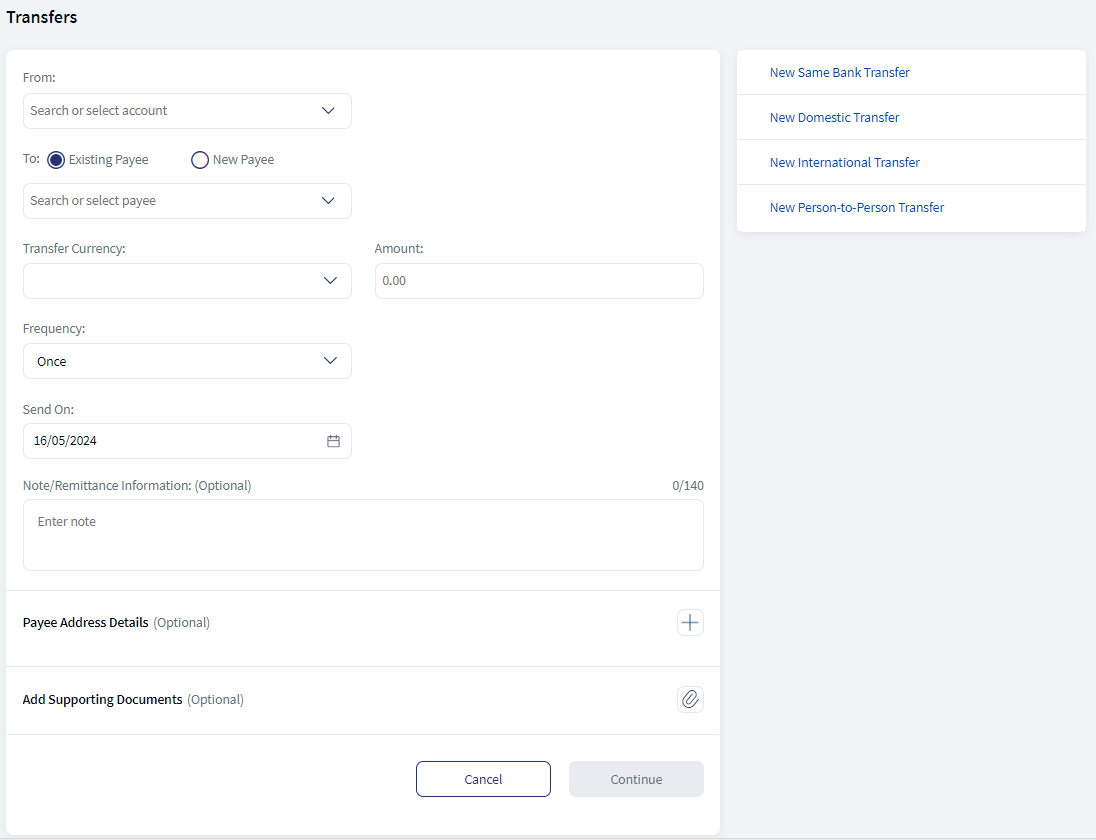
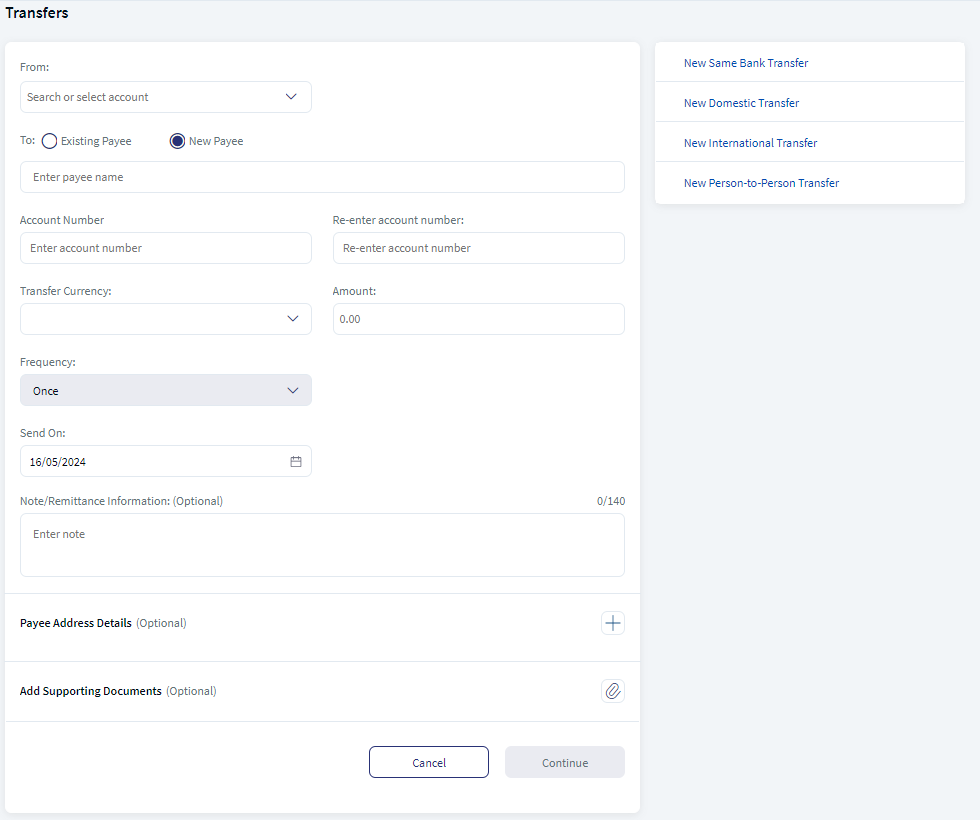
Enter the following details to initiate a fund transfer:
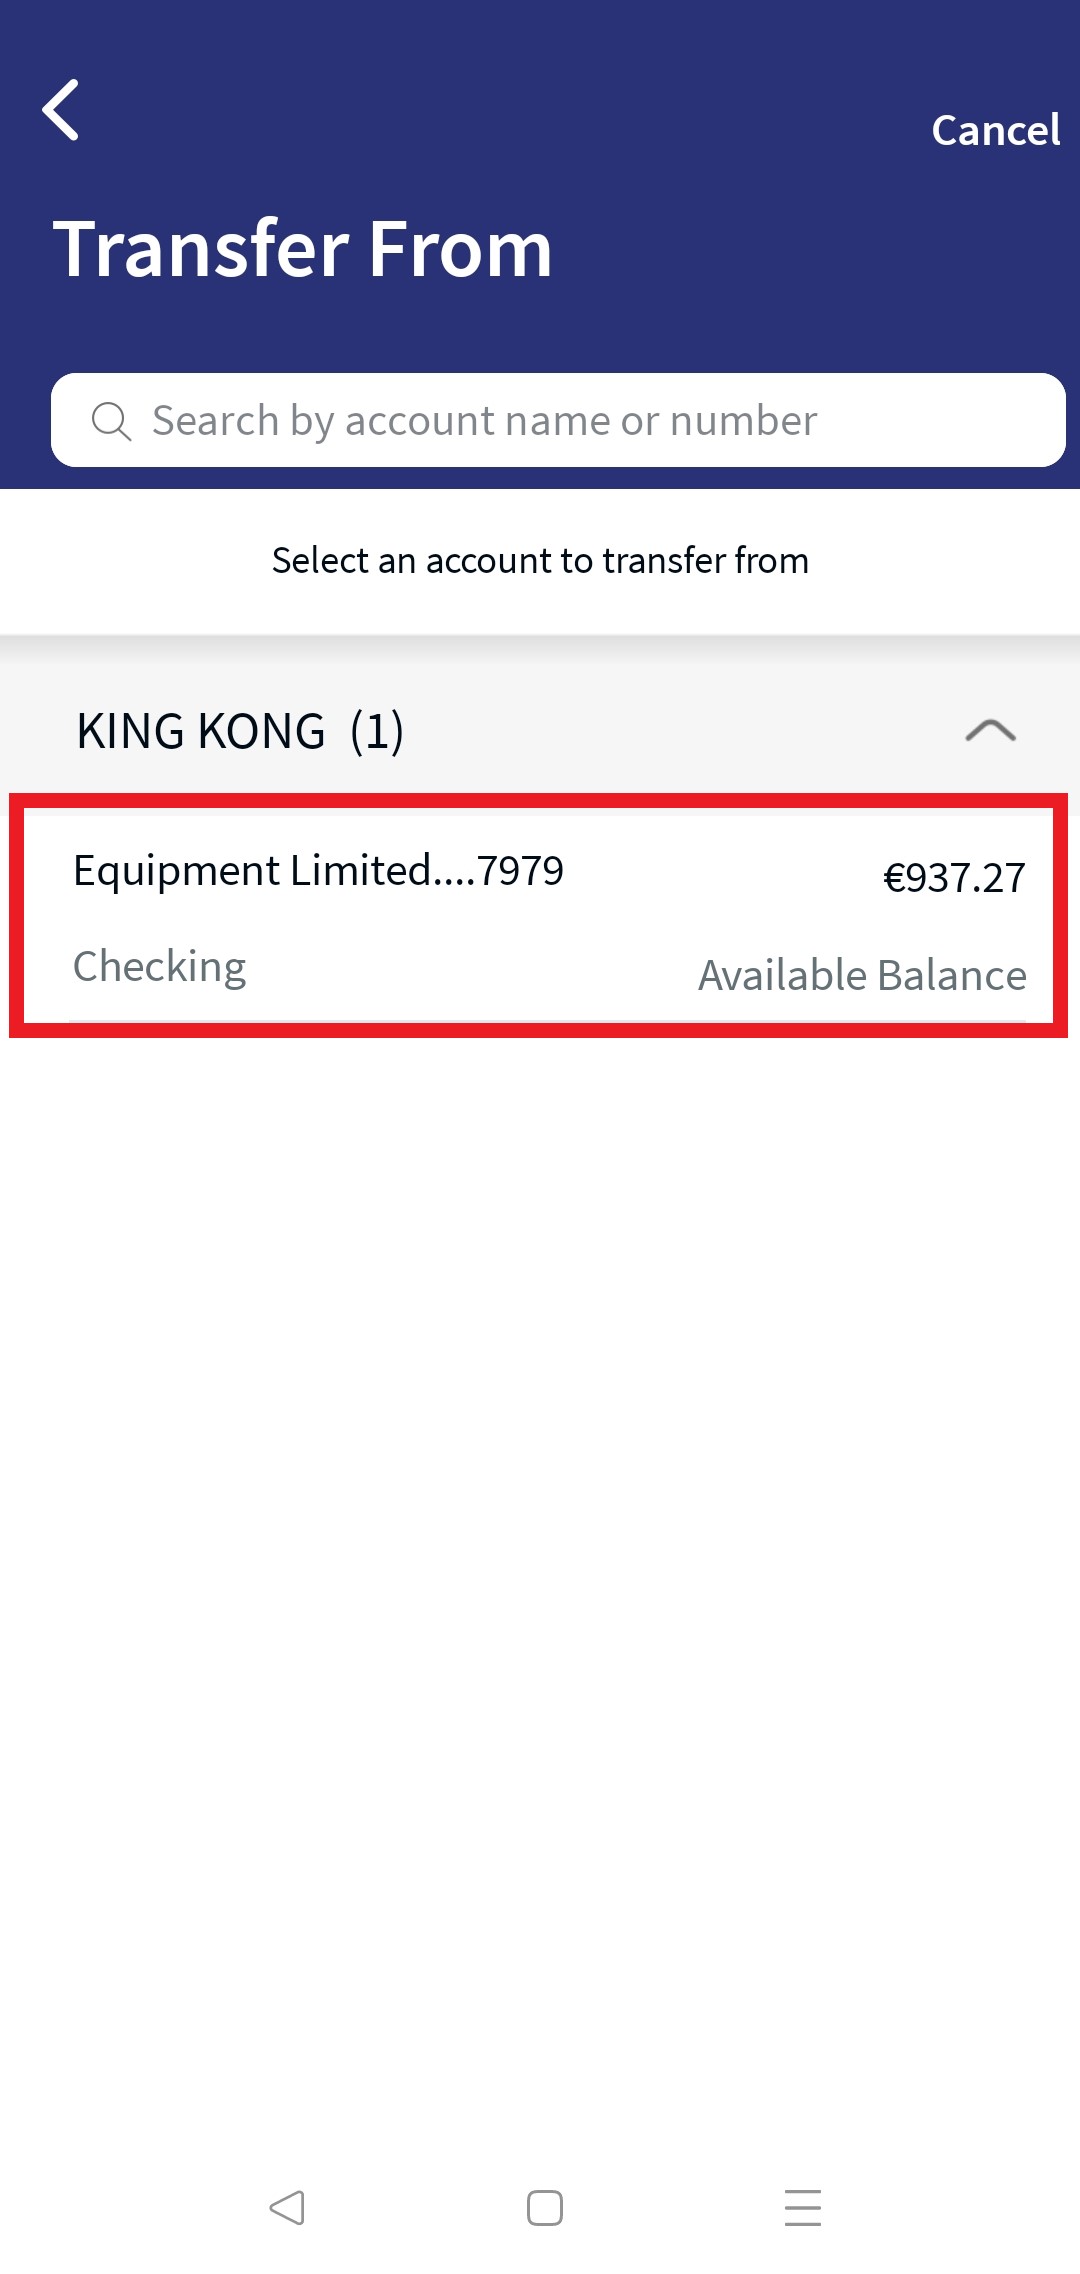
- From account. This is a combo box, the user can use to search using account name or account number or select account from the drop-down list. The application displays the accounts grouped by Favorite, Savings, Checking accounts. If no accounts are marked as favorite the application does not display this category. After selecting the account, the application displays the Available Balance next to the field. If the search did not retrieve any results, the application displays a message No result found.
- To account. Select if you want to transfer to an existing payee in your list or to a new payee.
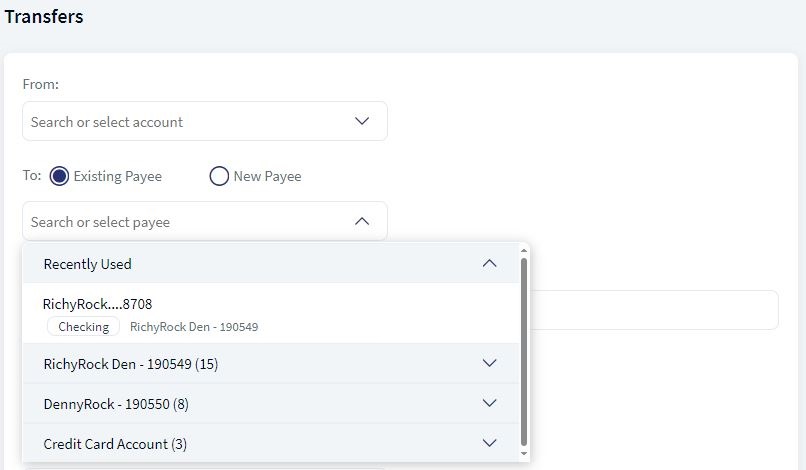
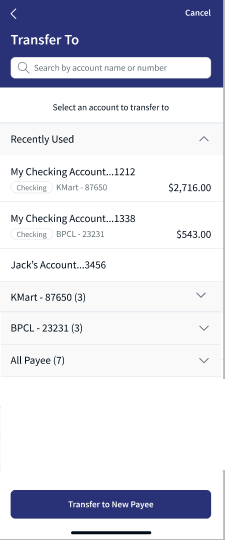
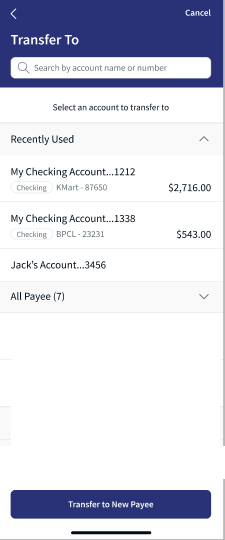
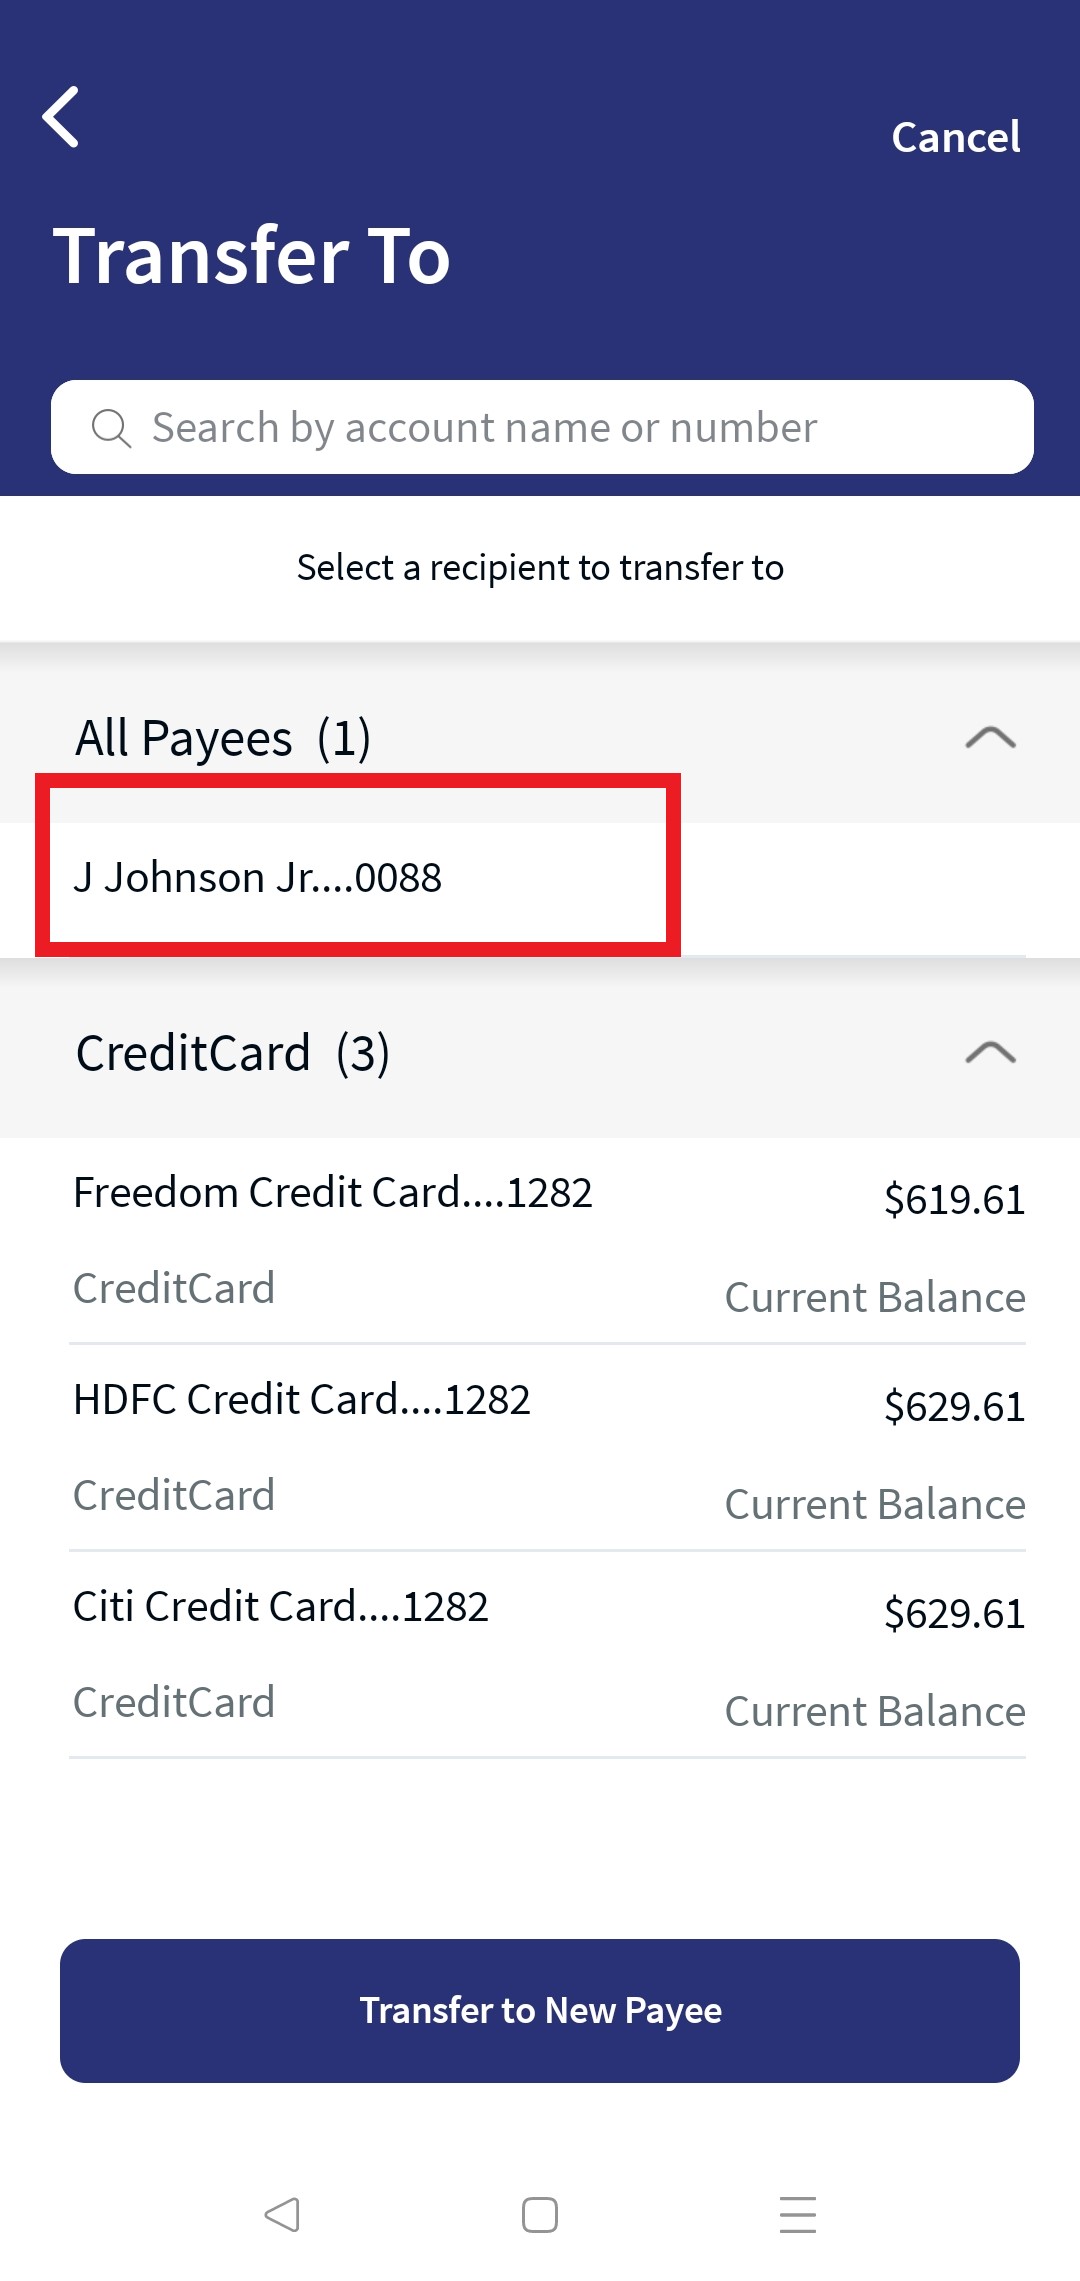
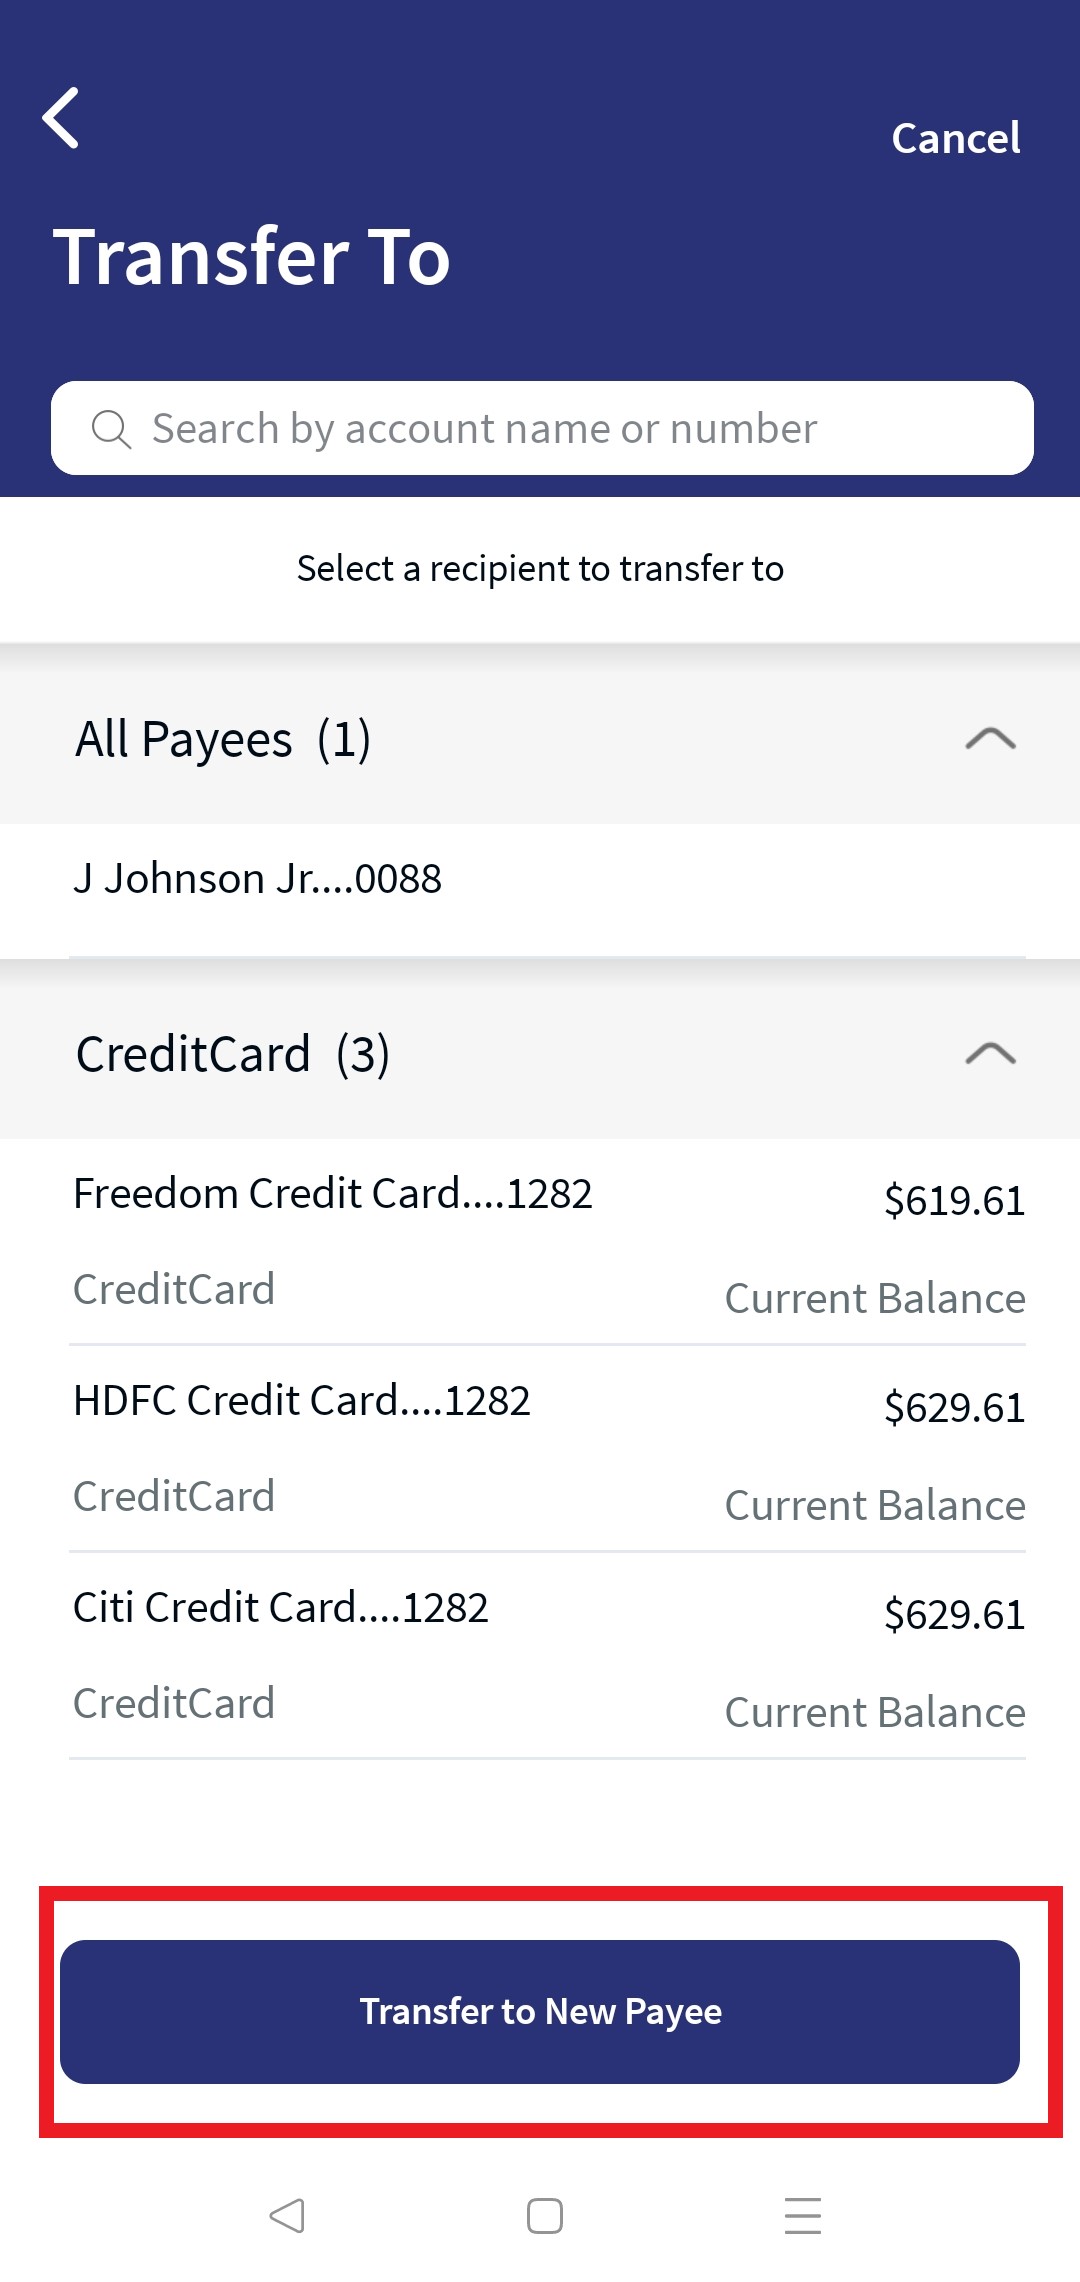
- Existing Payee. This is a combo box, the user can use to search using account name or account number or select account from the drop-down list. The application displays the accounts grouped by account types (Recently used, Savings, Current, All Payees, and many more). The application displays Recently used based on the previous transactions. After selecting the To account, the application displays the available balance for the own accounts transfer and bank name for same bank payees. If the search did not retrieve any results, the application displays a message No result found. You can transfer to new account without adding it with a link Transfer to a New Payee. By default, the application displays up to five recently used accounts, and this value can be configured in Spotlight under bundle DBP - RECENTLY_USED_ACCOUNTS_LENGTH. See Spotlight configuration for more information.
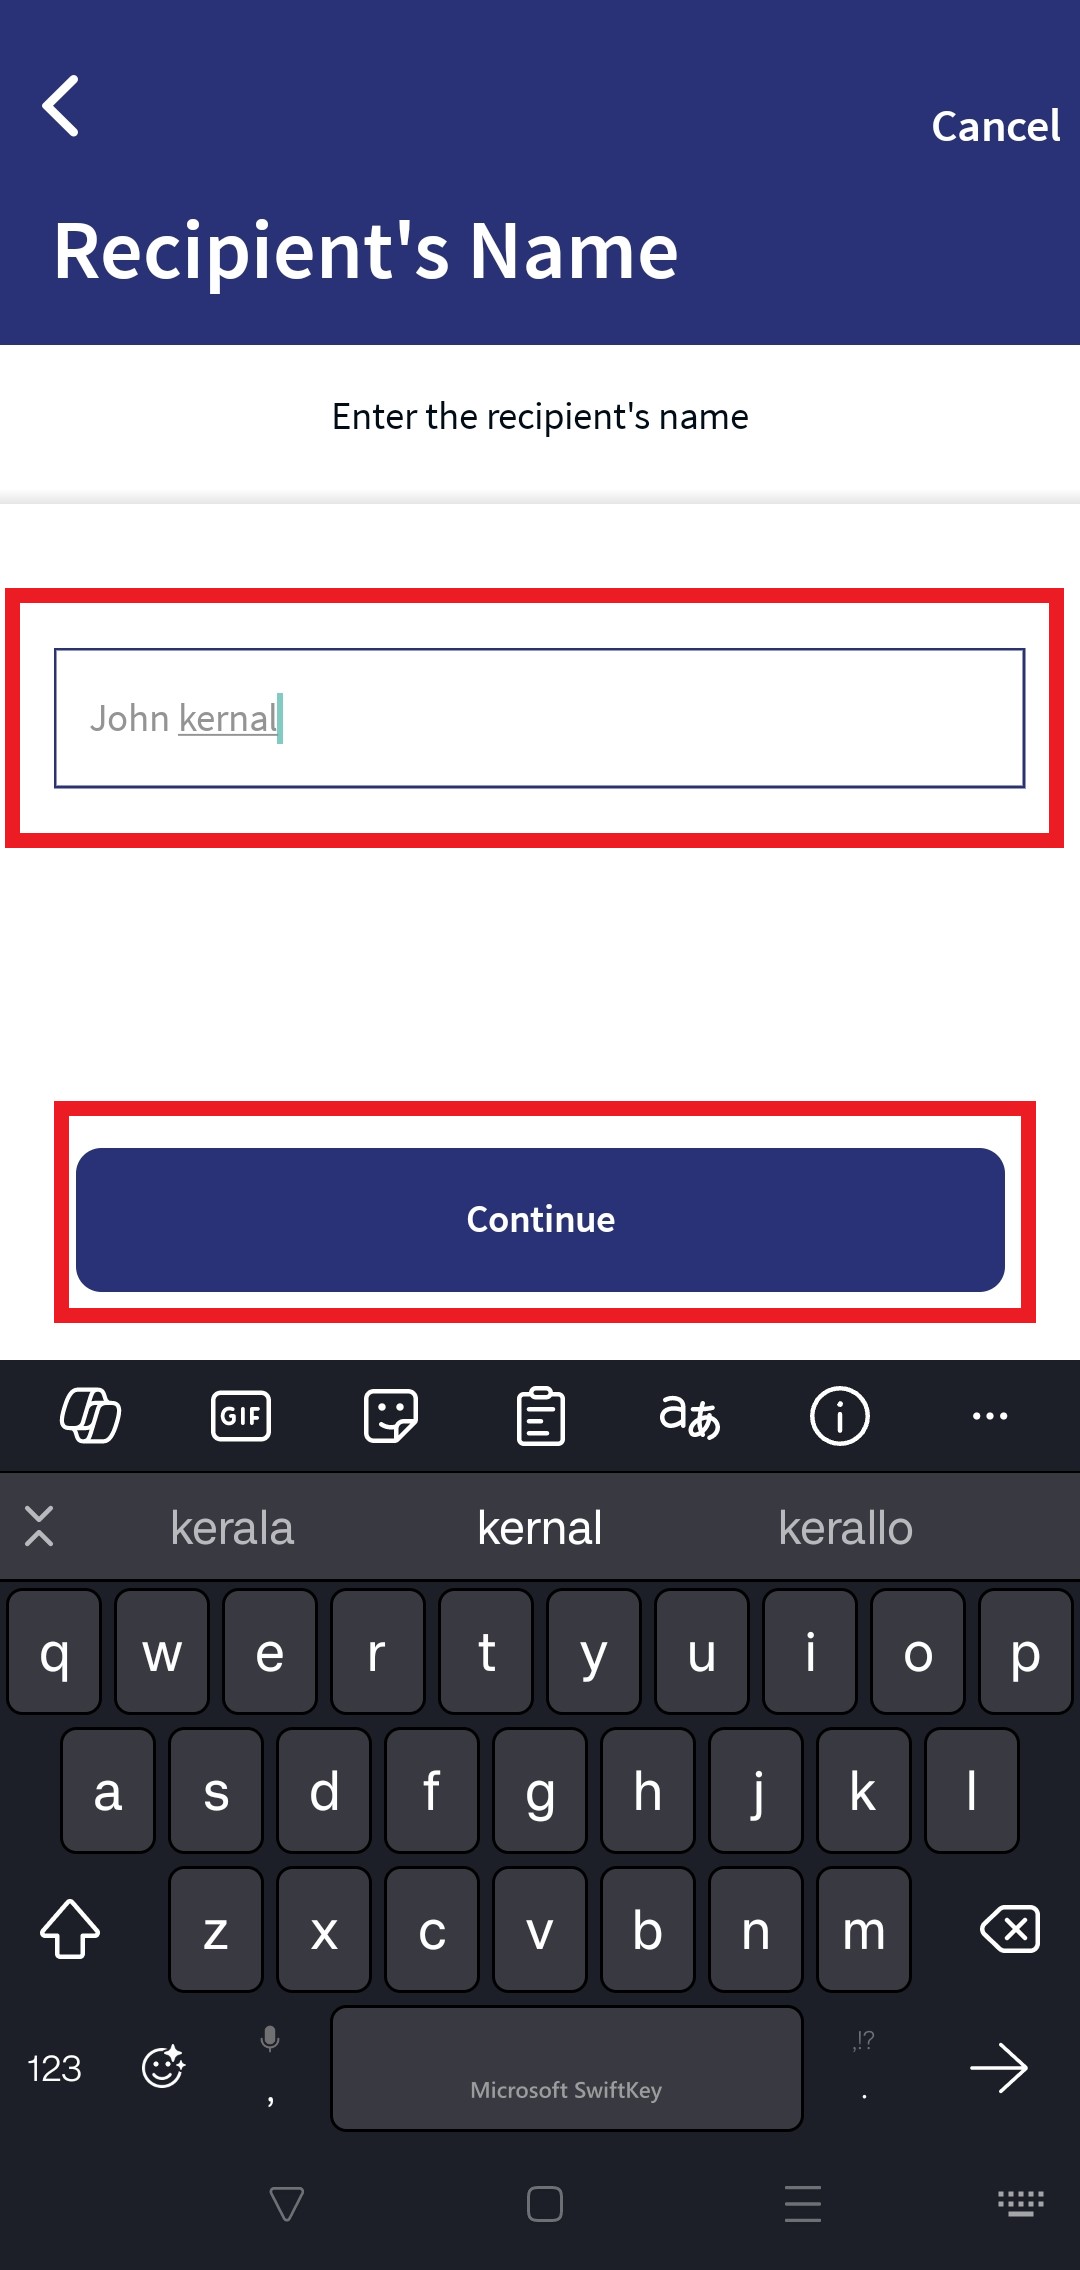
- New Payee. Select this option if you want to transfer to a new payee whose account details are not saved in your list. The following options are displayed:
The new payee is added to the customer ID of From account selected by the user.
- Account Number. Enter the account number of the new payee.
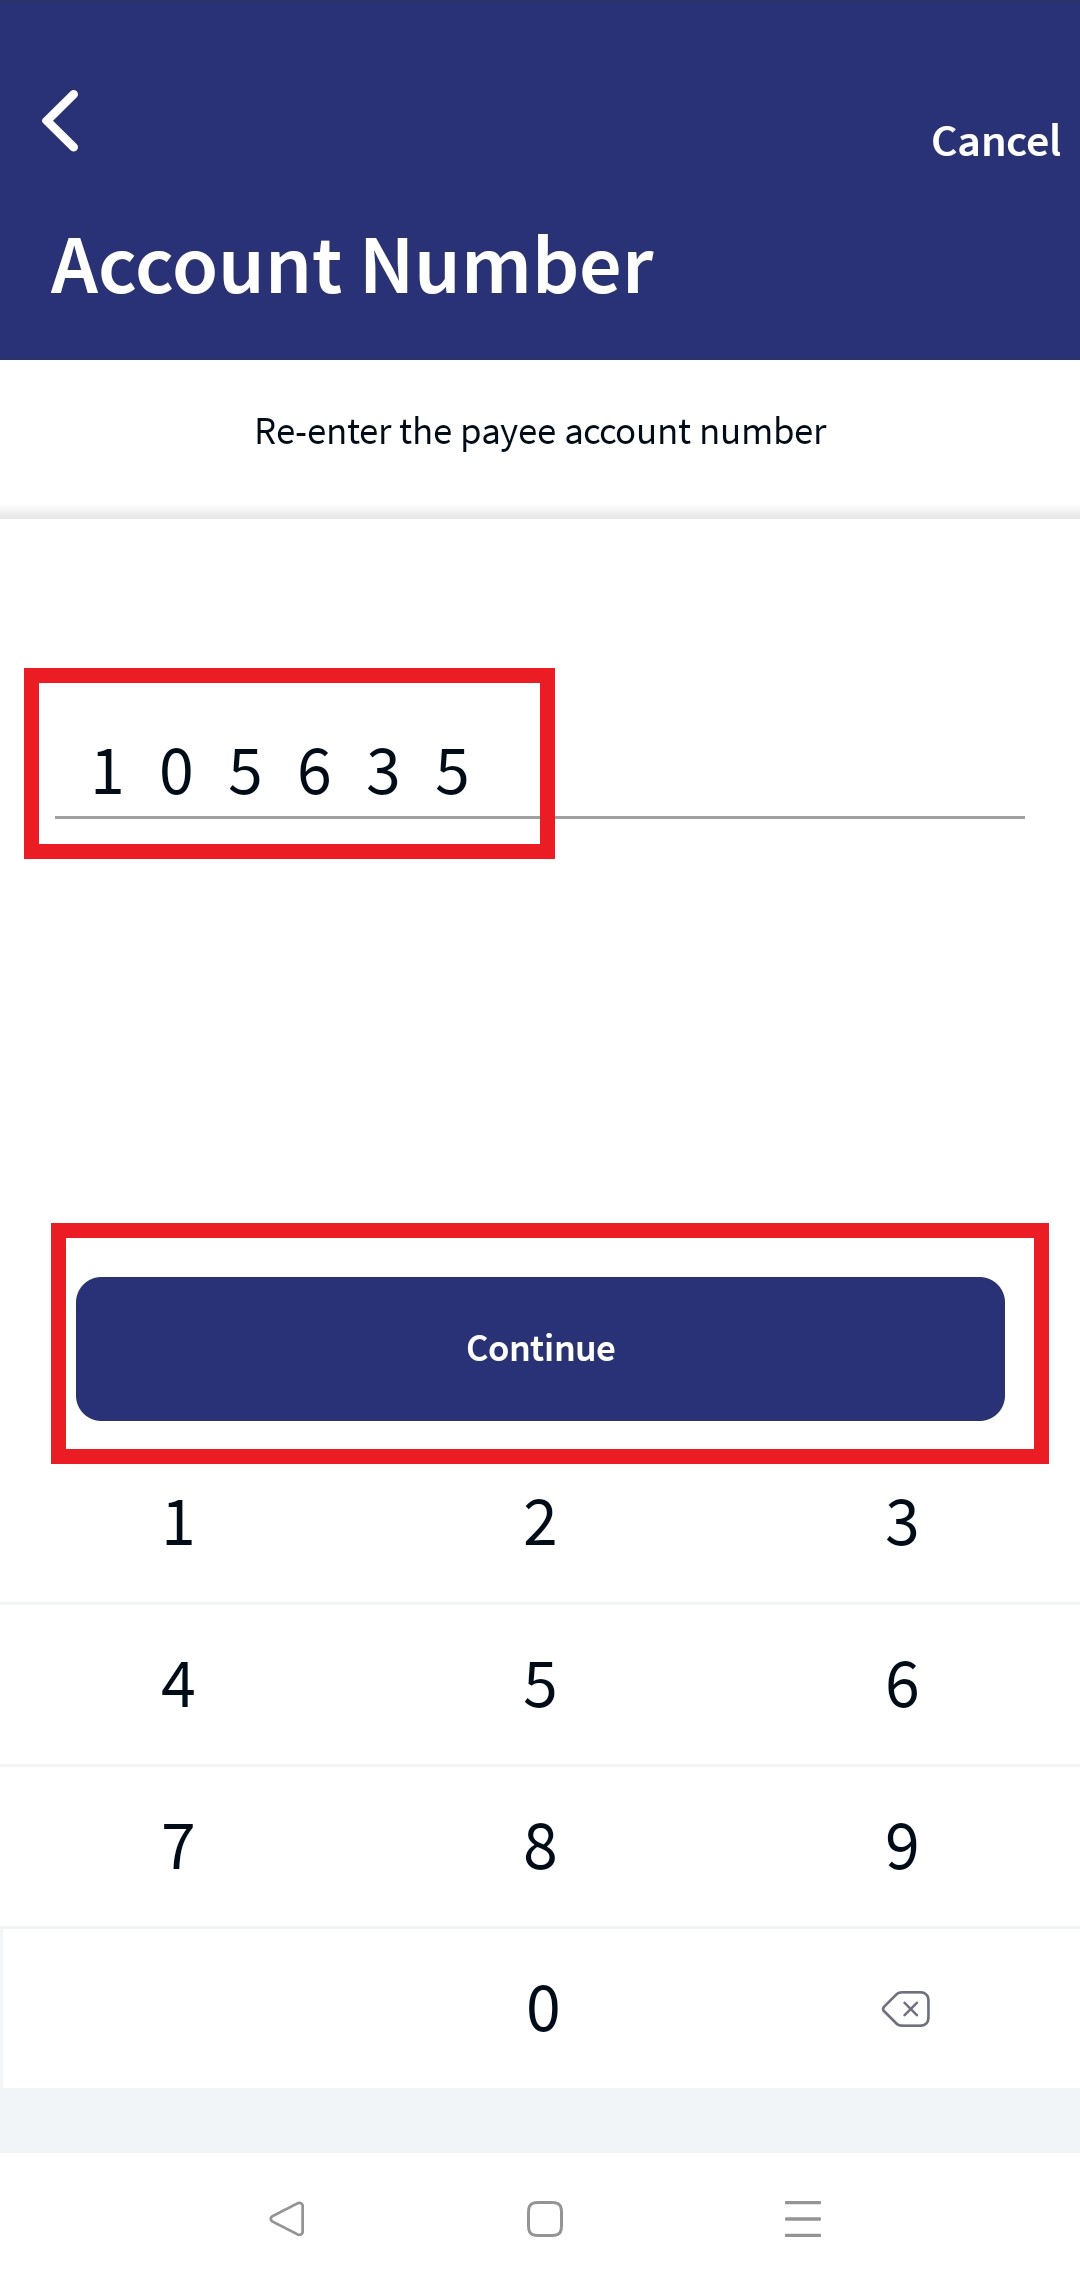
- Re-enter Account Number. Re-enter the account number of the payee. The application performs Payee Verification.
- Credit Card. Select this option to transfer amount to your credit card account.
- Loan Account. You can also make a transfer to your loan account. The list of loan accounts is displayed. Select the loan account to perform a transfer.
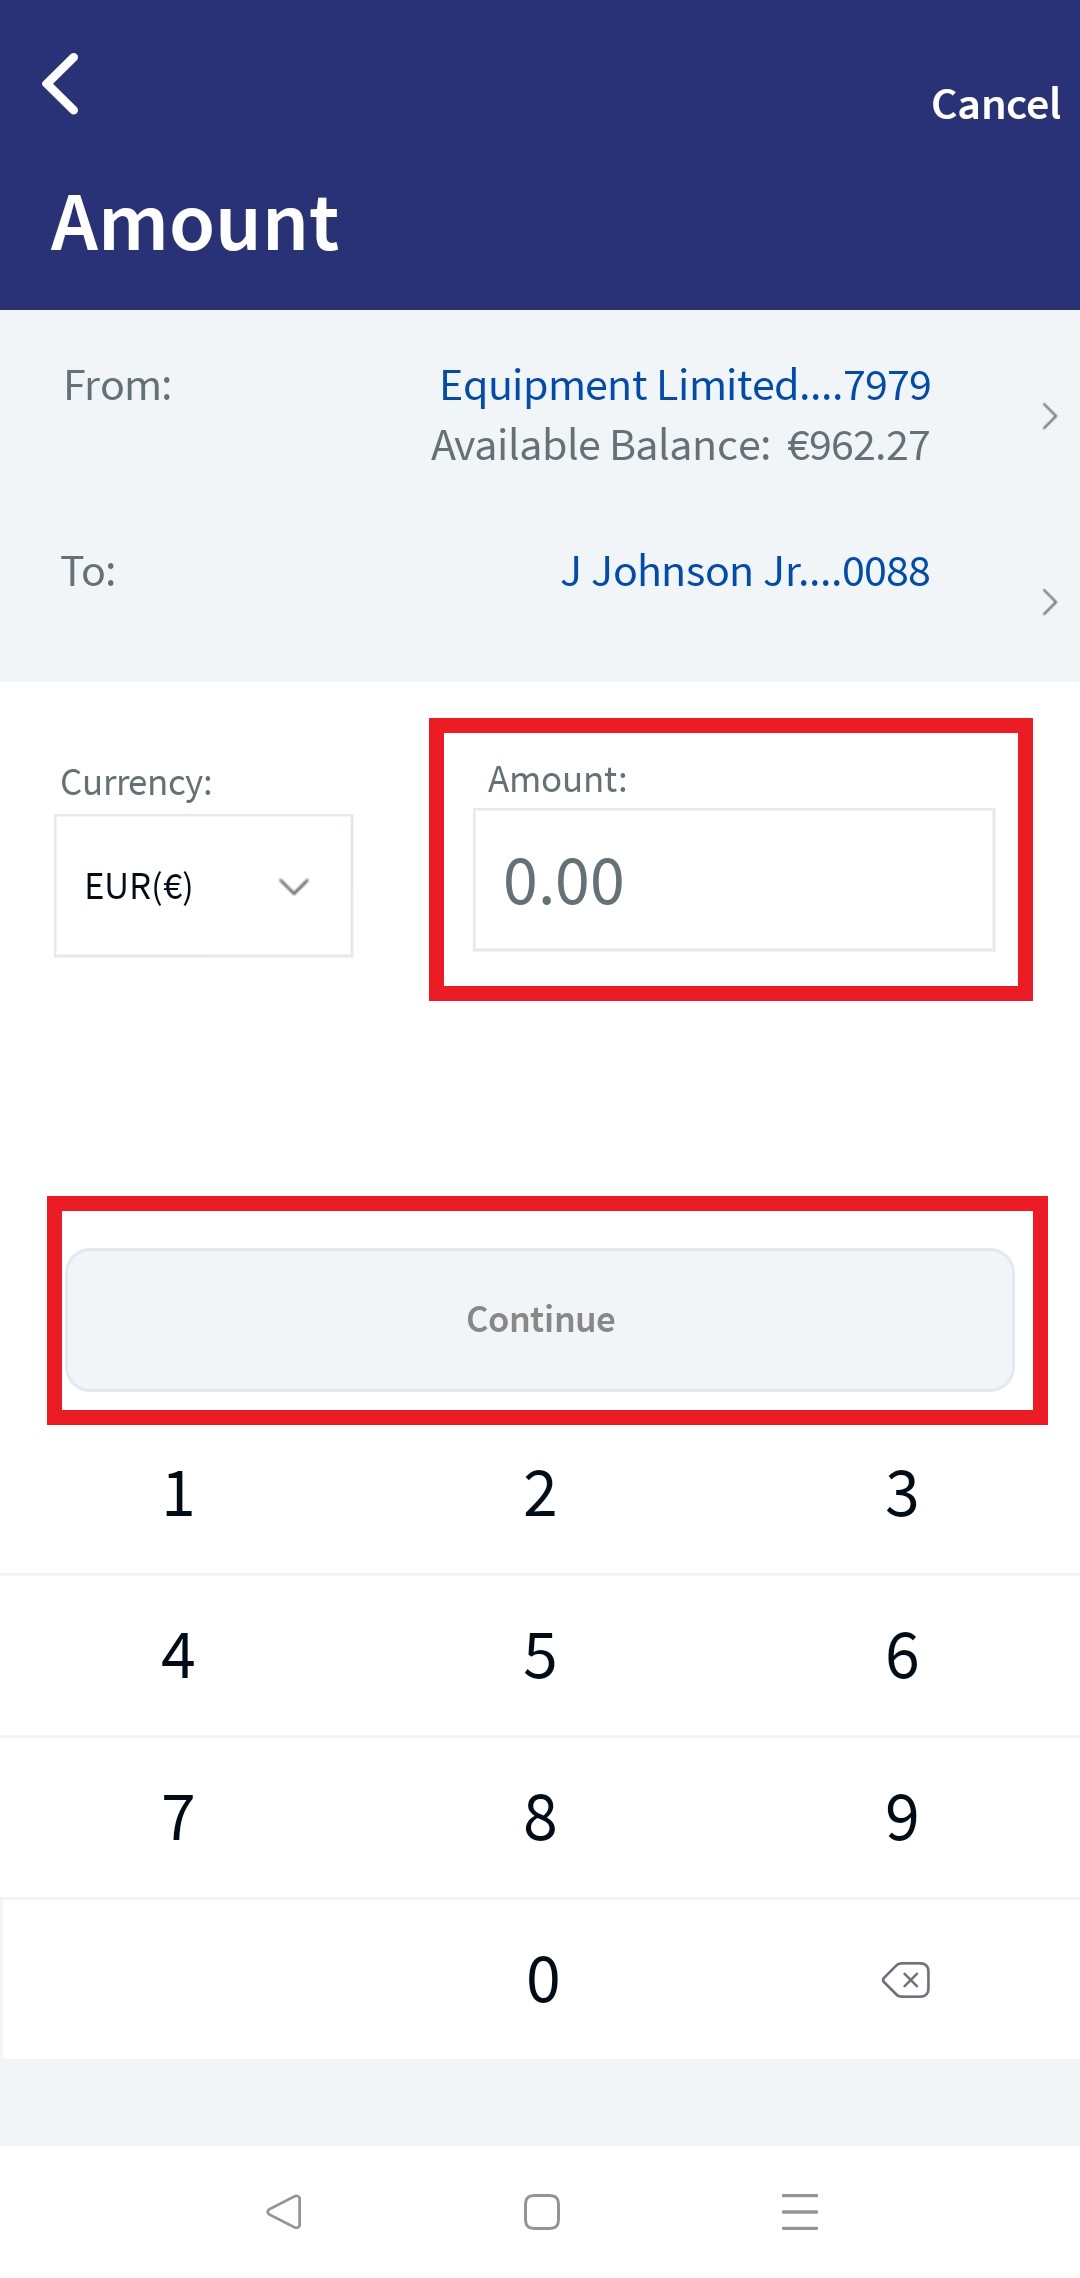
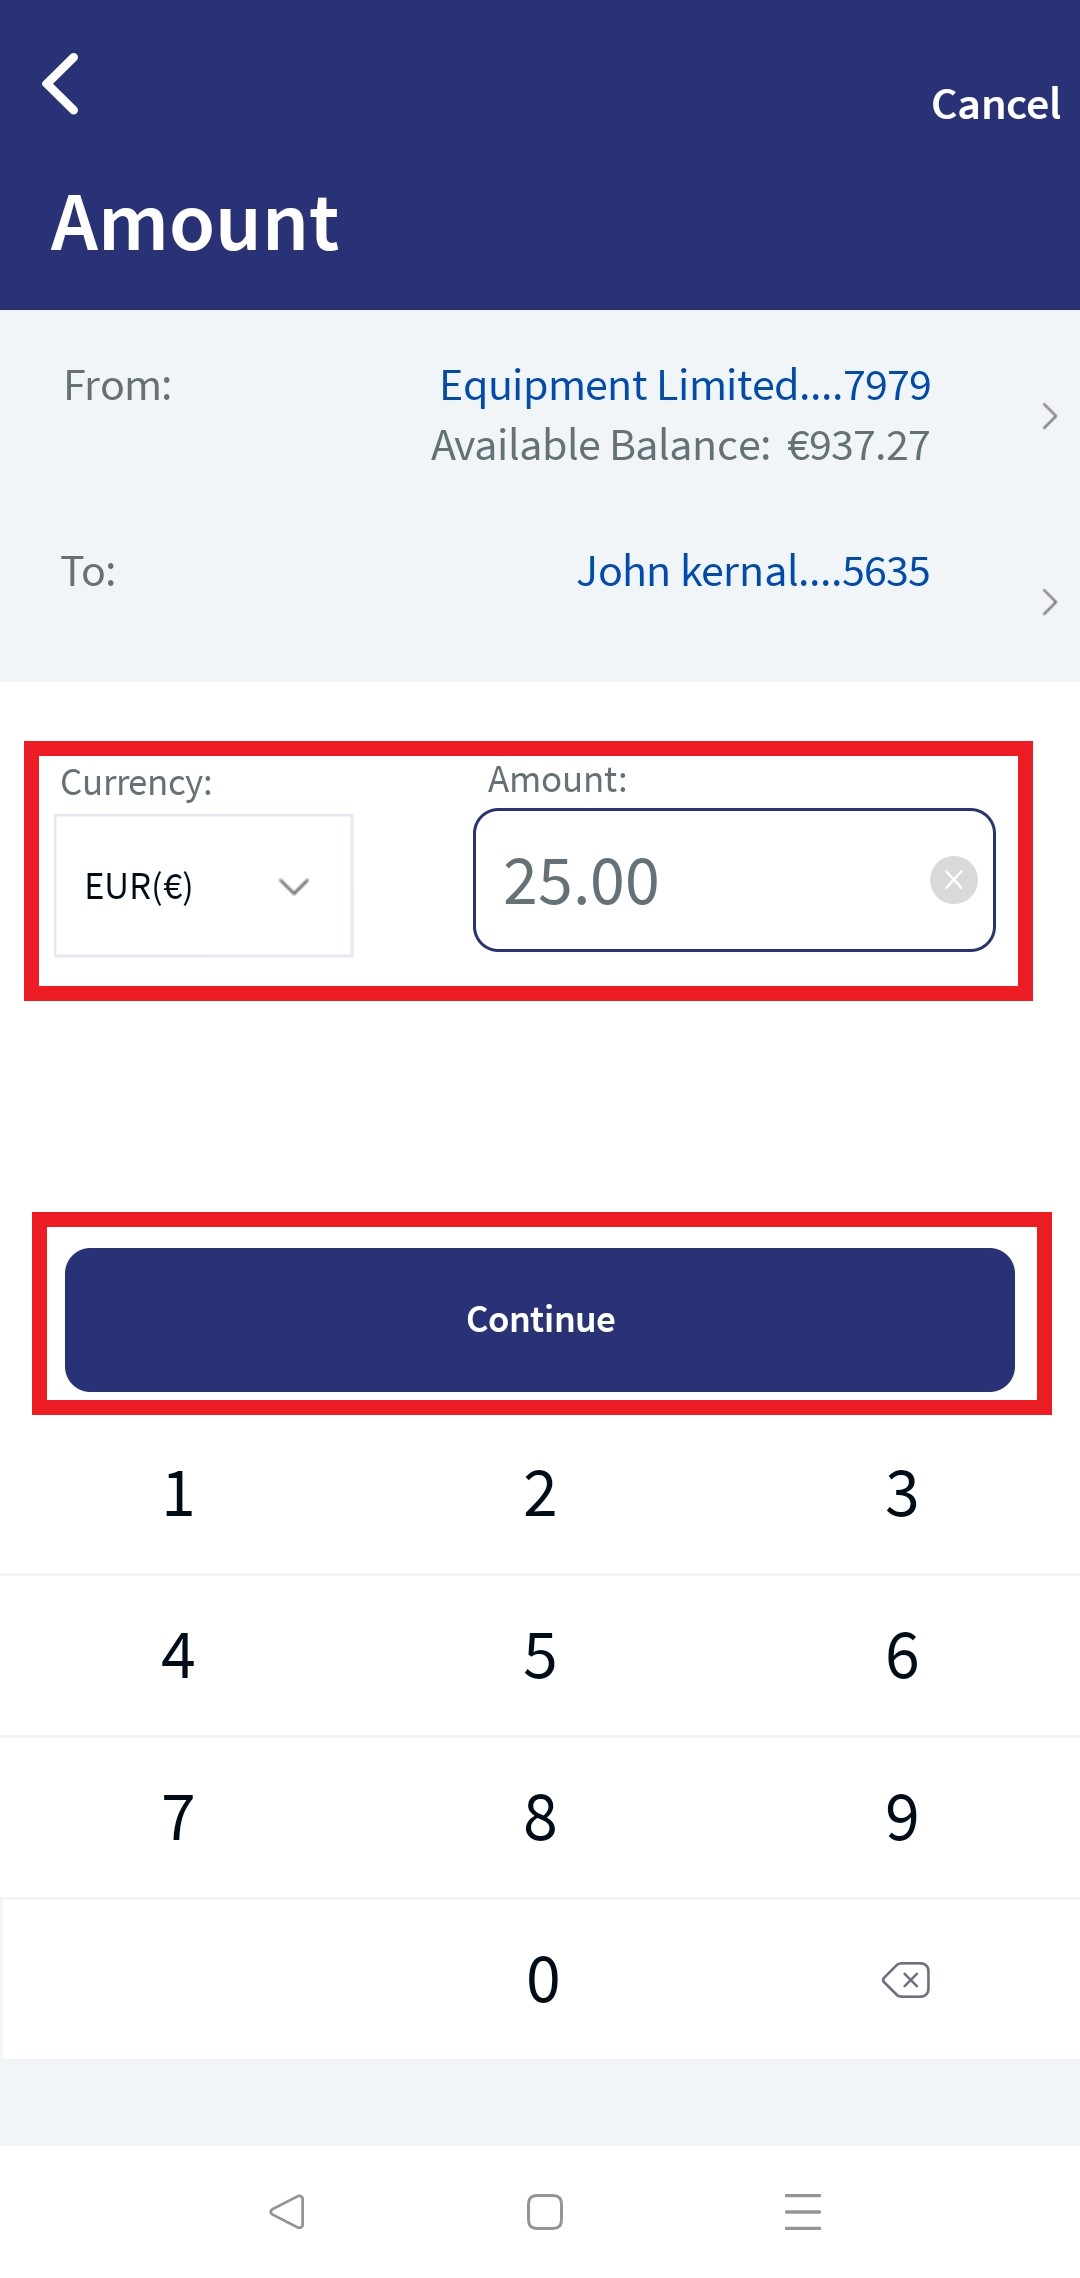
- Transfer Currency. Select the currency type to make the payment. Choose a currency type from the list of currency types.
- If the From and To accounts are currencies are same, then the currency type of that account is displayed by default.
- If the 'From account' currency and 'To account' currency is different, both the currencies are displayed while performing a transfer. You can select the currency type from the displayed options.
- This option is not applicable if you have selected your credit card account or the loan account in the 'To account' field.
- Amount. Enter the amount to be transferred. You cannot enter an amount greater than the available balance. This field is not applicable if you have selected a credit card account or loan account in To account.
- For Credit Card, The following options are displayed:
- Current Balance. Select this option to transfer current balance amount to the credit card from the selected account.
- Statement Balance: Select this option to transfer the monthly statement balance amount to the credit card.
- Minimum Due Balance. Select this option to transfer the minimum due balance amount to the credit card.
- Other Amount. Select this option to transfer other amount to the credit card.
- For loan account, the application displays the following options
- Pay Due Amount - The user cannot edit the field. The application calculates the due amount and pre-filled in the Amount field. By default this option is selected.
- Pay Other Amount - The user can enter the desired amount for payment. The user cannot enter the amount greater than Loan amount and less than minimum transaction value defined by the bank.
- For Credit Card, The following options are displayed:
- Frequency. Select the frequency from the list.
- By default, the app selects the frequency as once and the current date. You can change the frequency and the date if the transfer is a scheduled or a recurring transfer.
- This field is not applicable if you have selected a credit card account or a loan account in the 'To account' field. The app selects the frequency as Once, by default.
- Scheduled Transfer or Recurring Transfer. You can choose to set the transfer as a recurring transfer (for example, daily, weekly, monthly, and so on). In that case, select if the recurrence has to be on a specific date and select a date from the calendar, or if it is the number of occurrences and enter the occurrence value (for example, 24 times). The current date is selected as the recurring transfer start date, by default. The other frequency options are:
- Daily
- Weekly (every 7th day from the selected start date)
- Bi-Weekly or every Two Weeks (every 14 days from the selected start date)
- Monthly (every month on the selected date, cannot select 31st of the month in this case)
- Quarterly
- Half Yearly
- Yearly
- Send On. Select the transfer date from the calendar. The current date is selected as the transfer date, by default.
- Note/ Remittance information (Optional). Add any notes if required. You can enter up to 140 characters.
- Payee Address Details. Enter the personal information (such as Phone, Email) and address details (such as Address, Country, City, State, and Zip). This section is applicable only when you have selected 'New Payee' in the 'To account' field.
- Add Support documents (Optional). You can add an attachment for future reference.
 To add an attachment, follow these steps:
- Click + icon and select the file to add as an attachment.
The attached file is displayed along with the Cancel (X) option.
- Click Cancel (X) to remove the attachment. A pop-up is displayed asking for confirmation.
- Click Yes to confirm. The attachment will be removed.
You can attach up to five PDF/JPEG files only. Adding an attachment is mandatory based on the payment/transfer amount. The threshold amount is configured by the bank.
- Click + icon and select the file to add as an attachment.
- Click Continue the application performs payee verification and based on the response the user can proceed with the payment.
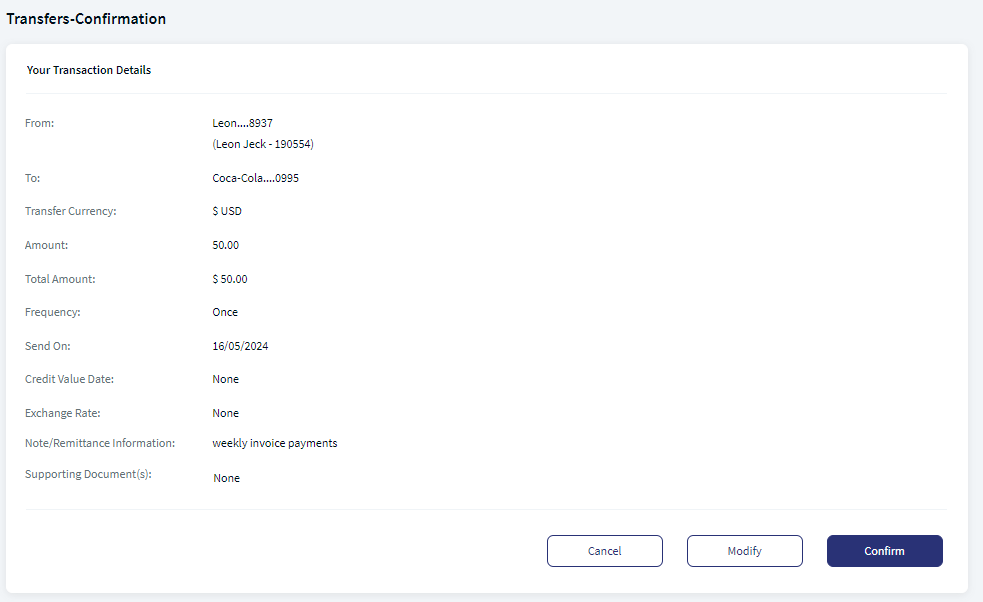
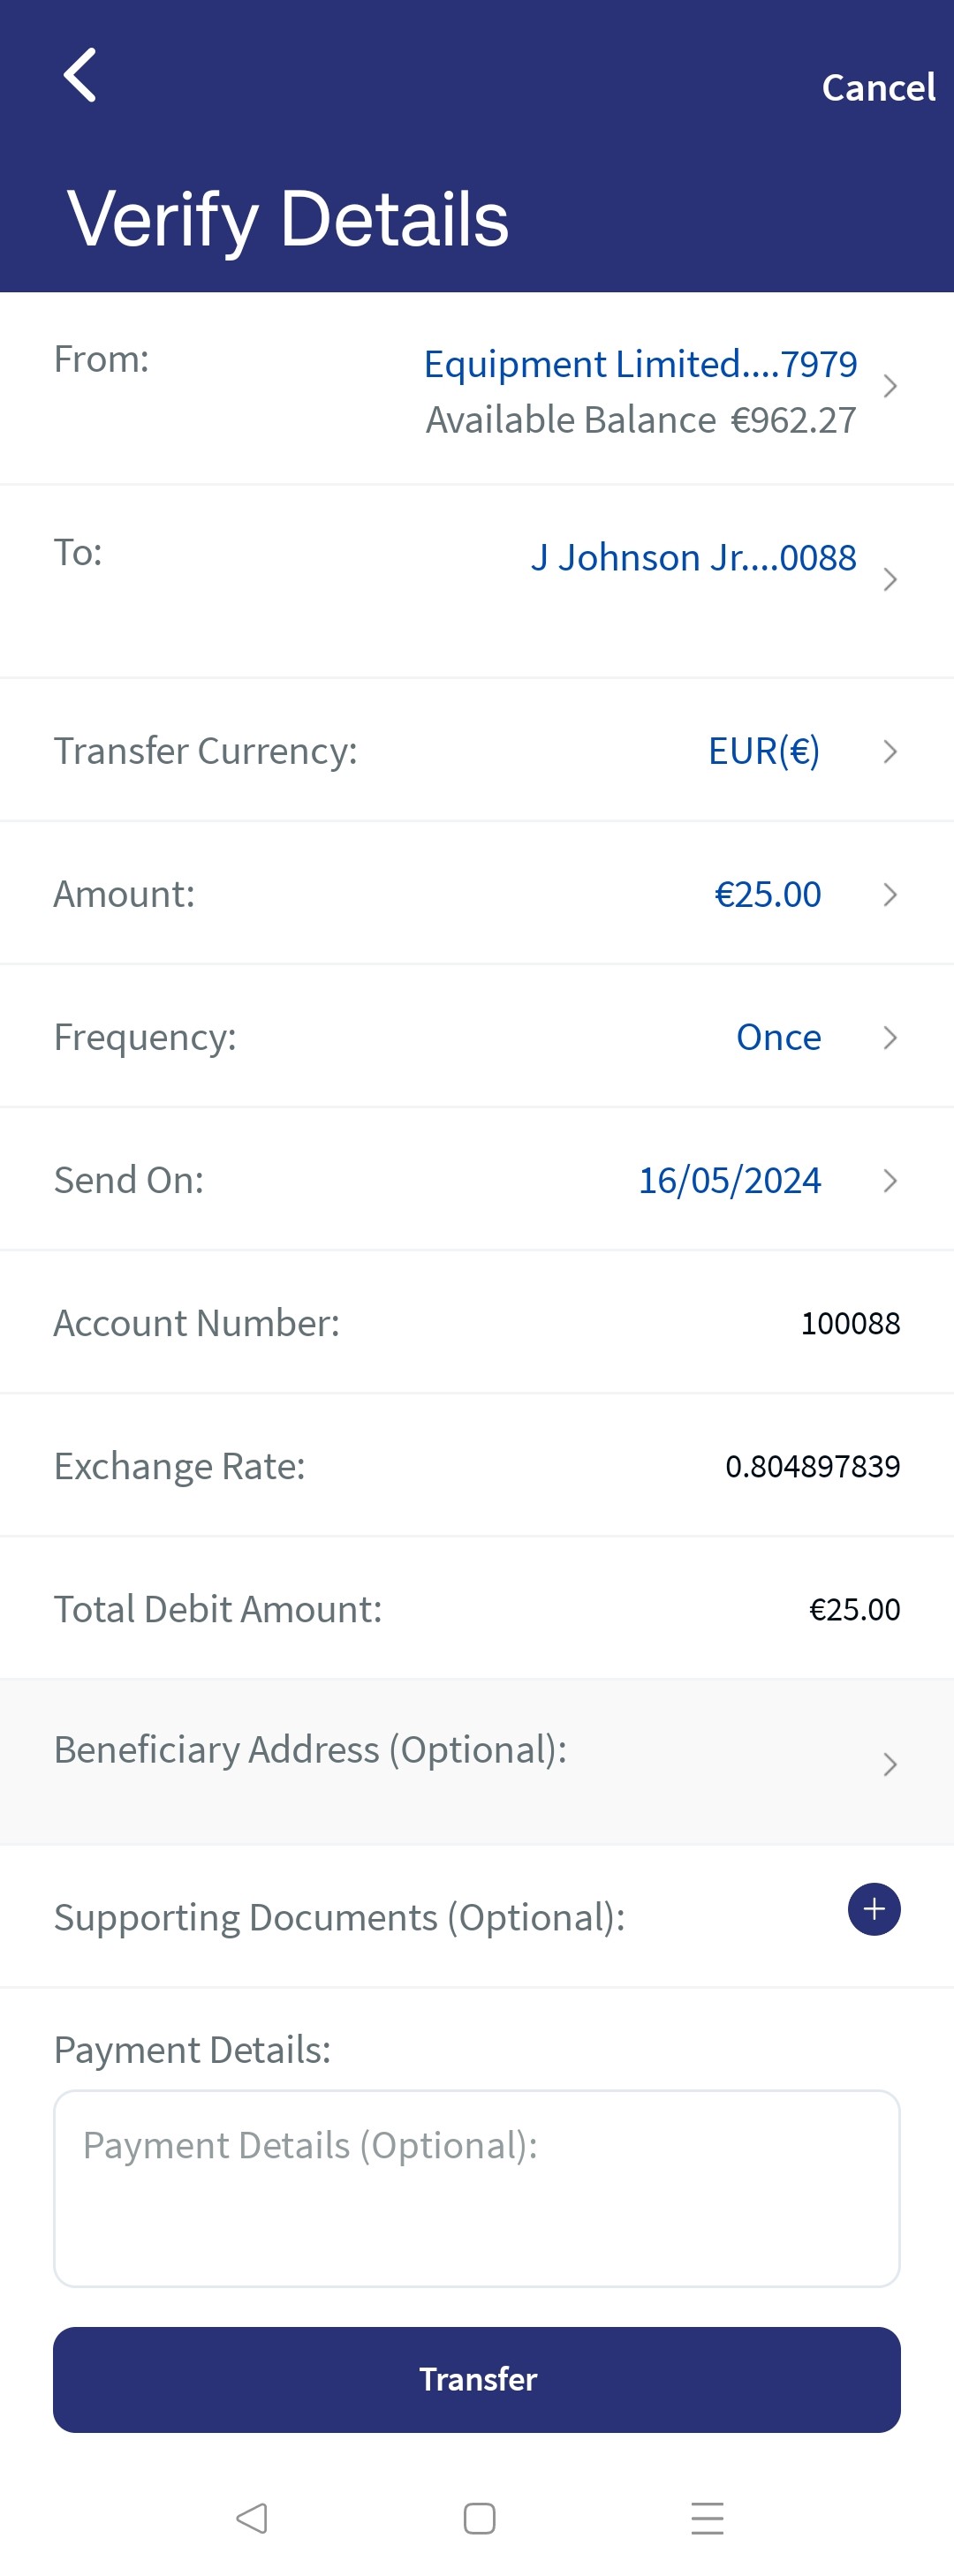
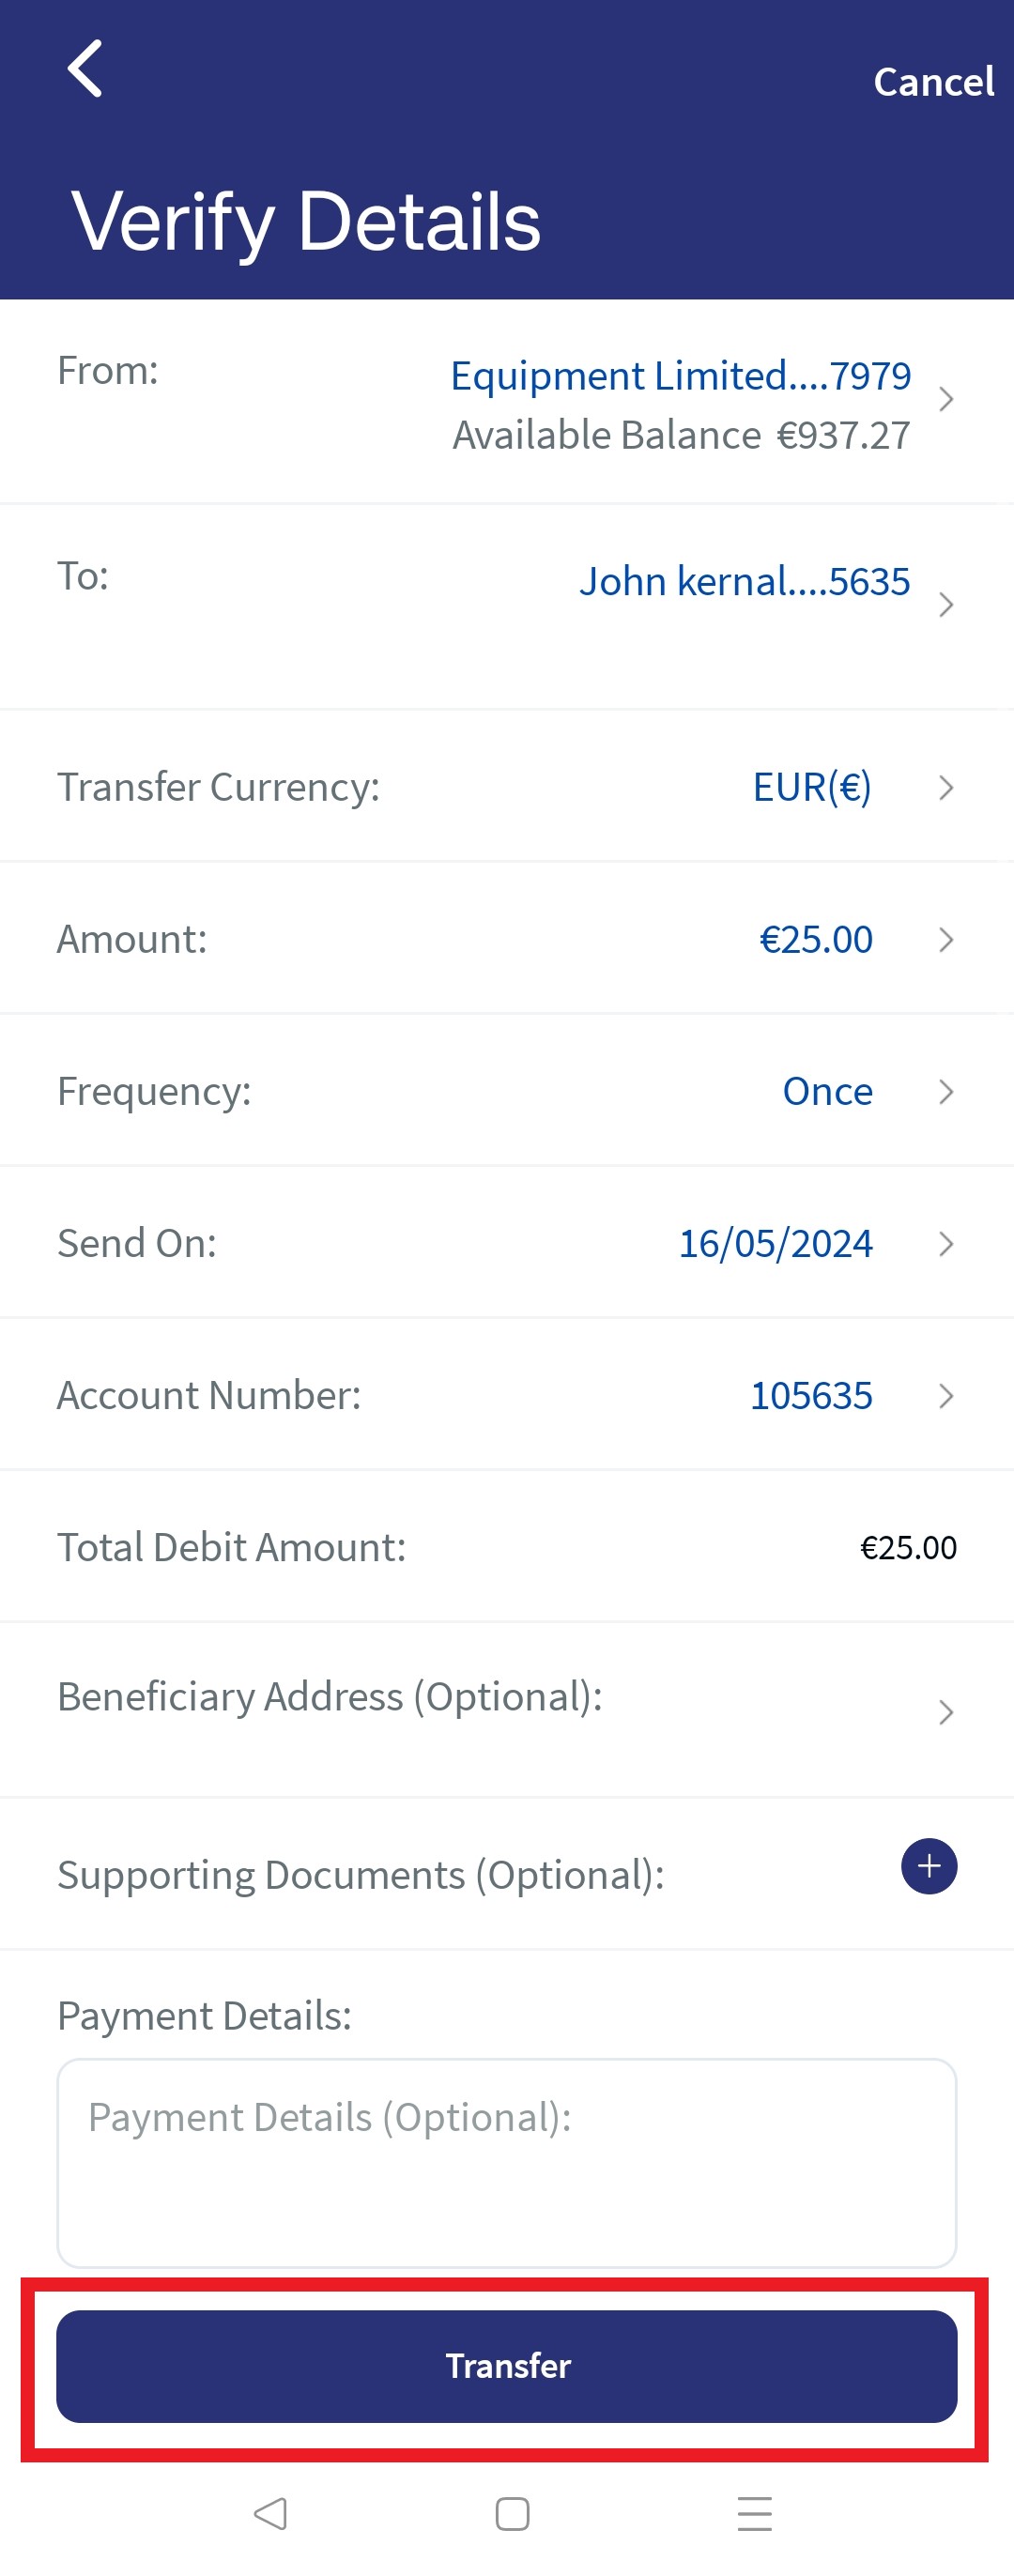
- Verify Transfer Details. If you have specified valid data in all the fields, the app displays the Confirmation screen with provision to modify the details, if required.
- Click Modify to modify the details. Once the details are confirmed, click Confirm.
- Click Cancel to cancel the transaction.
- Depending on the bank configuration, if Strong Customer Authentication(SCA) is enabled for the feature, SCA is triggered. The authentication type is configured and can be turned on or off in the Spotlight application. For more information see Push Notification.
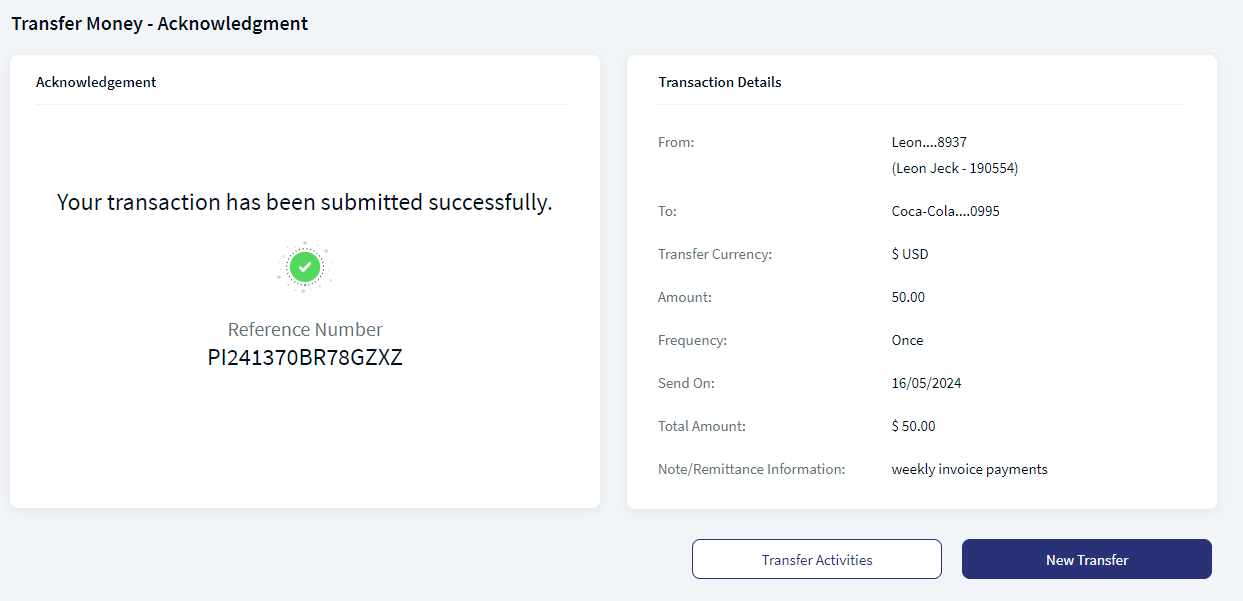
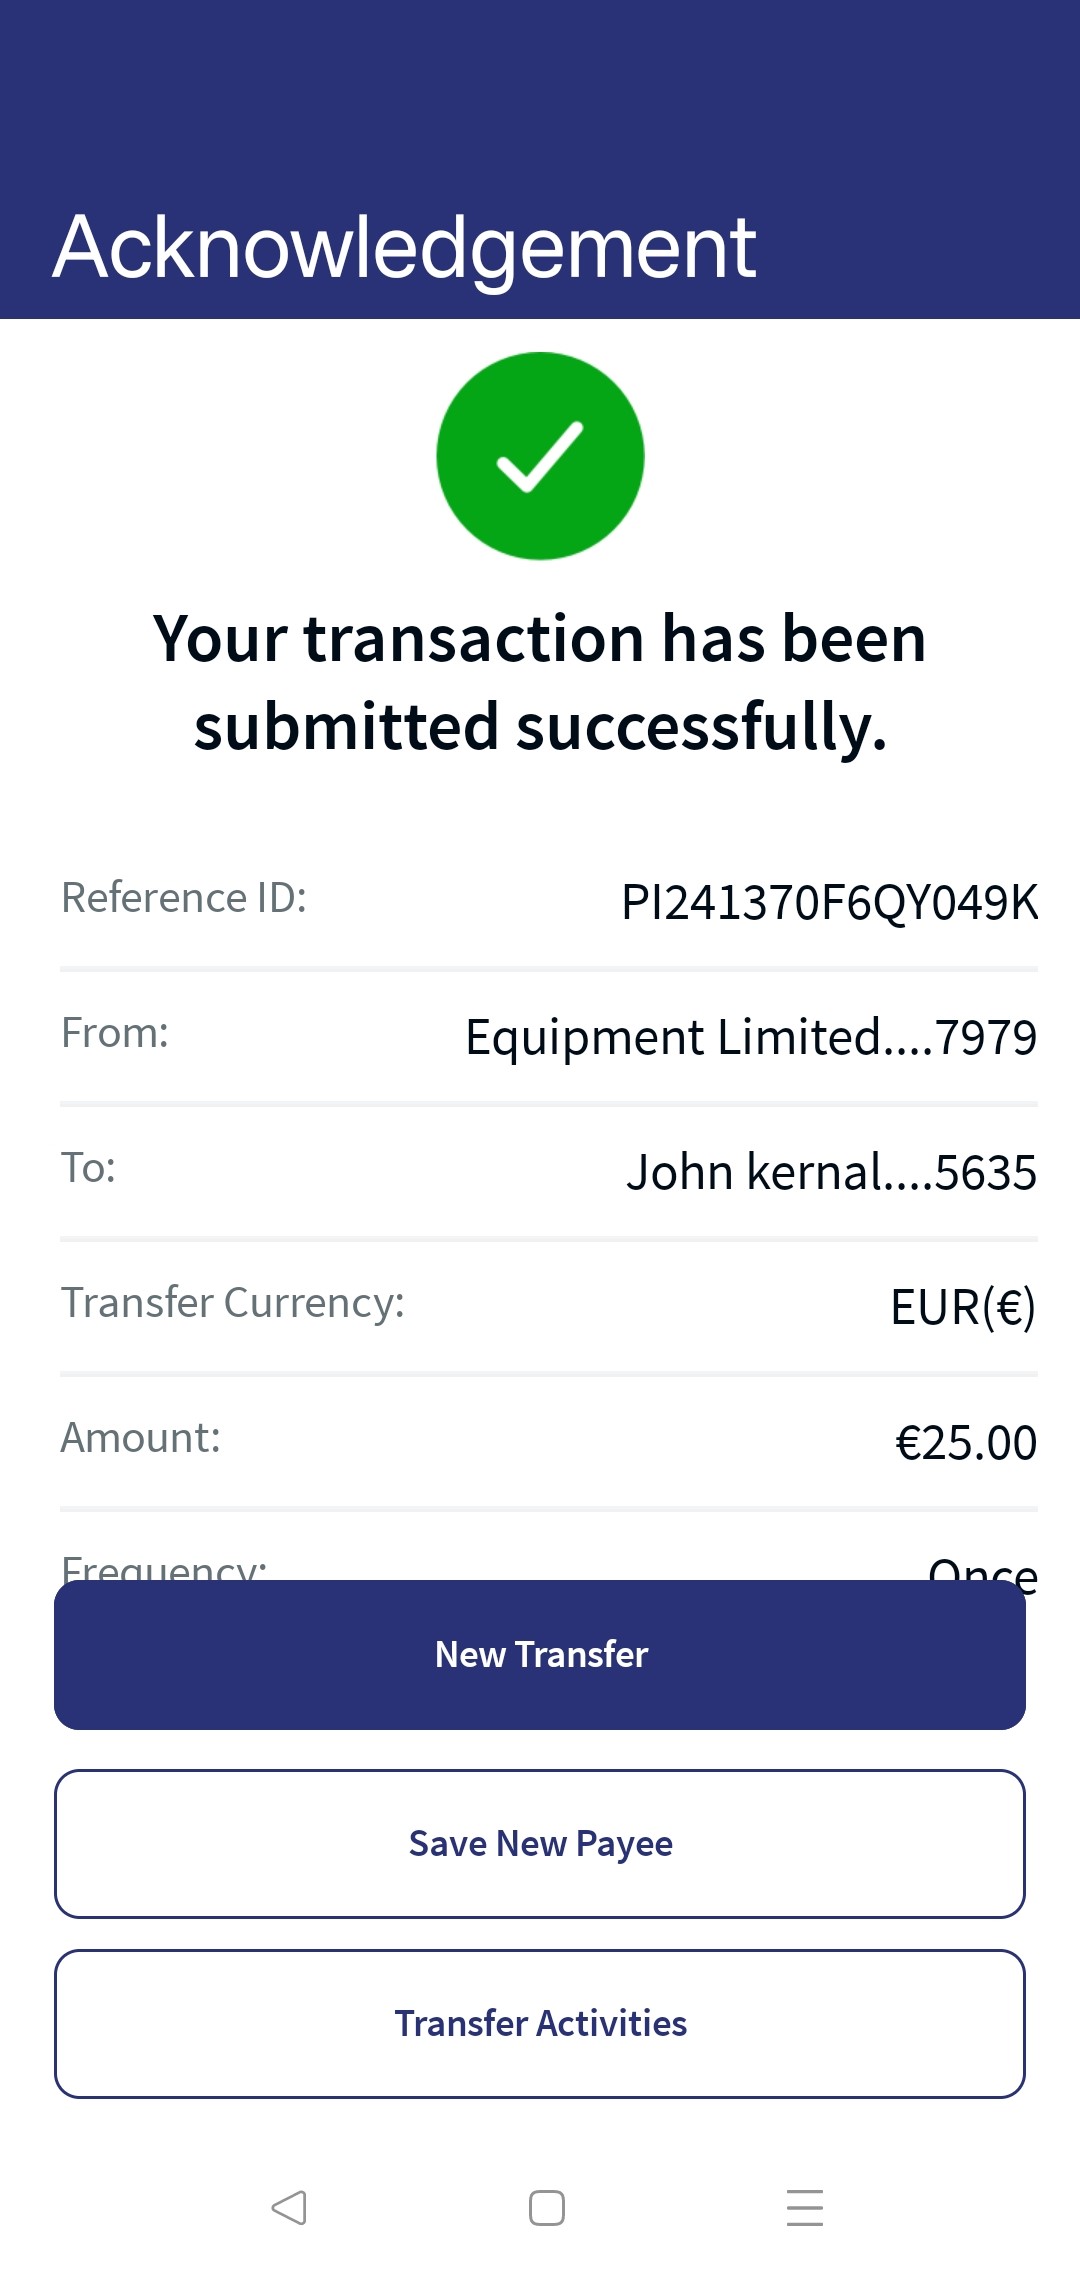
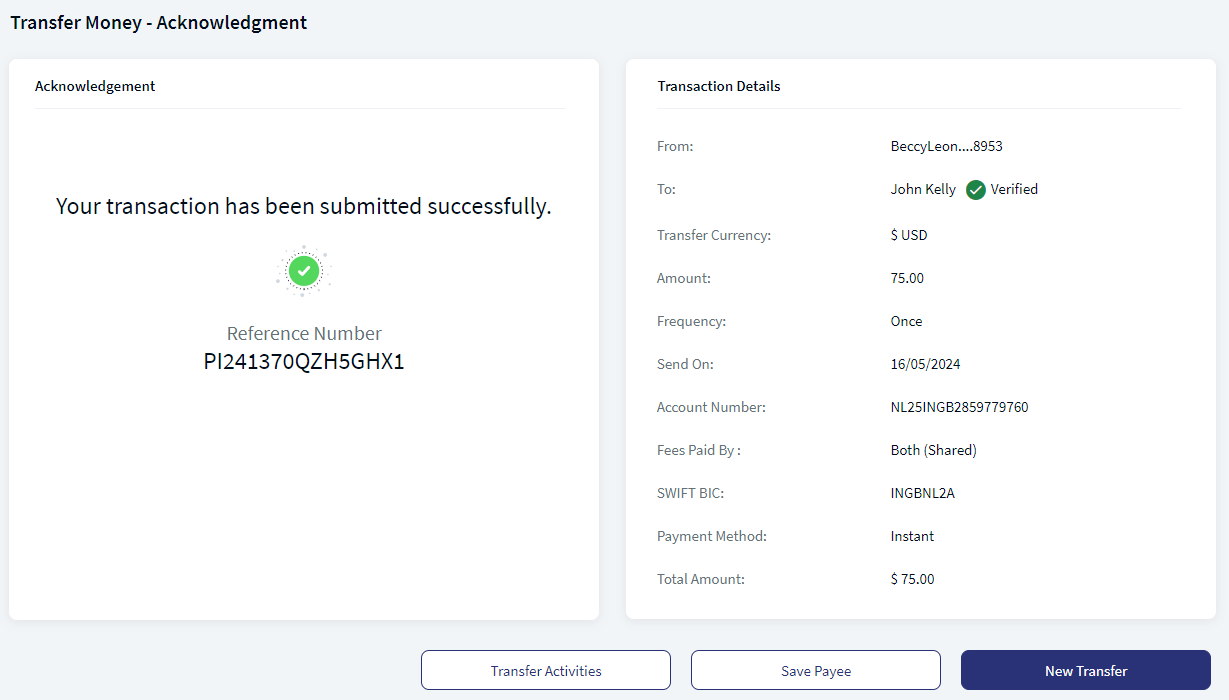
- Once the entered details are correct, the application displays an acknowledgment screen with a reference number.
- The app displays the acknowledgment screen with transaction details, unique reference number to the transaction, and provision to do the following:
- Make a new transfer
- Transfer View Activities
- Save Payee. Click here for more information.
Existing Payee - Web Channel
New Payee - Web Channel
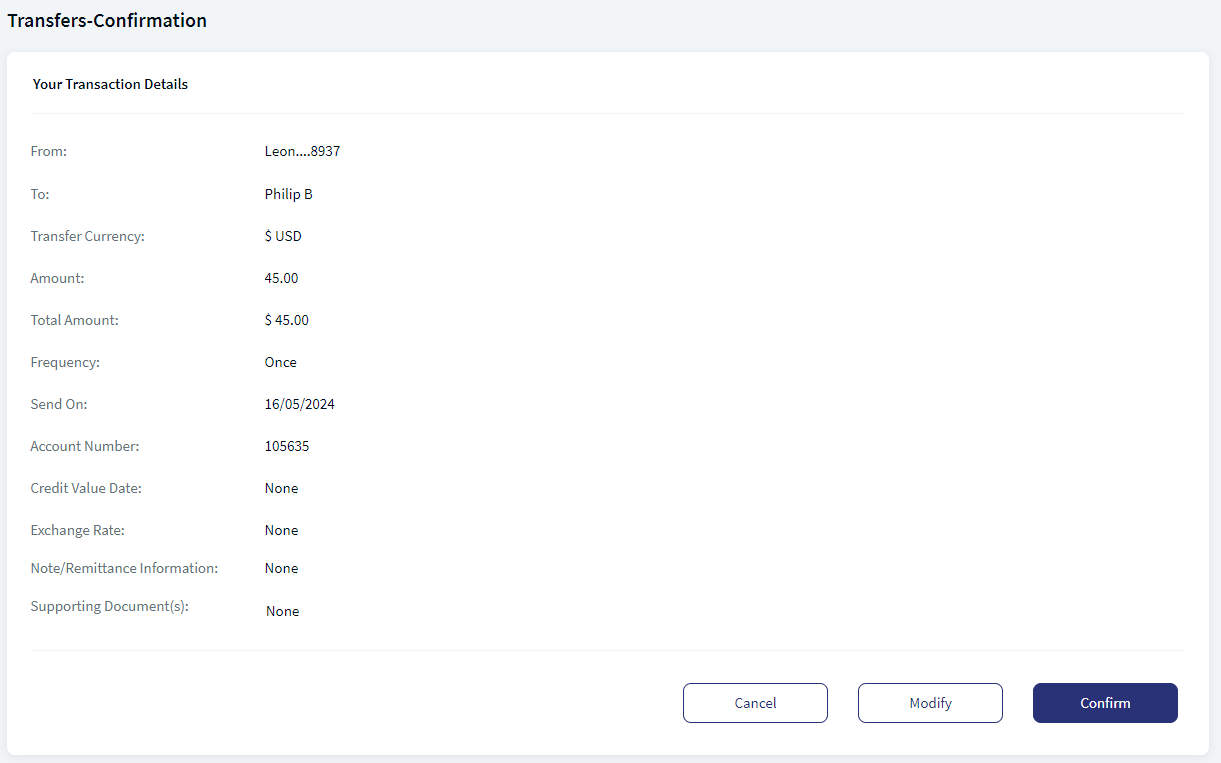
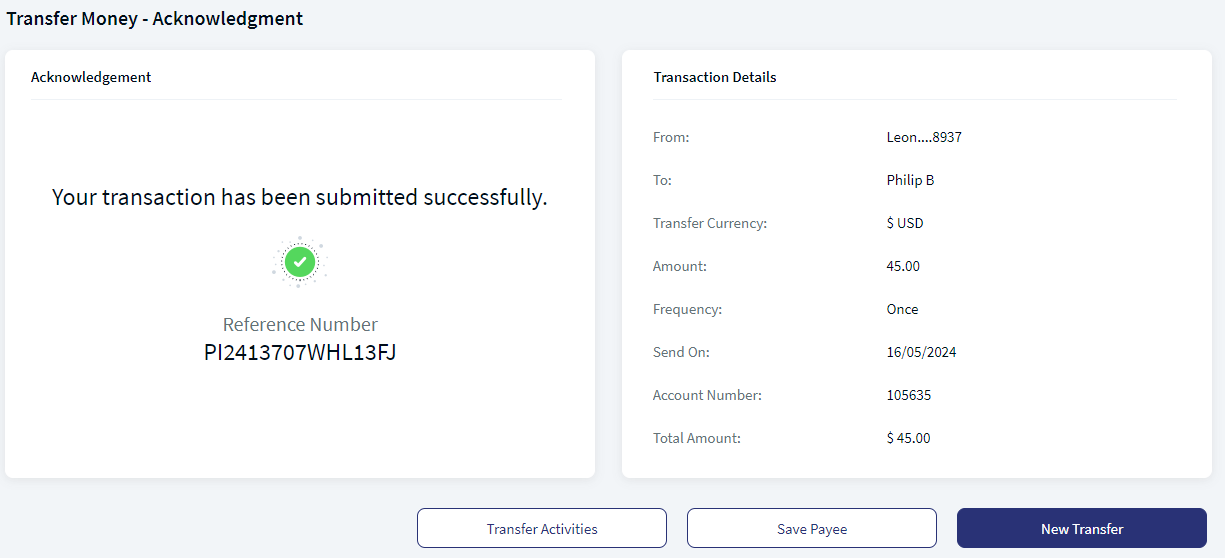
Existing Payee - Mobile Native
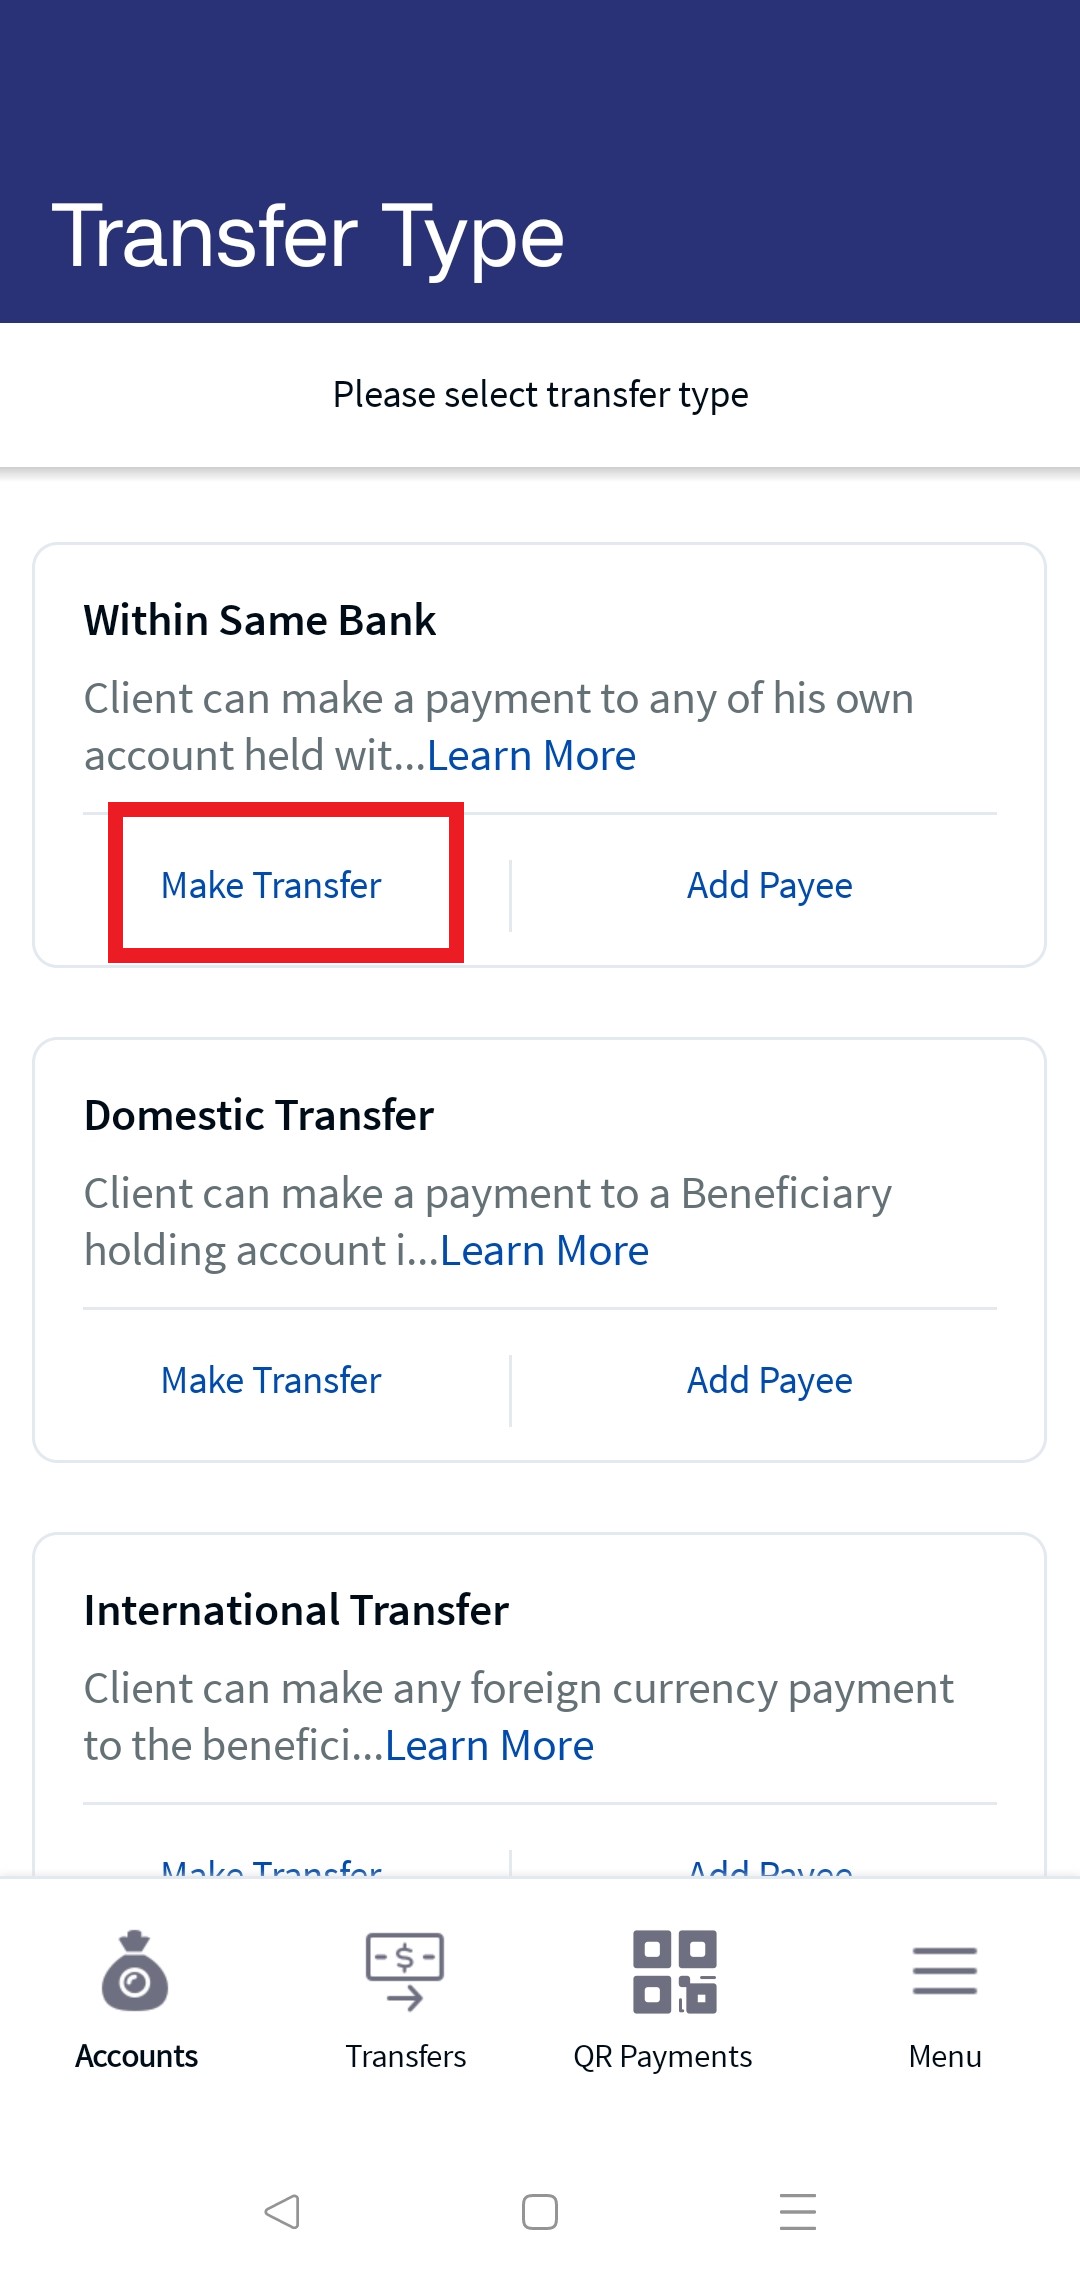
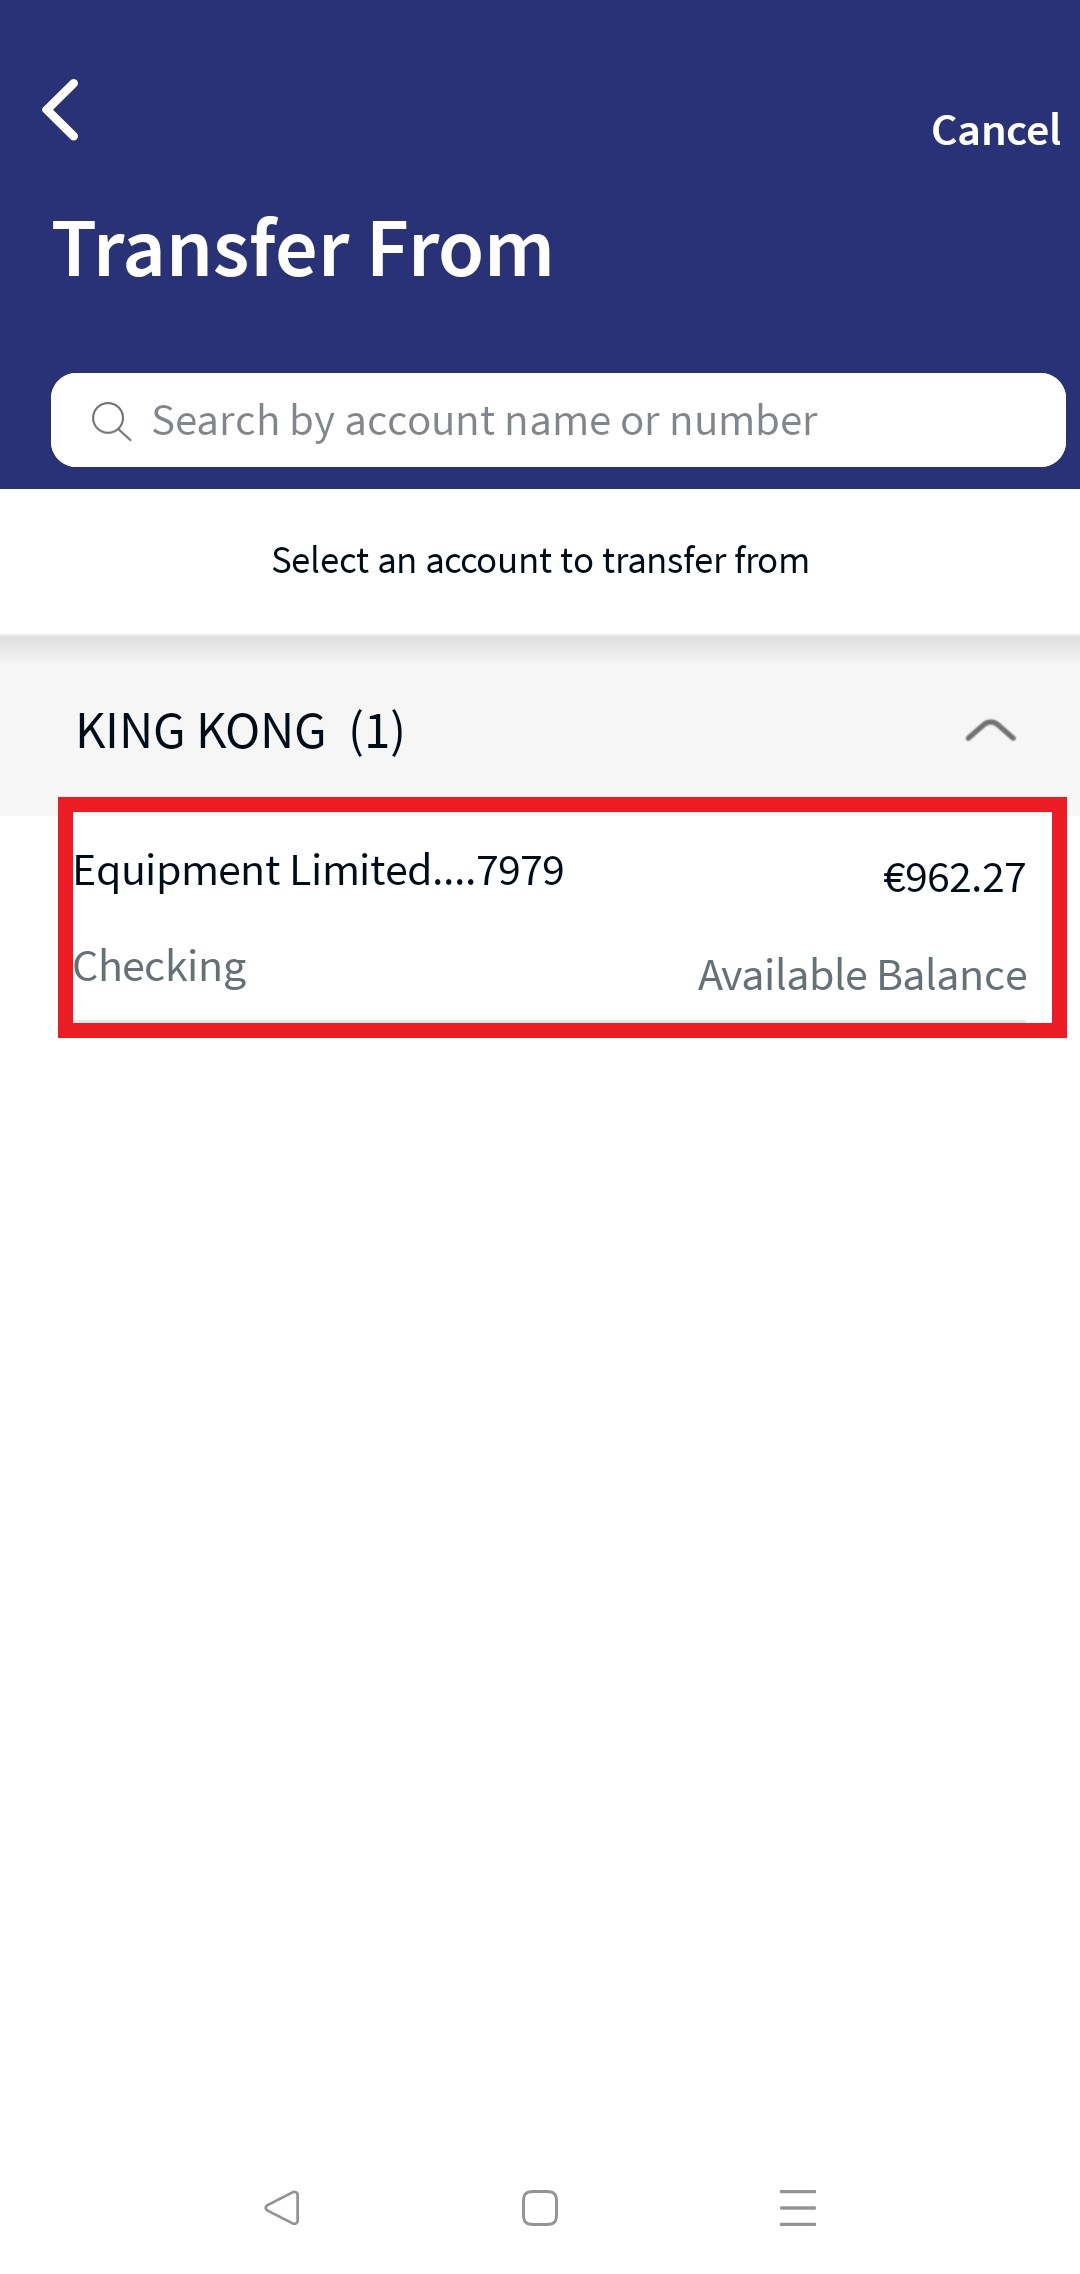
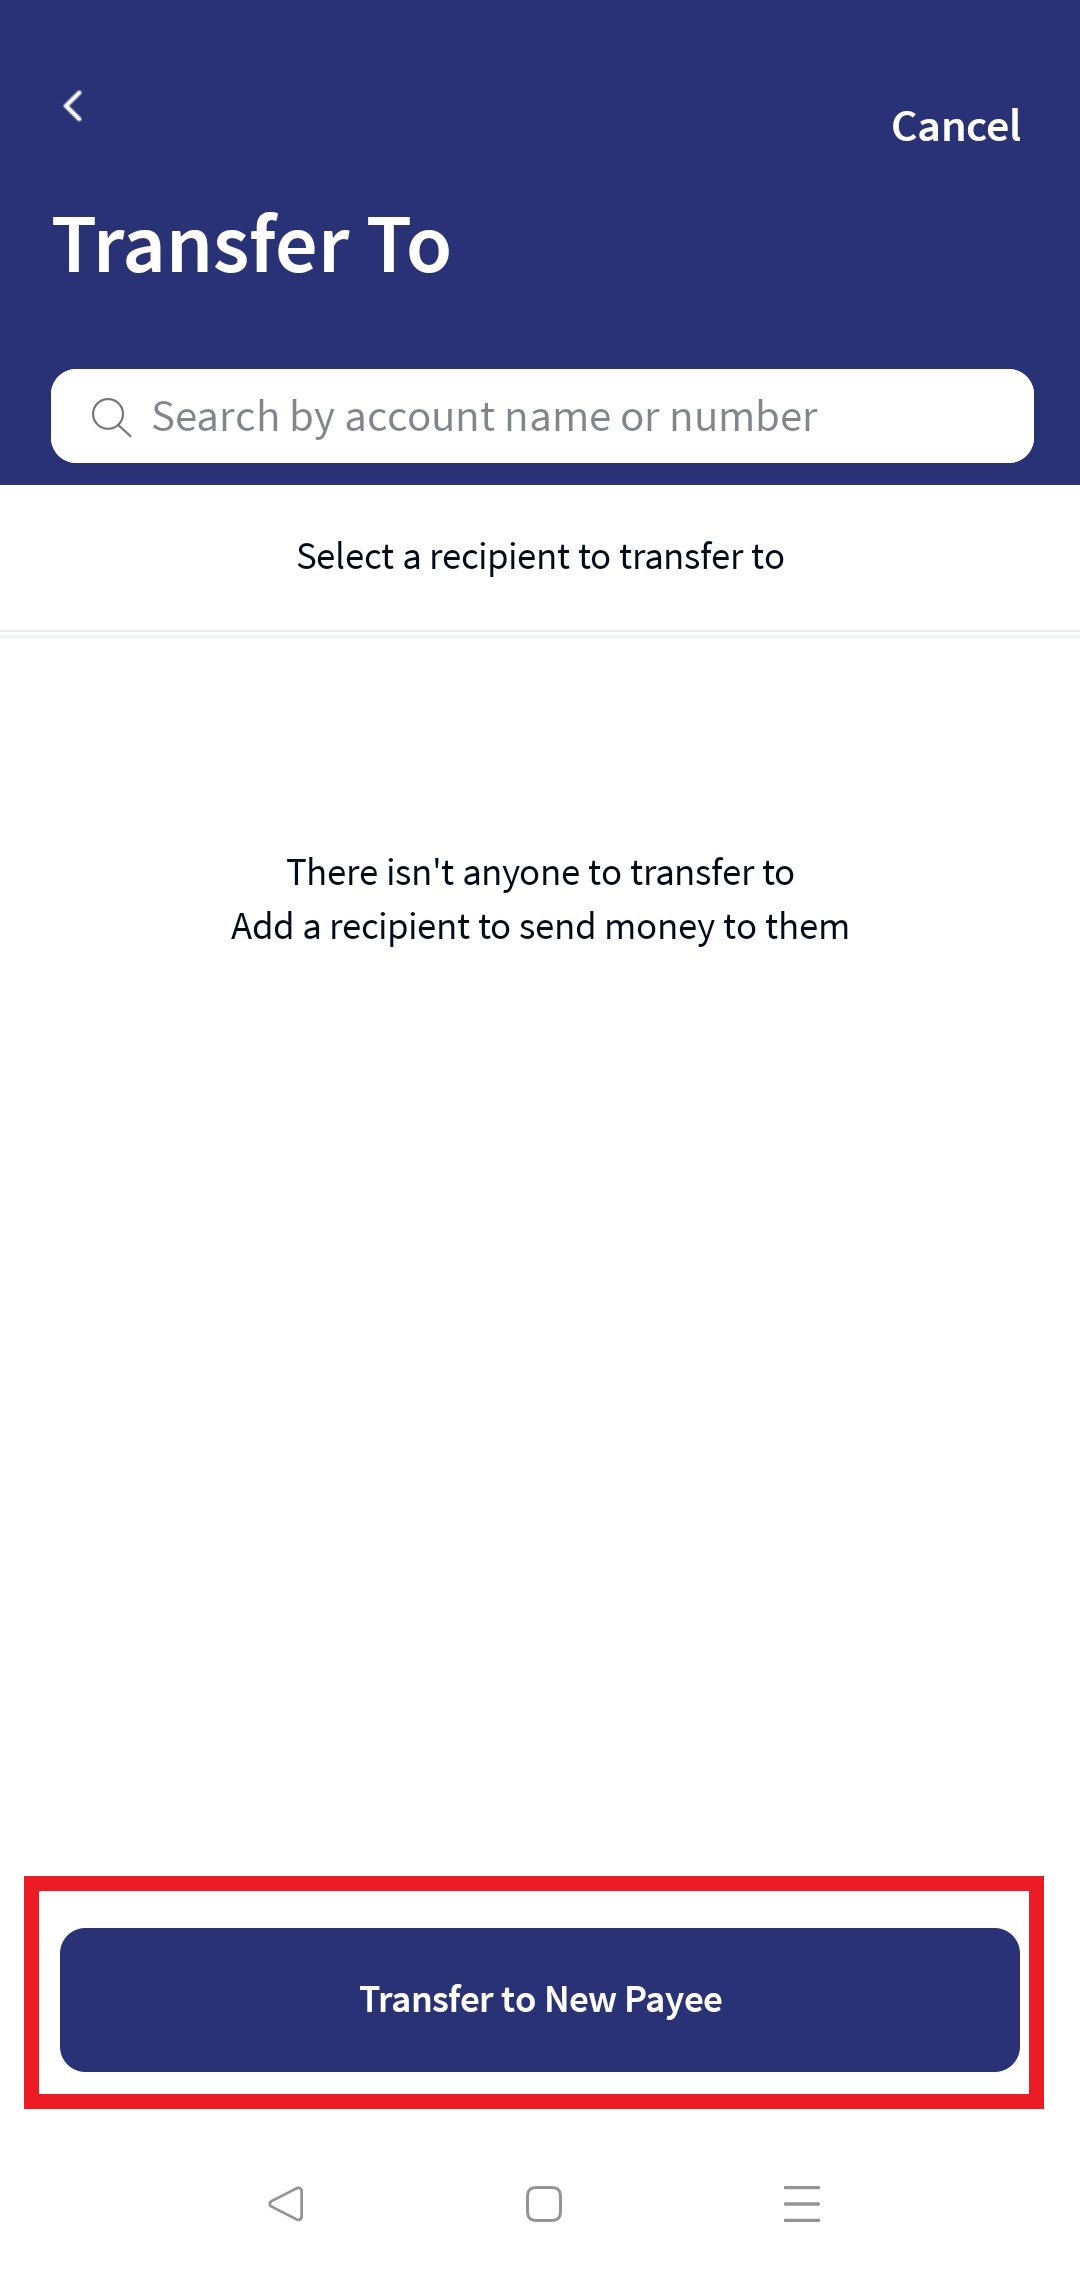
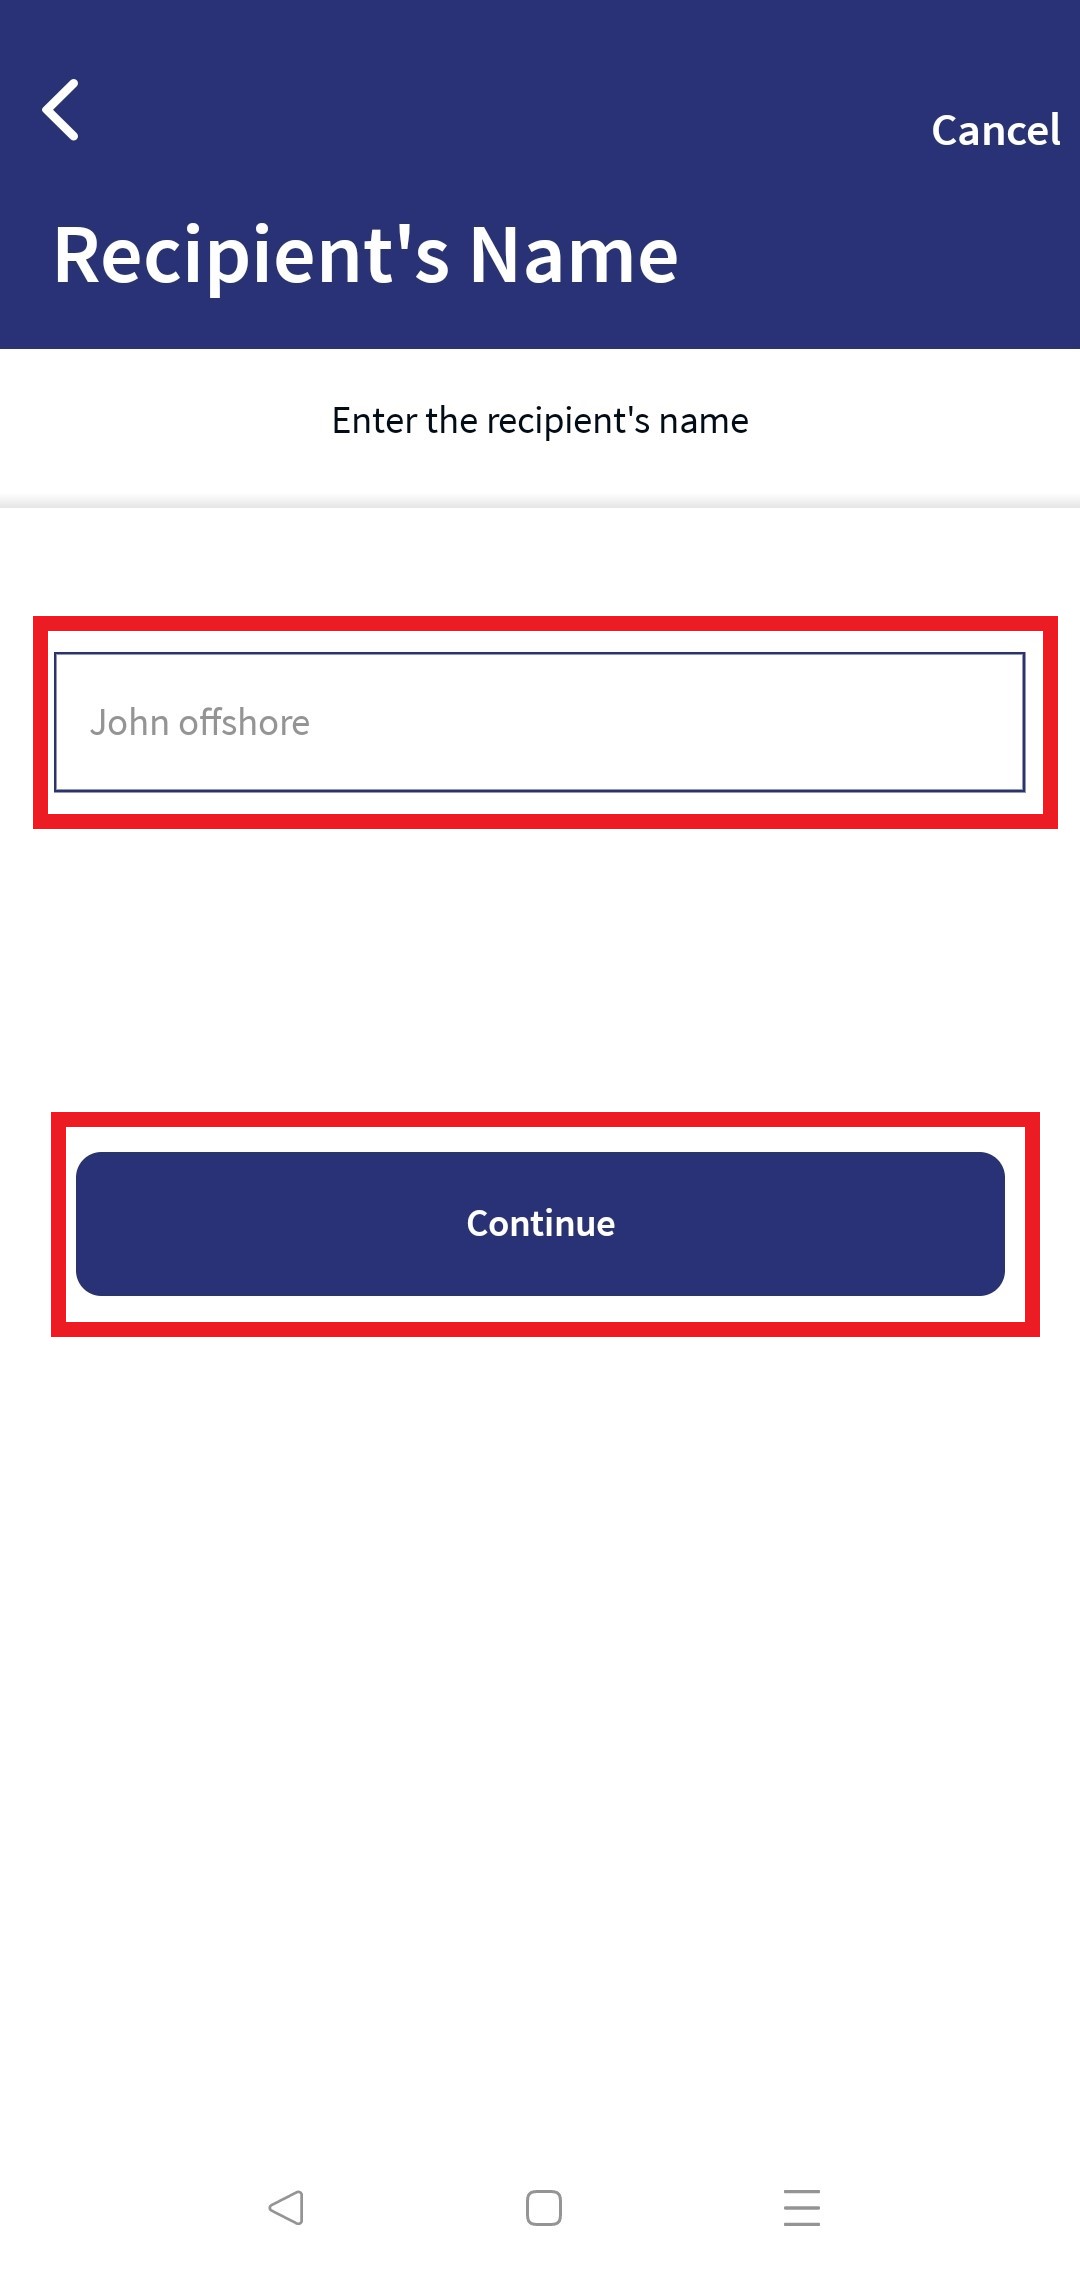
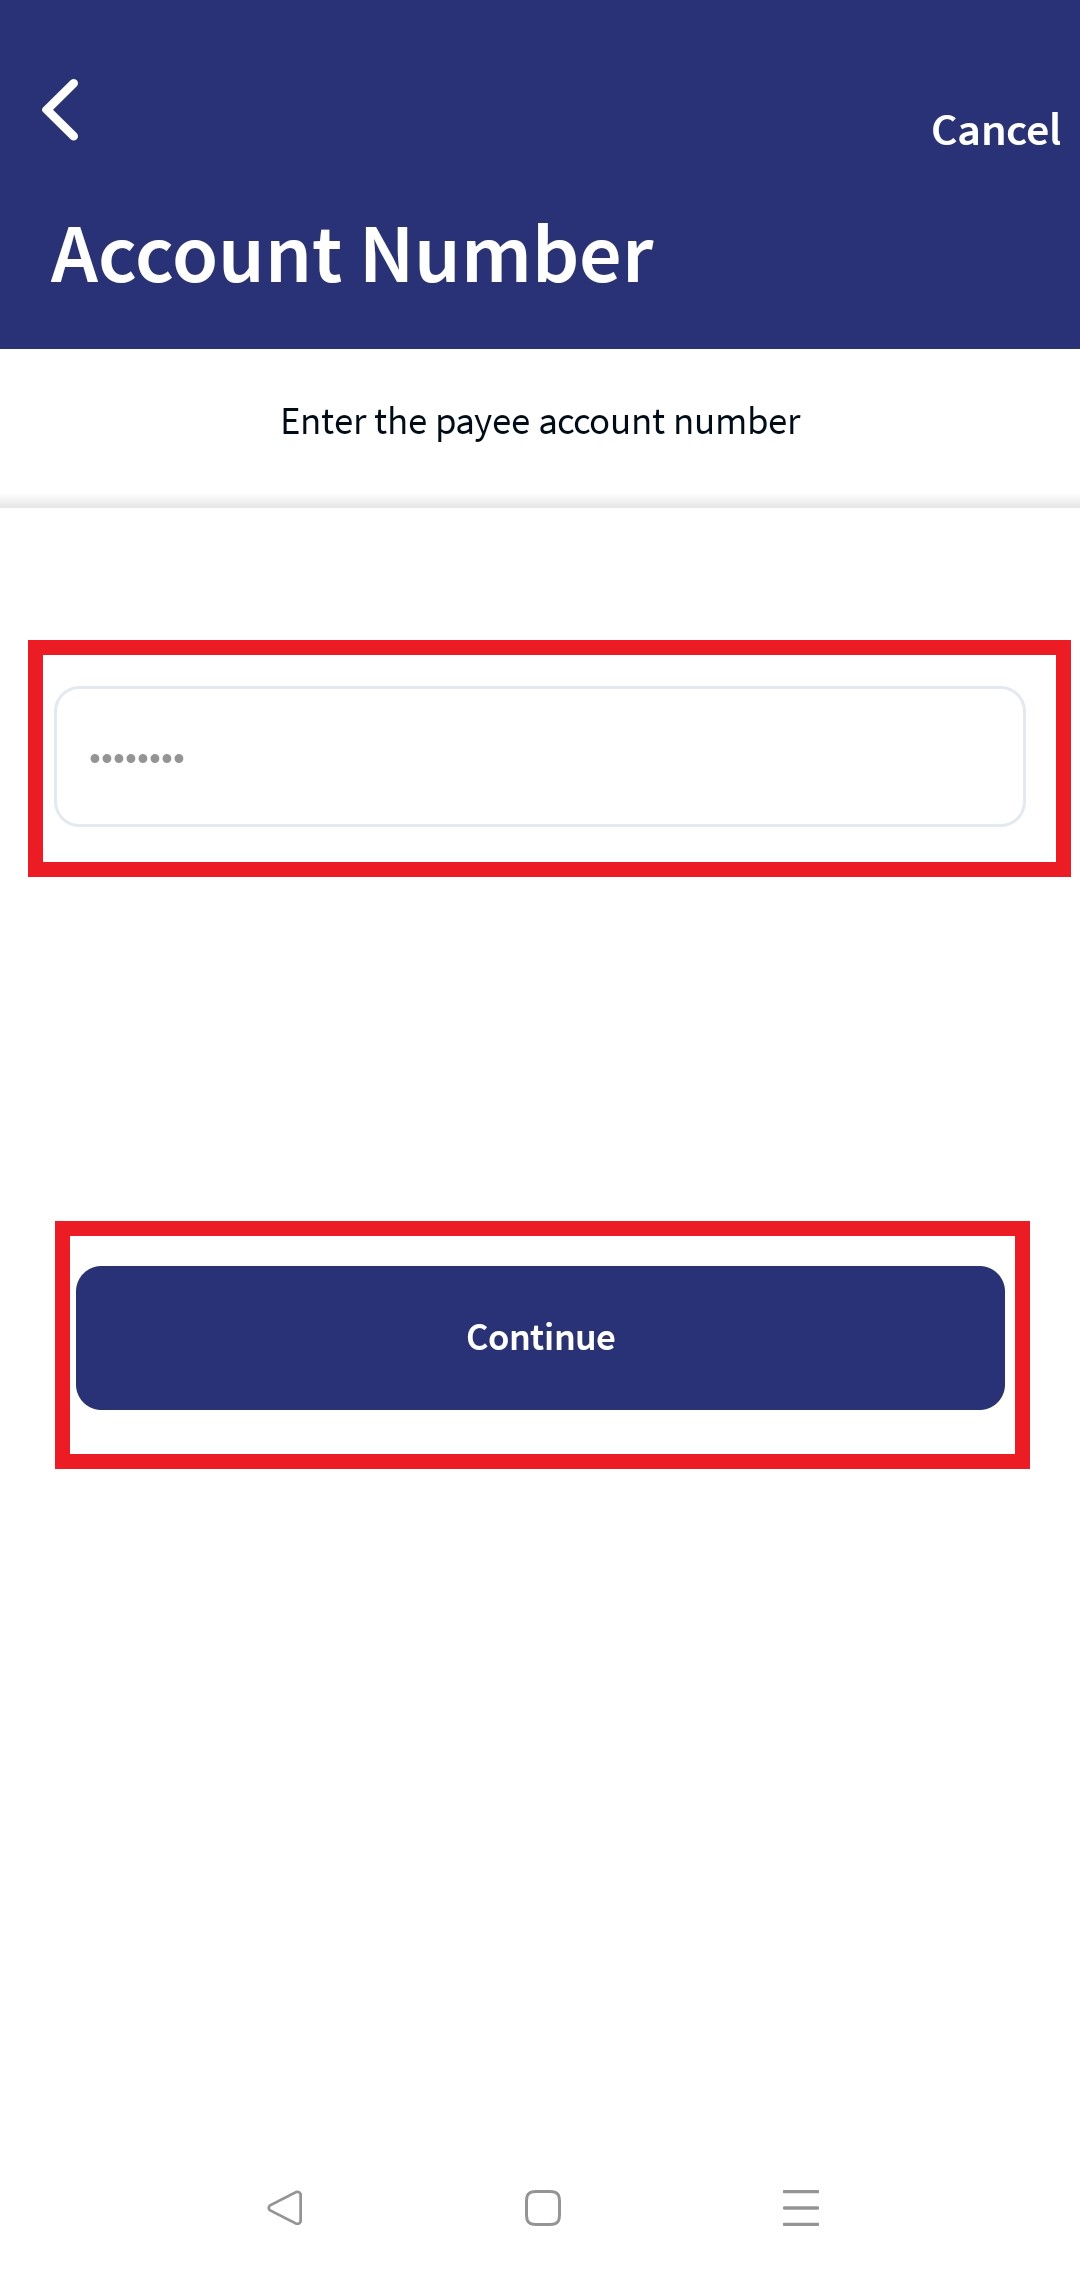
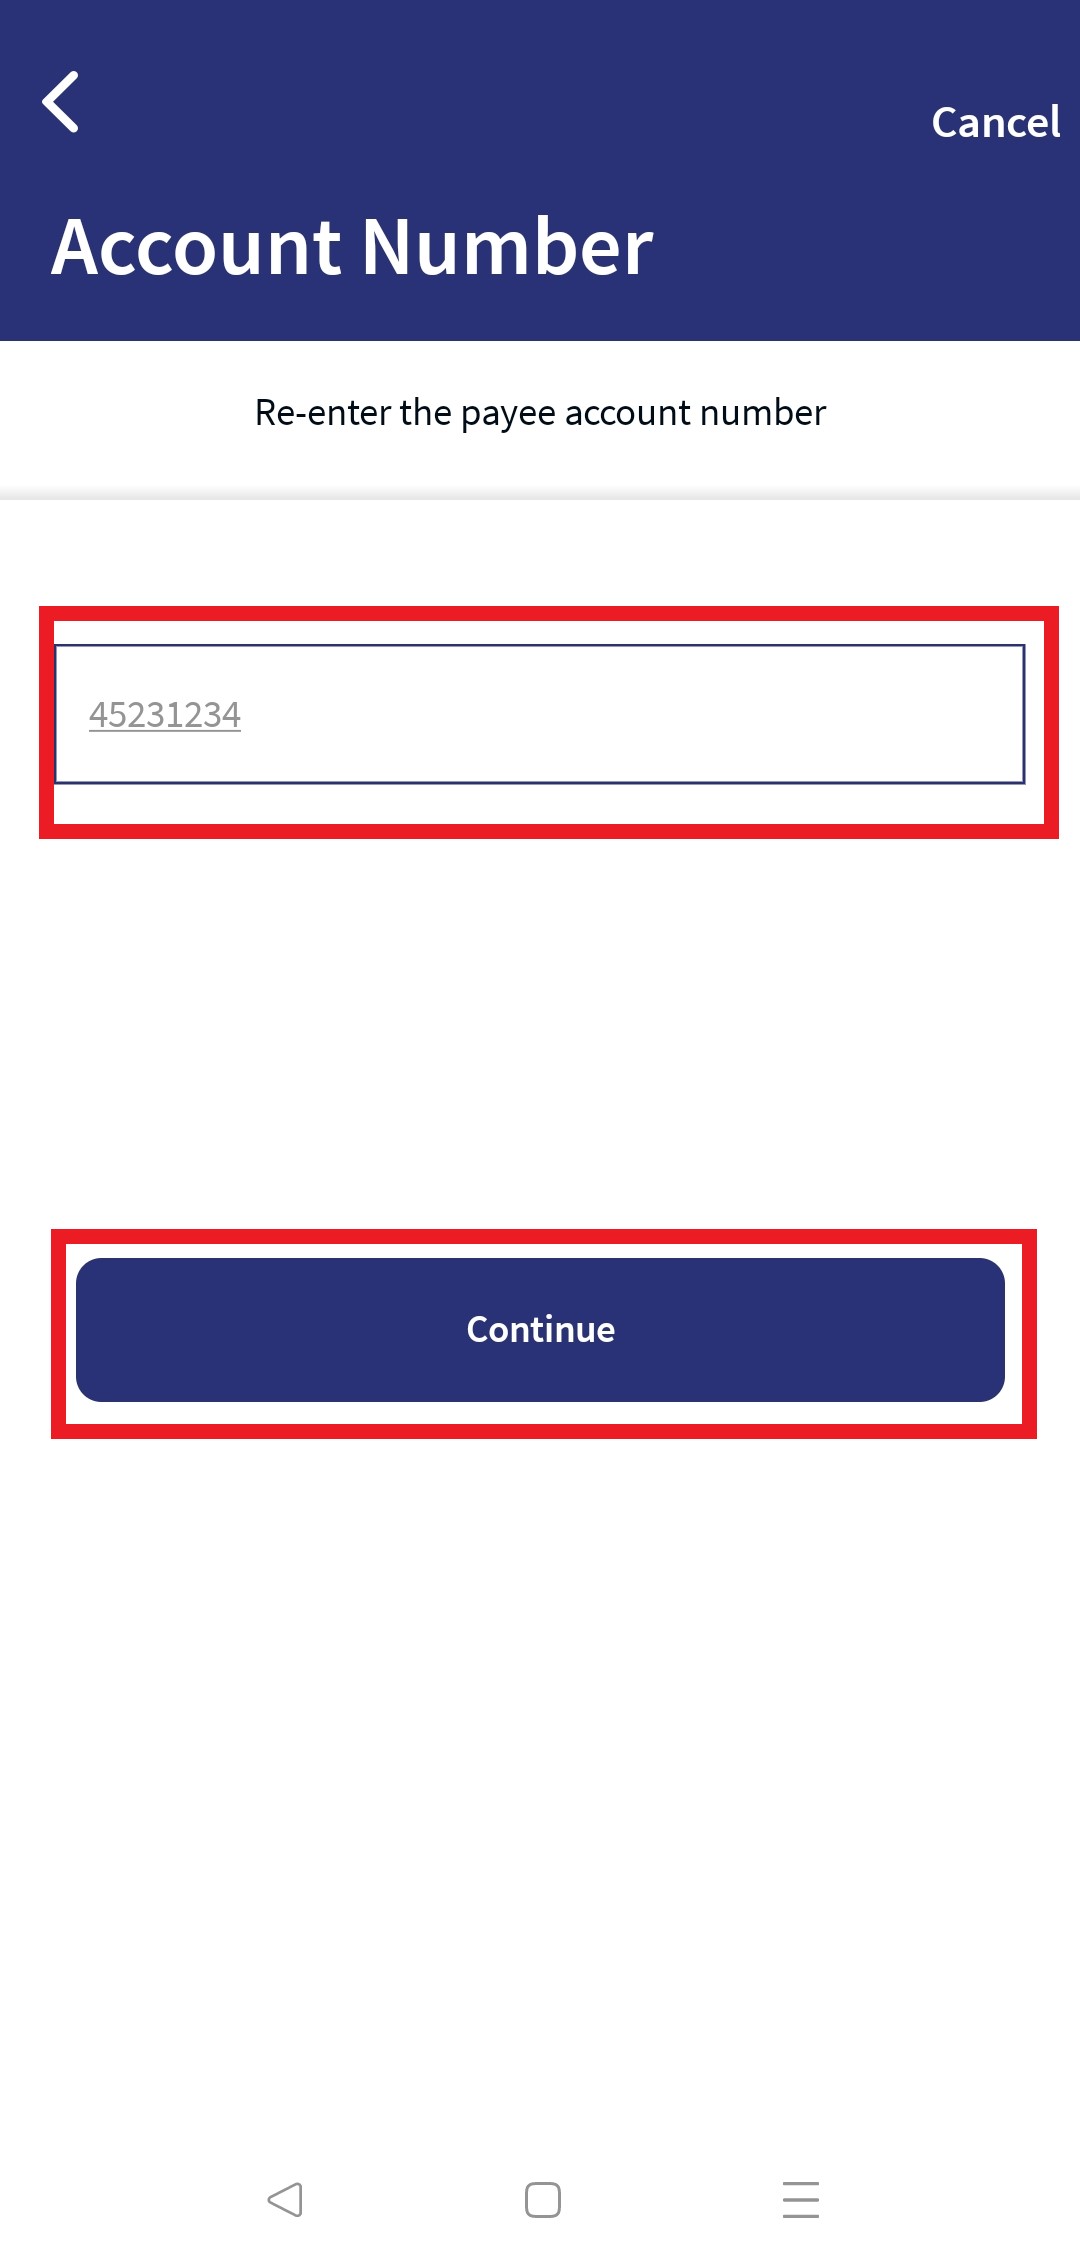
New Payee - Mobile Native
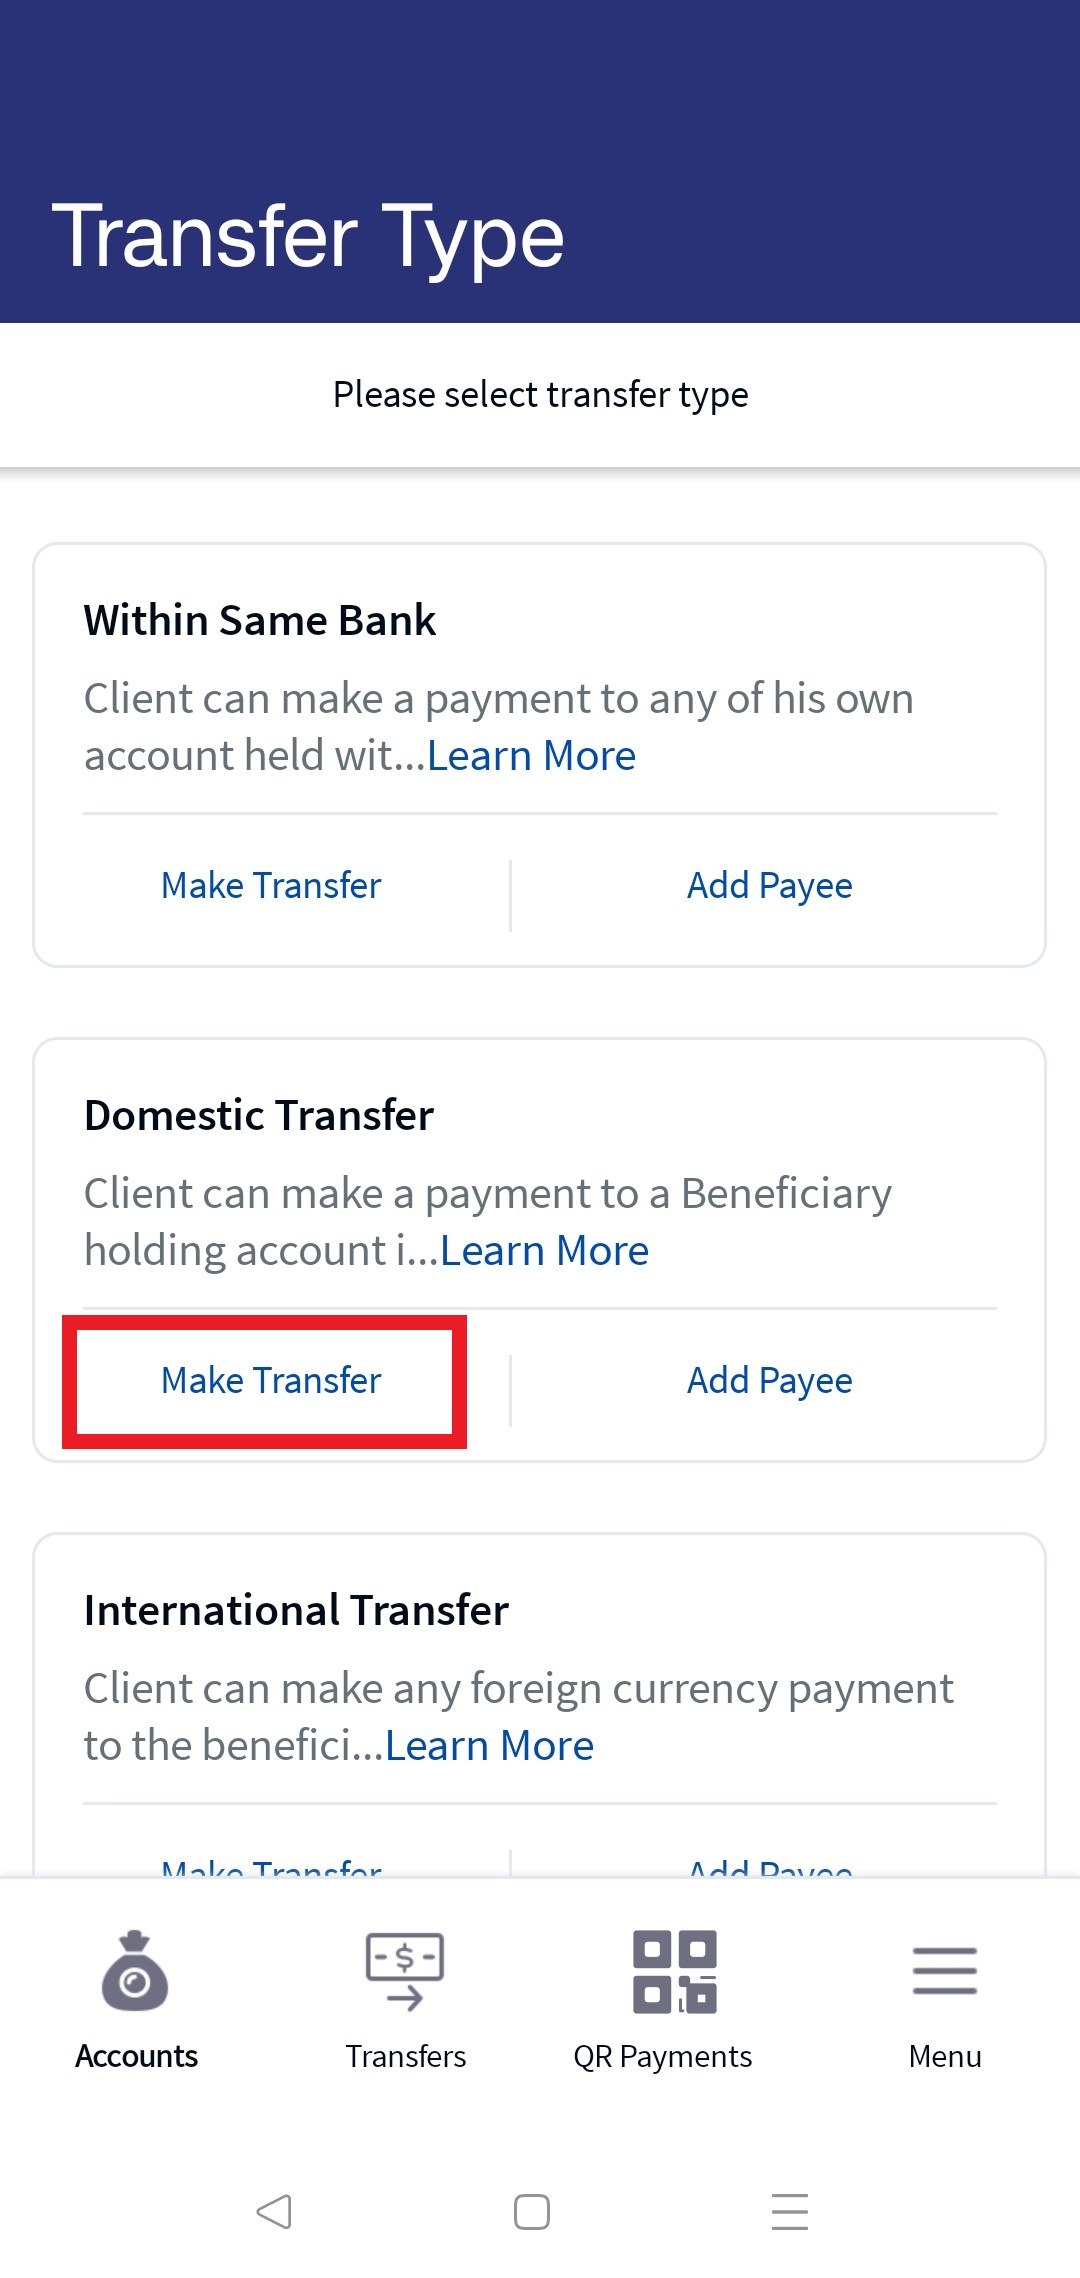
Domestic Transfer
You can initiate a fund transfer to the recipients in other banks that you have added, and recipients in international banks.
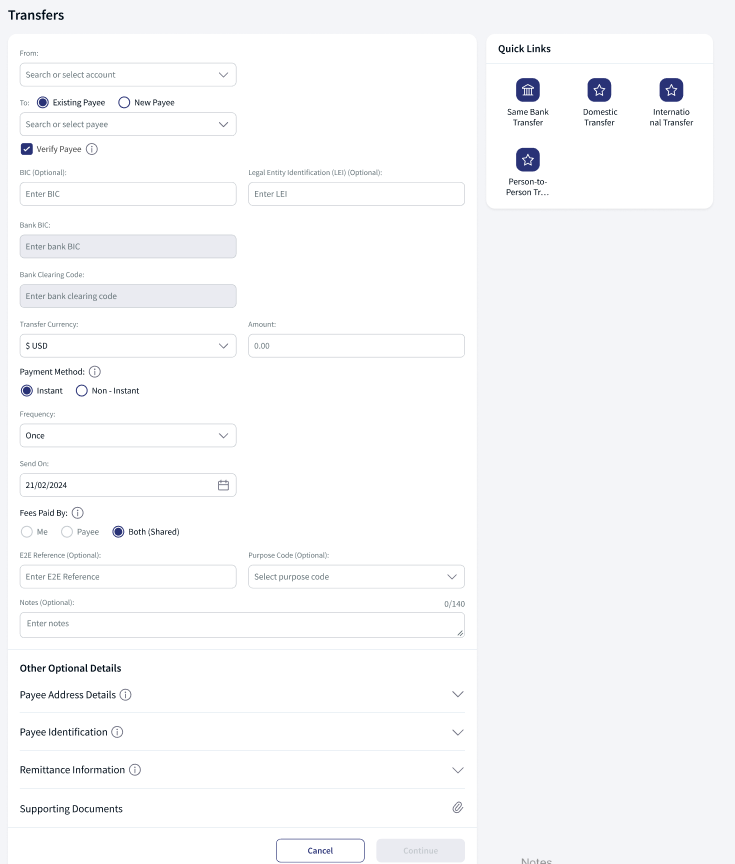
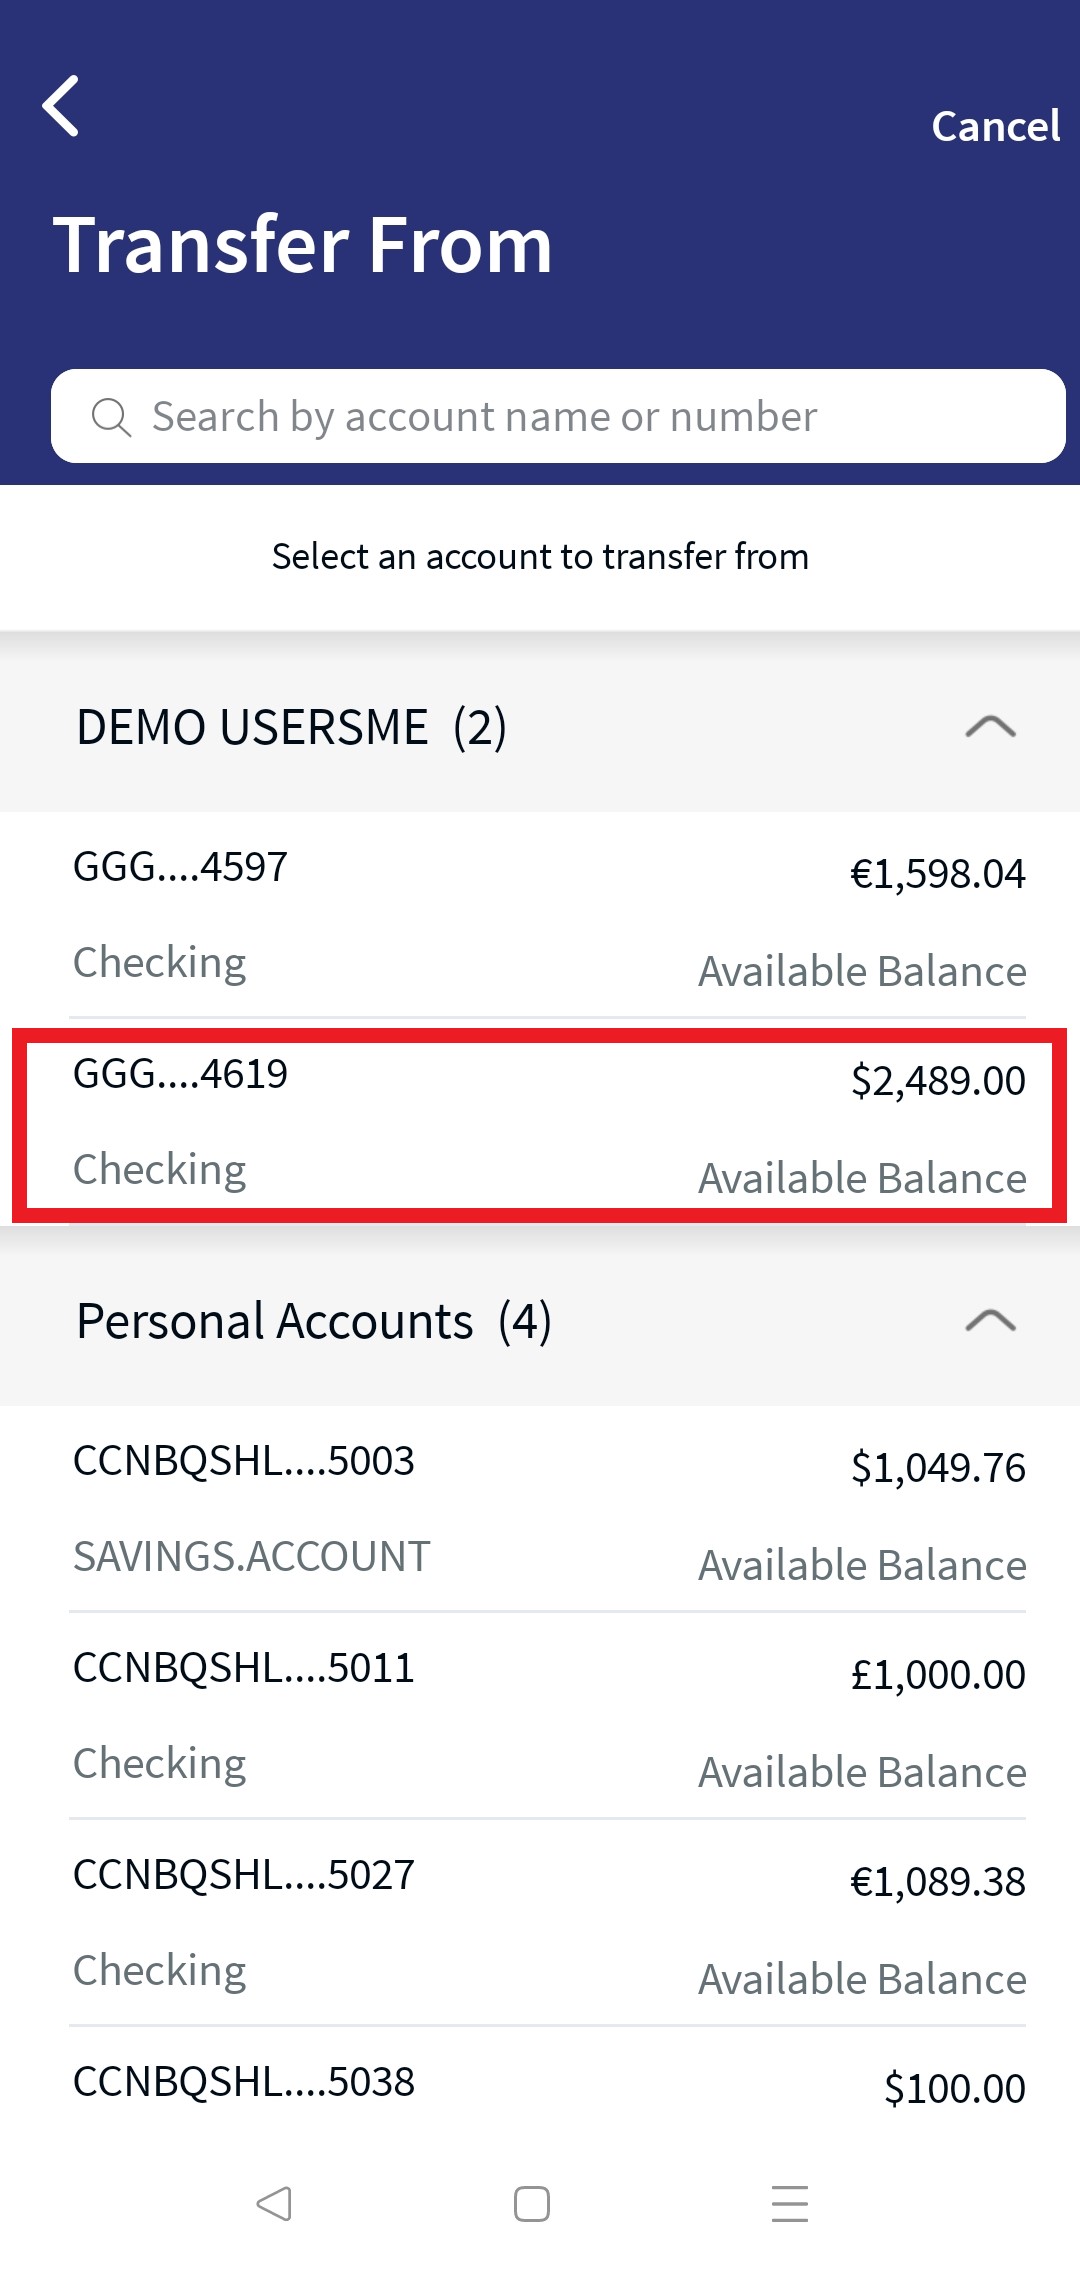
- From: This is a combo box field, the user can use to search using account name or account number or select account from the drop-down list. The application displays all the accounts grouped by Favorite, Savings, Checking accounts. If no accounts are marked as favorite the application does not display this category. After selecting the account, the application displays the Available Balance next to the field. If the search did not retrieve any results, the application displays a message No result found.
- To account. Select if you want to transfer to an existing payee in your list or to a new payee.
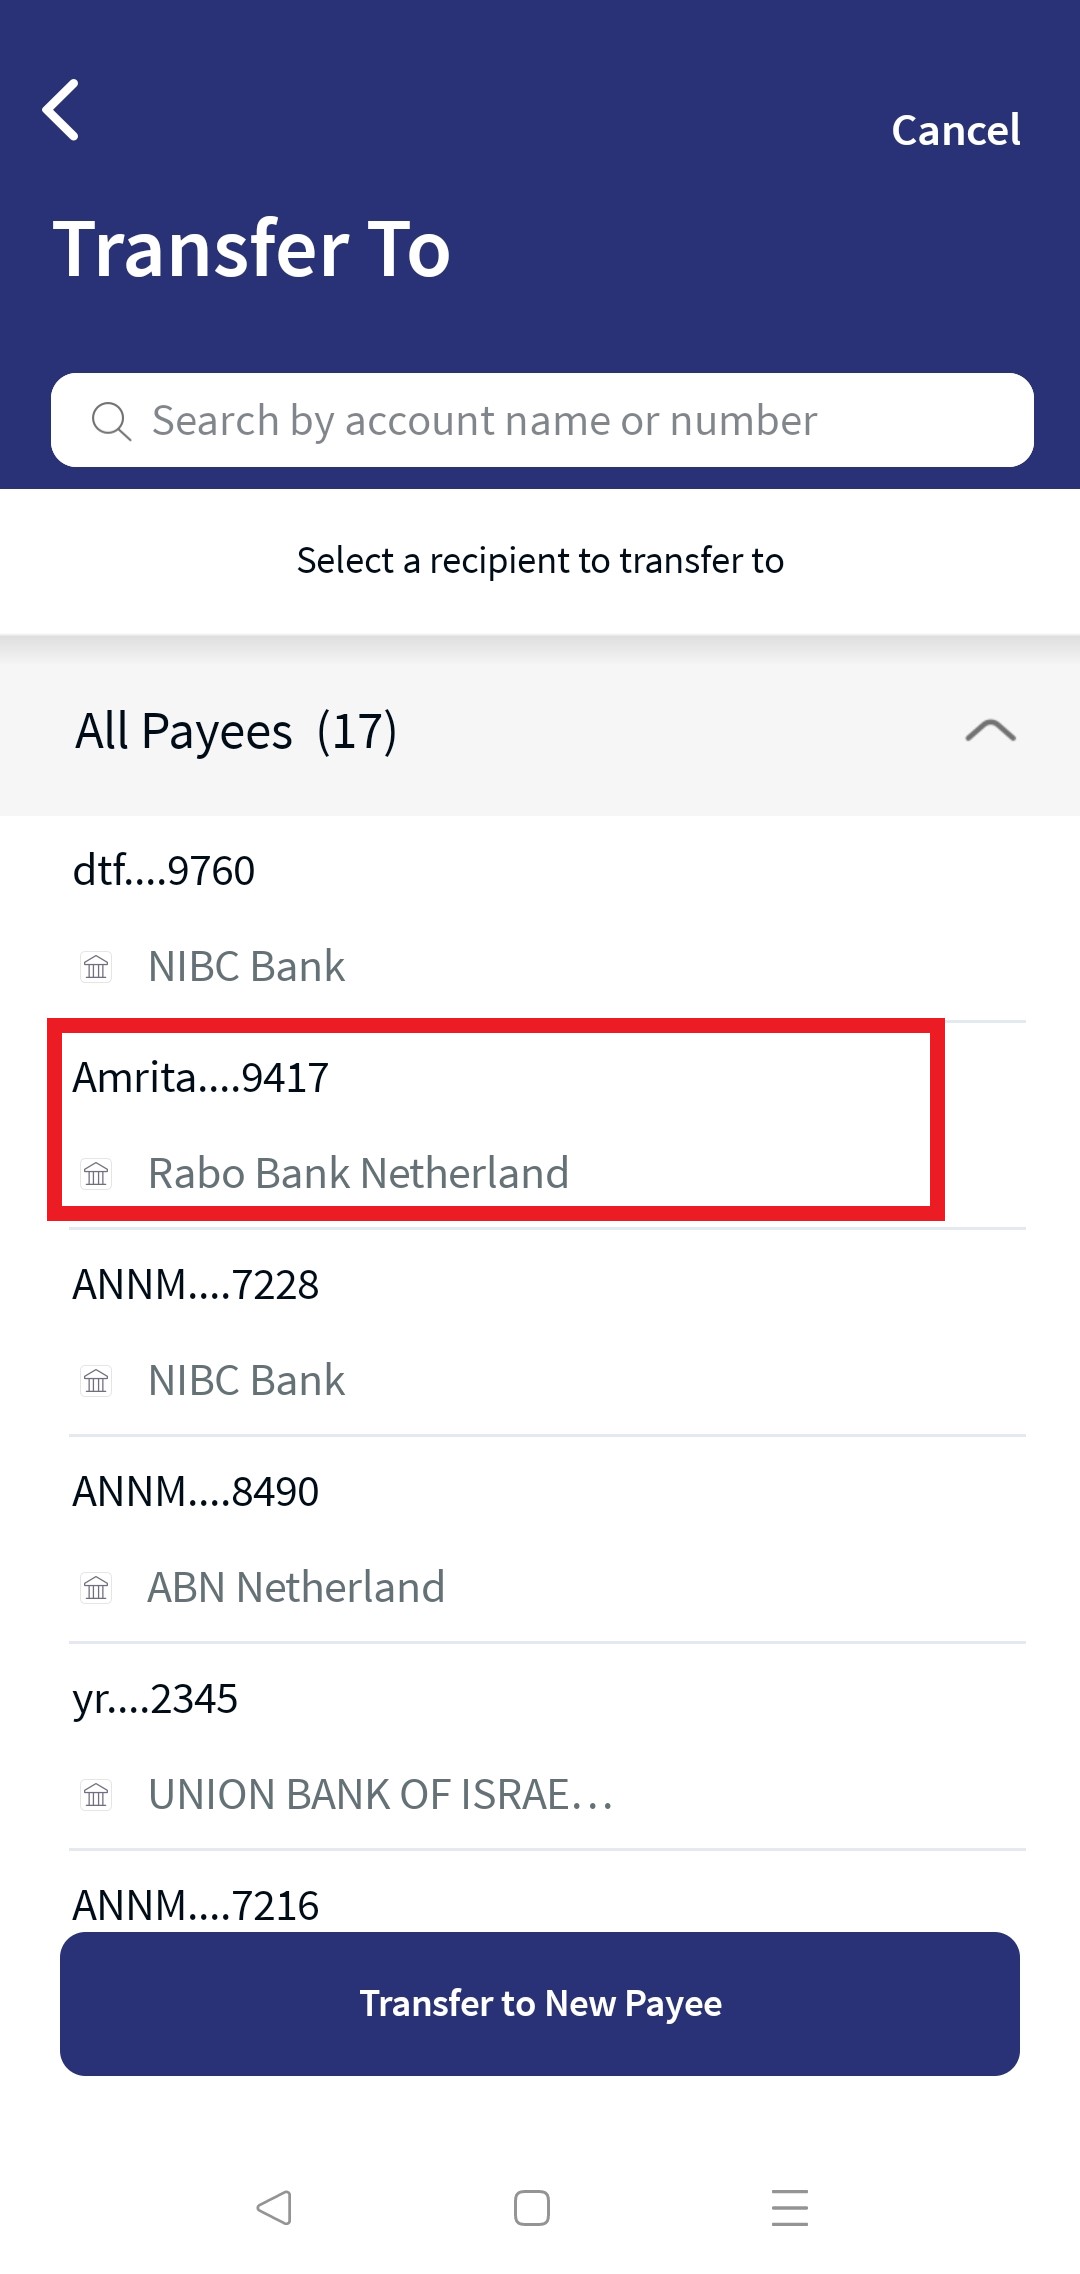
- Existing Payee. This is a combo box field, the user can use to search using account name or account number or select account from the drop-down list. The application displays all the accounts grouped by account types (Recently used and All Payee). The application displays Recently used based on the previous transactions. After selecting the To account, the application displays the bank name for the selected payee. If the search did not retrieve any results, the application displays a message No result found. You can transfer to new account without adding it with a link Transfer to a New Payee. By default, the application displays up to five recently used accounts, and this value can be configured in Spotlight under bundle DBP - RECENTLY_USED_ACCOUNTS_LENGTH. See Spotlight configuration for more information. If the Verified on time stamp is displayed in orange color, see Expiry Period for more information.
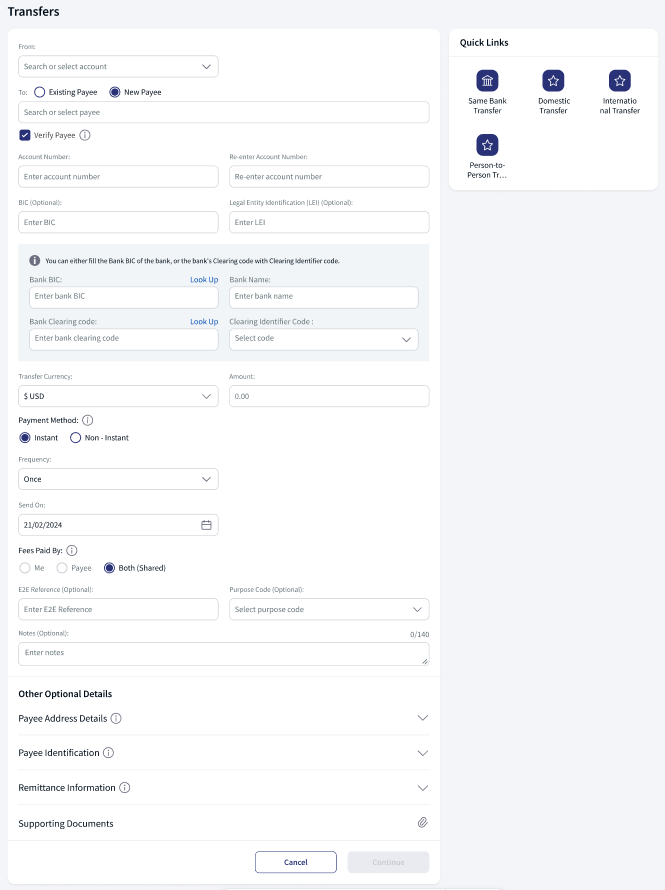
- New Payee. Select this option if you want to transfer to a new payee whose account details are not saved in your list. The following options are displayed:
The new payee is added to the customer ID of From account selected by the user.
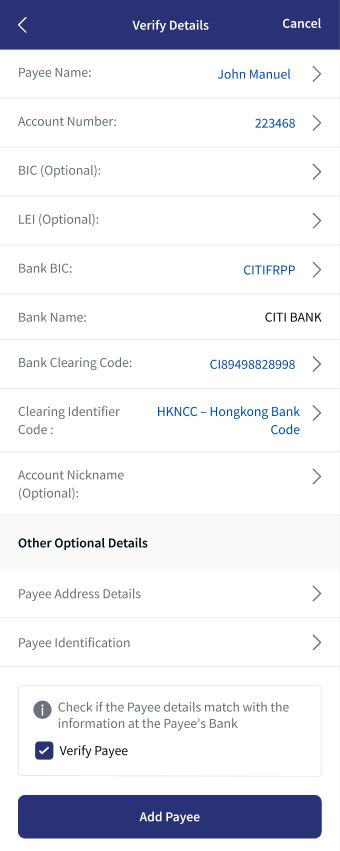
- Name: When you select New Payee, the ‘To Account’ becomes the name field. Enter the name of the payee
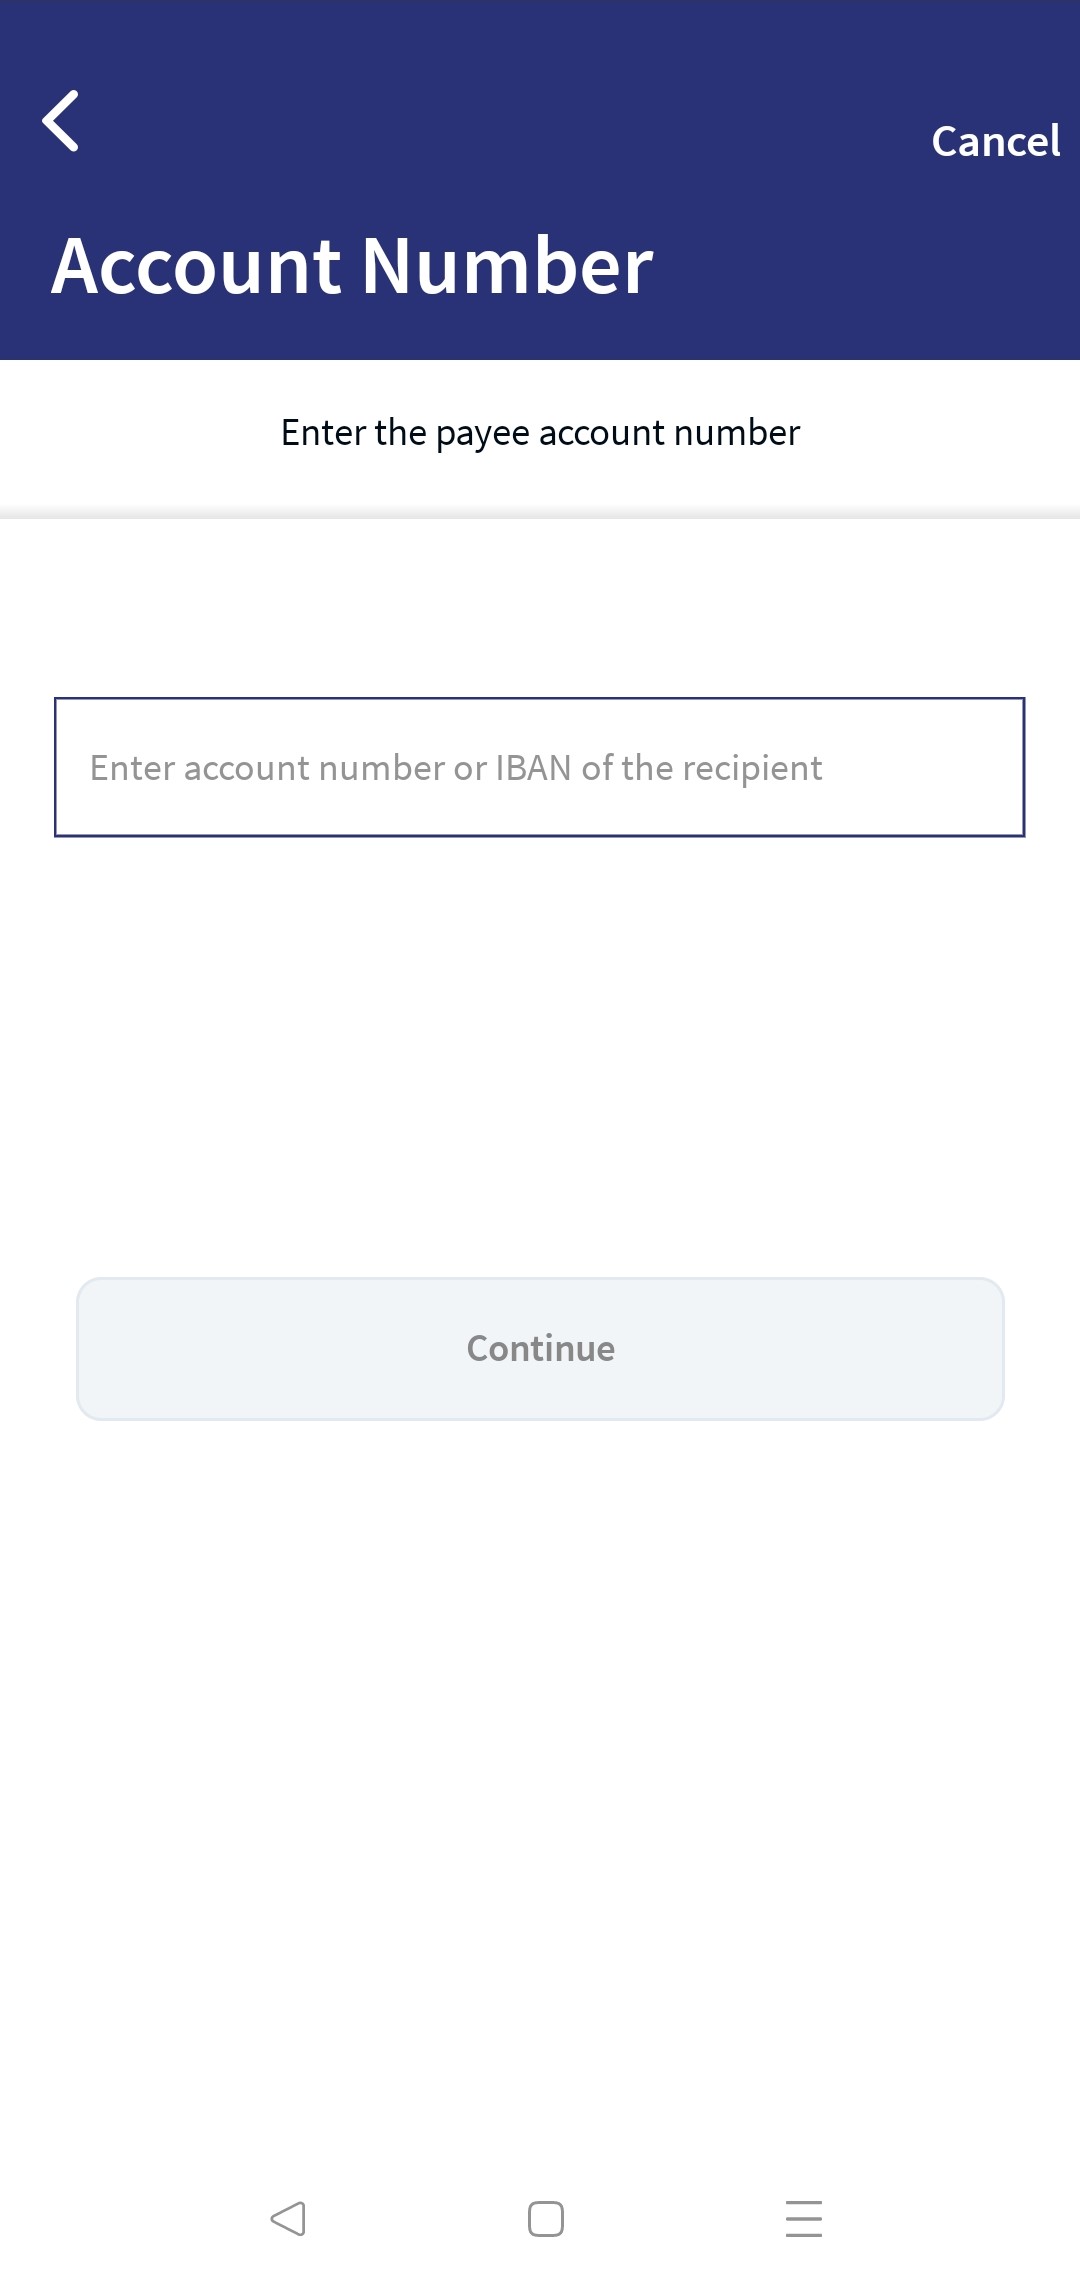
- Account Number. Enter the account number of the new payee.
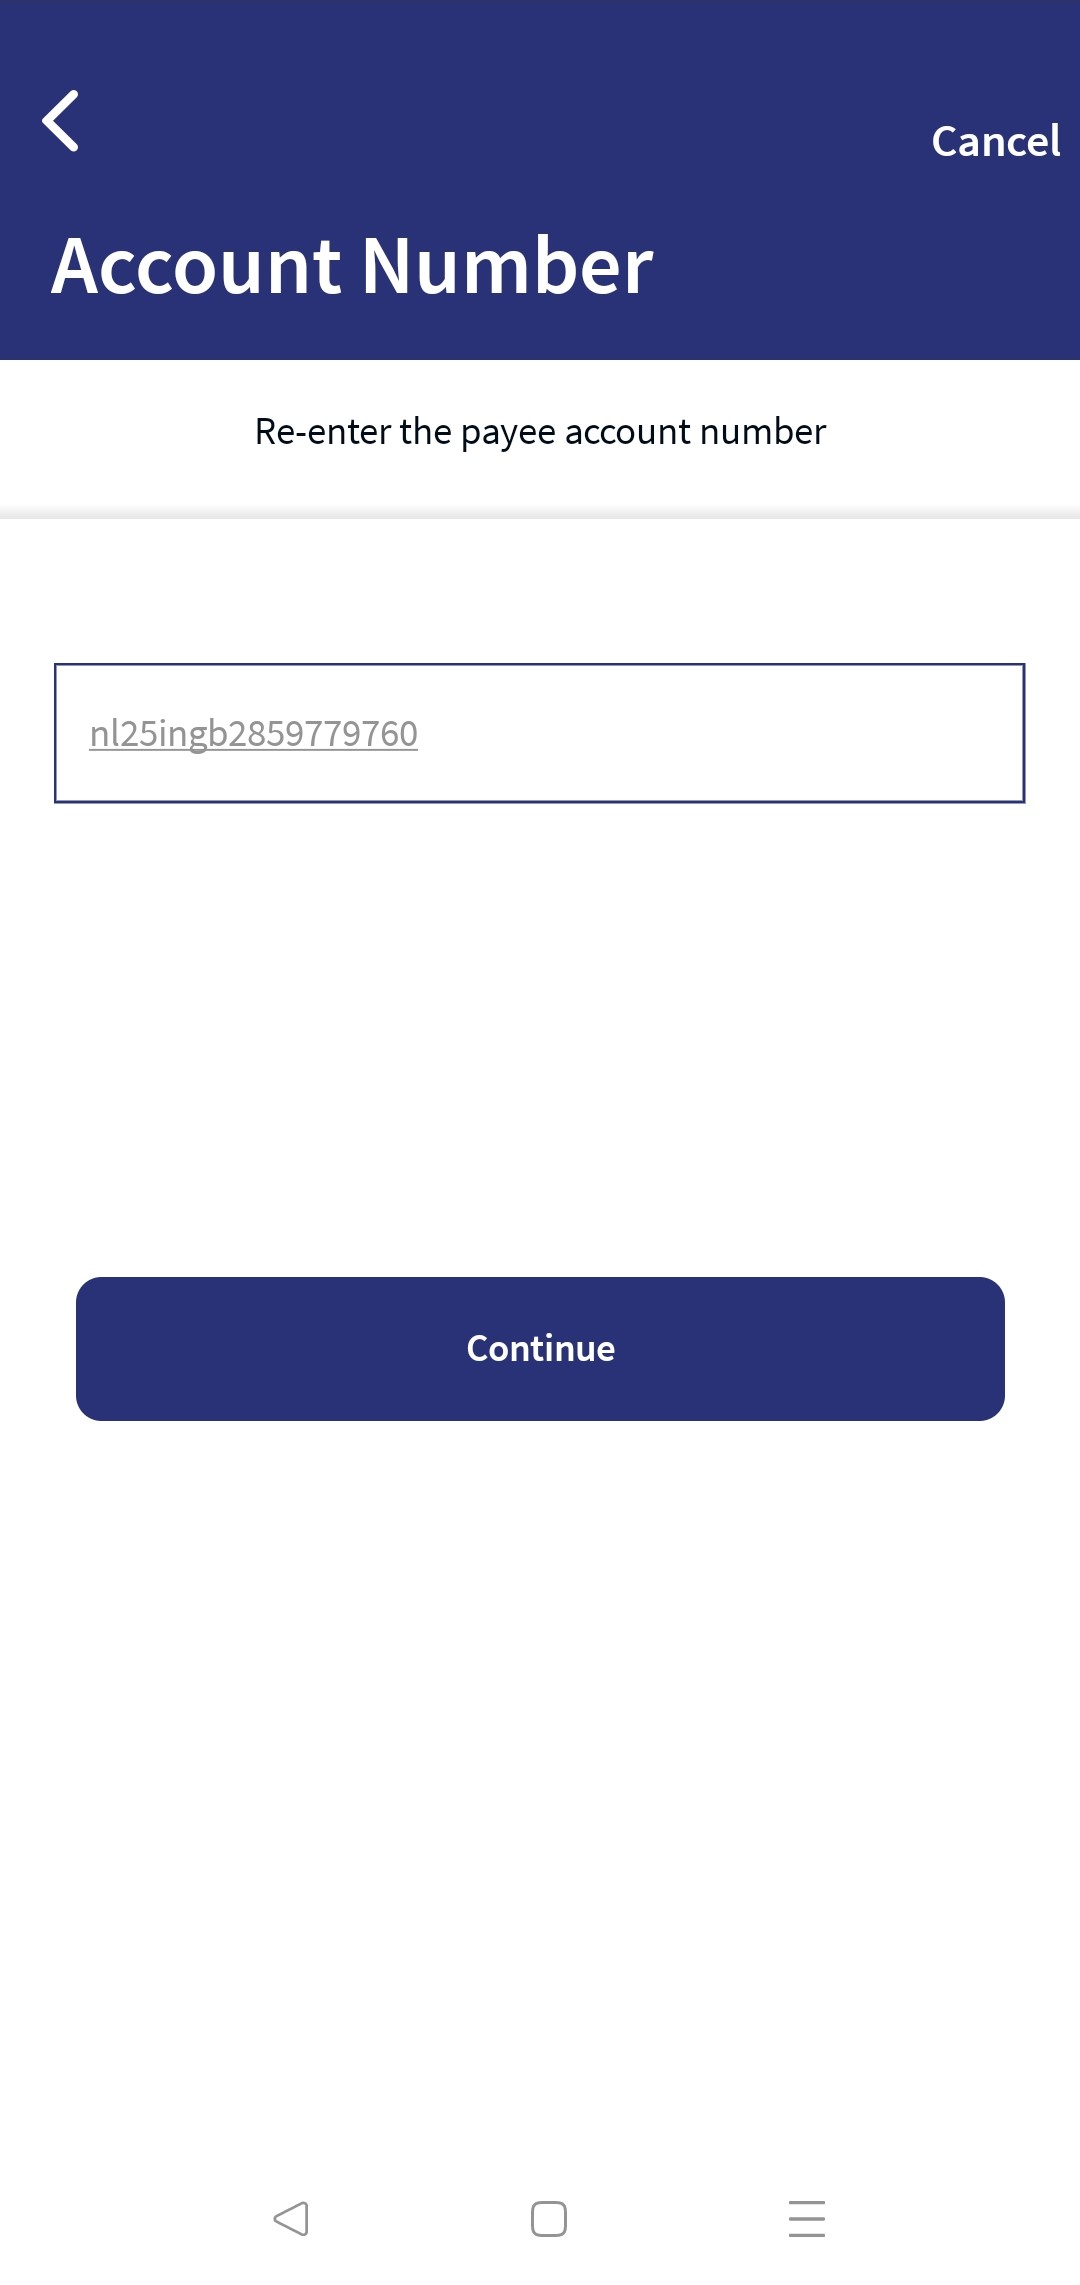
- Re-enter Account Number. Re-enter the account number. The application performs Payee Verification.
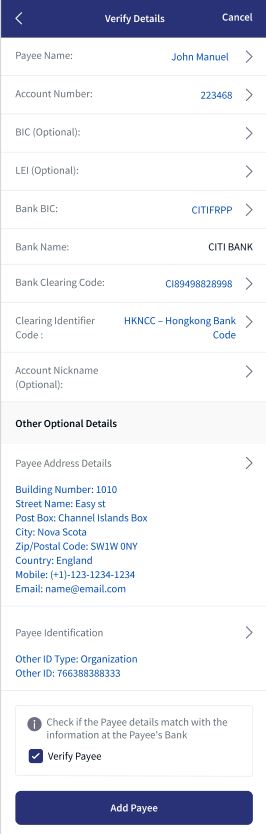
- Any BIC (Optional).
- Legal Entity Identification(LEI) (Optional).
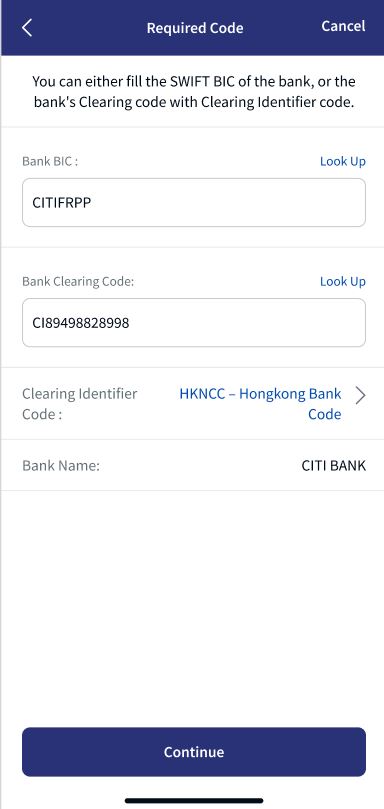
- Bank BIC: If the provided account number is part of cross border or international payment, then you must enter the Bank BIC number that contains alphanumeric characters. Bank BIC field does have a format and structure validations.
BIC must be either 8 or 11 characters only.
- Bank code (A-Z): 4 letter code
- Country code (A-Z): 2 letter code
- Location Code (0-9 or A-Z): 2 digit code – either letters or numbers
- Branch Code (0-9 or A-Z): optional 3 digit code – either letters or numbers
BIC is non-editable if it is derived from IBAN.
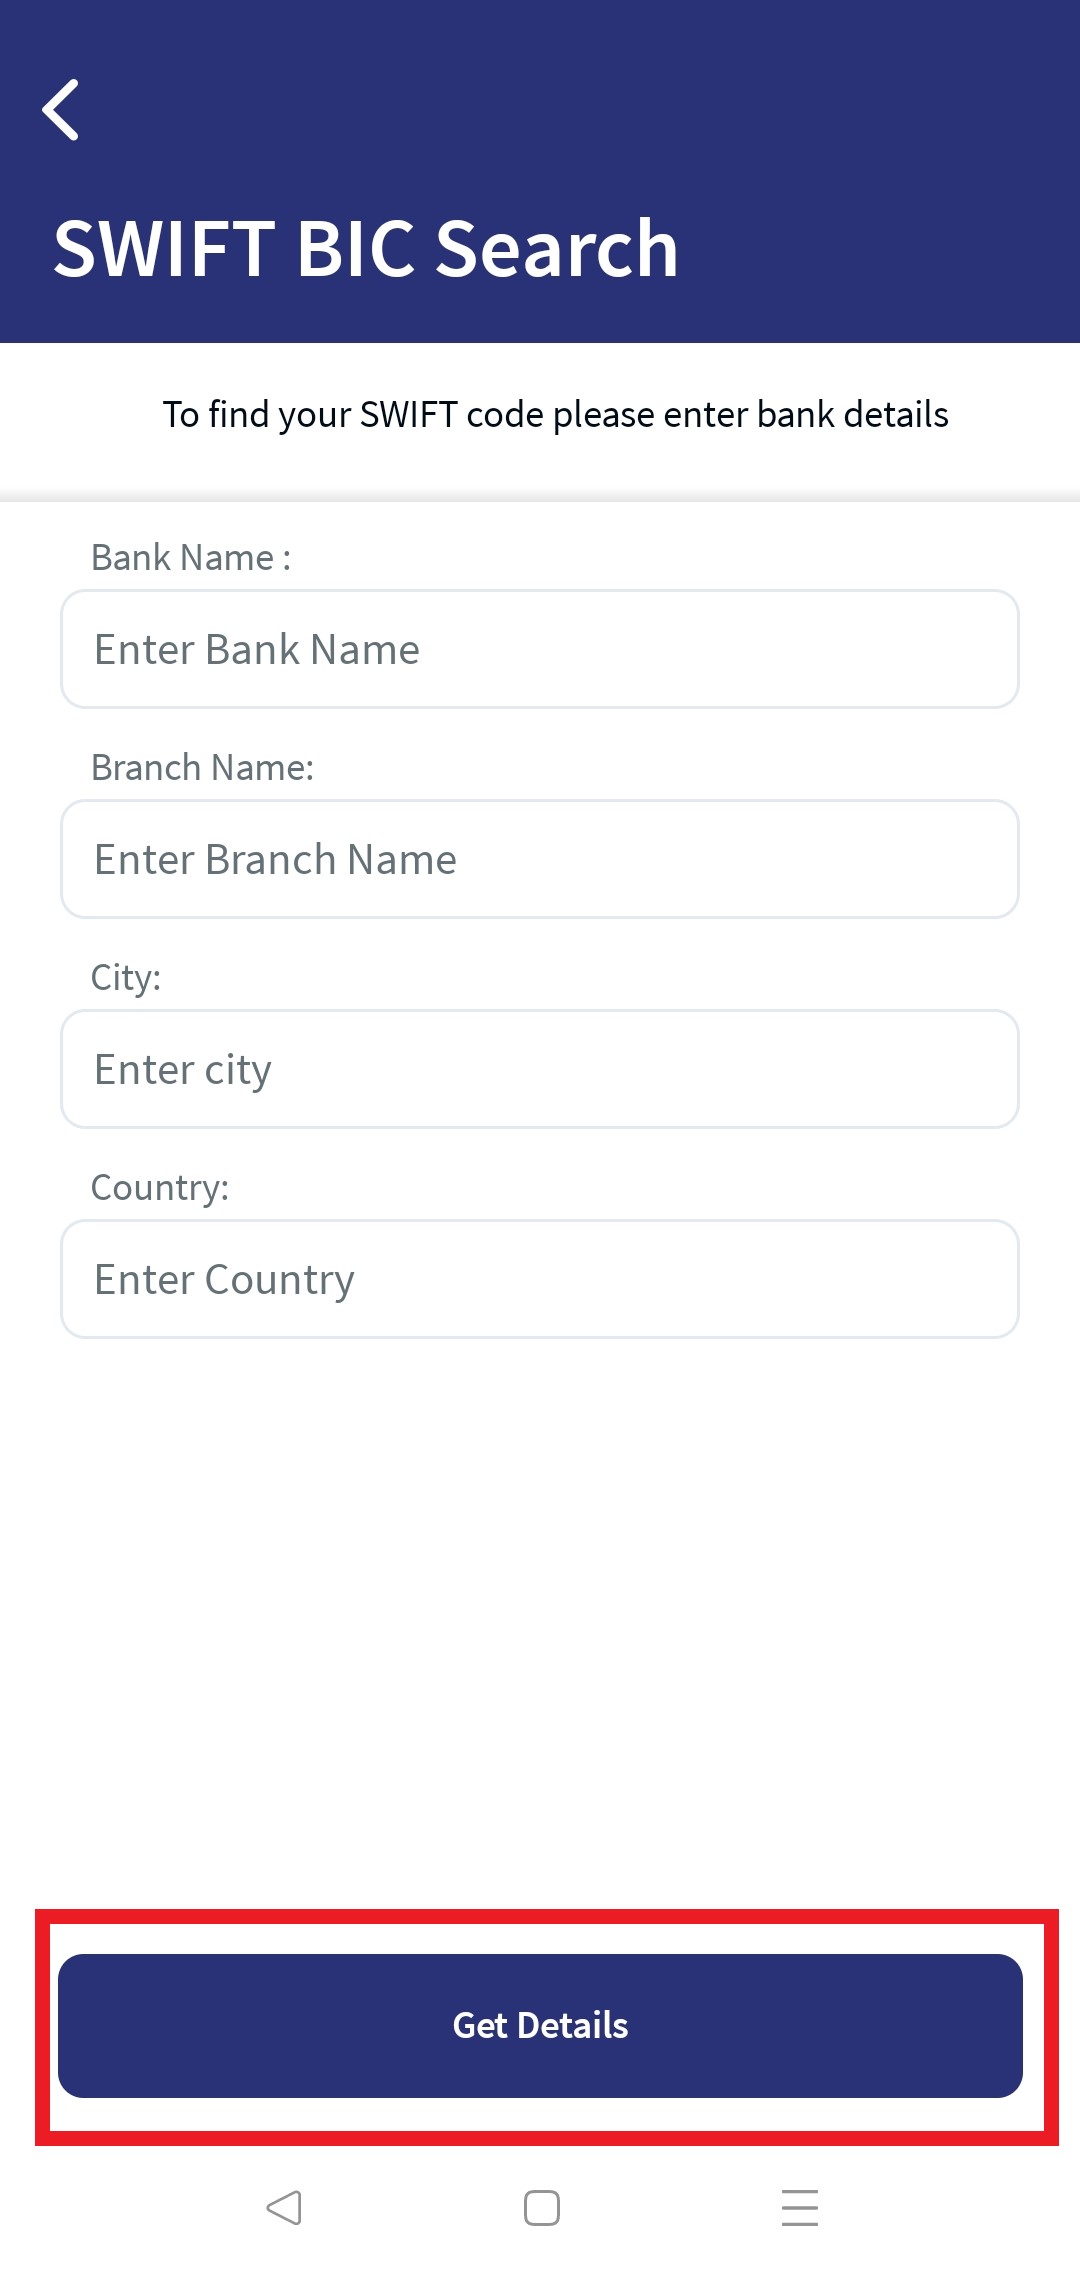
- Click on Look Up to automatically detect the Bank BIC. Clicking on Look Up will display a pop up with the privilege to search the Bank BIC details. Search by providing the following details to pick the right Bank BIC:
- Bank Name
- Branch code
- Country
- City
The Lookup feature is place holder which is to be integrated.
- Bank Name.
- Bank Clearing Code. Enter the clearing code.
- Clearing code is the bank code that is used to perform the domestic transfer.
- The user need to enter either the Clearing code with clearing identifier code or Bank BIC.
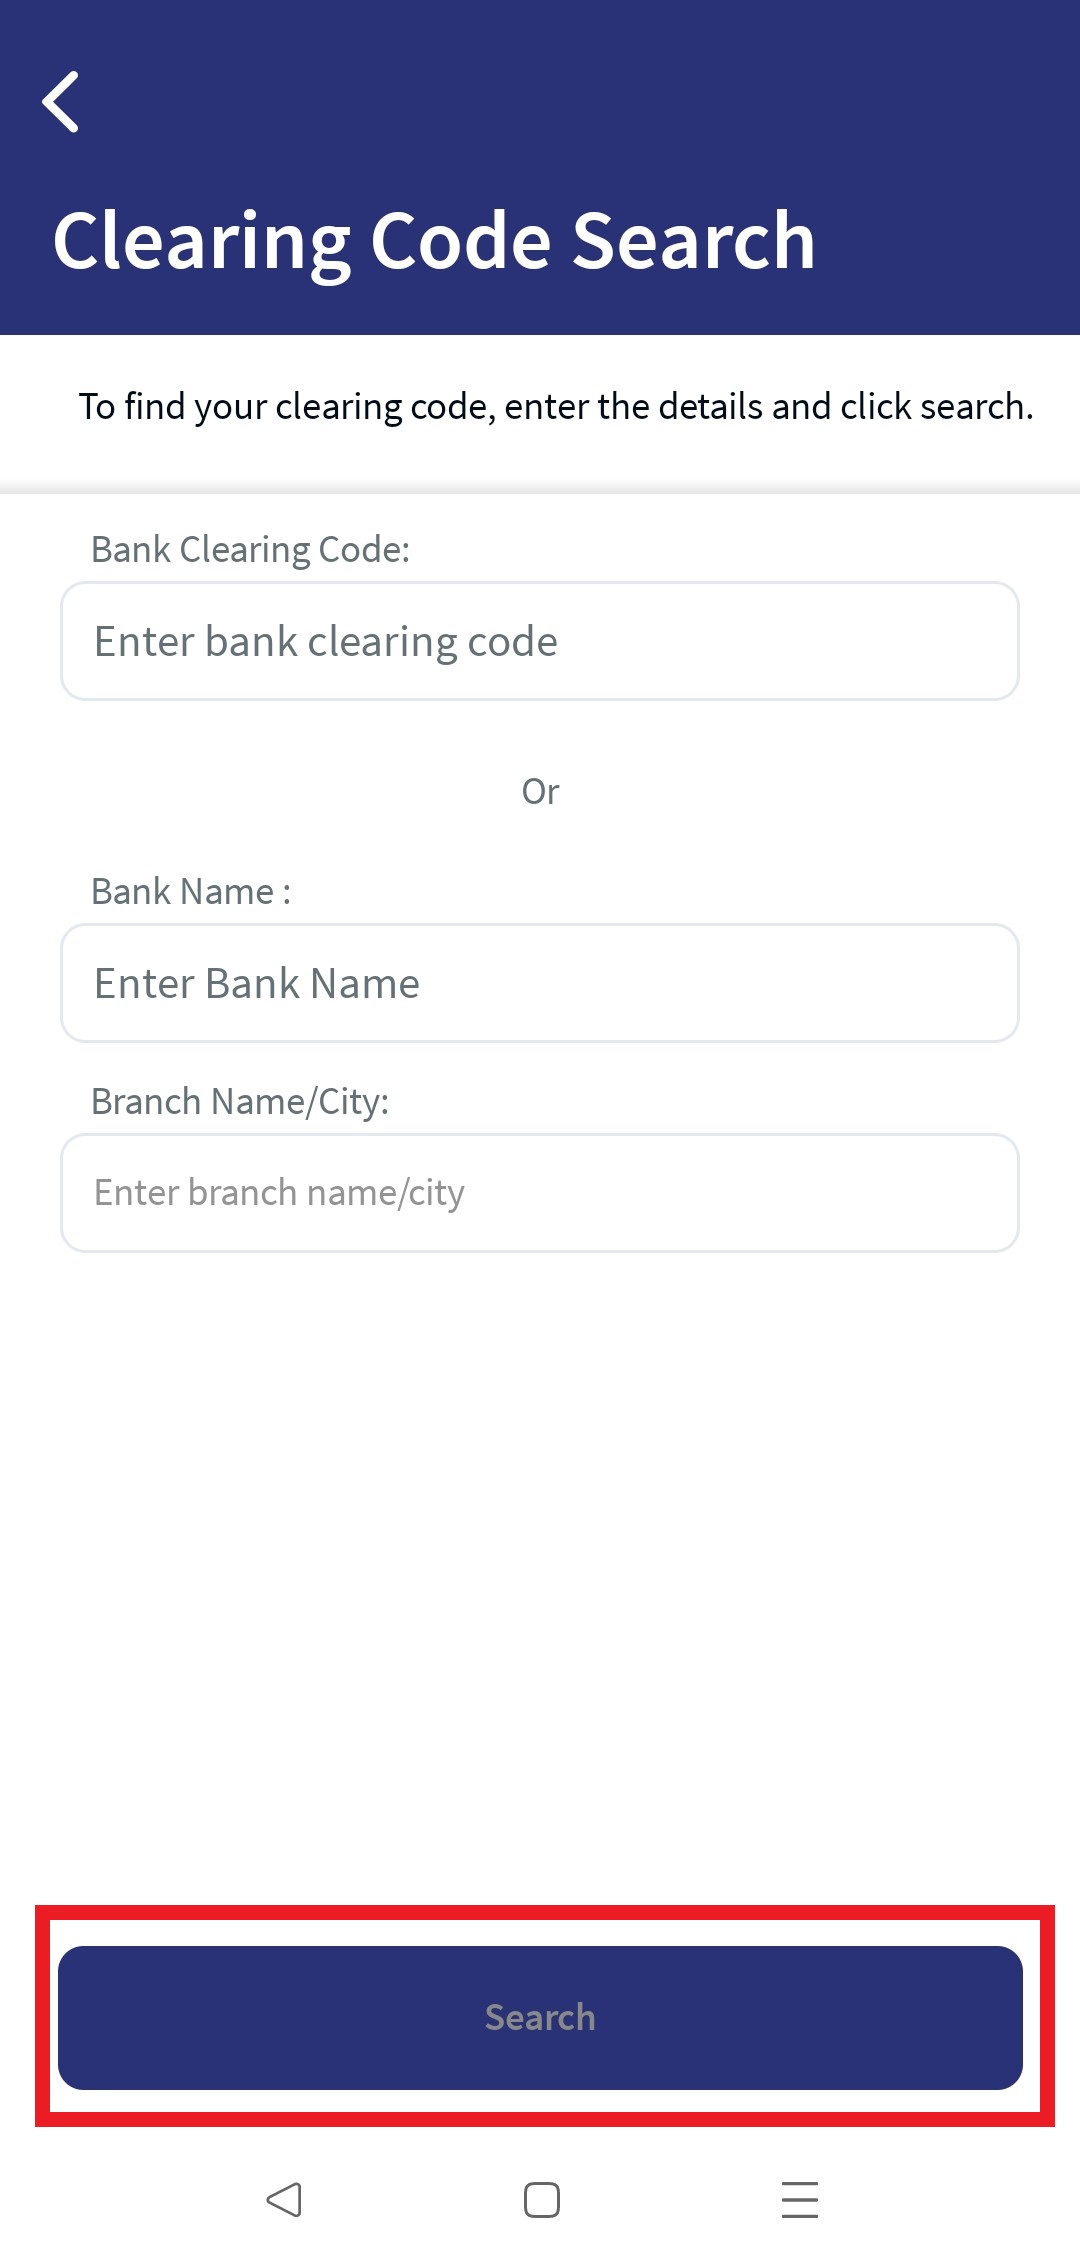
- Click on Look Up to automatically detect the Clearing code. Clicking on Look Up will display a pop up with the privilege to search the Clear code details. Search by providing the following details to pick the right Clearing code:
- Bank Name
- Branch code
- Country
- City
- The Lookup feature is place holder which is to be integrated.
- Clearing Identifier Code. select the option from the drop down.
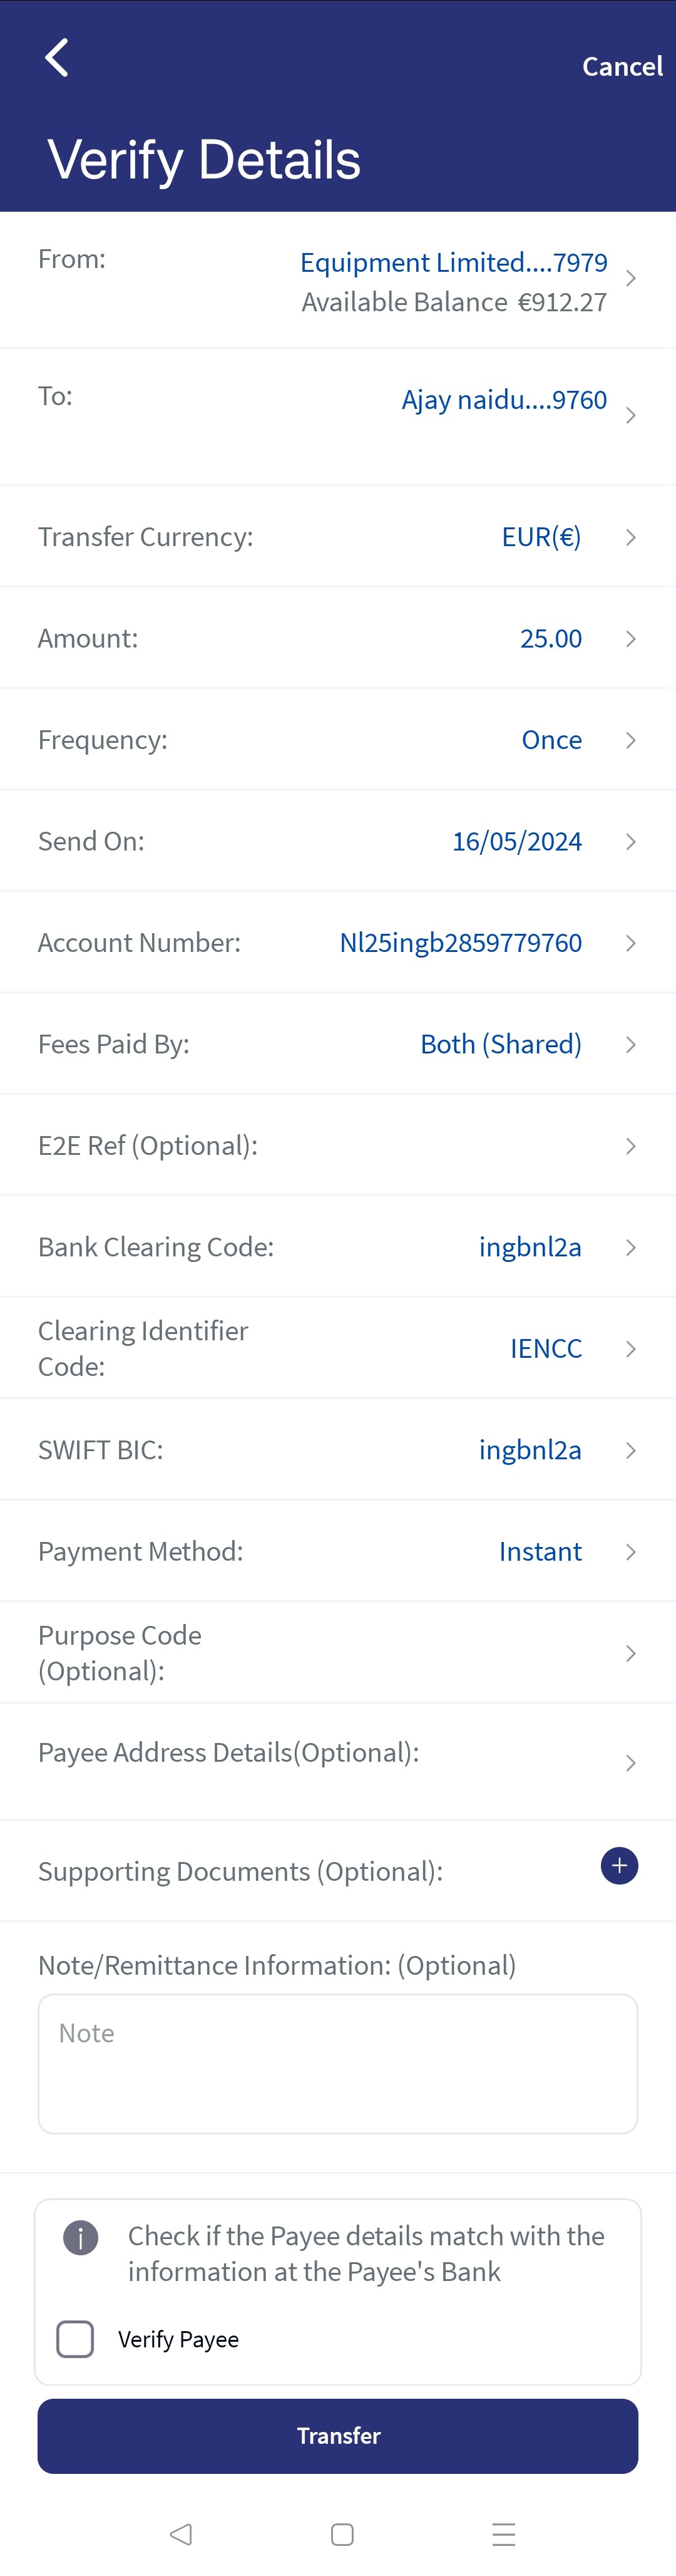
- Transfer Currency. Select the transfer currency from the Currency list. The Currency list displays the currency code with symbol.
- Amount. Enter the amount.
- Payment Method. Select the type of payment method. Instant and Non - Instant are the types of payment methods. See Spotlight configuration for more details.
- Frequency. Specify the payment frequency details.
- By default, the app selects the frequency as once and the current date. You can change the frequency and the date if the transfer is a scheduled or a recurring transfer.
- Scheduled Transfer or Recurring Transfer. You can choose to set the transfer as a recurring transfer (for example, daily, weekly, monthly, and so on). In that case, select if the recurrence has to be on a specific date and select a date from the calendar, or if it is the number of occurrences and enter the occurrence value (for example, 24 times). The current date is selected as the recurring transfer start date, by default. The other frequency options are:
- Once
- Daily
- Weekly
- Bi-Weekly or Every two weeks
- Monthly
- Quarterly
- Half Yearly or Every six months
- Annually
- Send On. Enter the send on date of payment/transfer details. By default, the app displays the current date. For future dated/recurring payment/transfer, you can schedule the future date.
- Ending On. Select the transfer ending date from the calendar. This is an optional field, user can enter the ending date or leave it as null. The default value is null.
- Fees paid by. Select the who will pay the charges in Fees paid by field. The available options are:
- Me - The Payer (sender of the payment) will bear the payment transaction fees. The payee will receive the full amount of the payment.
This field is disabled in this release.
- Payee - The Payee (recipient of the payment) will incur the payment transaction fees. In this scenario, the payee will receive the payment excluding the transfer charges.
This field is disabled in this release.
- Both (Shared) - The Payer (sender of the payment) will pay all fees charged by the sending bank. The Payee (recipient of the payment) will pay all fees charged by the receiving bank. The payee will receive the payment excluding the charges.
- Me - The Payer (sender of the payment) will bear the payment transaction fees. The payee will receive the full amount of the payment.
- E2E Ref (Optional) is the reference used to track payments for reconciliation purpose.
E2E reference is not applicable for an International payment. This field is displayed only for SEPA and INSTANT payment methods only.
- Purpose Code (Optional) is the reference used to track payments for reconciliation purpose.
- Note/ Remittance Information (Optional). Enter any additional notes. You can enter up to 140 characters.
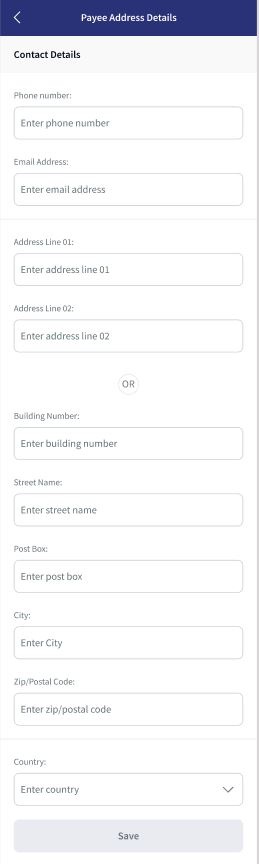
- Payee Address details (Optional). Enter the personal information (such as Phone, Email) and address details (such as Address, Country, City, State, and Zip/ postal code).
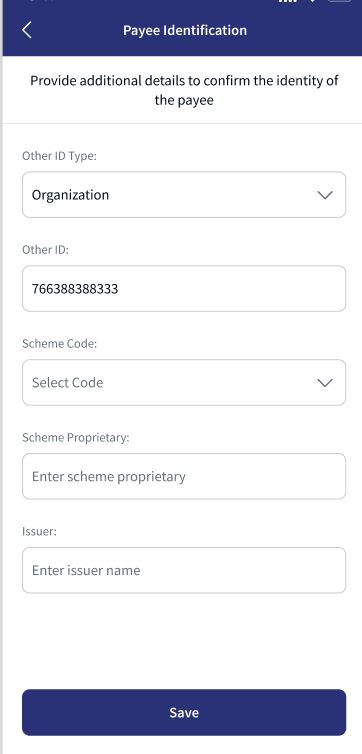
- Payee Identification details (Optional). Enter the payee identification details such as Other ID Type (Organization or Individual), Other ID, Issuer, Scheme Code, and Scheme Proprietary.
- Remittance Information (Optional). Enter the Creditor reference details such as Code, Proprietary, Issuer, Reference Number, and Additional Remittance information.
- Add Support Documents. You can add an attachment for future reference. To add an attachment, follow these steps:
- Click + icon and select the file to add as an attachment.
The attached file is displayed along with the Cancel (X) option.
- Click Cancel (X) to remove the attachment. A pop-up is displayed asking for confirmation.
- Click Yes to confirm. The attachment will be removed.
You can attach up to five PDF/JPEG files only. Adding an attachment is mandatory based on the payment/transfer amount. The threshold amount is configured by the bank.
- Click + icon and select the file to add as an attachment.
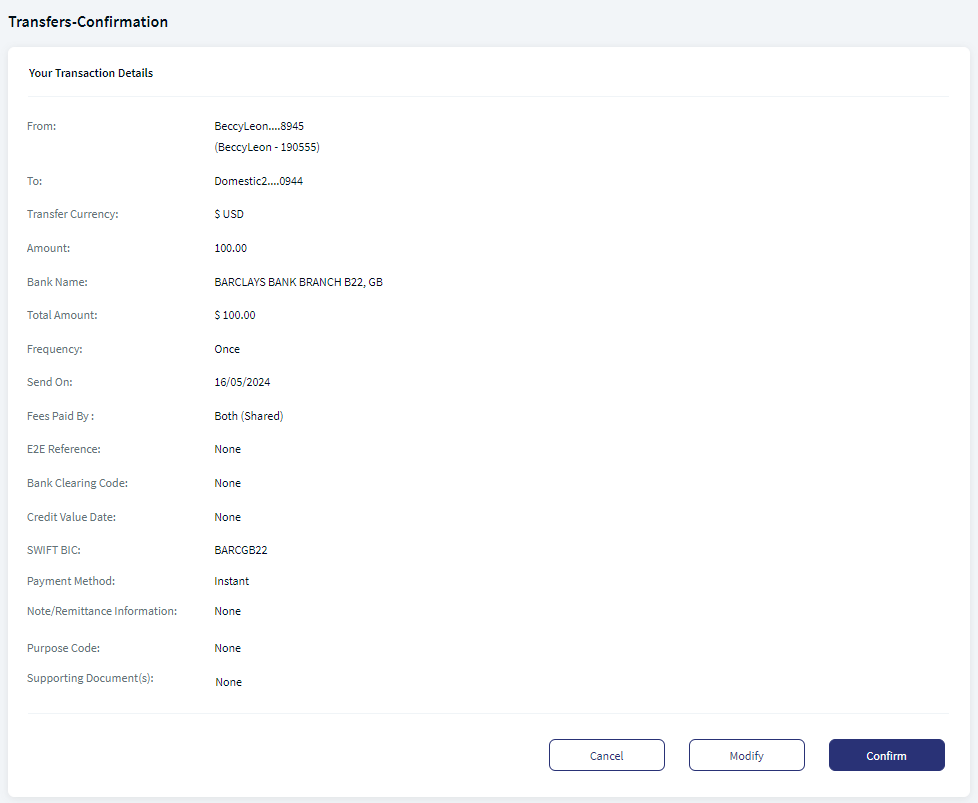
- Click Continue, the application performs payee verification and based on the response the user can proceed with the payment. The Confirmation screen appears.
- You can perform the following actions in the Confirmation screen.
- Click Continue to proceed with the payment.
- Click Modify to edit the details.
- Click Cancel to cancel the transaction.
Credit value date is displayed for the user in the Confirmation and Acknowledgment screens.
- Depending on the bank configuration, if Strong Customer Authentication(SCA) is enabled for the feature, SCA is triggered. The authentication type is configured and can be turned on or off in the Spotlight application. For more information see Push Notification.
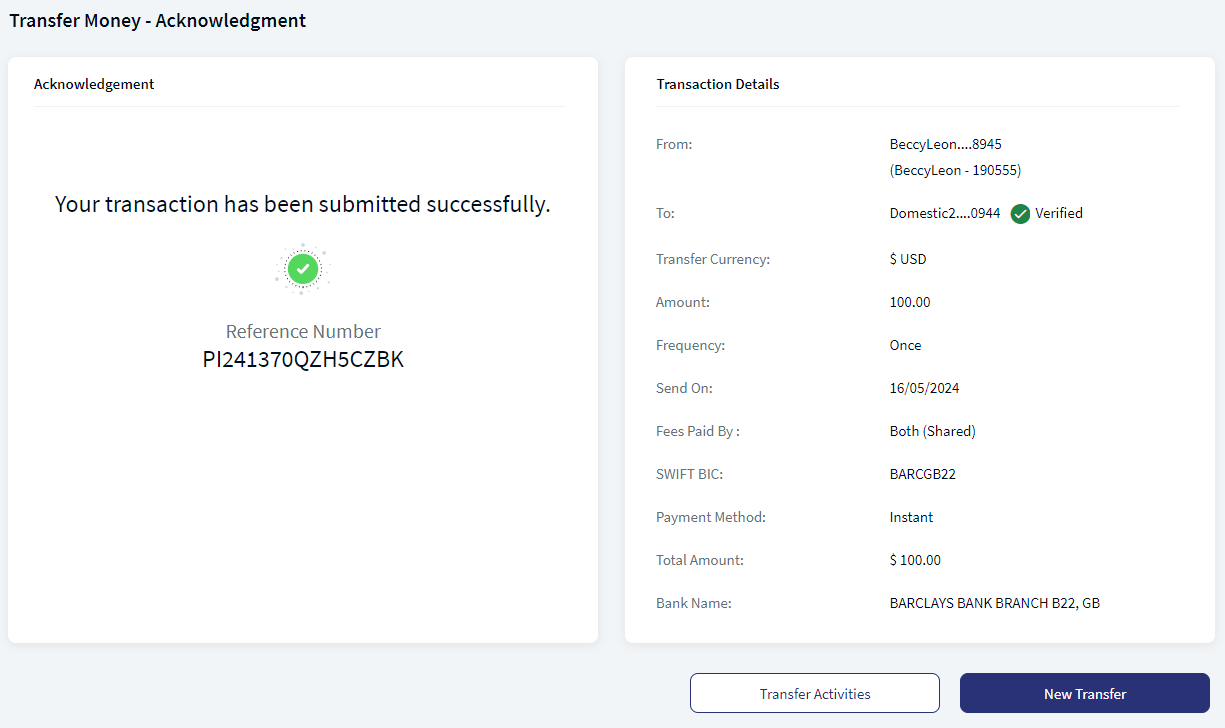
- Once the entered details are correct, an acknowledgment screen is displayed with a reference number.
- The app displays the acknowledgment screen with transaction details, unique reference number to the transaction, and provision to do the following:
- Make a new transfer
- Save Payee. Click here for more information.
- View Transfer Activities
Domestic Transfer - Existing Payee - Web Channel
Domestic Transfer - New Payee - Web Channel
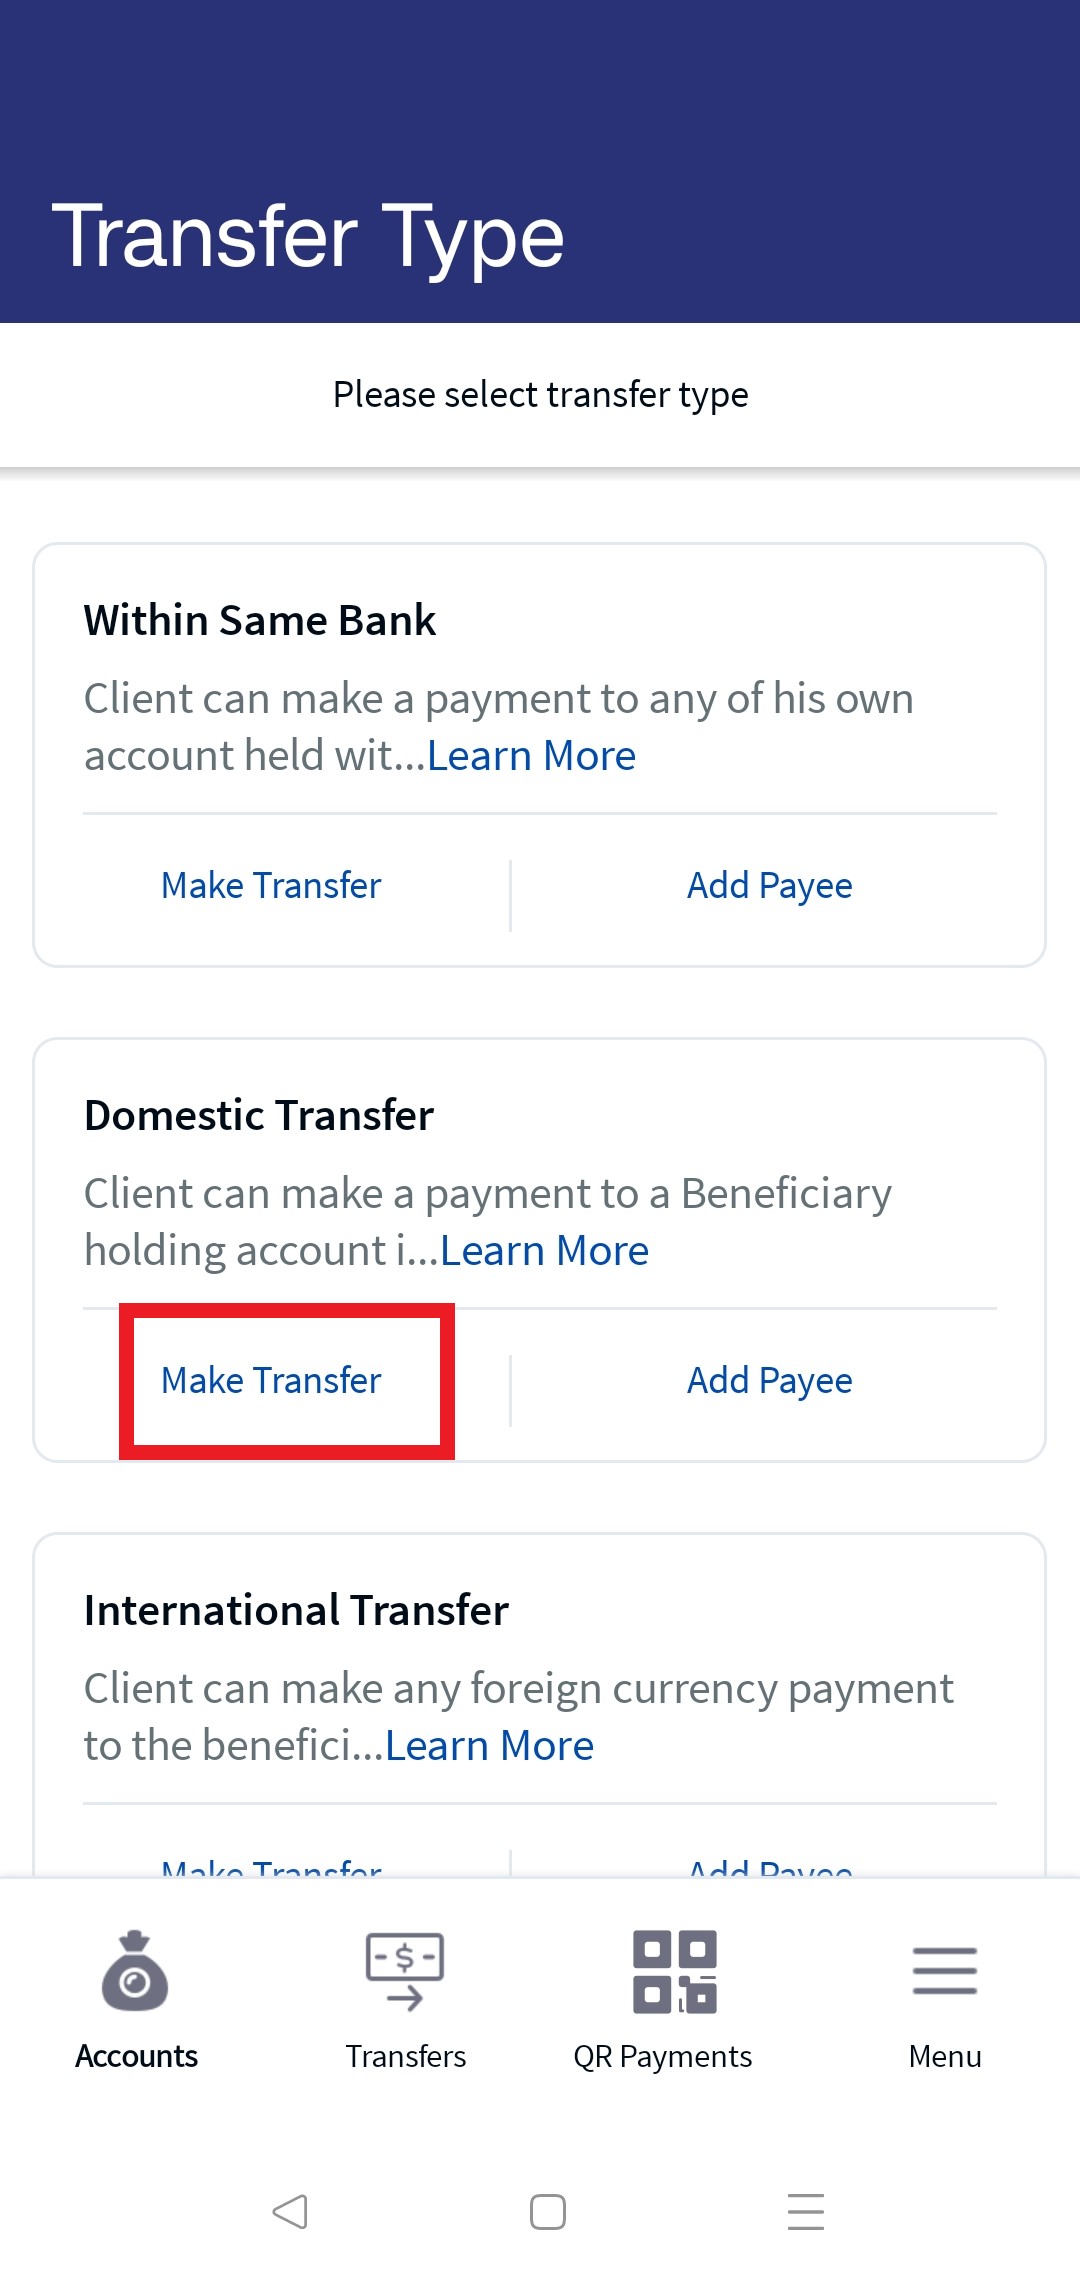
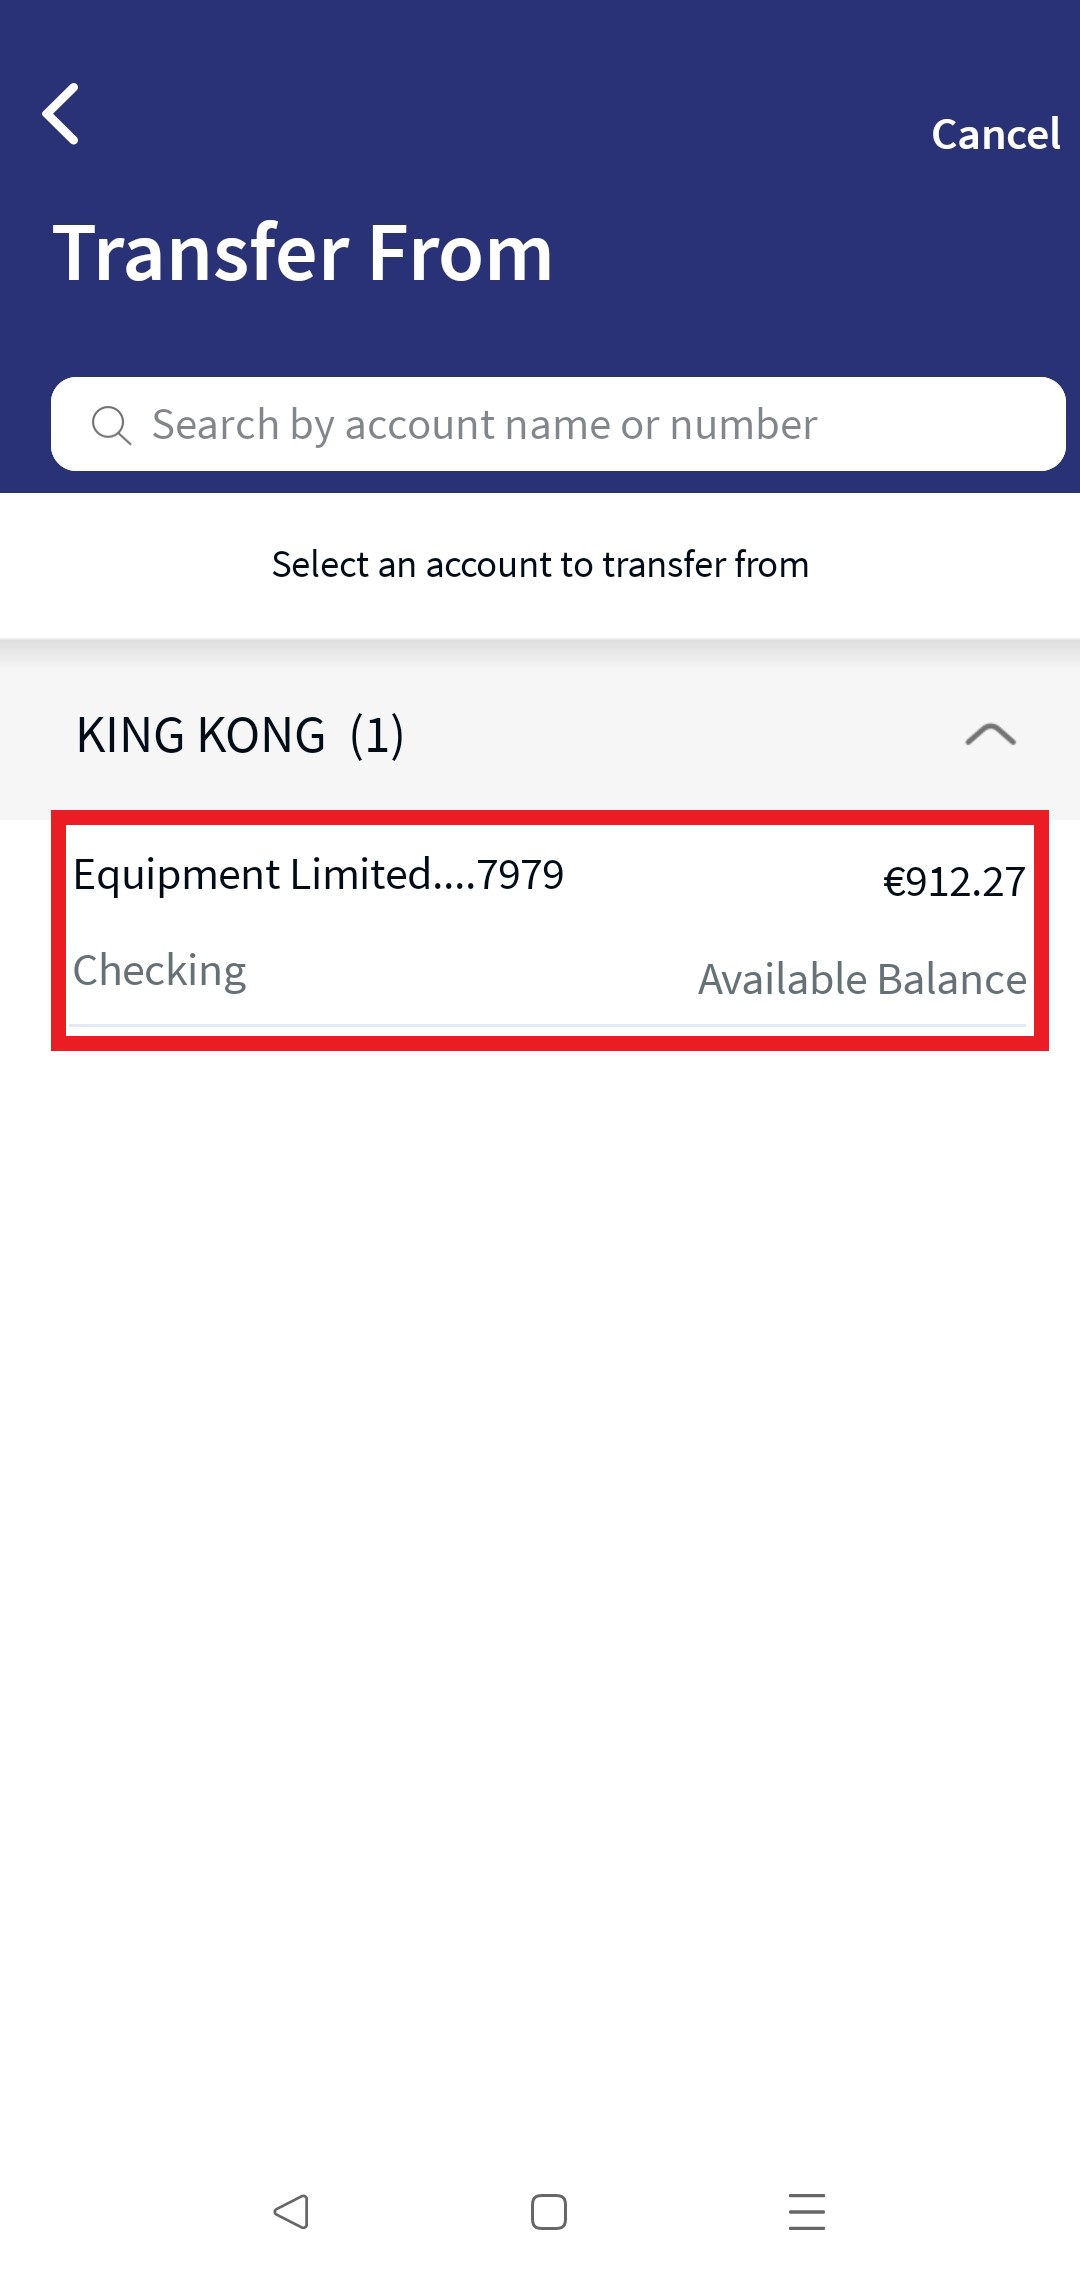
Domestic Transfer - Existing Payee - Mobile Native
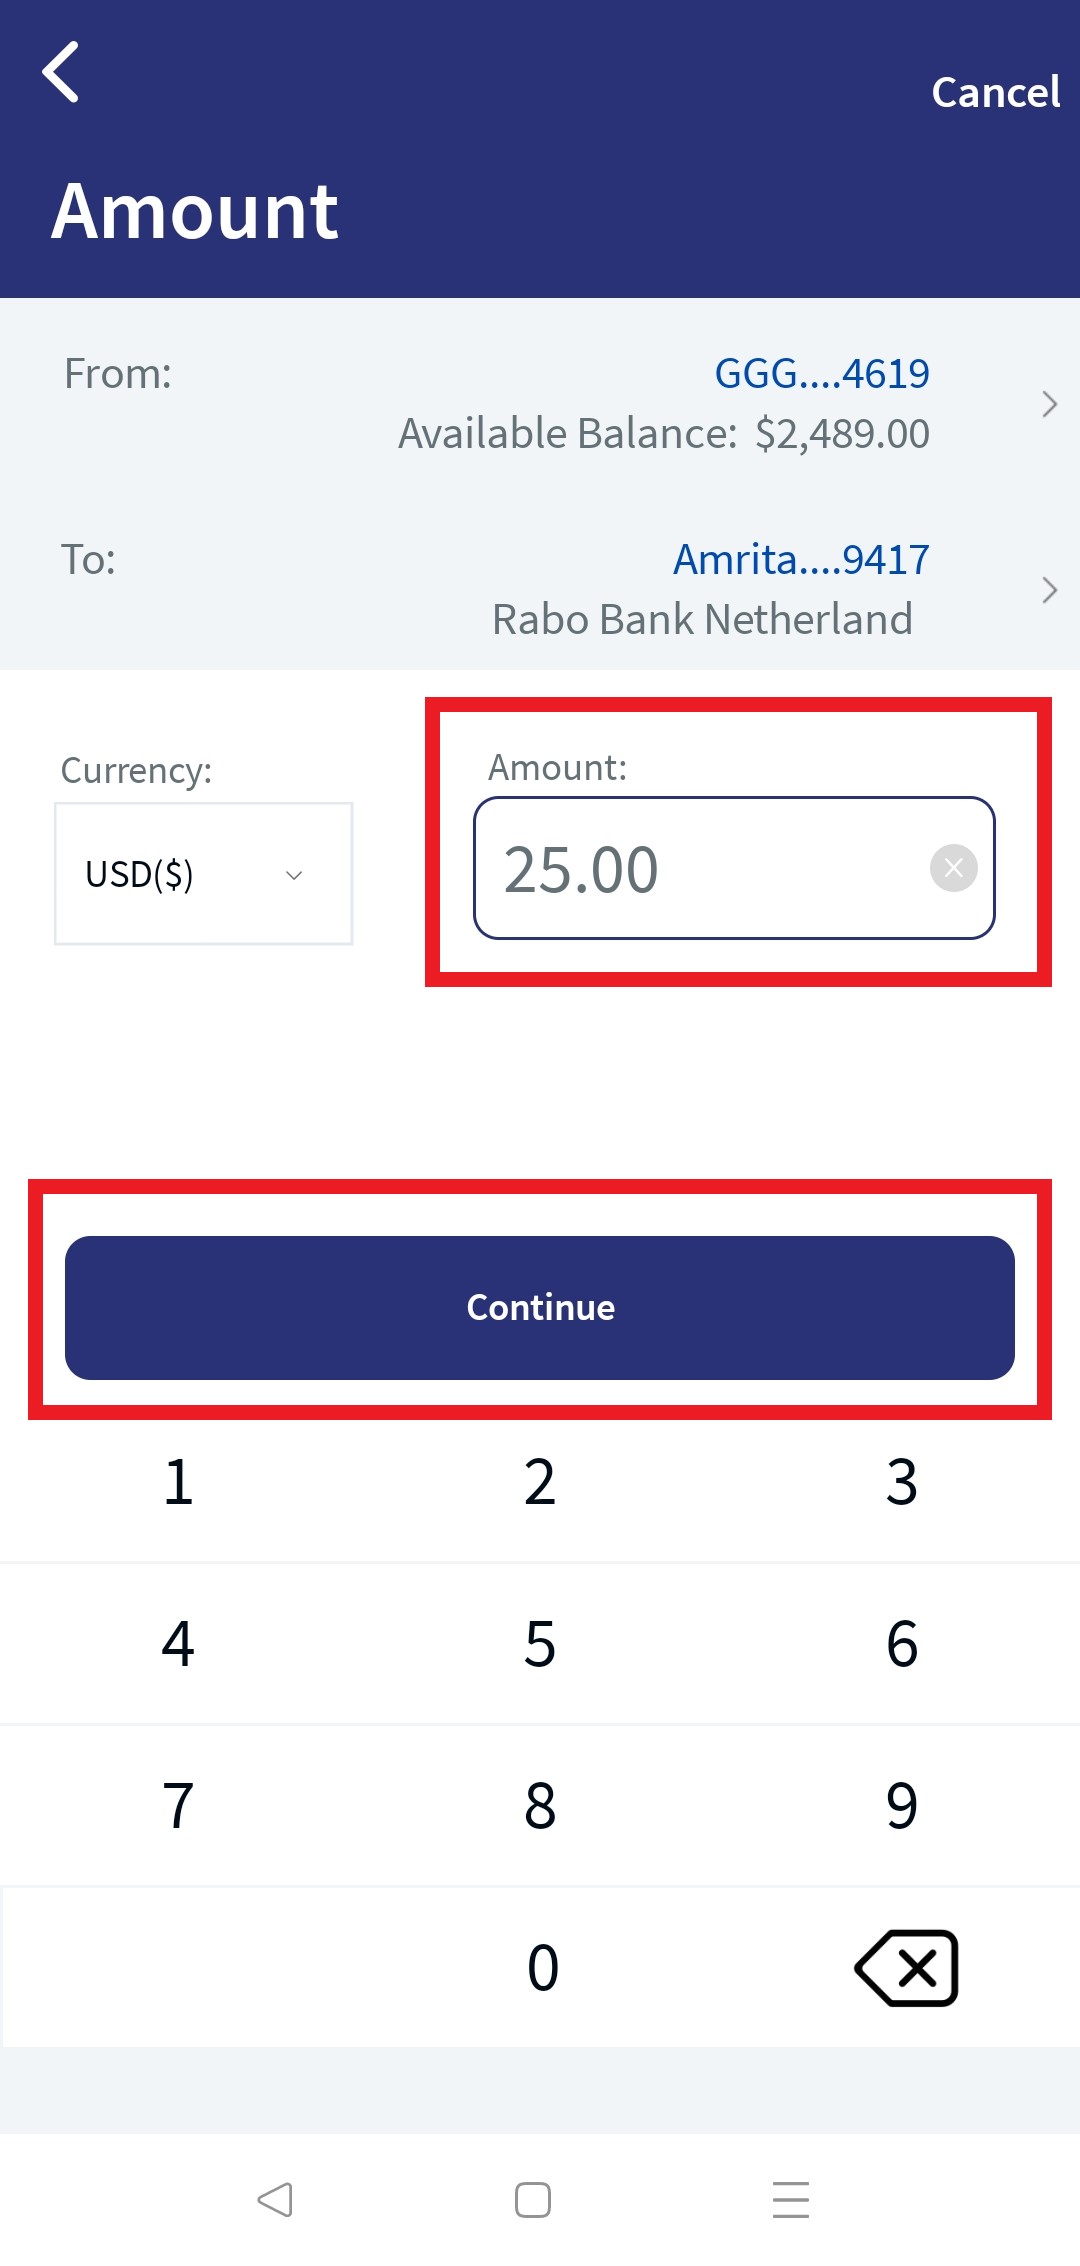
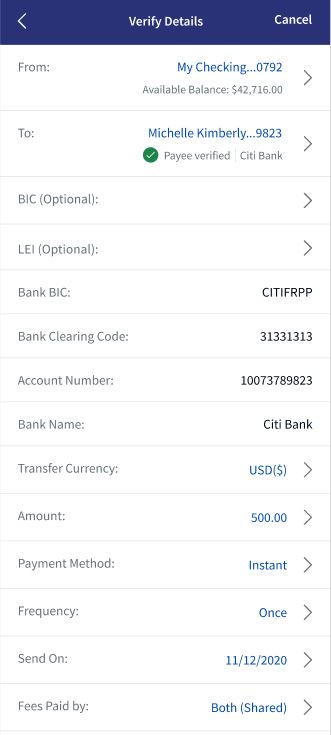
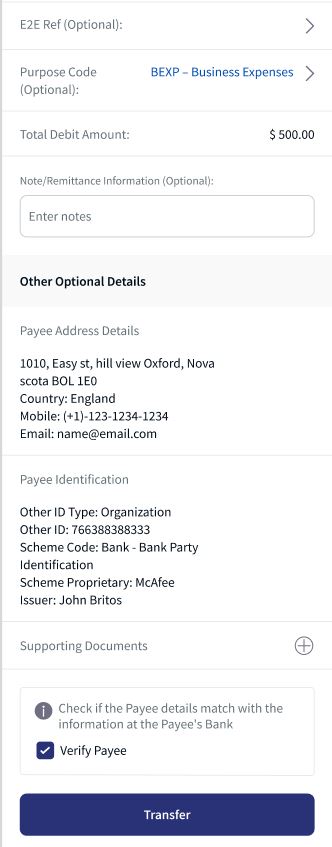
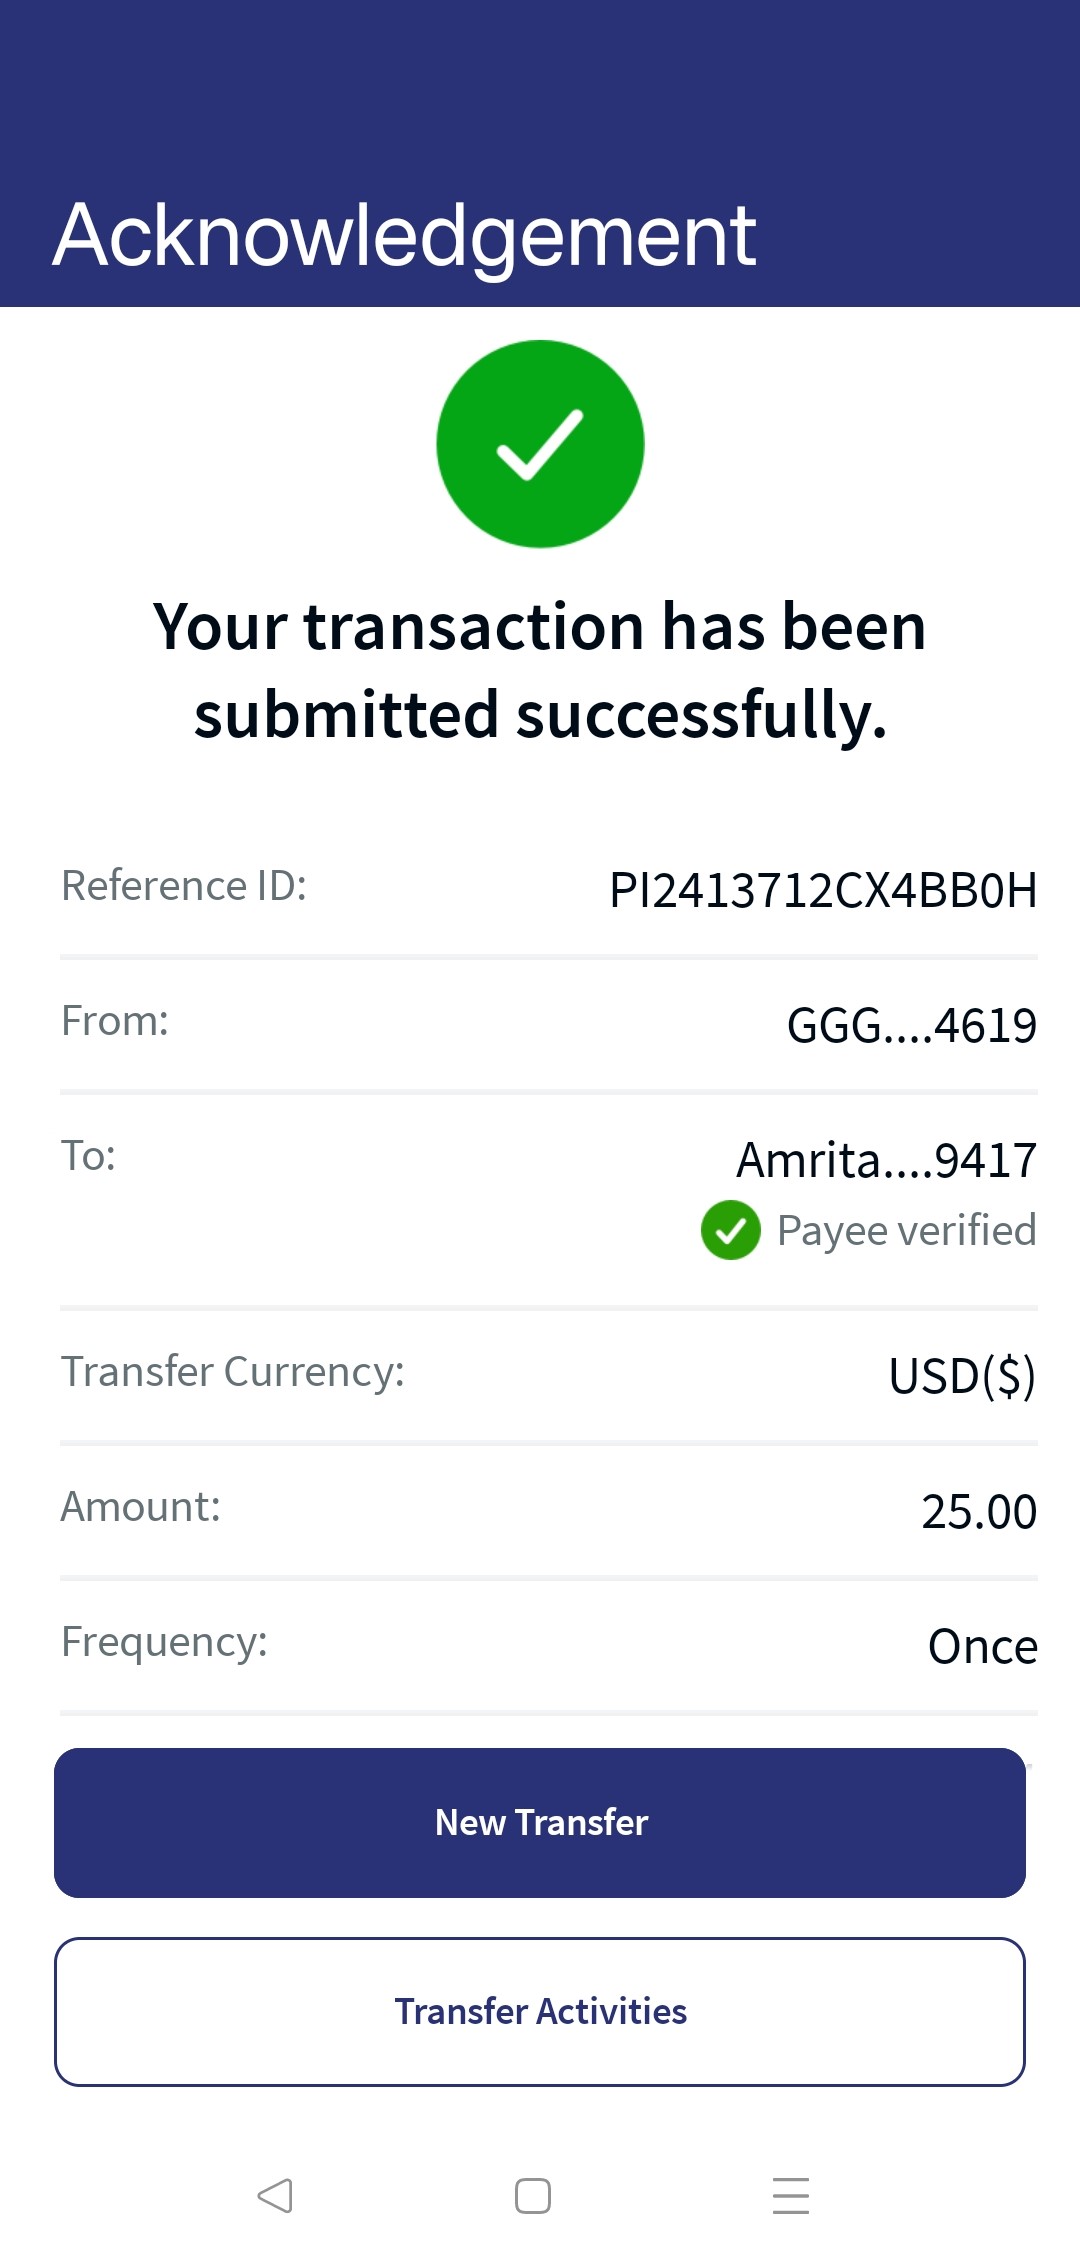
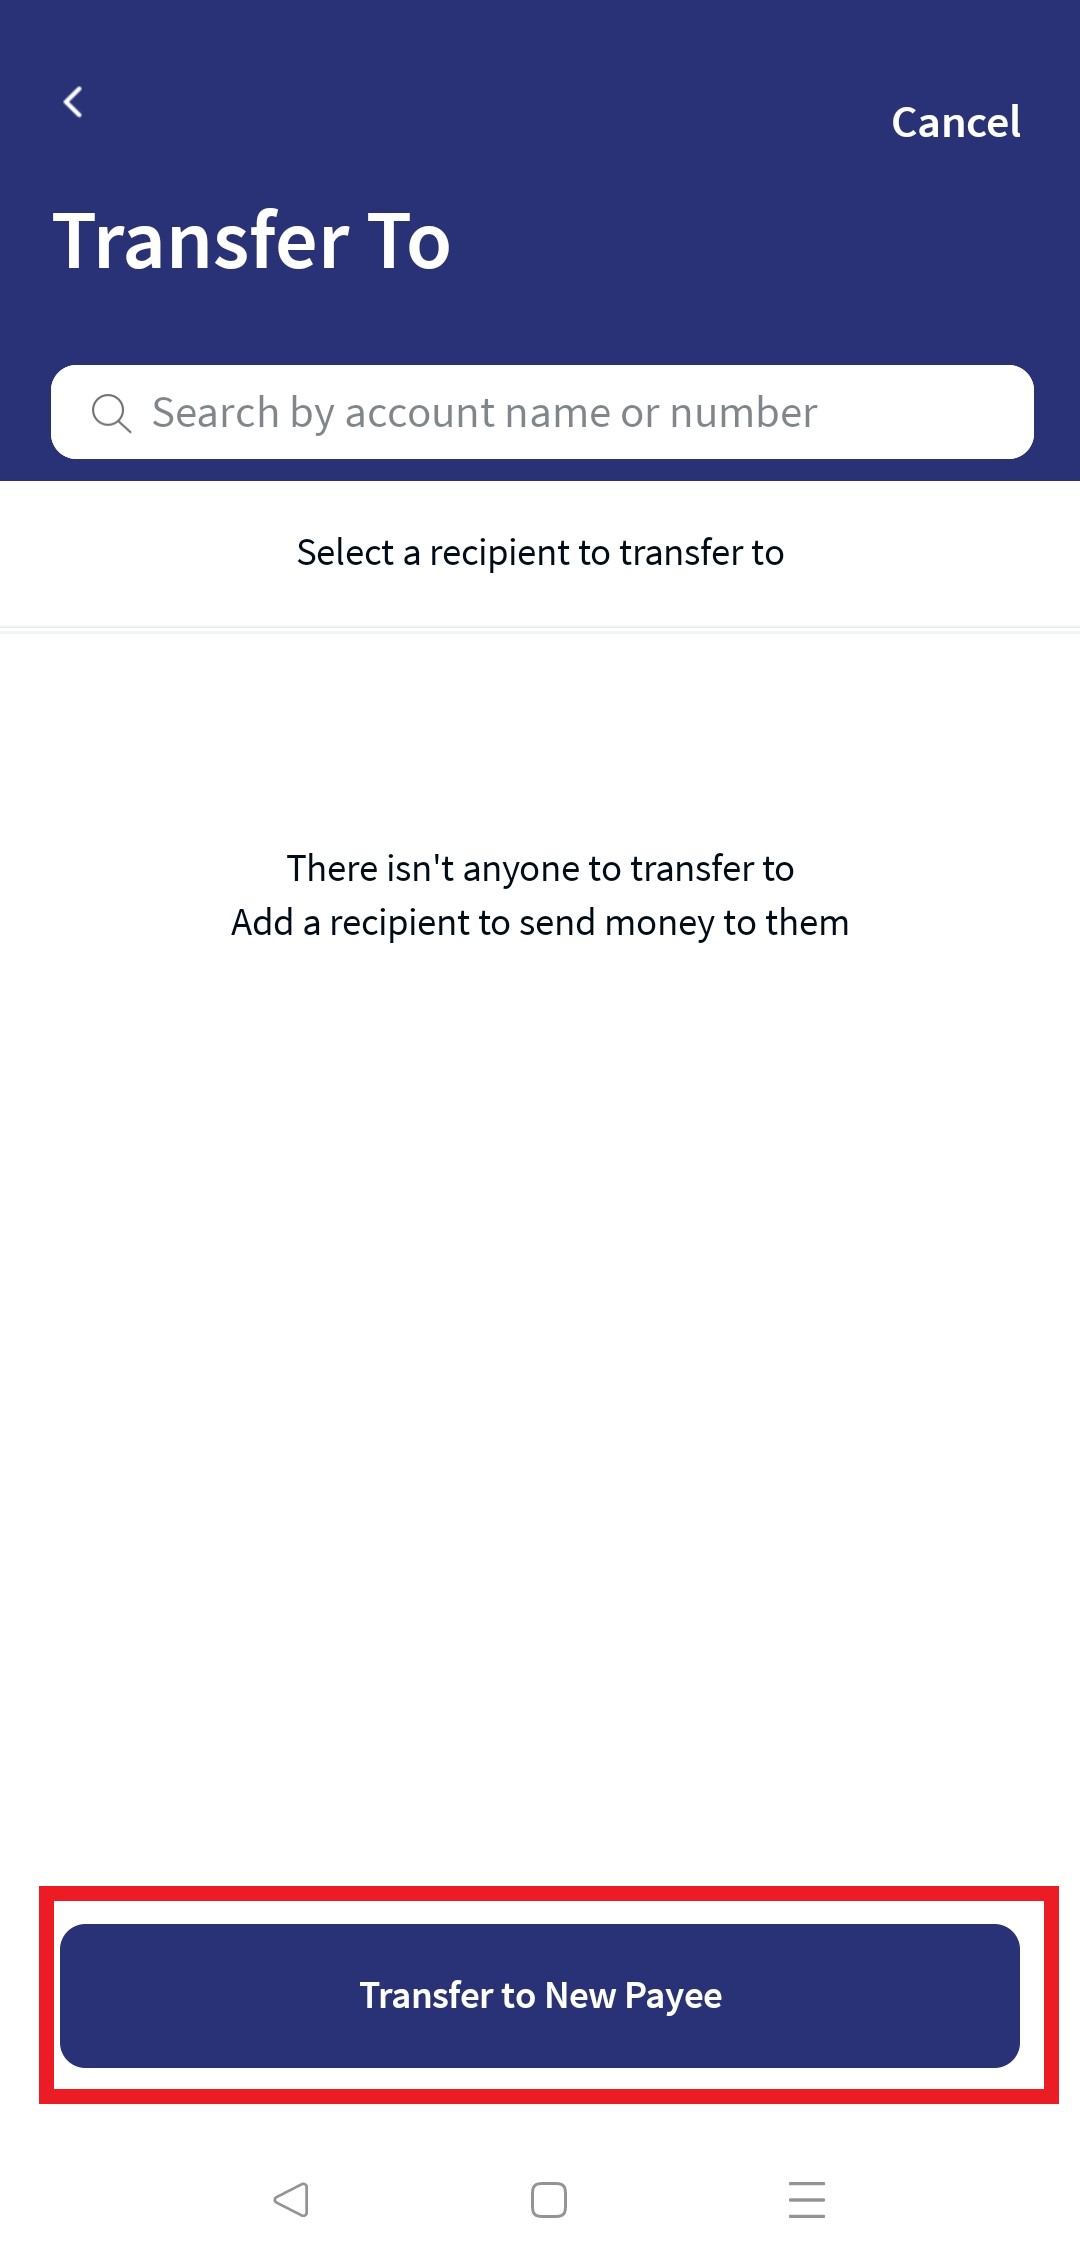
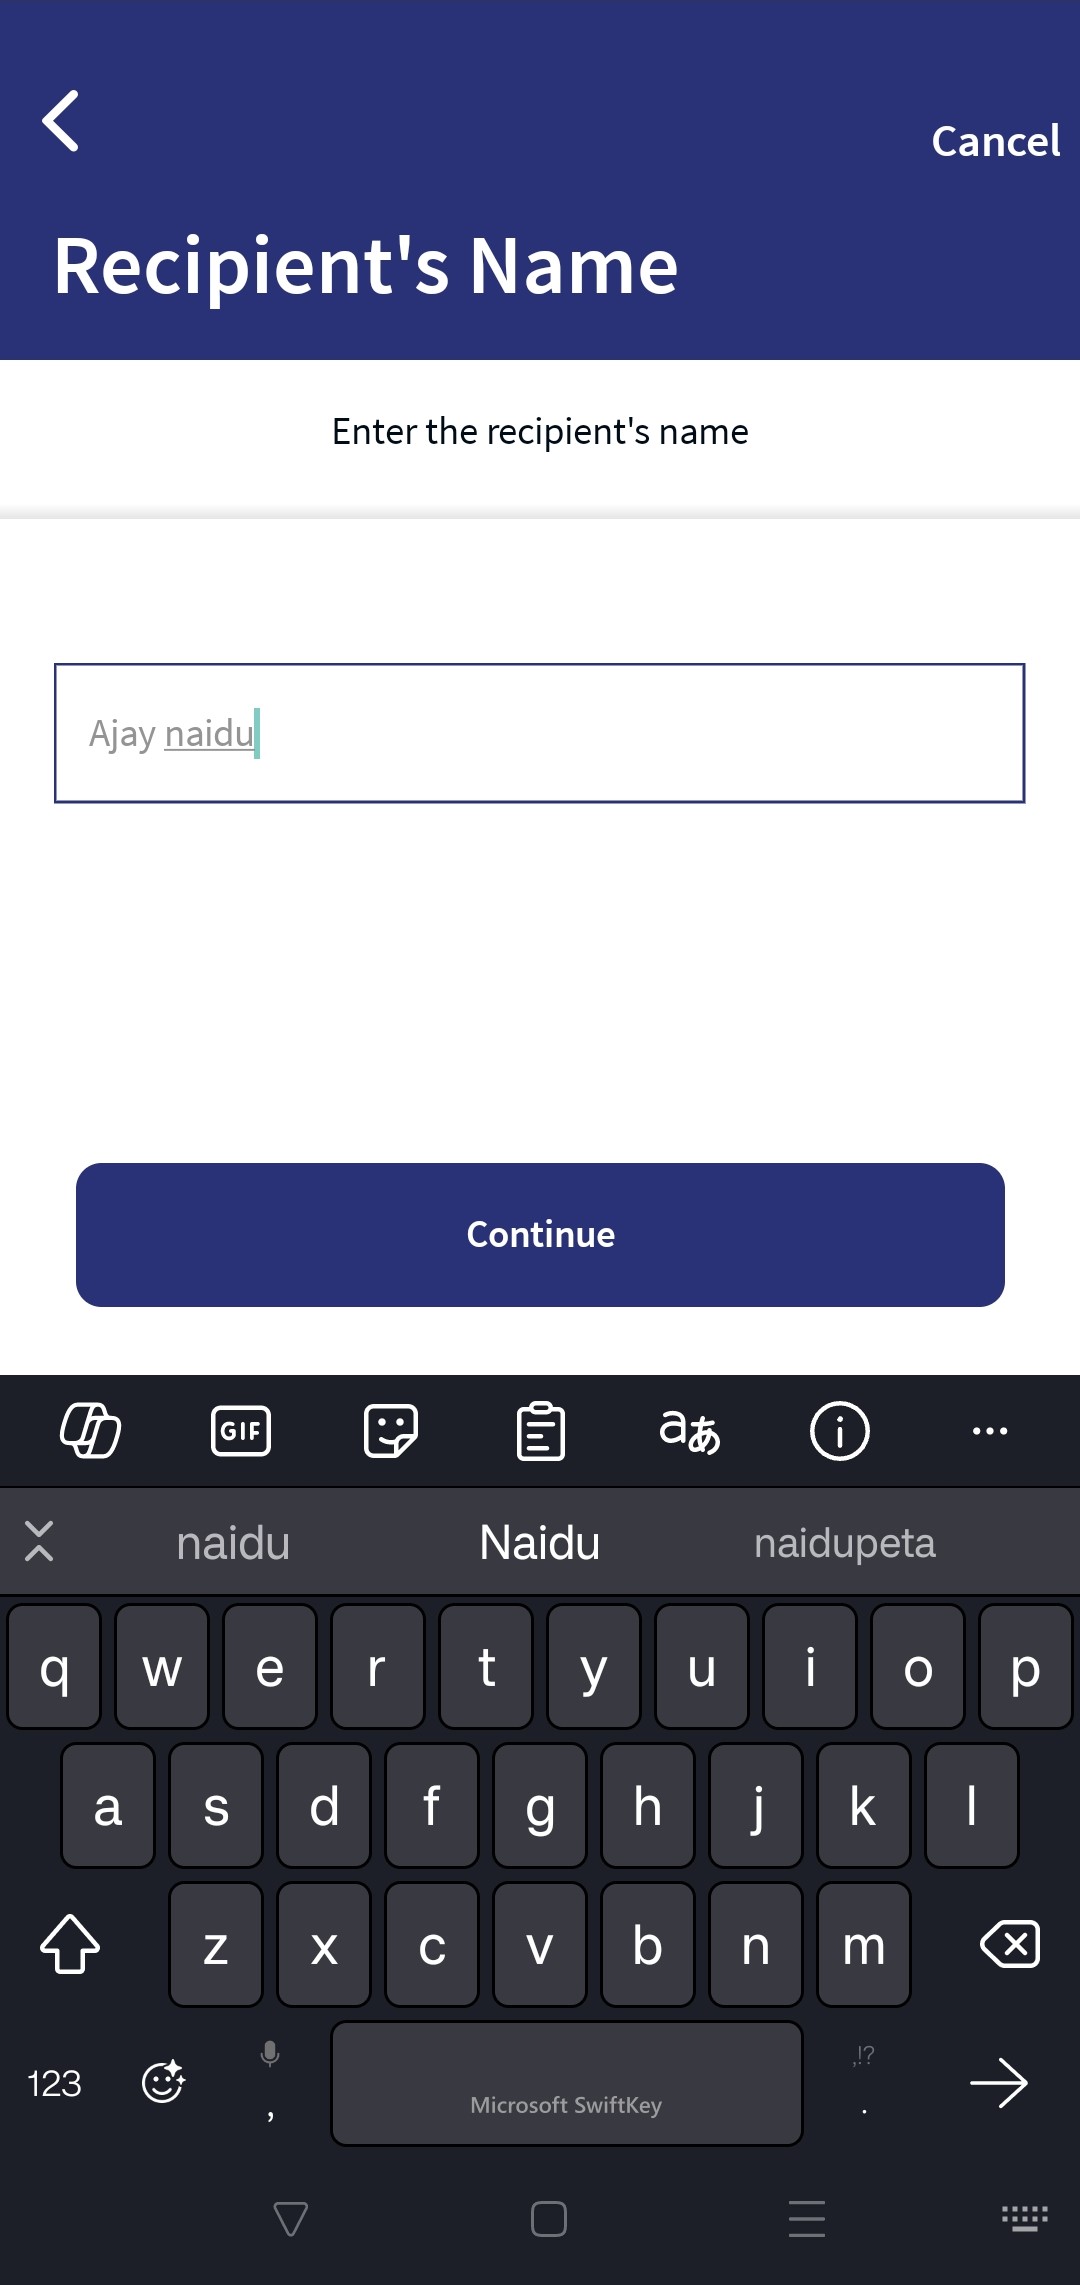
Domestic Transfer - New Payee - Mobile Native
International Transfer
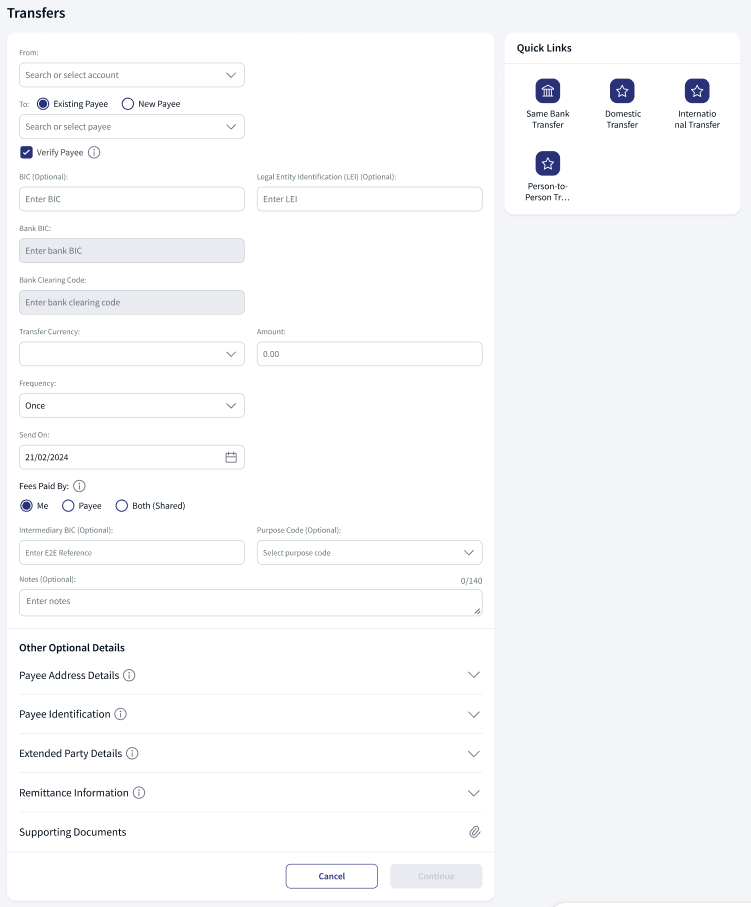
You can initiate a fund transfer to the recipients in other banks that you have added, and recipients in international banks.
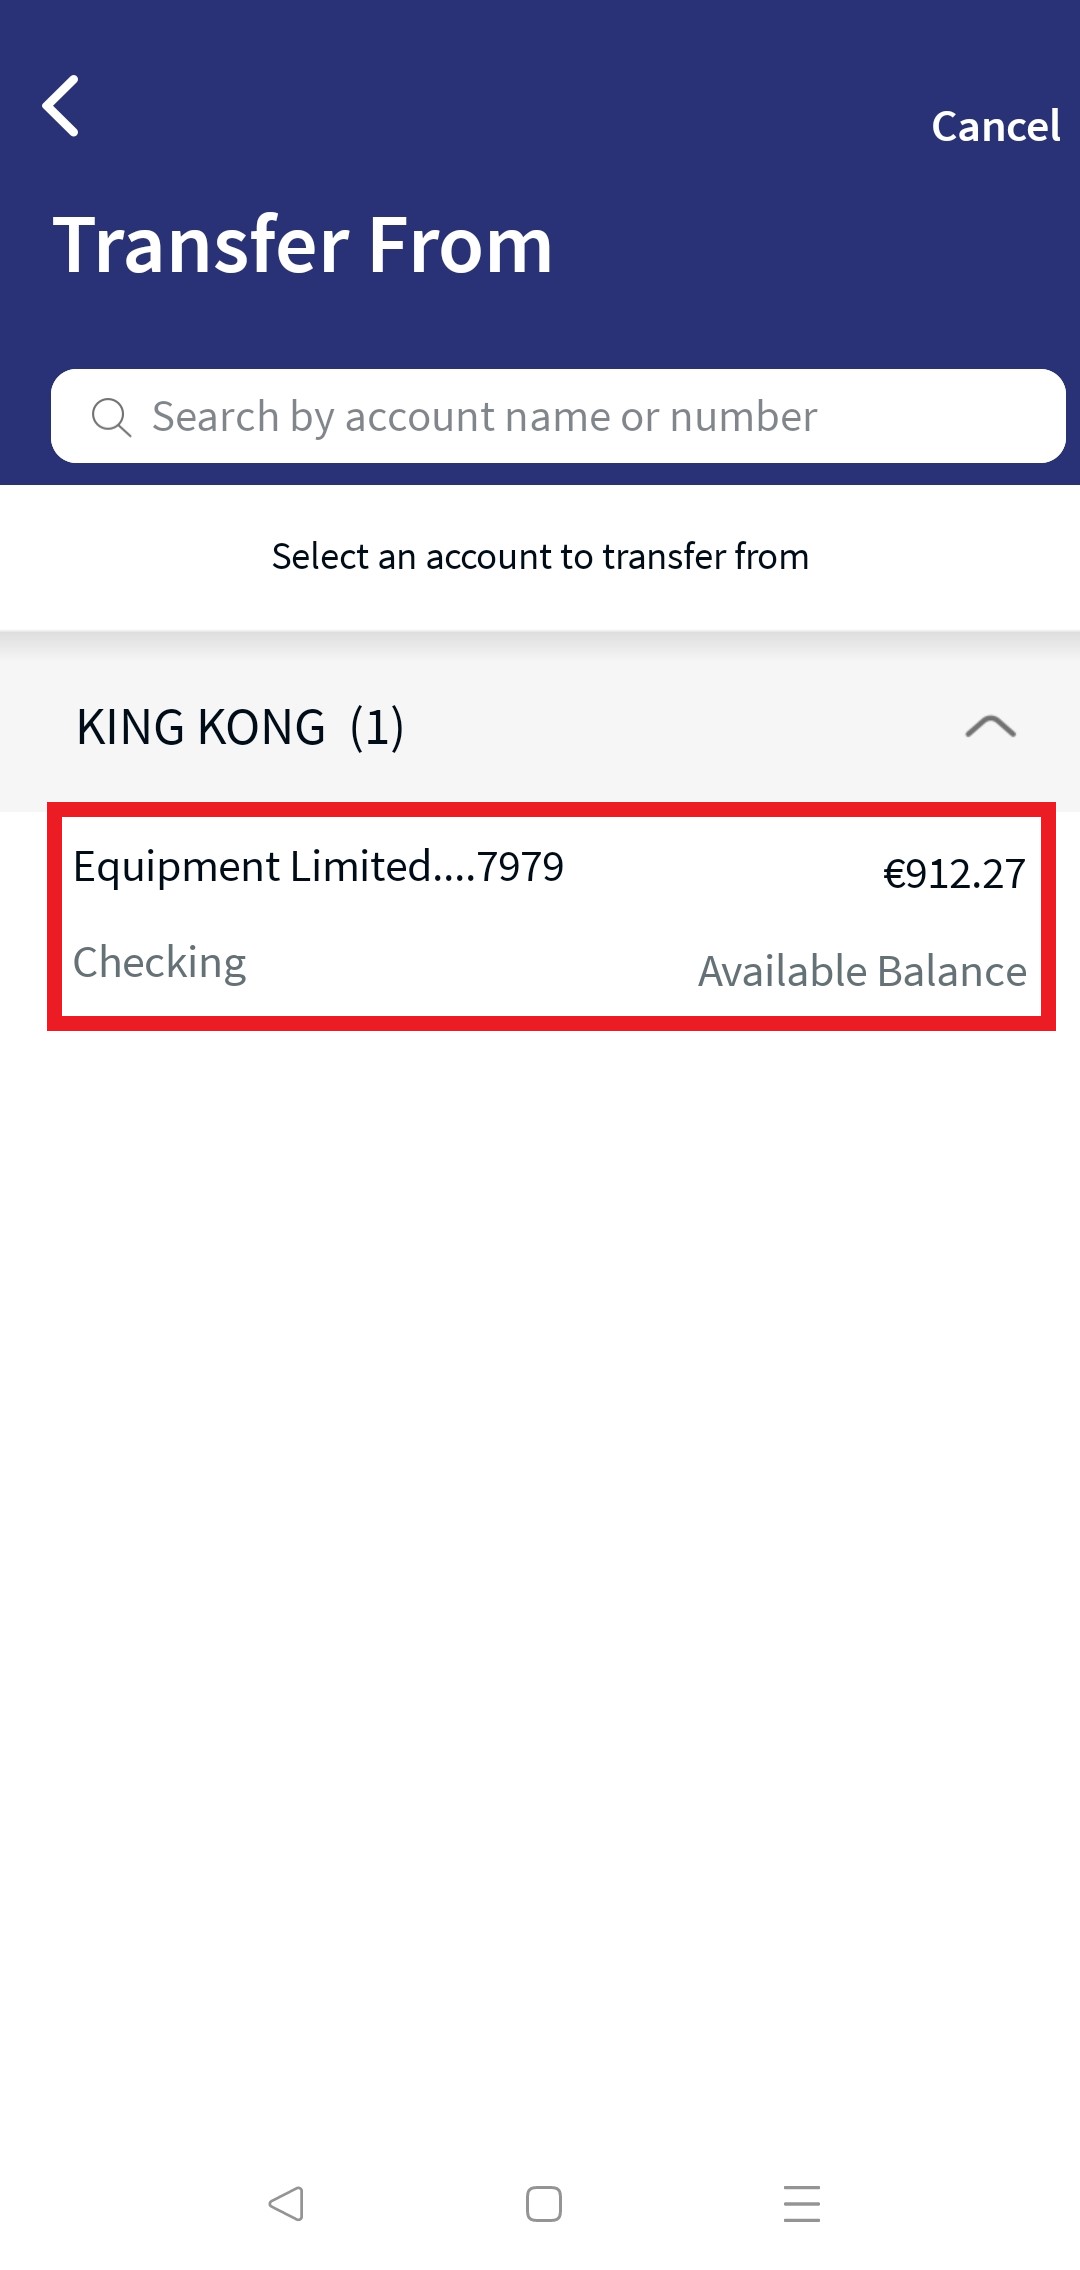
- From: This is a combo box field, the user can use to search using account name or account number or select account from the drop-down list. The application displays all the accounts grouped by Favorite, Savings, Checking accounts. If no accounts are marked as favorite the application does not display this category. After selecting the account, the application displays the Available Balance next to the field. If the search did not retrieve any results, the application displays a message No result found.
- To account. Select if you want to transfer to an existing payee in your list or to a new payee.
- Existing Payee. This is a combo box field, the user can use to search using account name or account number or select account from the drop-down list. The application displays all the accounts grouped by Recently used and All Payee accounts. The application displays Recently Used based on the previous transactions. After selecting the To account, the application displays the bank name for the selected payee. If the search did not retrieve any results, the application displays a message No result found. You can transfer to new account without adding it with a link Transfer to a New Payee. By default, the application displays up to five recently used accounts, and this value can be configured in Spotlight under bundle DBP - RECENTLY_USED_ACCOUNTS_LENGTH. See Spotlight configuration for more information. If the Verified on time stamp is displayed in orange color, see Expiry Period for more information.
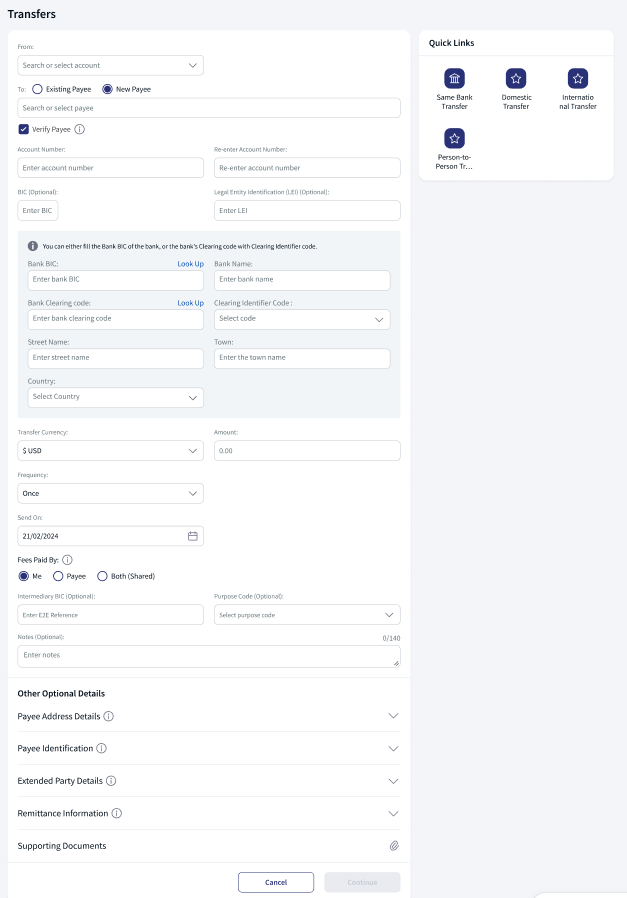
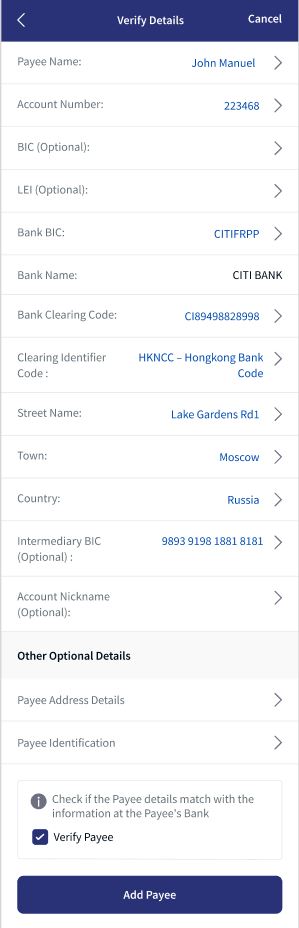
- New Payee. Select this option if you want to transfer to a new payee whose account details are not saved in your list. The following options are displayed:
The new payee is added to the customer ID of From account selected by the user.
- Name: When you select New Payee, the ‘To Account’ becomes the name field. Enter the name of the payee
- Account Number. Enter the account number of the new payee.
- Re-enter Account Number. Re-enter the account number. The application performs Payee Verification.
- Any BIC (Optional).
- Legal Entity Identification(LEI) (Optional).
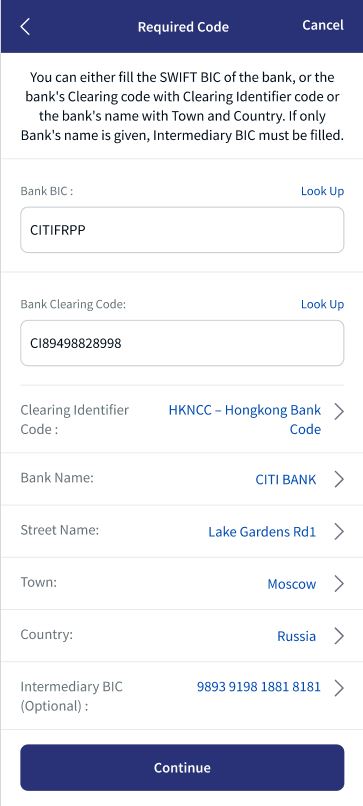
- Bank BIC: If the provided account number is part of cross border or international payment, then you must enter the Bank BIC number that contains alphanumeric characters. Bank BIC field does have a format and structure validations.
BIC must be either 8 or 11 characters only.
- Bank code (A-Z): 4 letter code
- Country code (A-Z): 2 letter code
- Location Code (0-9 or A-Z): 2 digit code – either letters or numbers
- Branch Code (0-9 or A-Z): optional 3 digit code – either letters or numbers
BIC is non-editable if it is derived from IBAN.
- Click on Look Up to automatically detect the Bank BIC. Clicking on Look Up will display a pop up with the privilege to search the Bank BIC details. Search by providing the following details to pick the right Bank BIC:
- Bank Name
- Branch code
- Country
- City
The Lookup feature is place holder which is to be integrated.
- Bank Name.
- Bank Clearing Code. Enter the clearing code.
- Clearing code is the bank code that is used to perform the domestic transfer.
- The user need to enter either the Clearing code with clearing identifier code or Bank BIC.
- Click on Look Up to automatically detect the Clearing code. Clicking on Look Up will display a pop up with the privilege to search the Clear code details. Search by providing the following details to pick the right Clearing code:
- Bank Name
- Branch code
- Country
- City
- The Lookup feature is place holder which is to be integrated.
- Clearing Identifier Code. select the option from the drop down.
- Street Name. Enter the street name.
- Town. Enter the town name.
- Country. Select country from the drop down list.
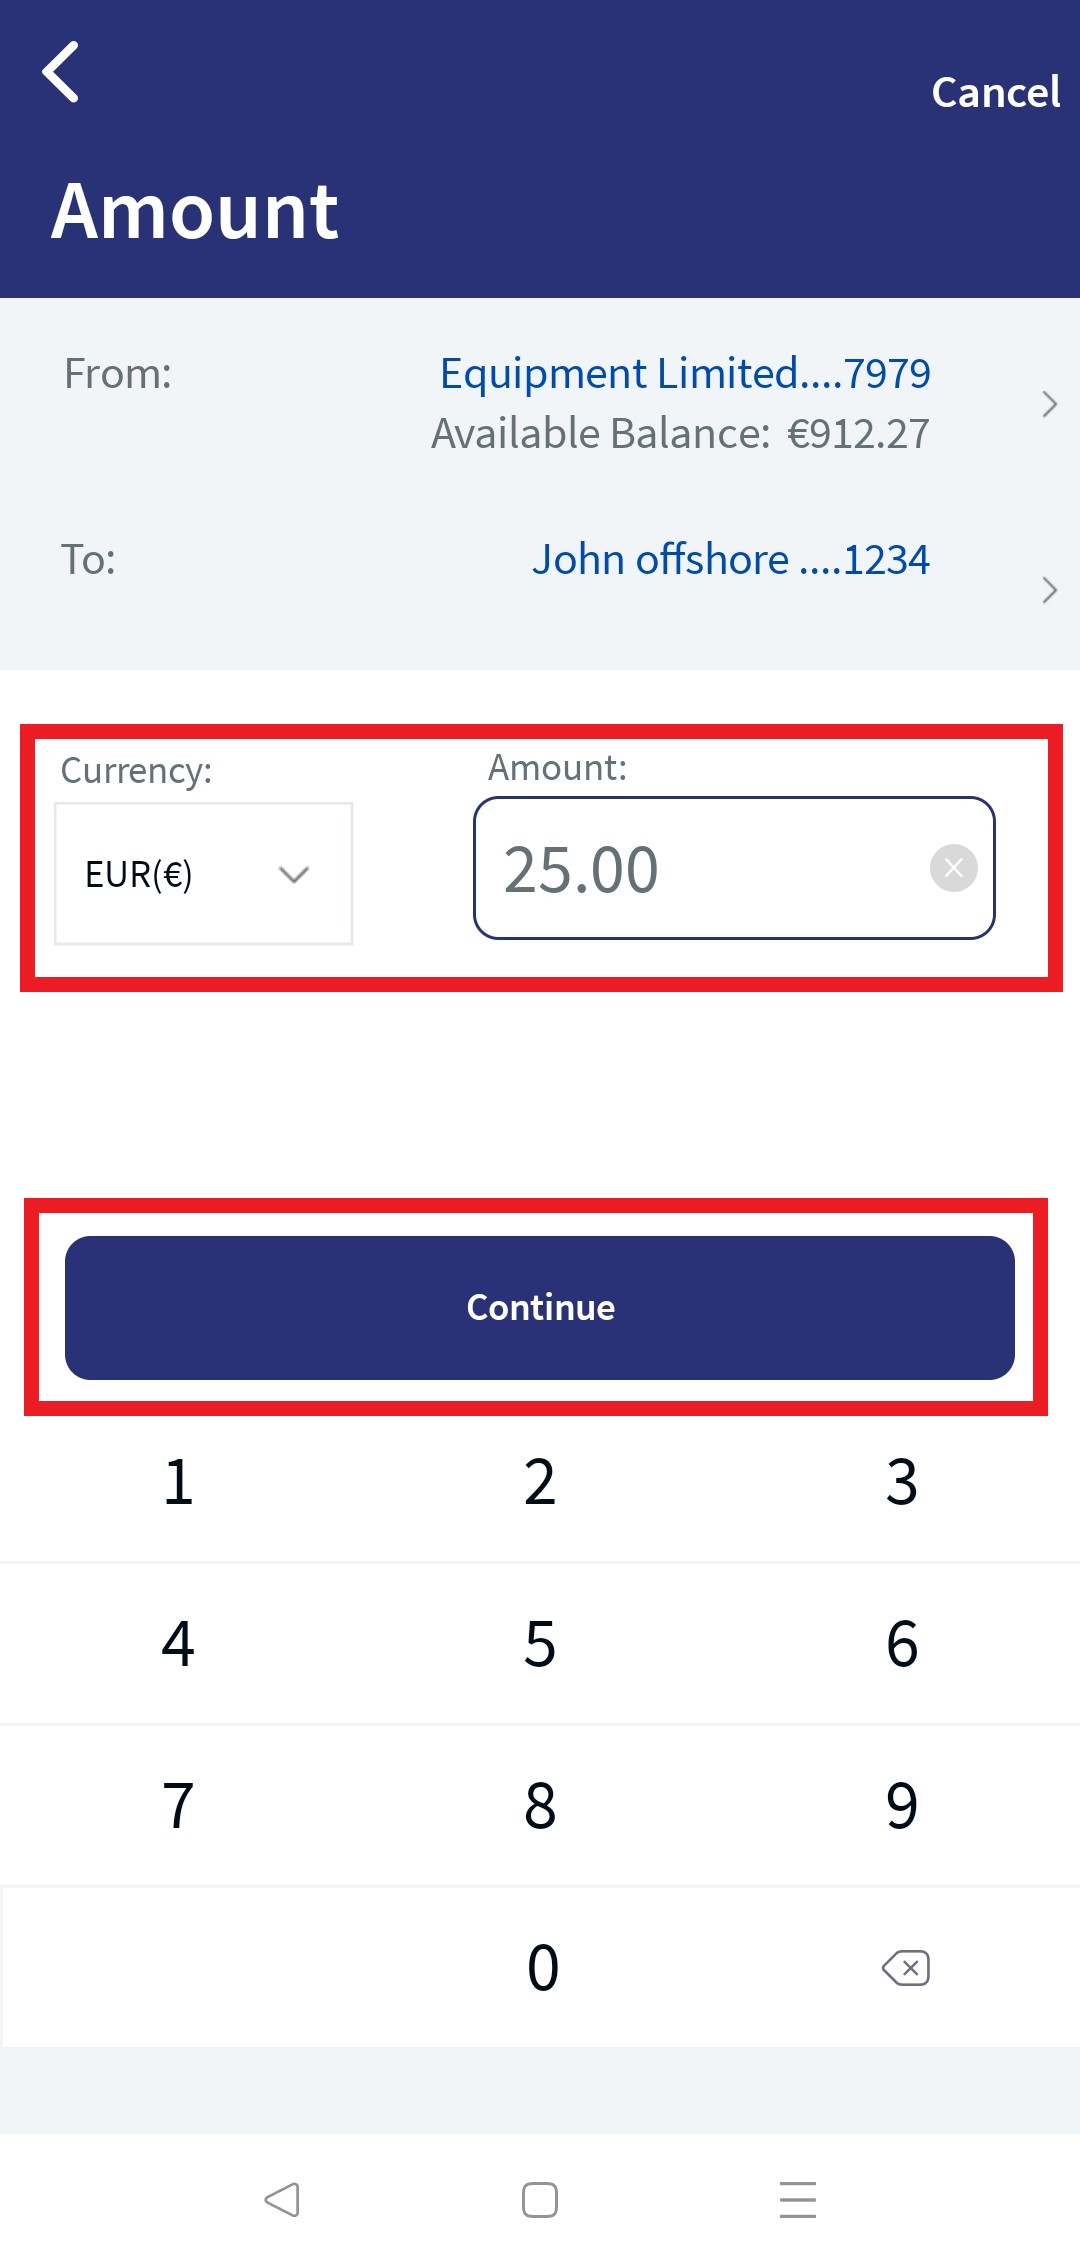
- Transfer Currency. Select the transfer currency from the Currency list. The Currency list displays the currency code with symbol.
- Amount. Enter the amount.
- Frequency. Specify the payment frequency details.
- By default, the app selects the frequency as once and the current date. You can change the frequency and the date if the transfer is a scheduled or a recurring transfer.
- Scheduled Transfer or Recurring Transfer. You can choose to set the transfer as a recurring transfer (for example, daily, weekly, monthly, and so on). In that case, select if the recurrence has to be on a specific date and select a date from the calendar, or if it is the number of occurrences and enter the occurrence value (for example, 24 times). The current date is selected as the recurring transfer start date, by default. The other frequency options are:
- Once
- Daily
- Weekly
- Bi-Weekly or Every two weeks
- Monthly
- Quarterly
- Half Yearly or Every six months
- Annually
- Send On. Enter the send on date of payment/transfer details. By default, the app displays the current date. For future dated/recurring payment/transfer, you can schedule the future date.
- Ending On. select the transfer ending date from the calendar. This is an optional field, user can enter the ending date or leave it as null. The default value is null.
- Fees paid by. Select the who will pay the charges in Fees paid by field. By default Both (shared) is selected. The available options are:
- Me - The Payer (sender of the payment) will bear the payment transaction fees. The payee will receive the full amount of the payment.
- Payee - The Payee (recipient of the payment) will incur the payment transaction fees. In this scenario, the payee will receive the payment excluding the transfer charges.
- Both (Shared) - The Payer (sender of the payment) will pay all fees charged by the sending bank. The Payee (recipient of the payment) will pay all fees charged by the receiving bank. The payee will receive the payment excluding the charges.
- Intermediary BIC (Optional).
- Purpose Code (Optional) is the reference used to track payments for reconciliation purpose.
- Note/ Remittance Information (Optional). Enter any additional notes. You can enter up to 140 characters.
- Payee Address details (Optional). Enter the personal information (such as Phone, Email) and address details (such as Address, Country, City, State, and Zip/ postal code).
- Payee Identification details (Optional). Enter the payee identification details such as Other ID Type (Organization or Individual), Other ID, Issuer, Scheme Code, and Scheme Proprietary.
- Extended Details (Optional). This section have two tabs
- Ultimate Debtor. Enter the Name, BIC, Legal Entity Identification(LEI), Other ID Type, Other ID, Address details (such as Building number, street name, post box, city, country, postal code).
- Ultimate Creditor. Enter the Name, BIC, Legal Entity Identification(LEI), Other ID Type, Other ID, Address details (such as Building number, street name, post box, city, country, postal code).
- Remittance Information (Optional). Enter the Creditor reference details such as Code, Proprietary, Issuer, Reference Number, and Additional Remittance information.
- Add Support Documents. You can add an attachment for future reference. To add an attachment, follow these steps:
- Click + icon and select the file to add as an attachment.
The attached file is displayed along with the Cancel (X) option.
- Click Cancel (X) to remove the attachment. A pop-up is displayed asking for confirmation.
- Click Yes to confirm. The attachment will be removed.
You can attach up to five PDF/JPEG files only. Adding an attachment is mandatory based on the payment/transfer amount. The threshold amount is configured by the bank.
- Click + icon and select the file to add as an attachment.
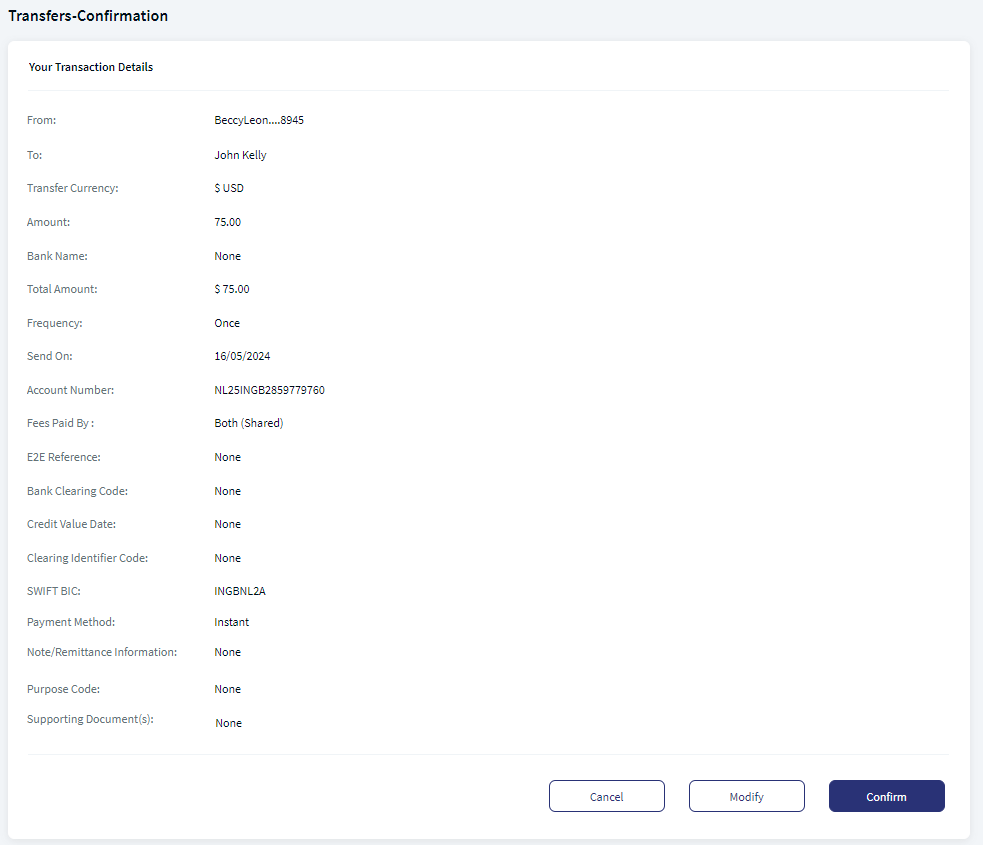
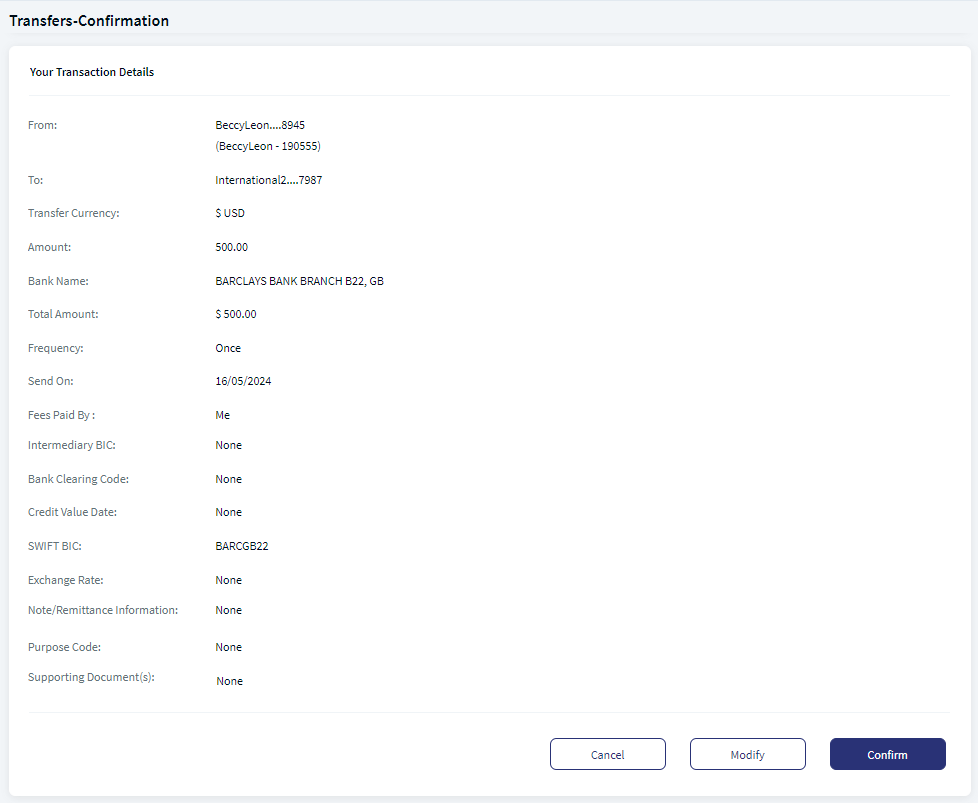
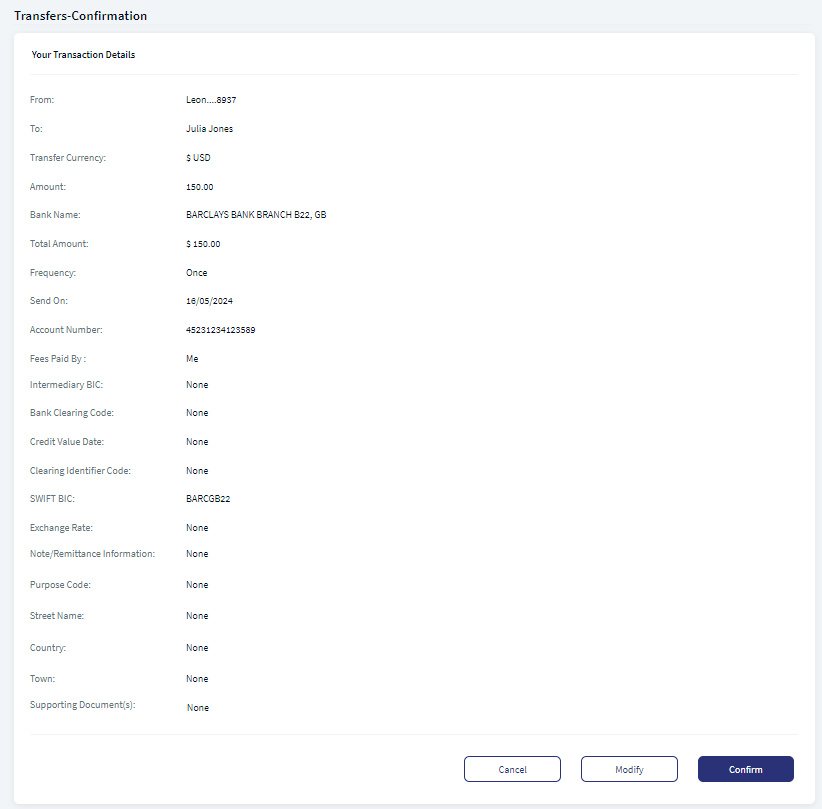
- Click Continue the application performs payee verification and based on the response the user can proceed with the payment. The Confirmation screen appears.
- You can perform the following actions in the Confirmation screen.
- Click Continue to proceed with the payment.
- Click Modify to edit the details.
- Click Cancel to cancel the transaction.
Credit value date is displayed for the user in the Confirmation and Acknowledgment screens.
- Depending on the bank configuration, if Strong Customer Authentication(SCA) is enabled for the feature, SCA is triggered. The authentication type is configured and can be turned on or off in the Spotlight application. For more information see Push Notification.
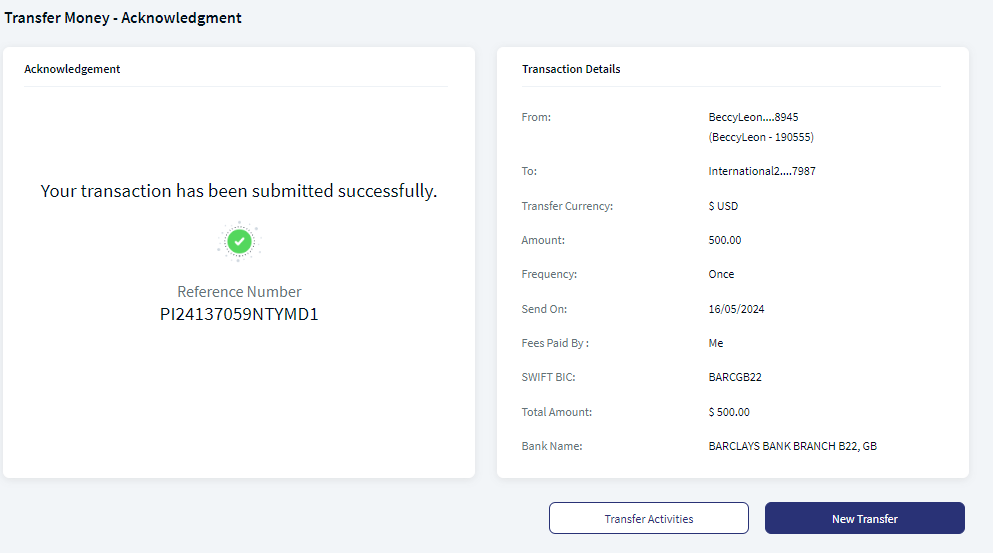
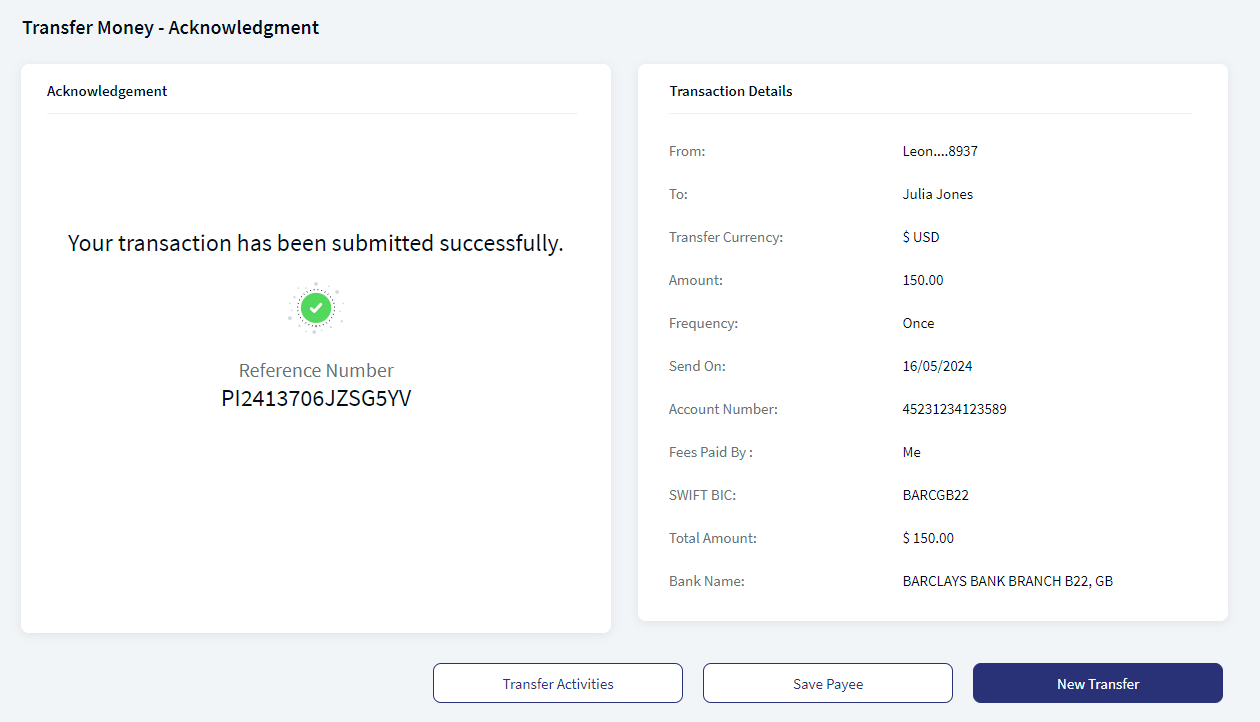
- Once the entered details are correct, an acknowledgment screen is displayed with a reference number.
- The app displays the acknowledgment screen with transaction details, unique reference number to the transaction, and provision to do the following:
- Make a new transfer
- Save Payee. Click here for more information.
- View Transfer Activities
International Transfer - Existing Payee - Web Channel
International Transfer - New Payee - Web Channel
International Transfer - New Payee
International Transfer - New Payee - Mobile Native
Pay a Person Transfer
Pay a Person transfer is an electronic fund transfer made from one person to another person. Use the feature to initiate a Pay a Person transfer (for example, to send money to a friend) by using the recipient's mobile number, email ID, or National ID. You can initiate Pay a Person transfer to the list of eligible Pay a Person recipients. Select a Pay a Person recipient to perform a transfer.
Activate Pay a Person Transfer
When you open the Pay a Person screen for the first time, the app displays the terms and conditions for you to activate the Pay a Person payment service.
You must specify the following details:
- Click Activate Pay a Person from Unified Transfers landing screen.
- Enter the following information:
- Registered Name
- Select Contact Type (Phone/Email/National ID) - Select the preferred contact type and enter the details.
- Default Deposit Account. Select the preferred account for using the Pay a Person payment service (for receiving money).
- Transfer Limit. Select the transfer currency and add a limit to your transfers.
- Click Continue. The app displays the terms and conditions for you to activate the Pay a Person payment service.
- Click the check box to accept terms and conditions.
- Click Activate to enable Pay a Person for your account. Once Pay a Person is activated, you can send and receive money via your email ID, mobile number, or national ID by using the OLB application.
In case you do not have an account eligible for Pay a Person payments, you will not be able to activate the Pay a Person payment service and the same will be conveyed to you with an appropriate message.
Send Money
To initiate a fund transfer using Pay a Person payment service, click Make a Transfer under Pay a Person Transfer section from UTF landing screen.
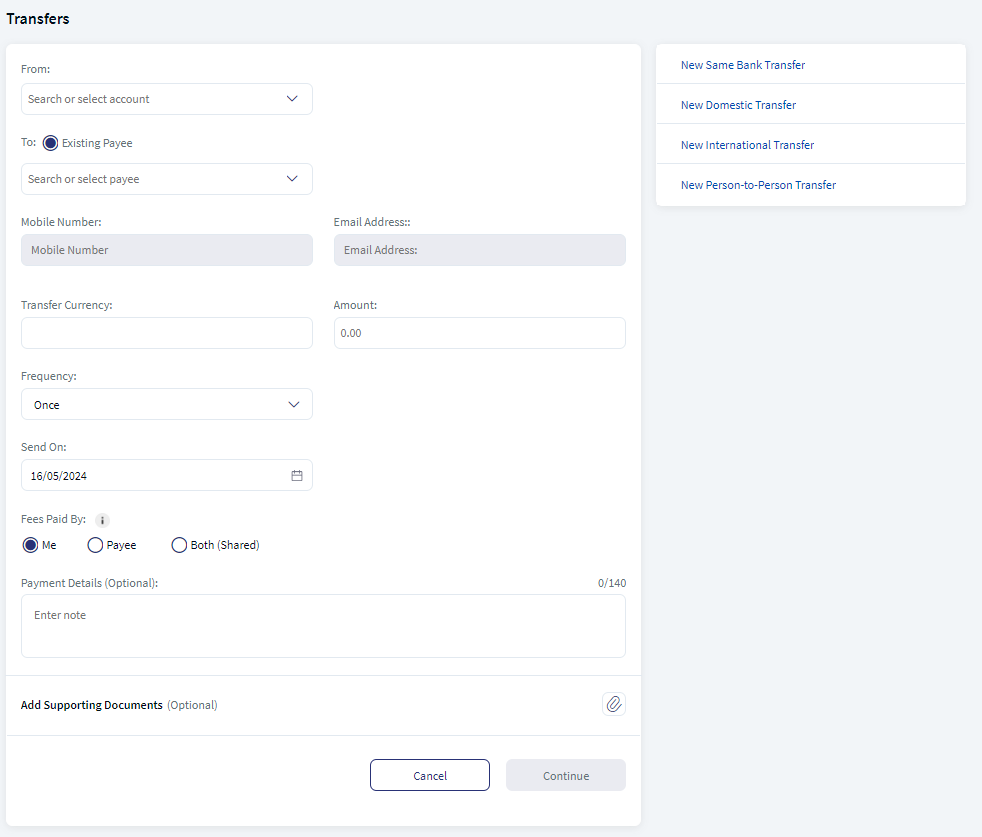
Enter the following details to initiate a Pay a Person transfer:
- From. This is a combo box field, the user can use to search using account name or account number or select account from the drop-down list. The application displays all the accounts segregated as Favorite, Savings, Checking accounts. If no accounts are marked as favorite the application does not display this category. After selecting the account, the application displays the Available Balance next to the field. If the search did not retrieve any results, the application displays a message No result found.
- To. This is a combo box field, the user can use to search using account name or account number or select account from the drop-down list. The application displays all the accounts grouped by Recently used and All Payee accounts. The application displays Recently Used based on the previous transactions. After selecting the To account, the application displays the bank name for the selected payees. If the search did not retrieve any results, the application displays a message No result found. By default, the application displays up to five recently used accounts, and this value can be configured in Spotlight under bundle DBP - RECENTLY_USED_ACCOUNTS_LENGTH. See Spotlight configuration for more information.
- Transfer Currency. The Currency field displays the (Euro) currency code with symbol, by default.
- Amount. Enter the amount of money to be sent.
- Frequency. Specify the payment frequency details.
- By default, the app selects the frequency as once and the current date. You can change the frequency and the date if the transfer is a scheduled or a recurring transfer.
- Scheduled Transfer or Recurring Transfer. You can choose to set the transfer as a recurring transfer (for example, daily, weekly, monthly, and so on). In that case, select if the recurrence has to be on a specific date and select a date from the calendar, or if it is the number of occurrences and enter the occurrence value (for example, 24 times). The current date is selected as the recurring transfer start date, by default. The other frequency options are:
- Once
- Daily
- Weekly
- Bi-Weekly or Every two weeks
- Monthly
- Quarterly
- Half Yearly or Every six months
- Annually
- Send On. Enter the send on date of payment/transfer details. By default, the app displays the current date. For future dated/recurring payment/transfer, you can schedule the future date.
- Fees paid by. Select who will pay the charges in Fees paid by field. The available options are:
- Me - The Payer (sender of the payment) will bear the payment transaction fees. The payee will receive the full amount of the payment.
- Payee - The Payee (recipient of the payment) will incur the payment transaction fees. In this scenario, the payee will receive the payment excluding the transfer charges.
- Both (Shared) - The Payer (sender of the payment) will pay all fees charged by the sending bank. The Payee (recipient of the payment) will pay all fees charged by the receiving bank. The payee will receive the payment excluding the charges.
- Payment Details (Optional). Enter the Payment Reference details. You can enter up to 140 characters.
- Add Support Documents. You can add an attachment for future reference. To add an attachment, follow these steps:
- Click + icon and select the file to add as an attachment.
The attached file is displayed along with the Cancel (X) option.
- Click Cancel (X) to remove the attachment. A pop-up is displayed asking for confirmation.
- Click Yes to confirm. The attachment will be removed.
You can attach up to five PDF/JPEG files only. Adding an attachment is mandatory based on the payment/transfer amount. The threshold amount is configured by the bank.
- Click + icon and select the file to add as an attachment.
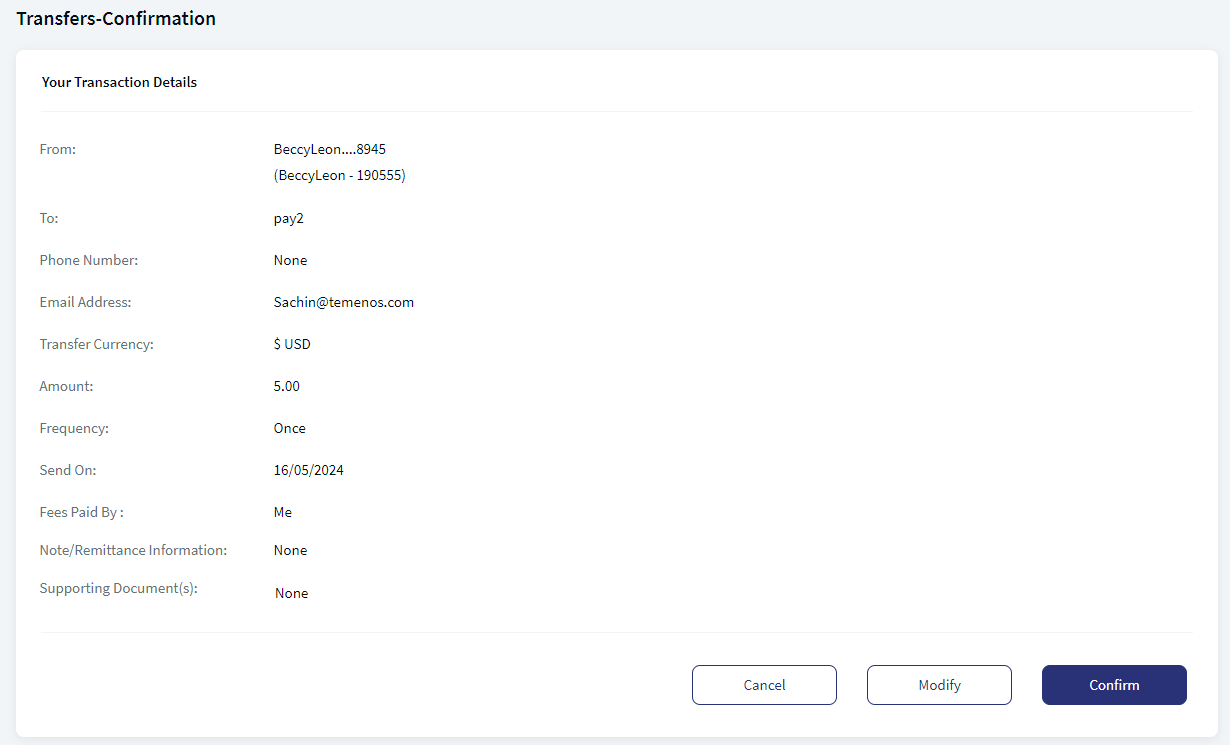
- Click Continue to proceed with the payment. The Confirmation screen appears.
- You can perform the following actions in the Confirmation screen.
- Click Continue to proceed with the payment.
- Click Modify to edit the details.
- Click Cancel to cancel the transaction.
- Depending on the bank configuration, if Strong Customer Authentication(SCA) is enabled for the feature, SCA is triggered. The authentication type is configured and can be turned on or off in the Spotlight application. For more information see Push Notification.
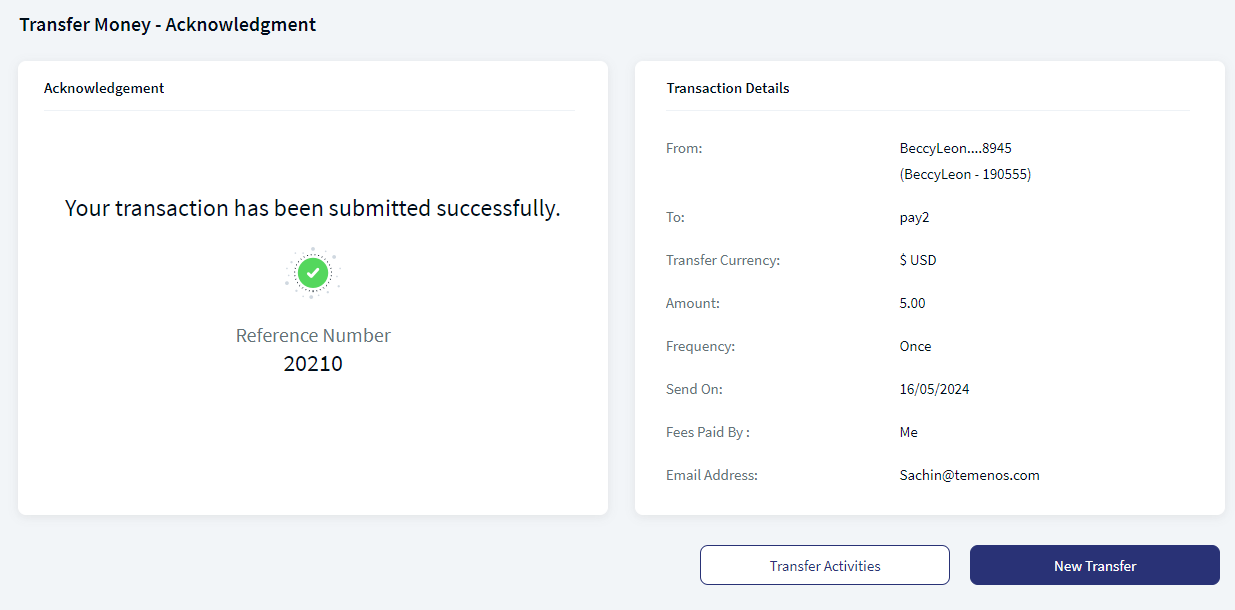
- Once the entered details are correct, an acknowledgment screen is displayed with a reference number.
- The app displays the acknowledgment screen with transaction details, unique reference number to the transaction, and provision to do the following:
- Make a new transfer
- View Transfer Activities
Save Payee
Use this feature to save the payee after making a transfer request. The user can see this feature by enabling the Create/ Edit Transfer feature in Spotlight. This function is available in Features Facilities under Master Data Management.
This Save Payee option is available only in the successful transaction acknowledgment screen. The user can save the payee directly only if he does not need any further approvals, otherwise the new payee details are sent for approval.
The following user matrix provides more details.
| User Type | Without Approval Matrix | With Approval Matrix |
|---|---|---|
| User | Directly save the payee. | Requires authorization according to the approval matrix rule to save the payee. |
| User is a part of one contract ID with one customer ID. | Directly save the payee. | Requires authorization according to the approval matrix rule to save the payee. |
| User is a part of one contract ID with more than one customer ID. | Directly save the payee by navigating to link payee screen. | Navigate to Link Payee Screen allowing the user to link payee. Requires authorization according to the approval matrix rule to save the payee. |
| User is a part of more than one contract and more than one customer ID. | Directly save the payee by navigating to link payee screen. | Navigate to Link Payee Screen allowing the user to link payee. Requires authorization according to the approval matrix rule to save the payee. |
The users can see the status in the manage payee screen,
- The users without approval can see the payee status as Active.
- The users with approvals can see payee status as
- Active if the request is approved.
- Pending if the request is yet to be approved.
Error Scenarios and Validations
- If the transfer fails due to some reason (for example, if you have insufficient funds in the selected account), the app displays an alert along with an appropriate message.
- If the session is timed-out during a transfer and leaves the window open, you have to reinitiate the transfer.
- The Bank/FI's can add a limit on the number of transfers or maximum amount that can be made/transferred to a loan account in a month.
- If the "From" account does not have the enough balance to make the payment an error or warning is displayed. The message can be configured in Transact for override.
- Loan Payments. In the following scenarios, the error messages are displayed.
- The payment may not be reflected immediately in the loan details or transaction section. It may take 2-3 business days to be reflected in your loan account.
- When the transfer to a loan is initiated, the next due amount is pre-filled in the "Amount" field. You cannot modify the due amount.
- In case the due amount is zero, the following message is displayed, "Currently there are no pending dues on your account".
- In case the selected date is later than the "Next Payment Date" associated with the loan account, the following message is displayed "The scheduled date is later than the due date. Making payments after the due date may incur penalty. Do you wish to continue?"
- You cannot make a payment more than the total over due amount. If you select "Pay Other Amount" and enter the overdue amount, the following message is displayed "Your account balance isn't sufficient to make this payment."
- Add Attachments. In the following scenarios the error messages are displayed.
- If you try uploading an invalid file format (PNG, TXT, CSV).
- If you try uploading a file more than the allowed size (i.e. 5MB).
- If you try uploading files more than the allowed file limit (max. five files).
SRMS Integration
- The request type and request subtype for a onetime transfer is configured in Service Request Microservice.
- The following are the configuration details saved in SRMS:
- Product: Account
- Request Type: OnetimeTransfer
- Request Sub type: ownAccounTransfer/sameBank Transfer/SWIFTTransfer/Pay a Person Transfer
- Order Style: Near time
- SEPA Transfer
- Instant Transfer
- Fedwire Transfer
- ACH Transfer
- CHAPS Transfer
- Faster Transfer
- RINGS Transfer
- BISERA Transfer
For Domestic Transfer, the request sub-type are configured based on the payment method.
- The customer does not have mandate definition for a submitted transfer request (without Signatory(s) approval).
- Once a transfer request is initiated, the application saves/persists the request in SRMS with the complete transfer data and displays the SRMS generated reference number on the acknowledgment screen. The status of the transaction is Request Initiated as the request is captured.
- The SRMS is integrated to Transact for all transfer types except Pay a Person .
- In Transfer Activities page, the one-time transfer details are read from SRMS.
- For Recurring transfer the flow is integrated to Transact, where the recurring payment is stored and executed on the respective dates (except Pay a Person ).
- For recurring transfers, the request type is configured as “RecurringTransfer” in SRMS while the names of the sub-types are identical to the ones in one-time transfers.
- In Transfer Activities page, the recurring transfer details are read directly from Transact.
Technical Information
The following information is applicable only for the retail bank users, in all types of transfers(Same Bank, Domestic, and International).
A new field CustomerID is introduced in the payload while sending the information to Transact. This customer ID is derived from the sign in user details. Once the payments is initiated, it is mapped to the ORDERING.CUSTOMER field in the Transact payment order. These values are sent to Transact through API.
Configuration
Feature and Action Codes
The following are the Feature and Action for the UTF Transfer.
Configuration for Instant
The following are the available feature and action code in Master Data Management.
Feature name - Interbank Instant Fund Transfer
Feature code - INTER_BANK_INSTANT_TRANSFER
Feature type - Retail Banking, Business Banking, Wealth Banking
The following table is the associated Action code for the feature.
| Display Name | Action Code | Action Type | Action Category | Limit Group | Action Level | Access Level | Dependencies |
|---|---|---|---|---|---|---|---|
| Approve Cancellations -Instant Transfer | INTER_BANK_INSTANT_FUND_TRANSFER_CANCEL_APPROVE | Retail Banking, Business Banking | Non-Monetary | NA | Account level | Approve | View |
| Approve Self-initiated Instant transfer | INTER_BANK_INSTANT_FUND_TRANSFER_SELF_APPROVAL | Retail Banking, Business Banking | Non-Monetary | NA | Account level | Approve | View |
| Approve Instant Transfer | INTER_BANK_INSTANT_FUND_TRANSFER_APPROVE | Retail Banking, Business Banking | Non-Monetary | NA | Account level | Approve | View |
| Cancel Instant transfer | INTER_BANK_INSTANT_FUND_TRANSFER_CANCEL | Retail Banking, Business Banking, Wealth Banking | Non-Monetary | NA | Account level | Delete | NA |
| Create/Edit Instant transfer | INTER_BANK_INSTANT_FUND_TRANSFER_CREATE | Retail Banking, Business Banking, Wealth Banking | Monetary | Single payment | Account level | Create | View |
| View History -Instant Transfer | INTER_BANK_INSTANT_FUND_TRANSFER_VIEW | Retail Banking, Business Banking, Wealth Banking | Non-Monetary | NA | Account level | View | NA |
Configuration for Non - Instant payment
The following are the available feature and action code in Master Data Management.
Feature name - Interbank Account to Account Fund Transfer
Feature code - INTER_BANK_ACCOUNT_FUND_TRANSFER
Feature type - Retail Banking, Business Banking, Wealth Banking
The following table is the associated Action code for the feature.
| Display Name | Action Code | Action Type | Action Category | Limit Group | Action Level | Access Level | Dependencies |
|---|---|---|---|---|---|---|---|
| Approve Cancellations -Transfer | INTER_BANK_ACCOUNT_FUND_TRANSFER_CANCEL_APPROVE | Retail Banking, Business Banking | Non-Monetary | NA | Account level | Approve | View |
| Approve Self-initiated transfer | INTER_BANK_ACCOUNT_FUND_TRANSFER_SELF_APPROVAL | Retail Banking, Business Banking | Non-Monetary | NA | Account level | Approve | View |
| Approve Transfer | INTER_BANK_ACCOUNT_FUND_TRANSFER_APPROVE | Retail Banking, Business Banking | Non-Monetary | NA | Account level | Approve | View |
| Cancel transfer | INTER_BANK_ACCOUNT_FUND_TRANSFER_CANCEL | Retail Banking, Business Banking, Wealth Banking | Non-Monetary | NA | Account level | Delete | NA |
| Create/Edit transfer | INTER_BANK_ACCOUNT_FUND_TRANSFER_CREATE | Retail Banking, Business Banking, Wealth Banking | Monetary | Single payment | Account level | Create | View |
| View History - Transfer | INTER_BANK_ACCOUNT_FUND_TRANSFER_VIEW | Retail Banking, Business Banking, Wealth Banking | Non-Monetary | NA | Account level | View | NA |
Bundle Configurations
The following are the Spotlight Bundle configuration for the UTF Transfer.
Configuration to View Account Compact Dashboard
System configuration (Bundle DBP - ACCOUNTS_COUNT_COMPACT_DASHBOARD) is available in the Spotlight application to drive the visibility of Account Compact Dashboard. Based on the bank configuration, number of accounts are displayed on the combo box.
For example, the configuration is set as 10. The following are the scenarios:
| Scenario 1 | User with less than or equal to 10 accounts | The application displays accounts with their available balances grouped by account types (Favorite, Savings, Current, and many more). |
| Scenario 2 | User with more than 10 accounts | The application displays accounts grouped by account types (Favorite, Savings, Current, and many more). By default, the application displays favorite account as expanded and rest all account types are collapsed. If there are no favorite accounts, then one of the account types as expanded and rest all account types are collapsed. |
Configuration to display recently used accounts
System configuration (Bundle DBP - RECENTLY_USED_ACCOUNTS_LENGTH) is available in the Spotlight application to view the recently used accounts. Based on the bank configuration, accounts are displayed on the screen.
For example, the configuration is set as 5.
| Scenario 1 | The user have up to 5 recently used(recently performed transaction) accounts. | The application will display all the recently used accounts in To combo box field. |
| Scenario 2 | The user have more than 5 recently used(recently performed transaction) accounts. | The application displays only 5 recently used accounts in To combo box field. |
The following are the bundle configuration.
|
Key |
Value |
Description |
|---|---|---|
| TRANSFERS_CBPR_FIELDS | {"ISOAdditionalFields":"ON","TransfersFromAccountType":{"Business":{"ISOAdditionalFields":"ON","Domestic":[{"PayeeIdentification":"ON","ExtendedPartyDetails":"OFF","RemittanceInformation":"OFF"}],"International":[{"PayeeIdentification":"ON","ExtendedPartyDetails":"ON","RemittanceInformation":"ON"}]},"Retail":{"ISOAdditionalFields":"OFF","Domestic":[{"PayeeIdentification":"ON","ExtendedPartyDetails":"OFF","RemittanceInformation":"ON"}],"International":[{"PayeeIdentification":"ON","ExtendedPartyDetails":"OFF","RemittanceInformation":"ON"}]}},"AddPayee":{"PayeeIdentification":"ON"}} | All this configuration is applicable for Make Transfer and Add Payee screens. In case of Add Payee, irrespective of configuration OPD and RI will not be displayed, as this information are related to payment. |
| TRANSFERS_RI_CREDITOR_CODES | [{"creditorRefCode":"DISP","creditorRefName":"DISP - Dispatch Advice"},{"creditorRefCode":"FXDR","creditorRefName":"FXDR - Foreign Exchange Deal Reference"},{"creditorRefCode":"PUOR","creditorRefName":"PUOR - Purchase order"},{"creditorRefCode":"RADM","creditorRefName":"RADM - Remittance advice message"},{"creditorRefCode":"RPIN","creditorRefName":"RPIN - Related Payment Instruction"},{"creditorRefCode":"SCOR","creditorRefName":"SCOR - Structured Communication"}] | Transfers Remittance Information section - Dropdown values of the field Creditor Reference code. |
In this topic