Bulk Payments
The Bulk Payments is a system that allows to make multiple payments to a bulk list. The bulk list of beneficiary payments the bank intends to pay from a single account.
A business user with the required permissions can initiate Bulk Payments by uploading a file (.csv or .xml) or through online template. Using this option, multiple payment details are uploaded in a single instance. This feature is applicable only to Web Channel and integrated with Transact directly. The request is created in Transact and the Transact application processes the payments.
The bulk payment feature supports the following functions and abilities:
- Upload bulk payment files in both xml (PAIN.001.03) and csv (Transact Proprietary format) files to create request.
- Create bulk payment request via online templates instead of file upload.
- Review the bulk payment request done via file upload or template.
- Submit the bulk payment request created via file upload or template.
- View, edit, and delete the uploaded bulk payment templates.
- Track the status of bulk payment request pending for authorization.
- Review the rejected bulk payment request and re-submit for authorization.
- Track the status of payment processing post authorization.
- Maintain list of bulk payment templates for reuse.
- The supervisor approving the bulk payments can view the list of bulk payment request pending for authorization and choose to Approve / Reject as required. Post authorization, the bulk payment request is initiated for processing the payment.
- Supports approval matrix.
- Supports limit validation.
- View the status of the requests submitted for processing.
- Supports two types of batch processing:
- Single – This mode is used for payroll / bonus processing (Single Debit and Multiple credits).
- Multiple – This mode is used for mass payments like vendor payments (each transaction is processed separately).
- While creating a template the user can use Confirmation of Payee feature.
The permissions for the business user are managed in the spotlight application. Navigate Customers Management > Customer > Search for customer > Features and Actions > Bulk Payment Template. Edit the available actions based o the criteria.
The following is the list of available actions:
- Submit a bulk request (Single and Multiple)
- Create, edit, view, and delete request
- Adding external bank details(domestic and International)
- Create and edit payment order
 Multi entity support
Multi Entity Support: Customers can view the dashboard, perform transfers, or view any request summary and submit requests against the entity associated with the customer during login. The feature is enhanced with Experience APIs to retrieve and post based on the Entity ID of the signed-in user.
- The Entity ID selected by the signed-in user flows through the application through the respective Experience API.
- For all fetch (GET) API calls, the system retrieves the results based on the Entity ID of the signed-in user.
- For all add/update/delete calls, the system passes and posts requests against the Entity ID of the signed-in user.
The feature supports the following modules:
| Authentication | Dashboard | Account Overview |
| Credit Card overview | Cheque Management | Card Management |
| Statements | Dispute Transactions | Service Requests |
| PFM | Account Settings | Consent Management |
| Sign In Settings | Profile Settings | Manage Beneficiaries |
| Unified Transfers | Manage Transfers | Foreign Exchange |
| Bulk Payments | Bill Payments | Approval Matrix |
| Portfolio Management | WealthOrder |
- The accounts are segregated by customer ID at all relevant places in the application during transfers and other flows and icons against each account indicates the type of account.
- The uploads to create request is done through file upload and through template.
- Appropriate Permissions are required for single and multi processing modes for the user to proceed with the journey. In case, if either of the processing mode permission is not there, the user cannot proceed with corresponding journey.
- The approvals and limit values are different for single and multi processing modes. If the approvals and limit values exceeds than configured value the user cannot proceed with corresponding journey. These values are configured in Spotlight application.
Web Channel menu path: Side menu > Bulk Payments > Click any of the following links: Upload Requests, Payment Status, Payment History, Templates, Upload File, and Create New Template. The application displays the relevant screen.
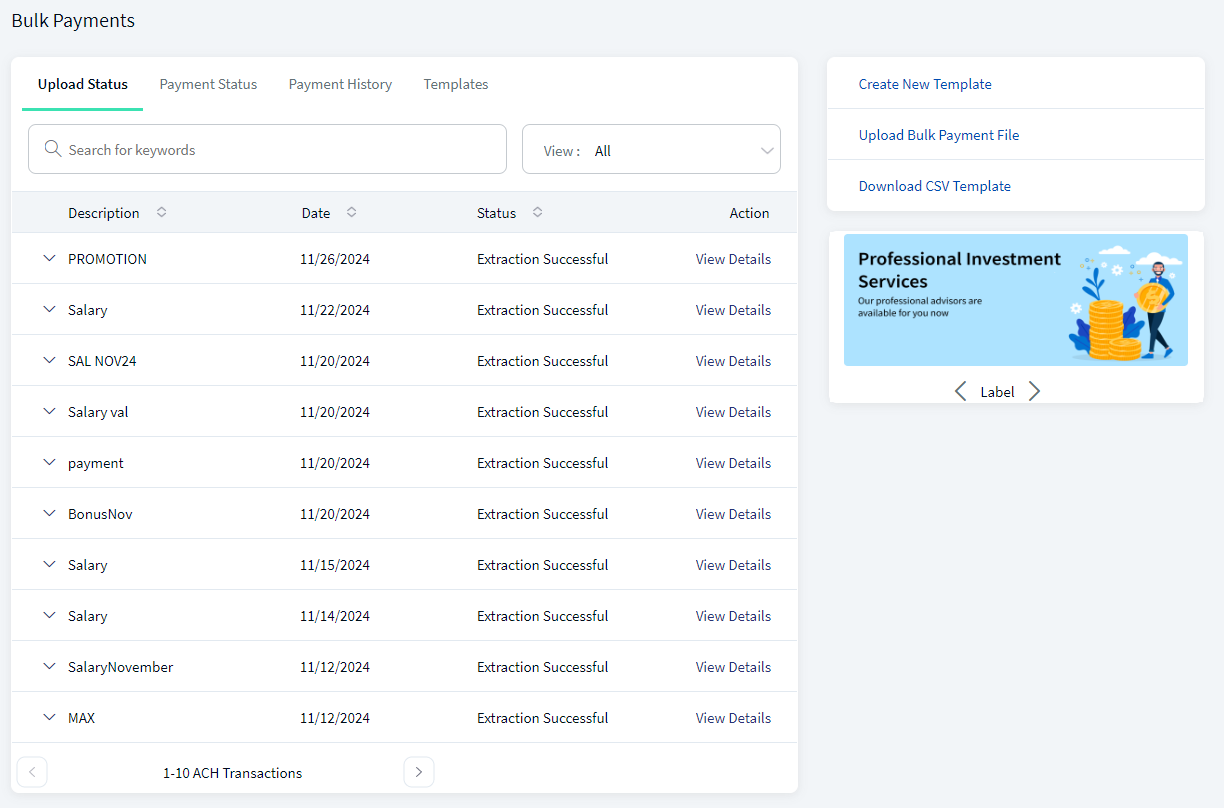
The Bulk Payments form contains four tabs and links to activities on the right-side bar:
- Upload Status
- Payment Status
- Payment History
- Templates
- Create New Template
- Upload File and Make Bulk Payment
- Download CSV Template
Business Process Diagram - Bulk Payments
Create New Template
Use the feature to create new templates for bulk payments by entering primary and payee details.
Web Channel menu path:
- Side menu > Bulk Payments > Create New Template.
- Right-side bar > Create New Template
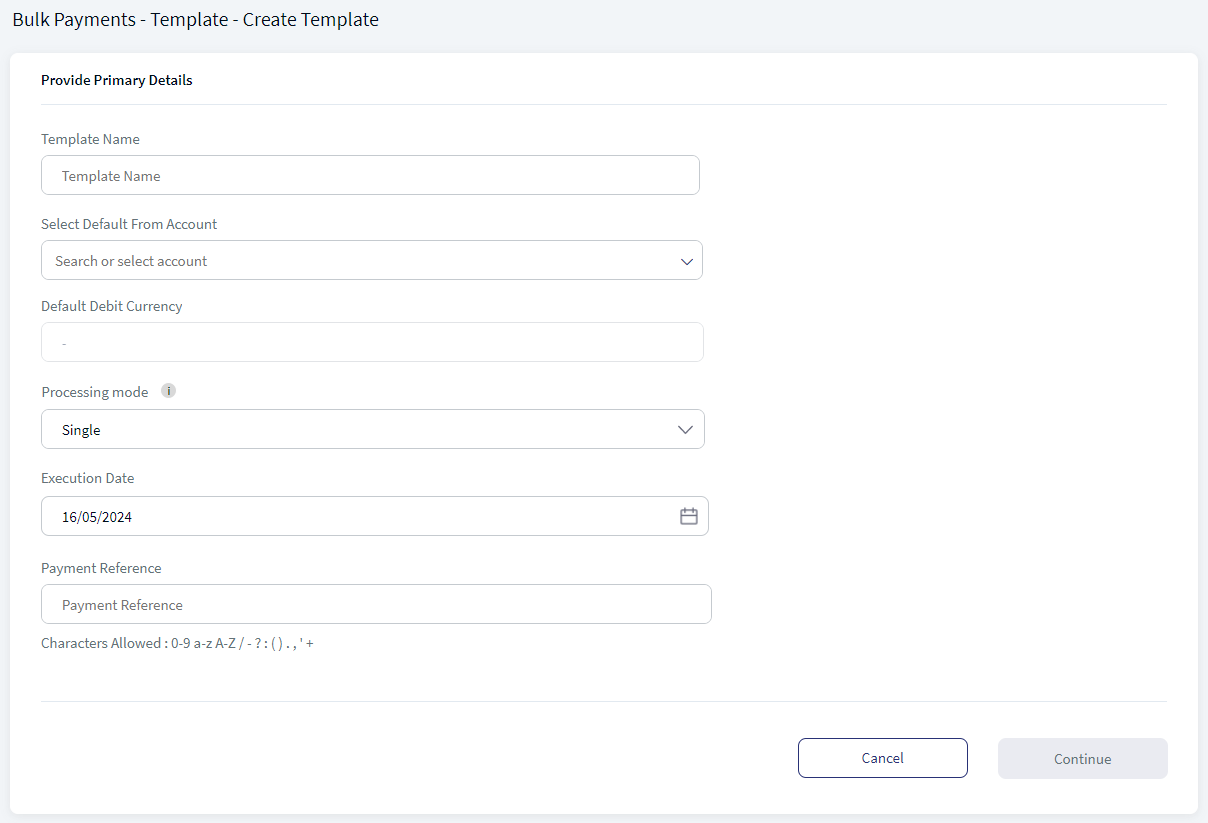
The application displays the create template screen.
To create a bulk payment template, follow these steps:
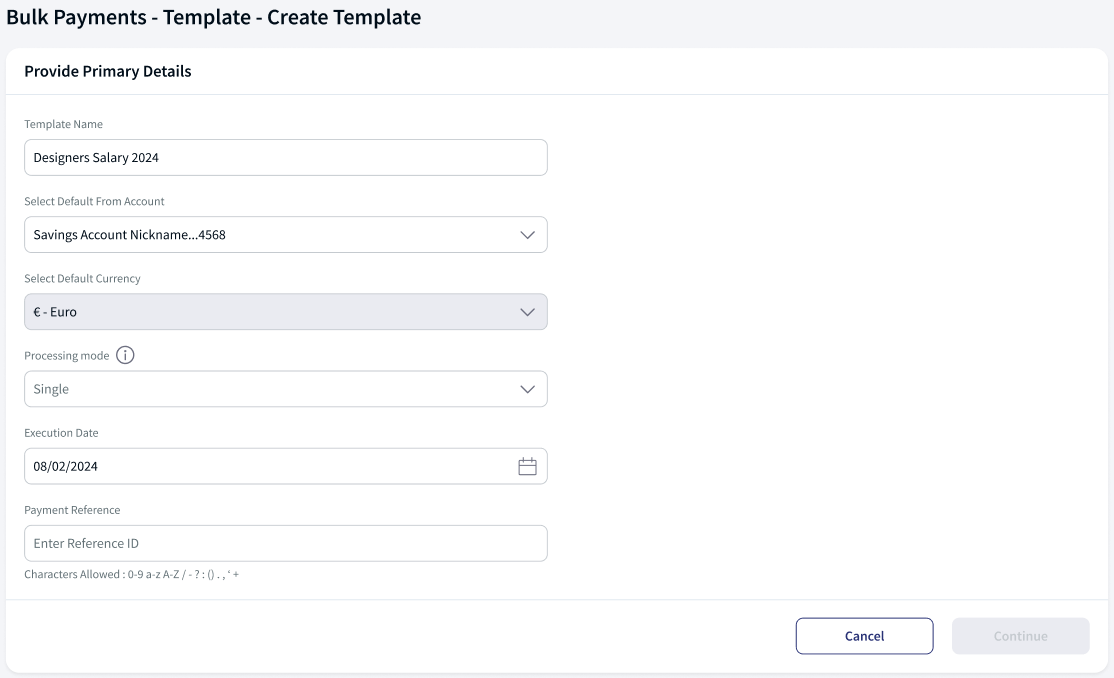
- Provide Primary Details
- Template Name. Enter a template name to identify the template. The template name must be unique, and the maximum length of the template name can be 50 characters.
- Select Default From Account. Only eligible accounts are displayed in the list. Select the debit account from the combo box field. The display of the accounts in the drop-down list depends on the user having access to single or multiple user IDs. Click here to see more details
The Select Default From Account field is combo box field. The application displays a place holder value as Search or select account with favorites accounts added in its drop down. The user can search using account name or account number or select an account from the drop down list. After selecting Select Default From Account, the application displays available balance next to the field.
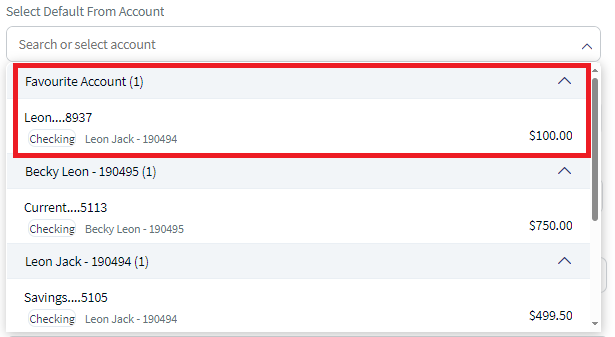
From Account combo field - Favorite Account 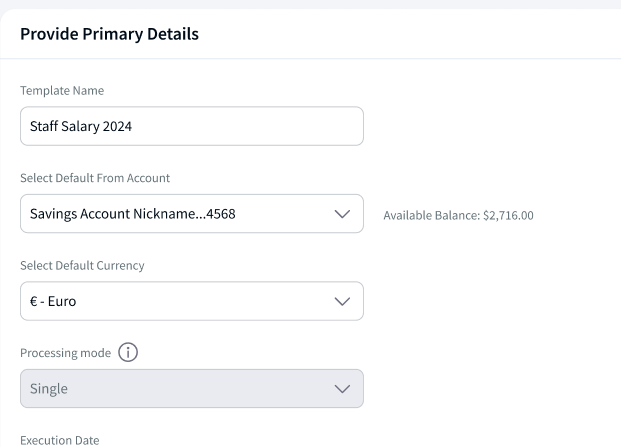
Display of account balance post account selection 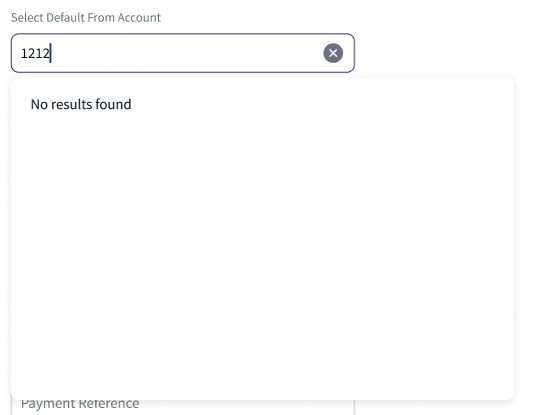
No results found The application displays different drop down screens to the user based on the contract. See Account listing and Customer listing dashboard for more information on users having large number of accounts and contracts. In Spotlight, the bank needs to configure the system configurations (Bundle DBP - ACCOUNTS_COUNT_COMPACT_DASHBOARD) to enable the different views.
The following are the different scenarios on how the applications behaves:
Scenario 1: The user having access to single customer ID and have less accounts
Displays account with their available balances grouped by account types (Favorite and Current). If no accounts are marked as favorite the application does not display this category.
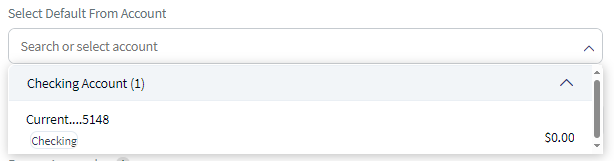
Single Customer with less accounts Scenario 2: The user having access to single customer ID and have more accounts
Displays accounts grouped by account types (Favorite and Current). By default, the application displays favorite account as expanded and rest all account types are collapsed. If no accounts are marked as favorite the application, then one of the account types is expanded and rest all account types are collapsed.
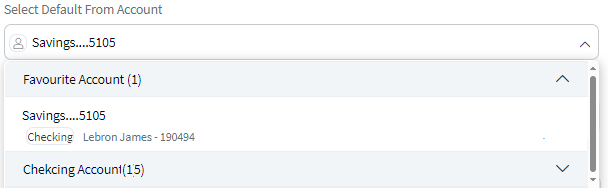
Single Customer with more accounts Scenario 3: The user having access to multiple customer IDs and have less accounts
Displays accounts with their available balances grouped by favorite accounts and customer name with ID. If no accounts are marked as favorite the application does not display this category.
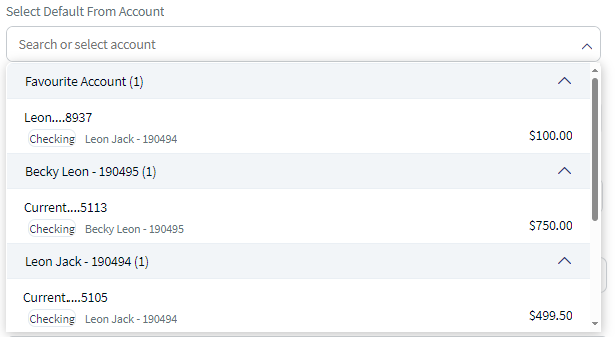
Multi Customer with less accounts Scenario 4: The user having access to multiple customer IDs and have more accounts
Displays accounts grouped by favorite accounts and customer name with ID. By default, the application displays favorite account as expanded and rest all customer accounts are collapsed. If no accounts are marked as favorite, then primary customer accounts is expanded and rest all customer accounts are collapsed.
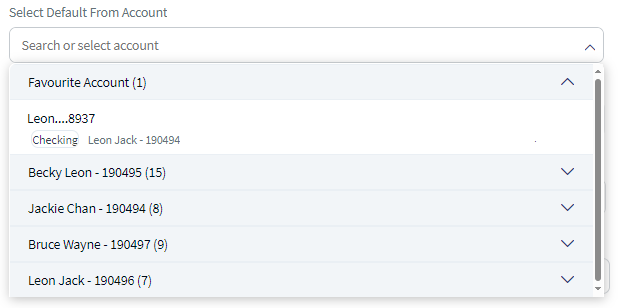
Multi Customer with more accounts - Select Default Debit Currency. Currencies of the selected account are displayed here.
- Processing Mode. Select from the list - Single or Multiple.
- Single. The bulk payment will be processed with a single debit followed by multiple credits. This mode is mainly selected for salary processing, bonus payment, and more.
- Multiple. The bulk payment will be processed, where each transaction is processed separately; for every credit there is a corresponding debit entry in the account. This mode is mainly selected for processing vendor payments.You can select the currency code based on the processing mode while adding a new payment detail:
- For single processing mode the currency code is defaulted to debit account currency and is disabled. You cannot change the currency code.
- For Multi-Processing mode, the currency code is defaulted to debit account currency and is enabled, you can change the currency code, if required.
- Appropriate Permissions are required for single and multi processing modes for the user to proceed with the journey. In case, if either of the processing mode permission is not there, the user cannot proceed with corresponding journey.
- The approvals and limit values are different for single and multi processing modes. If the limit values exceeds than configured value the user cannot proceed with corresponding journey. These values are configured in Spotlight application.
- Execution Date. Select the payment initiation date from the calendar or enter the date in DD/MM/YYYY format.
- Payment Reference. Enter the payment description for reference.
Only 0-9 a-z A-Z / - ? : ( ) . , ' + characters allowed are enter the field.
- Click Continue to proceed to the add payees screen.
Cancel the process at any time. The changes are not saved.
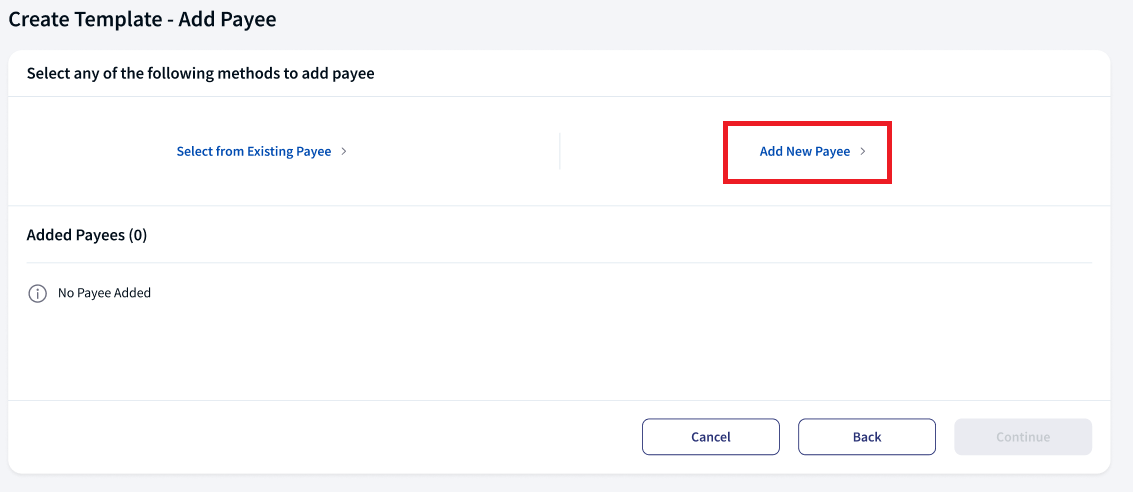
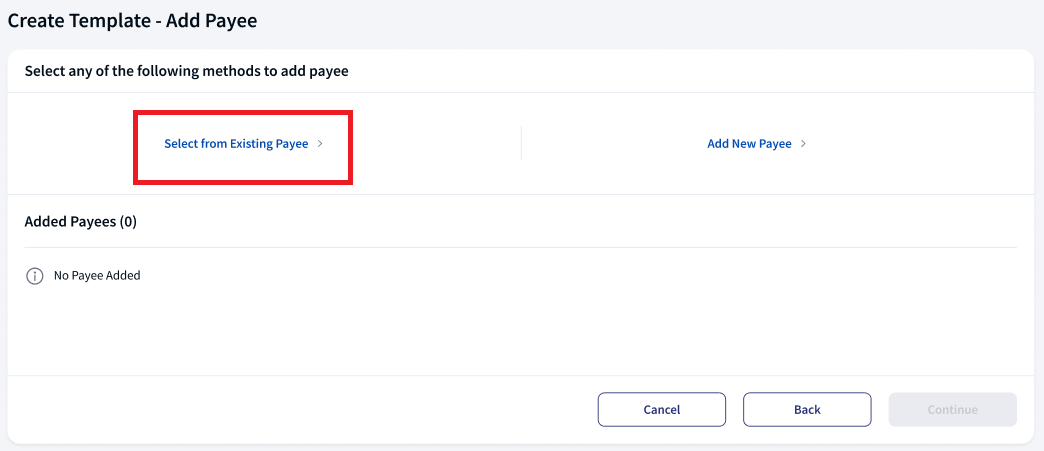
- Add Payee. Add New Payee or Select from Existing Payees list maintained by the user.
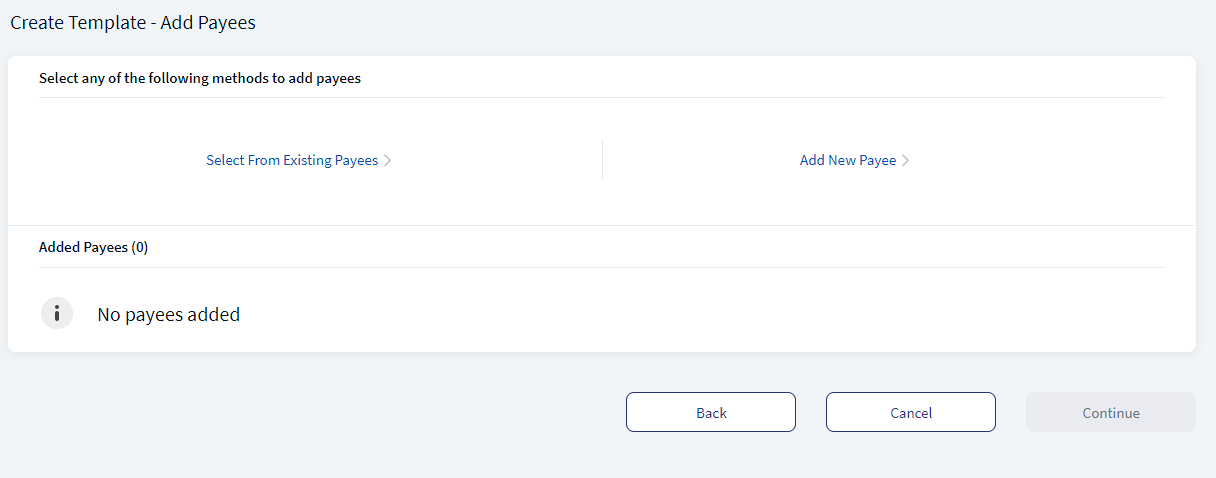
- Select from Existing Payees. Add the existing payees. Follow these steps:
- Click Select from Existing Payees.
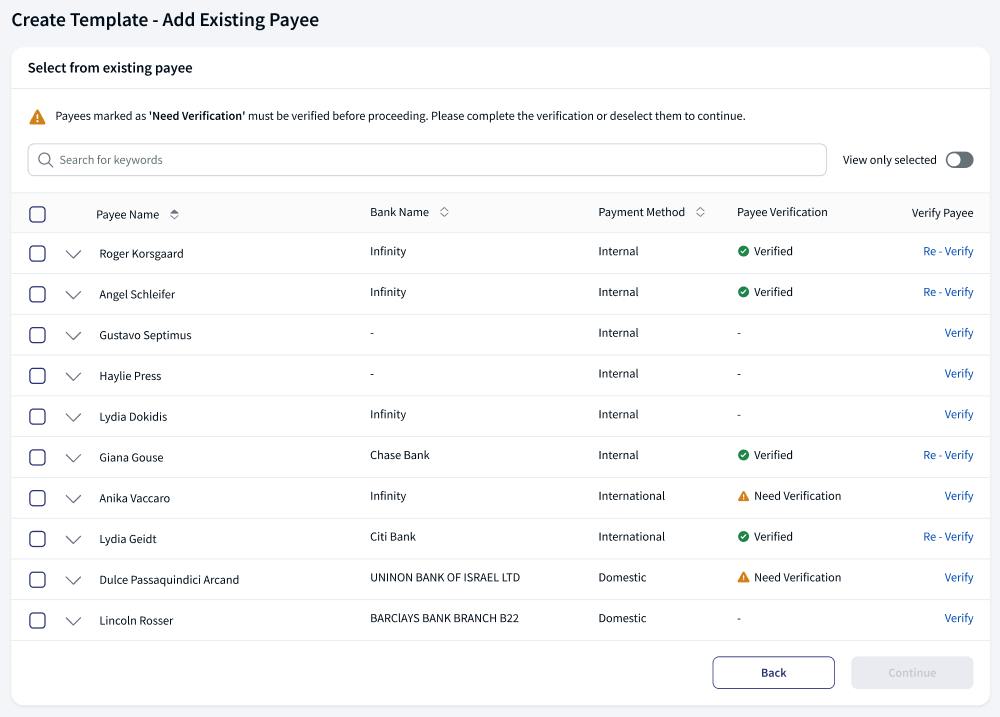
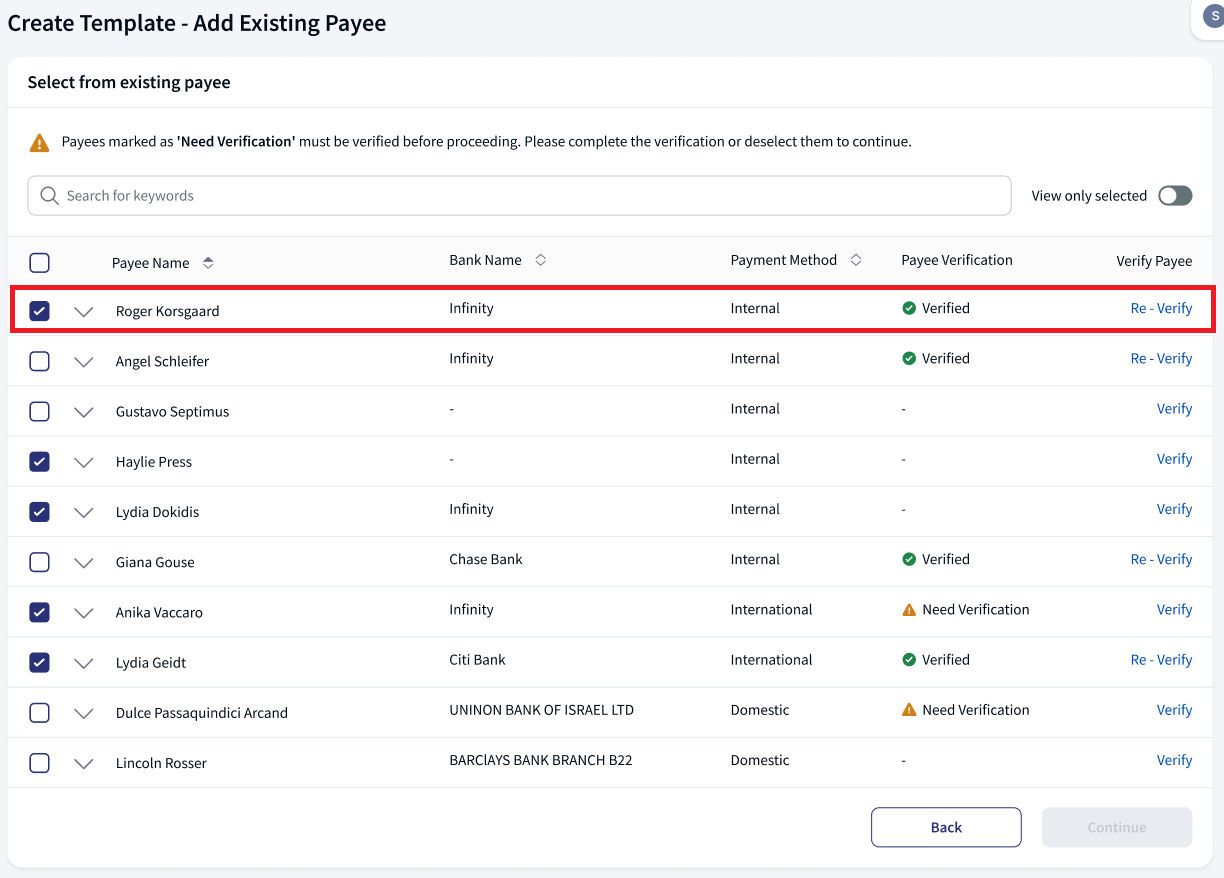
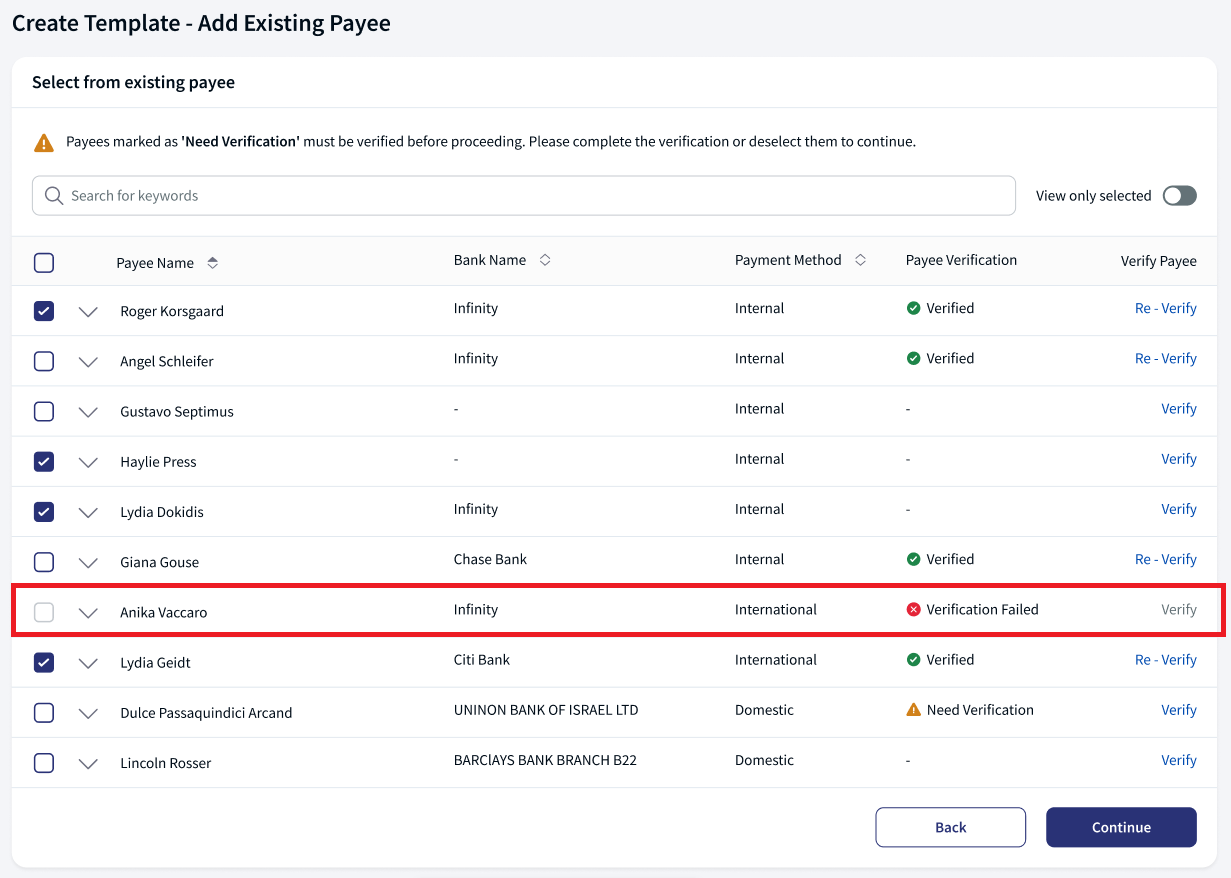
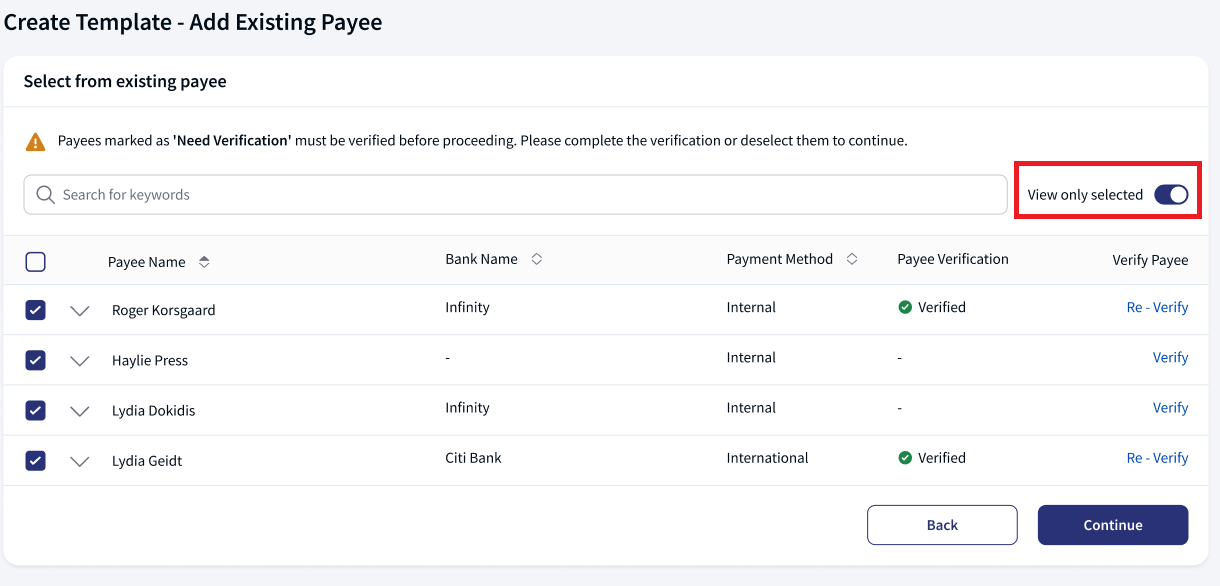
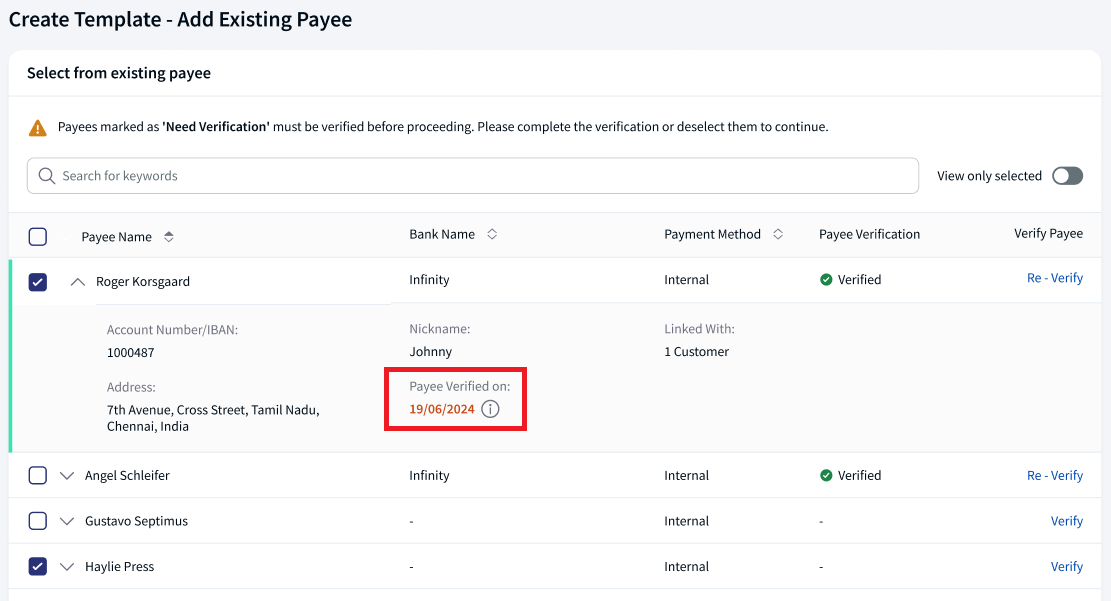
- The Add Existing Payee page appears with the list of saved payees with the following details: Payee Name, Bank Name, Payment Method, Payee Verification, Verify Payee. For information on Payee Verification see Conformation of Payee. If the Verified on time stamp is displayed in orange color, see Expiry Period for more information.
- Click the down arrow besides each payee record to view the additional details such as Account Number / IBAN, Nick Name, Linked With, Address, and Payee Verified on depending on the payment method (internal, domestic, and international).
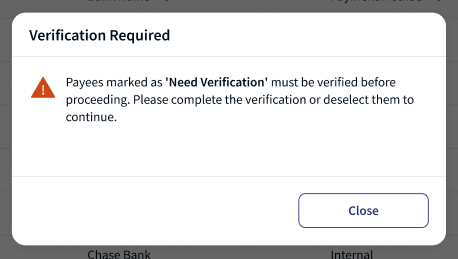
- The Payee Verification can show, Verified when the Confirmation of Payee check is success, Need Verification for the payee records with confirmation of payee status as skipped or blank(The user did not perform Confirmation of Payee check) and mandatory configuration payment category.
- Perform any of the following actions:
- Search for specific payees using the search bar.
- Re-verify or Verify the payee. The user can perform payee verification check verify/ re-verify, on one payee at a time.
- Sort the list using the sort icon. By default, the list is sorted by the payee name.
- Turn on / off to view only the selected recipients to review before adding them to the template.
- This option is turned off by default.
- It cannot be toggled if there are no recipients to select.
- On turning on, only the selected payees are shown while maintaining the same sort order applied on the page.
- On turning off, all the payees will be shown while maintaining the same sort order applied on the page.
- Perform Confirmation of payee checks.
- Select the check box(es) to add the payees to the template. Click Select All to select all the payees.
- Click Continue to proceed to the add payment information screen.
The continue button is disabled when confirmation of payee is mandatory and the user selects any of the payees with Payee Verification status as Need Verification.
- Add Payment Information
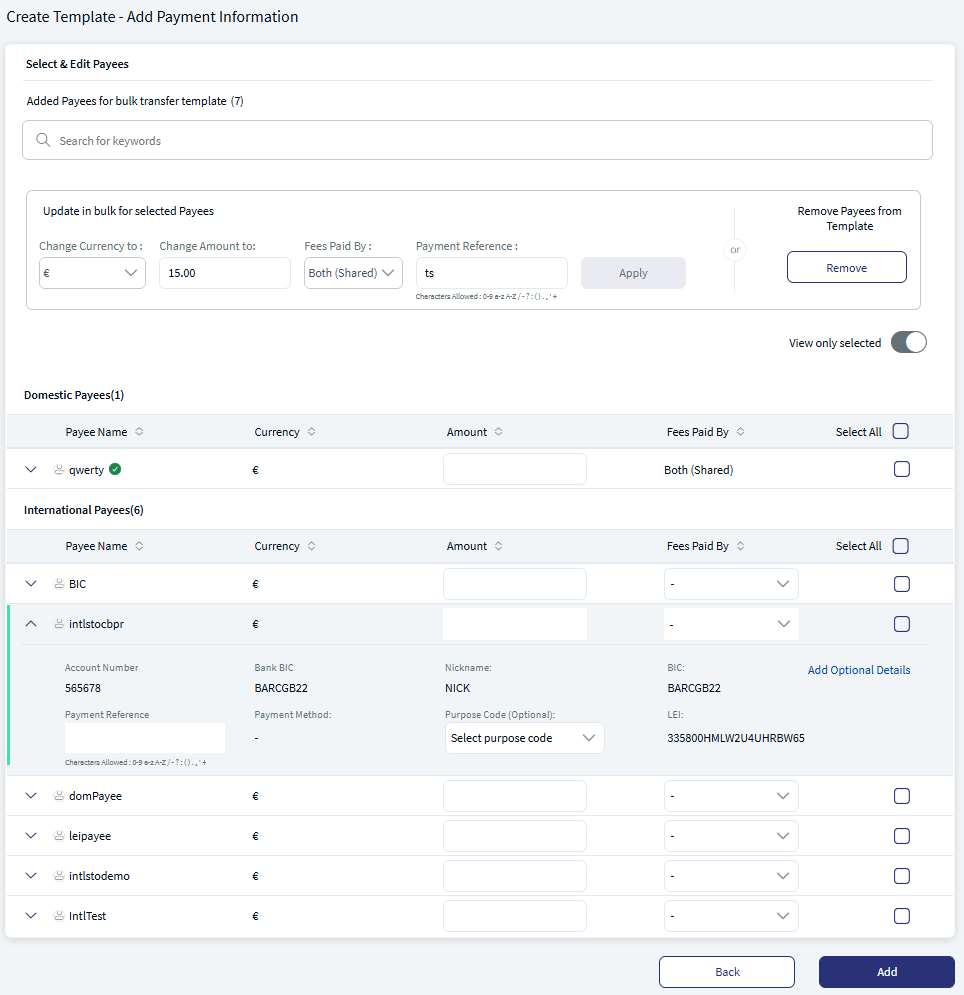
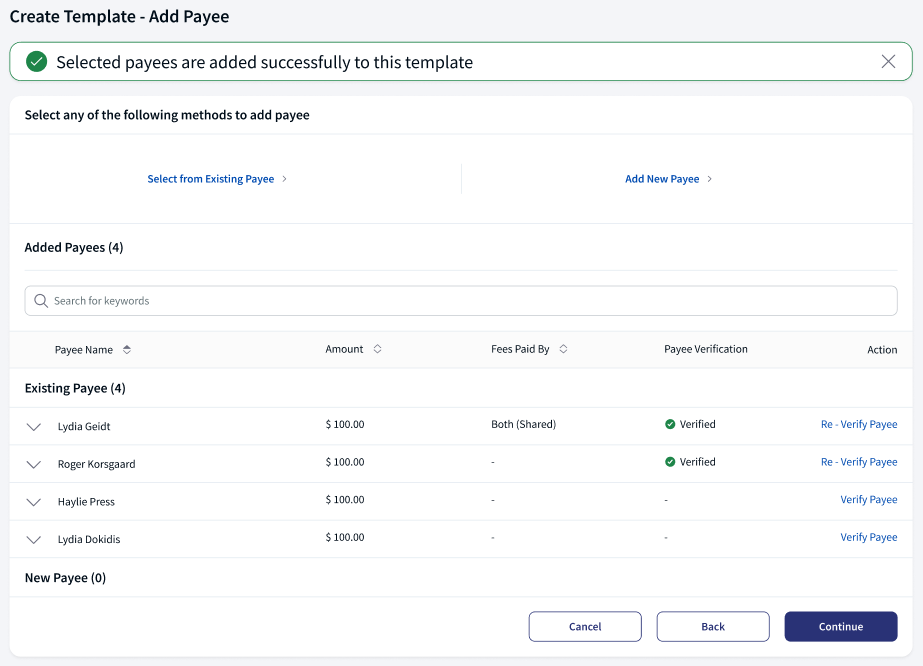
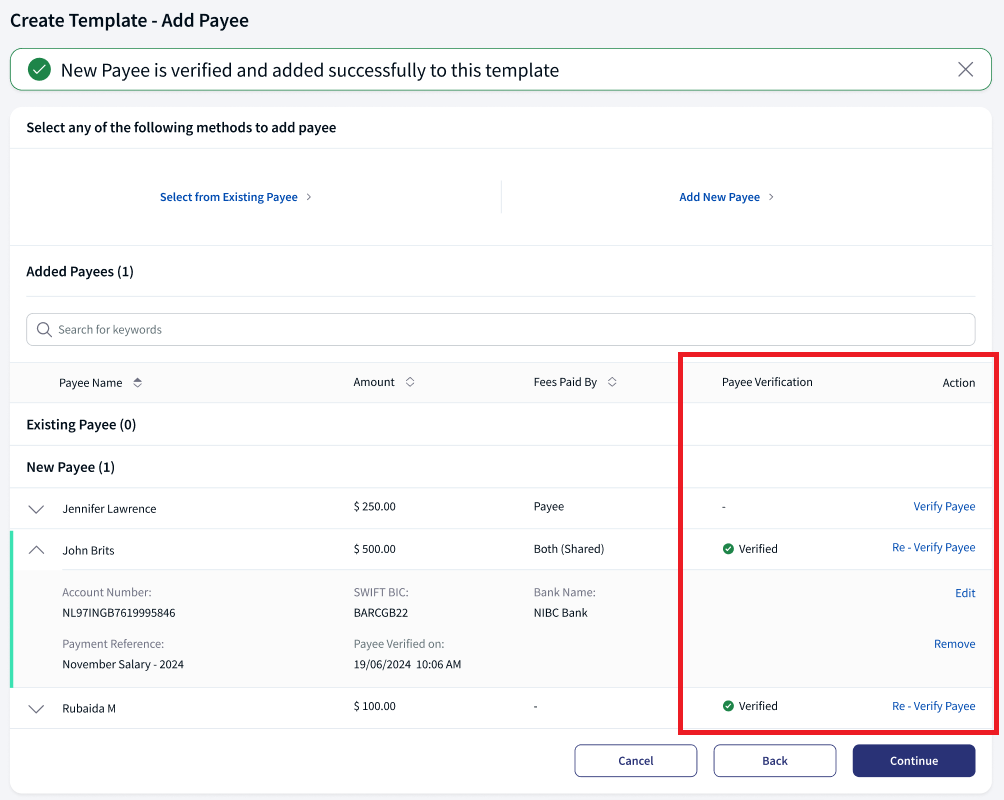
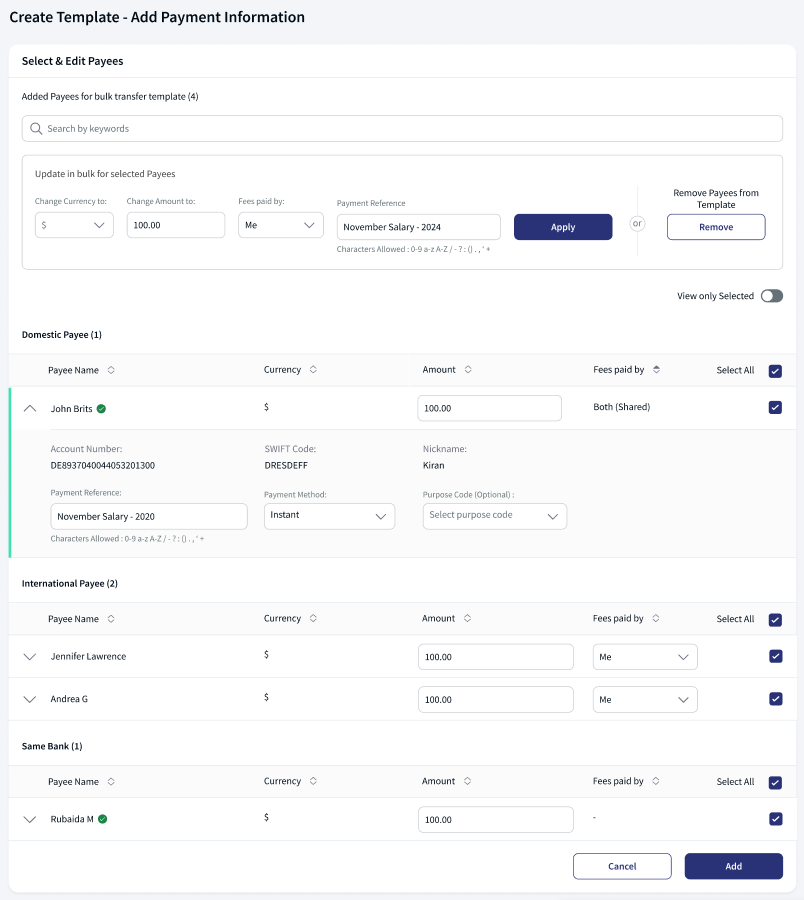
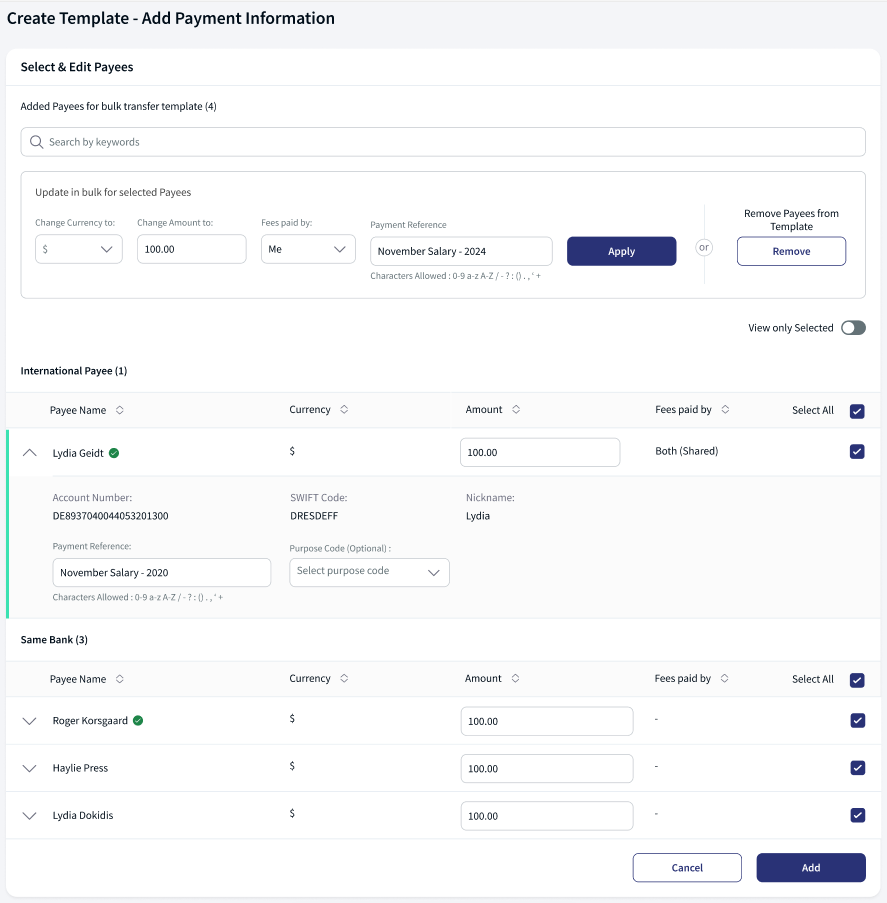
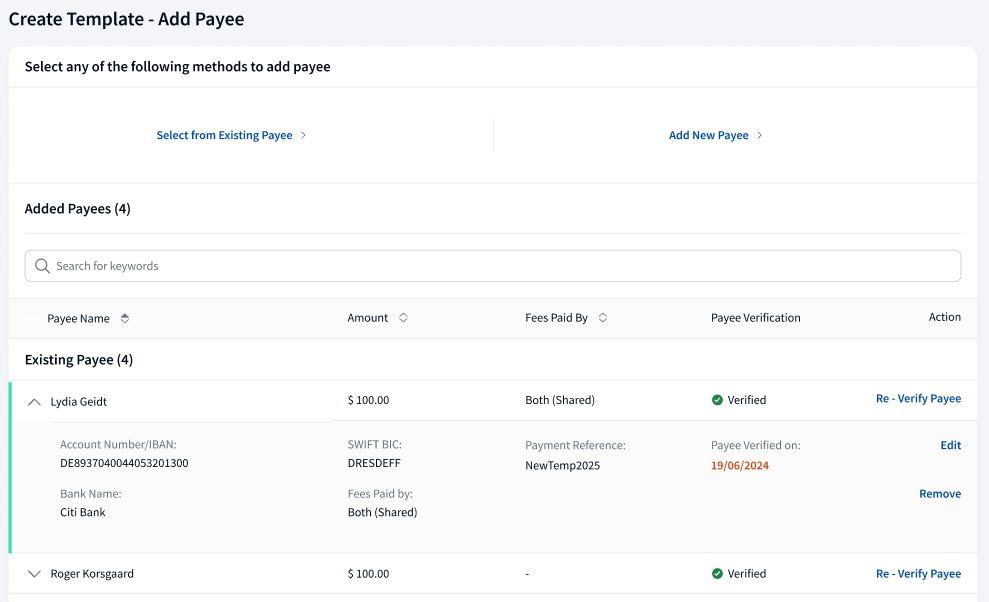
- The application displays the list of segregated payee details in Existing Payee and New Payee with the following details: Payee Name, Amount, Fees paid by, Payee Verification, and Action. The list is sorted by Payee Name by default, but can also be sorted by Amount, and Fees Paid by using the sort icon.
- Do any of the following:
- Update the payment information in bulk for selected payees: Select the check box of the required payees and update the data in bulk. The following information can be updated:
- Change the currency from the list.
- Enter the changed amount.
- Select the person who will bear the fees. logged-in user, beneficiary, or shared.
- Enter the Payment Reference notes. It denotes the payee reference details.
Only 0-9 a-z A-Z / - ? : ( ) . , ' + characters allowed are enter the field.
- Click Apply Changes. The data of the selected payees is updated.
- Use the search bar to search for specific payees.
- Remove payees from the template. Select the check box of the required payees to be removed and click Remove.
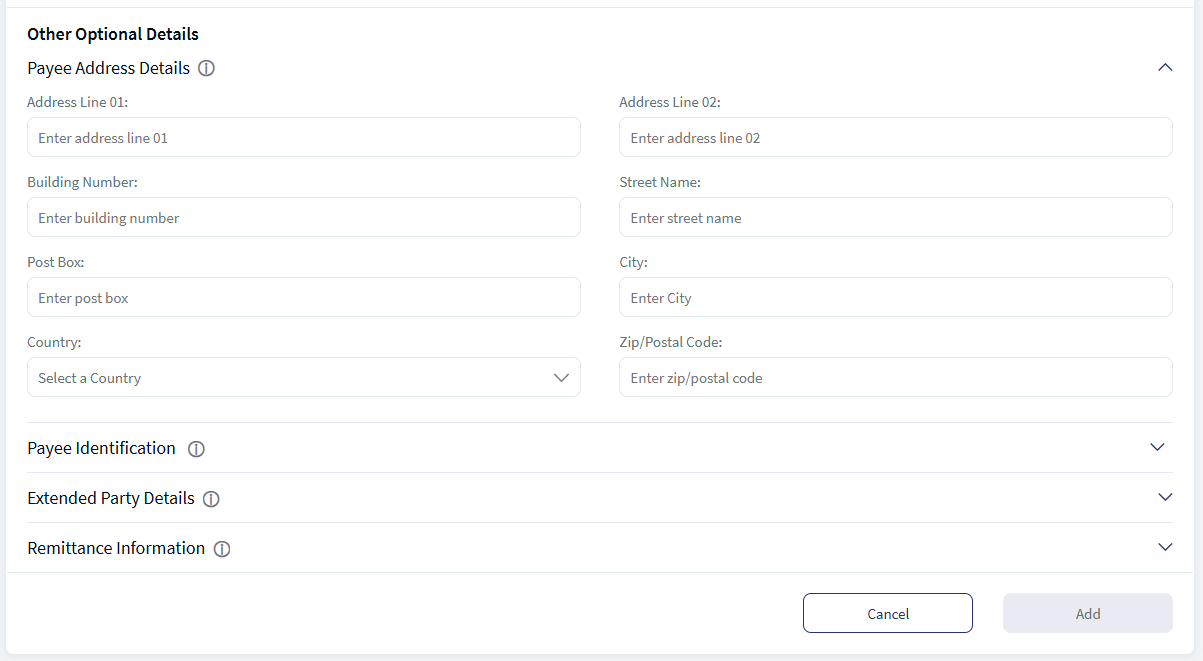
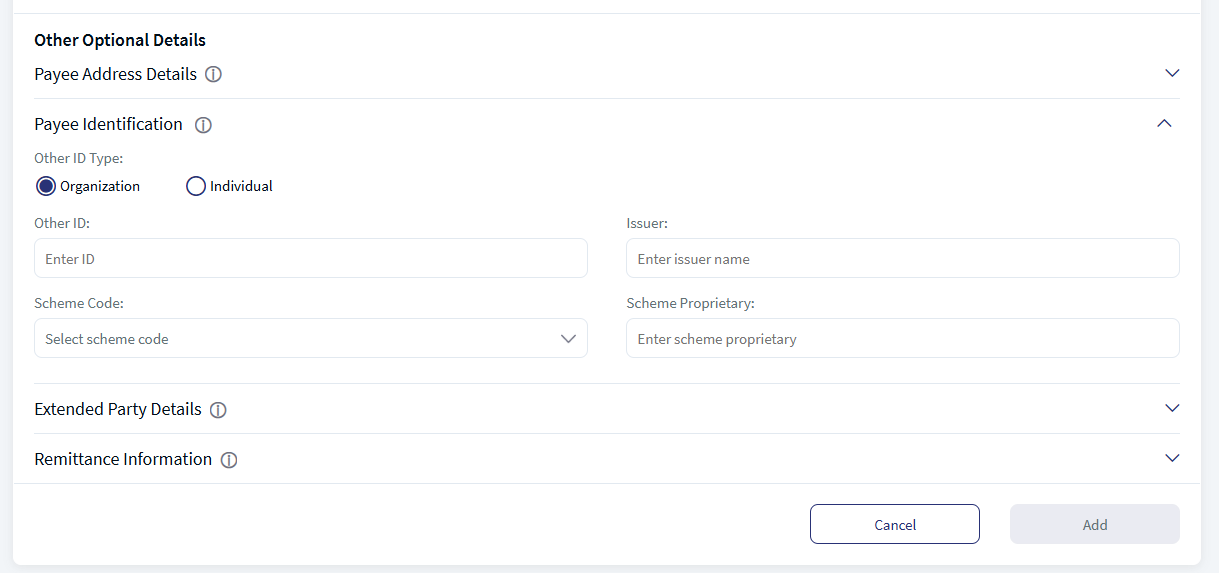
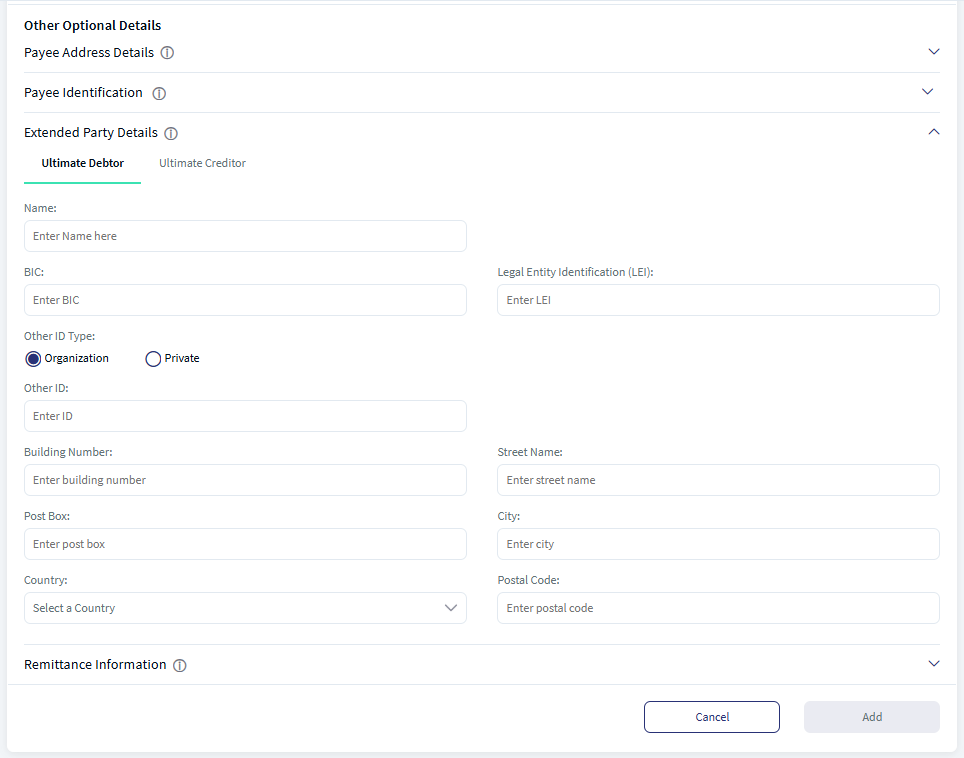
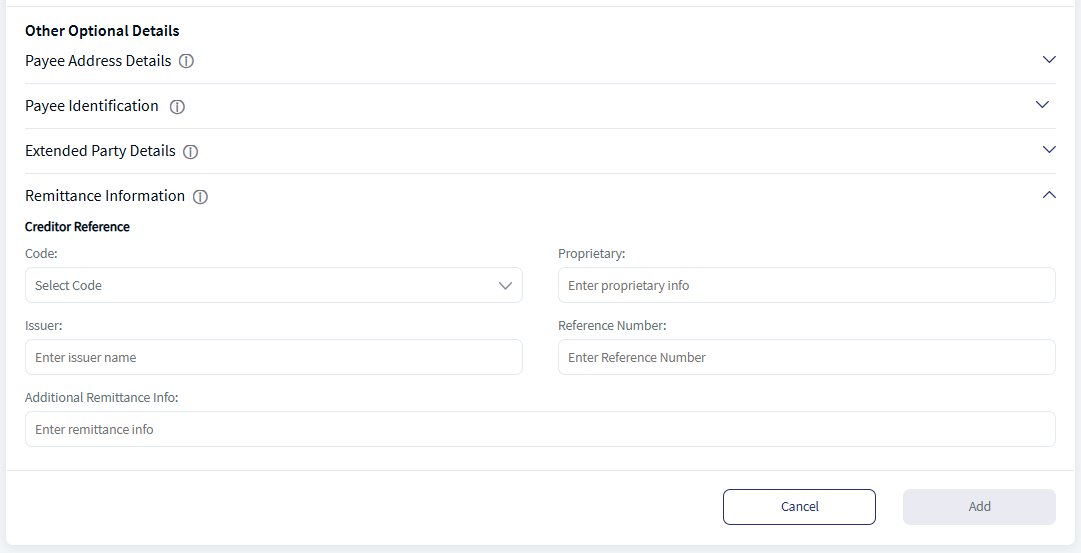
- View/ Add Optional details for Payees. Click Add Optional Details. The application displays a pop-up window. This visibility of Payee Identification, Extended Party Details, Remittance information is controlled by Spotlight configuration. Click here to see details. The section Payee Address Details is only visible if the record has address details saved.
- Payee Address Details. The user can view personal information (such as Phone, Email) and address details (such as Address, Country, City, State, and Zip/ postal code). These fields are disabled.
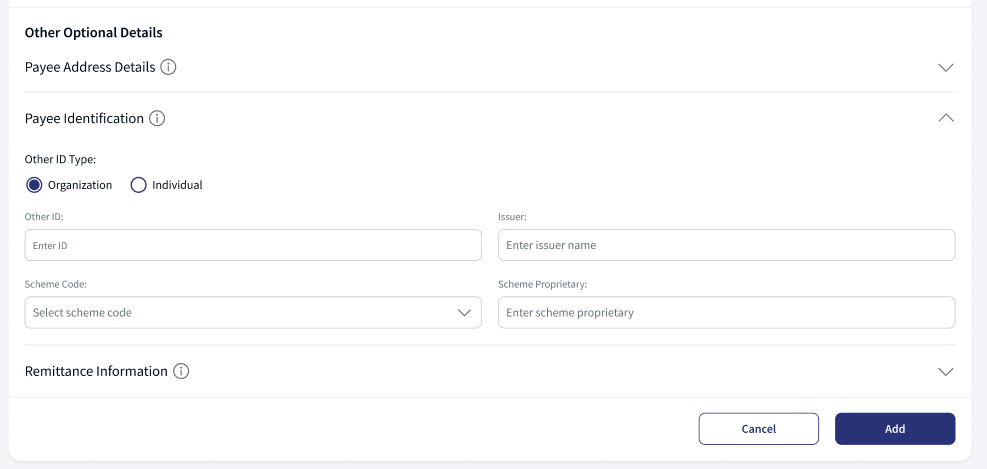
- Payee Identification details. Enter the payee identification details such as Other ID Type (Organization or Individual), Other ID, Issuer, Scheme Code, and Scheme Proprietary.
The user can either select Scheme Code or enter Scheme Proprietary. The application disables the other field automatically. - Extended Party Details (Optional). This section is visible only for International transfer. This section have two tabs
- Ultimate Debtor. Enter the Name, BIC, Legal Entity Identification(LEI), Other ID Type, Other ID, Address details (such as Building number, street name, post box, city, country, postal code).
- Ultimate Creditor. Enter the Name, BIC, Legal Entity Identification(LEI), Other ID Type, Other ID, Address details (such as Building number, street name, post box, city, country, postal code).
- Remittance information details (Optional). Enter the Creditor Reference details Code, Proprietary, Issuer, Reference Number, and Additional Remittance Info.
The user can either select Code or enter Proprietary. The application disables the other field automatically.
- Update the payment information in bulk for selected payees: Select the check box of the required payees and update the data in bulk. The following information can be updated:
- Click Add to add the selected payees to the template.
- The application displays an acknowledgment that the payee is added to the template successfully.
- Click Select from Existing Payees.
- Add New Payee. Add Payees manually to the template. All fields are mandatory until otherwise stated. See notes from Payee enrichment. Follow these steps:
- On the add payees screen, click Add New Payees. The user is provided with two options. Add a payee account that resides in the same bank or add a payee that resides in another bank.
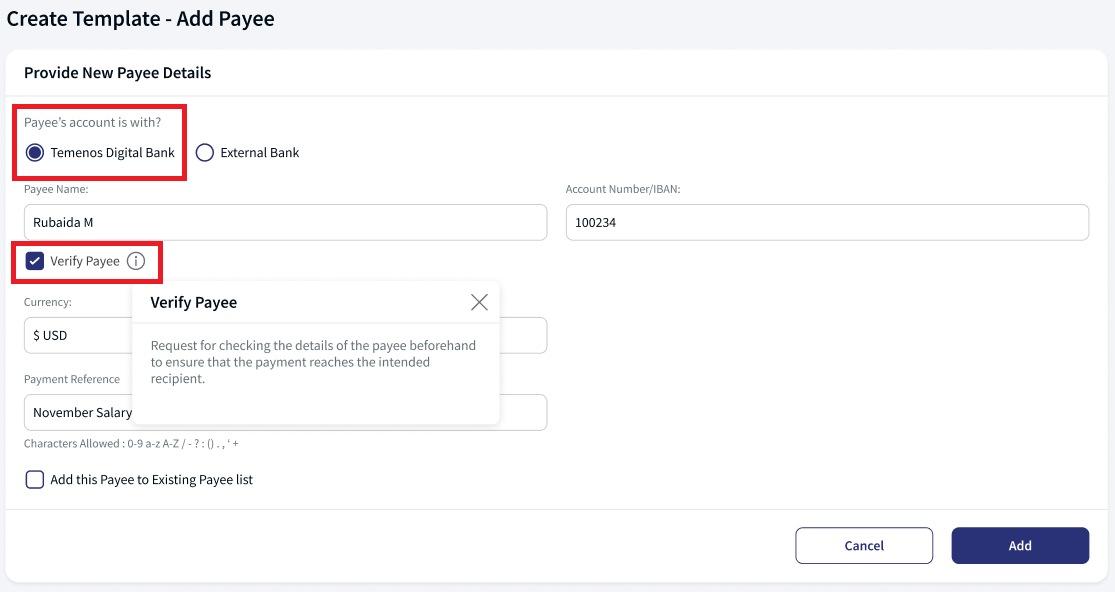
- Select the beneficiary's account. Temenos Digital Bank or External Bank. The fields vary depending on selected bank.
- Temenos Digital Bank
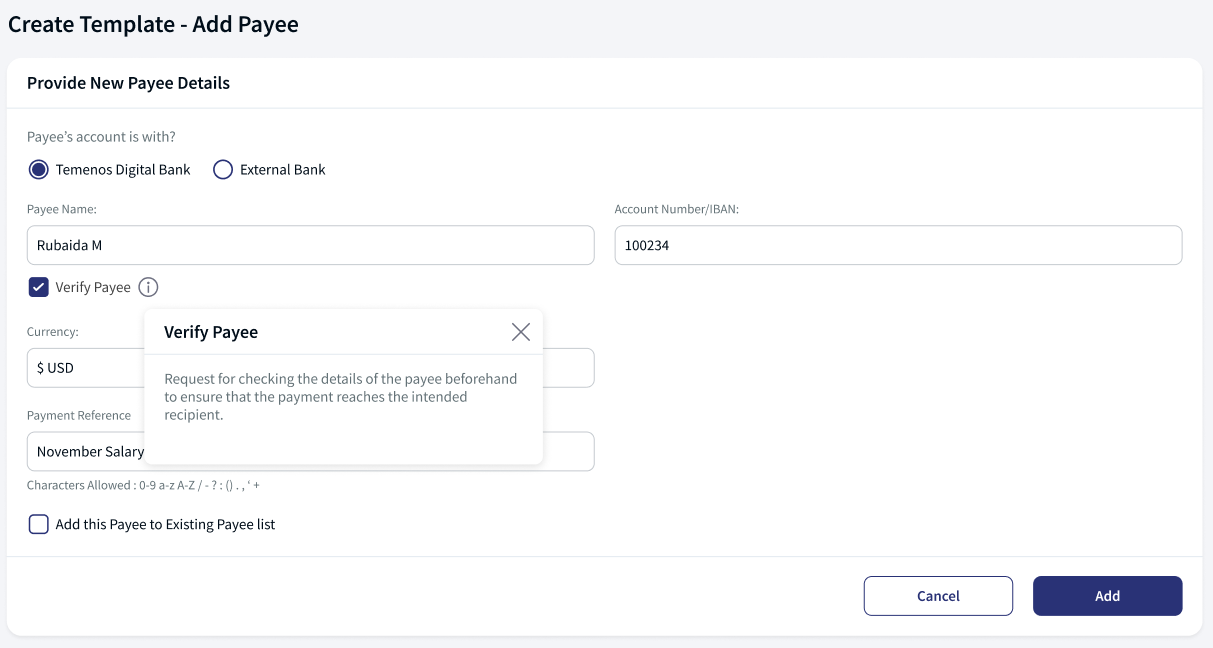
- Enter the Payee Name.
- Enter the Account Number/ IBAN. The application verifies the account number with the backend system and displays an appropriate message if the account number is wrong.
- If the Processing Mode is Single, the Currency is the default currency selected on the primary details screen and cannot be changed. If the Processing Mode is Multiple, you can define the payment currency.
- Enter the payment Amount.
- Enter the Payment Reference details.
Only 0-9 a-z A-Z / - ? : ( ) . , ' + characters allowed to enter in the field.
- Select the check box Add this payee to existing payee list to add to the list of registered payees. This step is optional.
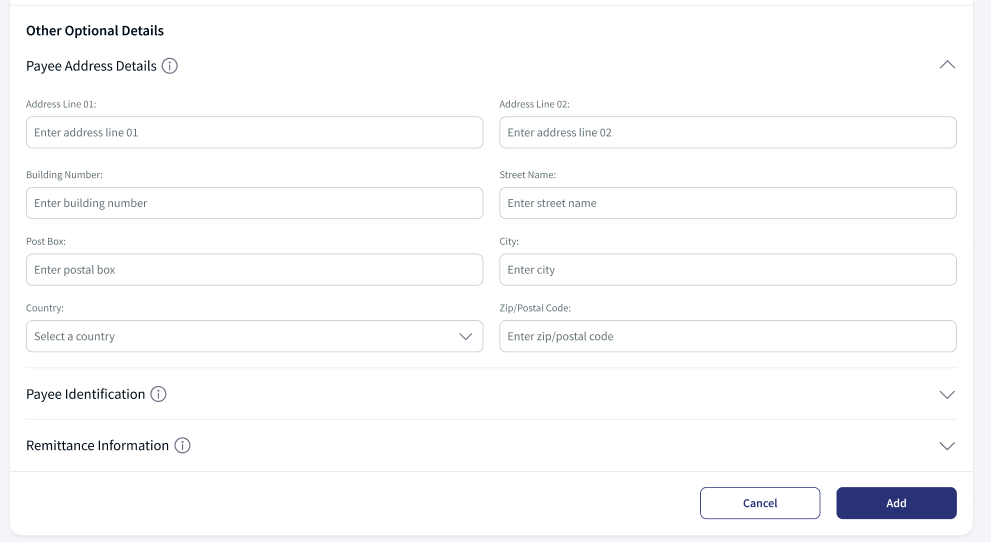
- Payee Address details (Optional). Enter the personal information (such as Phone, Email) and address details (such as Address, Country, City, State, and Zip/ postal code).
- External Bank. For External bank, the user can define if it is a Domestic payment or International Payment.
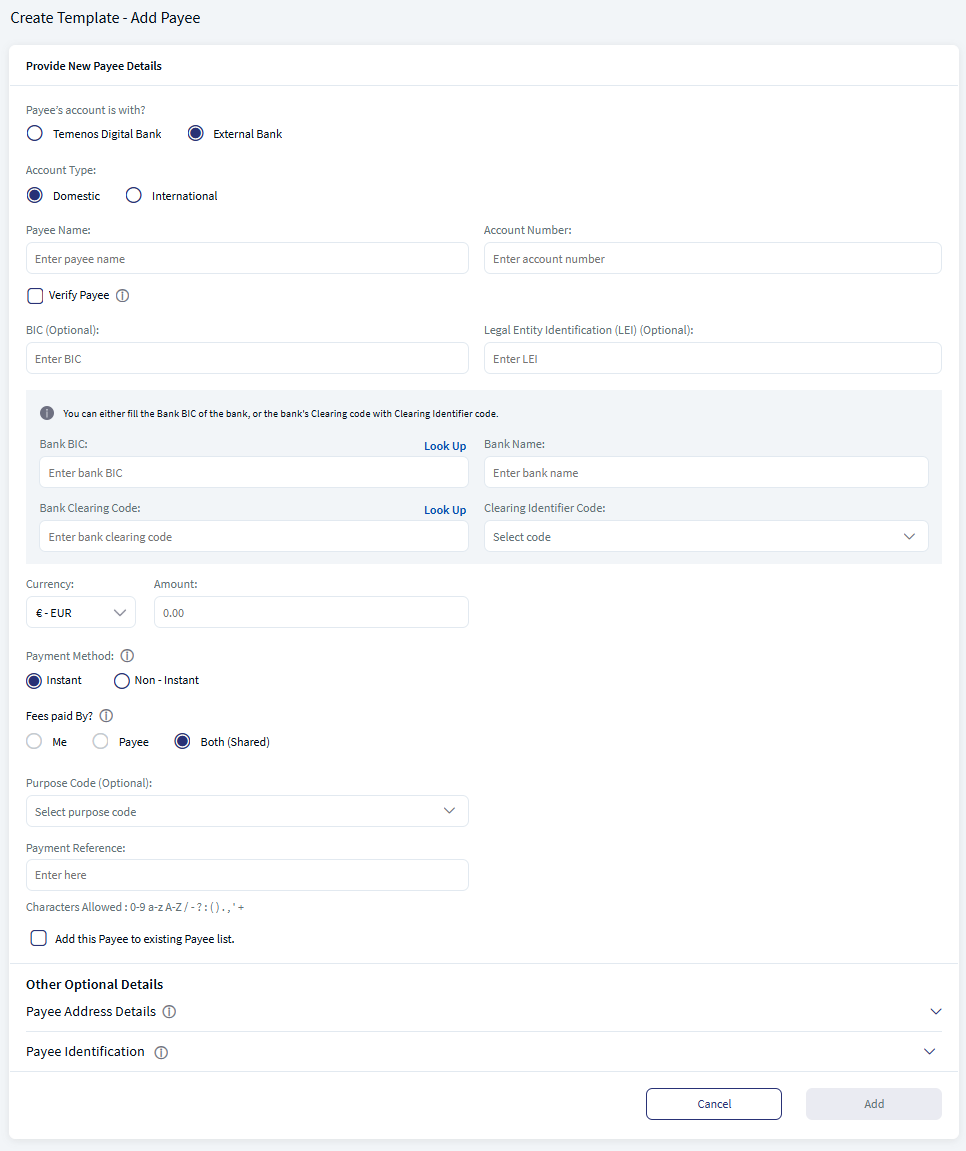
- Select the Account Type - Domestic or International.
- Enter the Payee Name.
- Enter Account Number
- Enter SWIFT BIC:
- For Domestic Account -
- SWIFT BIC. If the provided account number is part of cross border or international payment, then you must enter the SWIFT BIC number that contains alphanumeric characters. SWIFT BIC field does have a format and structure validations.
BIC must be either 8 or 11 characters only.
- Bank code (A-Z): 4 letter code
- Country code (A-Z): 2 letter code
- Location Code (0-9 or A-Z): 2 digit code – either letters or numbers
- Branch Code (0-9 or A-Z): optional 3 digit code – either letters or numbers
BIC is non-editable if it is derived from IBAN.
- Click on Look Up to automatically detect the SWIFT BIC. Clicking on Look Up will display a pop up with the privilege to search the SWIFT BIC details. Search by providing the following details to pick the right SWIFT BIC:
- Bank Name
- Branch code
- Country
- City
The Lookup feature is place holder which is to be integrated.
- Bank Name
- Bank Clearing Code. Enter the clearing code.
- Clearing code is the bank code that is used to perform the domestic transfer.
- The user need to enter either the Clearing code with clearing identifier code or SWIFT BIC.
- Click on Look Up to automatically detect the Clearing code. Clicking on Look Up will display a pop up with the privilege to search the Clear code details. Search by providing the following details to pick the right Clearing code:
- Bank Name
- Branch code
- Country
- City
The Lookup feature is place holder which is to be integrated.
- Clearing Identifier Code. select the option from the drop down.
- SWIFT BIC. If the provided account number is part of cross border or international payment, then you must enter the SWIFT BIC number that contains alphanumeric characters. SWIFT BIC field does have a format and structure validations.
- For International Account -
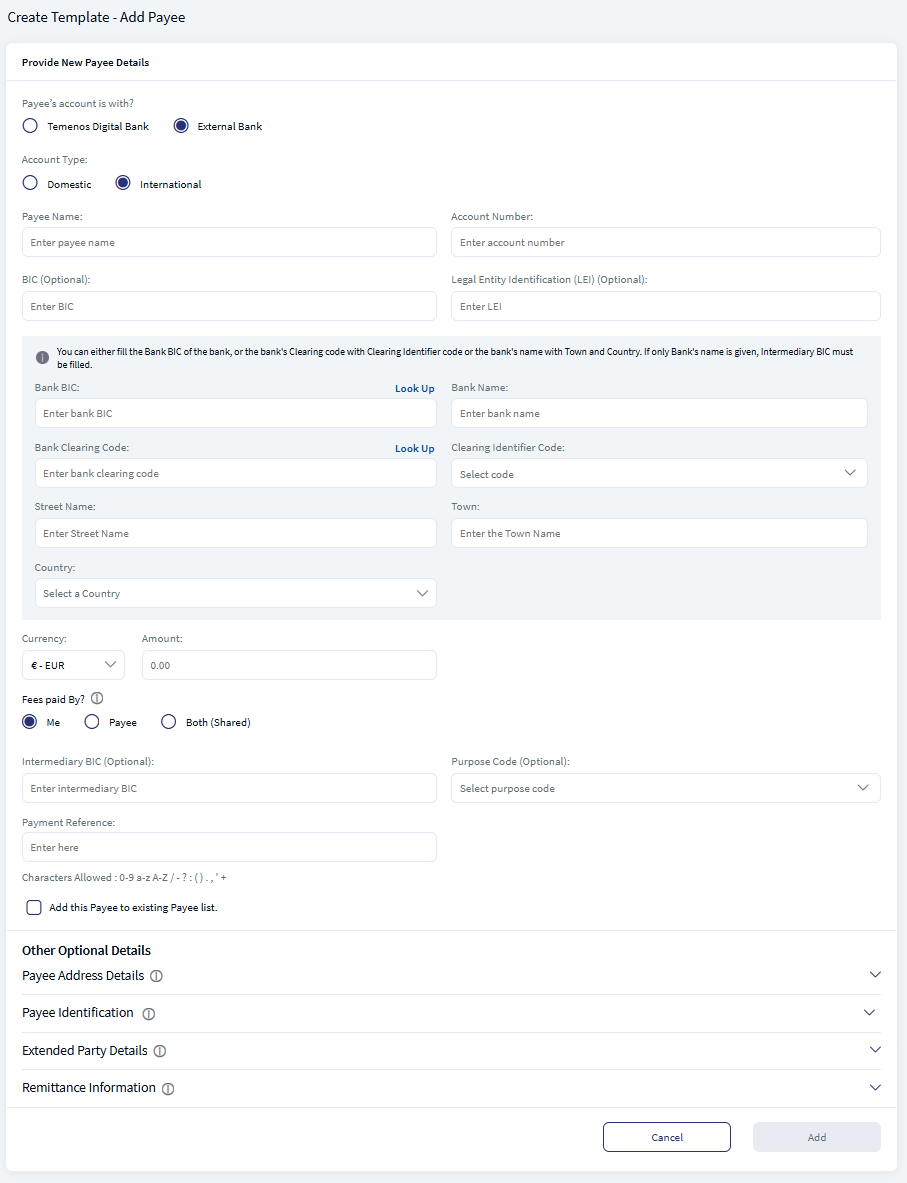
- SWIFT BIC: If the provided account number is part of cross border or international payment, then you must enter the SWIFT BIC number that contains alphanumeric characters. SWIFT BIC field does have a format and structure validations.
BIC must be either 8 or 11 characters only.
- Bank code (A-Z): 4 letter code
- Country code (A-Z): 2 letter code
- Location Code (0-9 or A-Z): 2 digit code – either letters or numbers
- Branch Code (0-9 or A-Z): optional 3 digit code – either letters or numbers
BIC is non-editable if it is derived from IBAN.
- Click on Look Up to automatically detect the SWIFT BIC. Clicking on Look Up will display a pop up with the privilege to search the SWIFT BIC details. Search by providing the following details to pick the right SWIFT BIC:
- Bank Name
- Branch code
- Country
- City
The Lookup feature is place holder which is to be integrated.
- Bank Name
- Bank Clearing Code. Enter the clearing code.
- Clearing code is the bank code that is used to perform the domestic transfer.
- The user need to enter either the Clearing code with clearing identifier code or SWIFT BIC.
- Click on Look Up to automatically detect the Clearing code. Clicking on Look Up will display a pop up with the privilege to search the Clear code details. Search by providing the following details to pick the right Clearing code:
- Bank Name
- Branch code
- Country
- City
- The Lookup feature is place holder which is to be integrated.
- Clearing Identifier Code. select the option from the drop down.
- Street Name
- Town
- Country
- SWIFT BIC: If the provided account number is part of cross border or international payment, then you must enter the SWIFT BIC number that contains alphanumeric characters. SWIFT BIC field does have a format and structure validations.
- For Domestic Account -
- Enter Legal Entity Identification(LEI) (Optional).
- Select the currency. If the Processing mode of the template is Single, the Currency is the default currency selected on the primary details screen and cannot be changed. If the Processing mode is Multiple, the user can define the Payment currency.
- Enter the Amount.
- Select the Payment Method - Instant, Non-Instant.
- Select who will bear the Fees Paid By - Me, Beneficiary, or Shared.
This field is not applicable if same bank option is chosen.
- Me. The payer (sender of the payment) will bear all of the payment transaction fees.
- Beneficiary. The payee (recipient of the payment) will incur all of the payment transaction fees.
- Shared. The payer (sender of the payment) will pay all fees charged by the sending bank. The payee (recipient of the payment) will pay all fees charged by the receiving bank.
- Enter the Intermediary BIC. This is an optional field and only displayed when Account type is International.
- Select the Purpose Code. This field is optional.
- Enter the Payment Reference details. It denotes the payee reference details.
Only 0-9 a-z A-Z / - ? : ( ) . , ' + characters allowed to enter in the field.
- Select the check box Add this Payee to Existing Payee list to add to the list of registered payees. This step is optional.
- Payee Address details (Optional). Enter the personal information (such as Phone, Email) and address details (such as Address, Country, City, State, and Zip/ postal code).
- Payee Identification details (Optional). Enter the payee identification details such as Other ID Type (Organization or Individual), Other ID, Issuer, Scheme Code, and Scheme Proprietary.
The user can either selects Scheme Code or enter Scheme Proprietary. The application disables the other field automatically. - Remittance information details (Optional). Enter the Creditor Reference details Code, Proprietary, Issuer, Reference Number, and Additional Remittance Info.
The user can either select Code or enter Proprietary. The application disables the other field automatically. - Extended Party Details (Optional). This section is visible only for International transfer. This section have two tabs
- Ultimate Debtor. Enter the Name, BIC, Legal Entity Identification(LEI), Other ID Type, Other ID, Address details (such as Building number, street name, post box, city, country, postal code).
- Ultimate Creditor. Enter the Name, BIC, Legal Entity Identification(LEI), Other ID Type, Other ID, Address details (such as Building number, street name, post box, city, country, postal code).
- Temenos Digital Bank
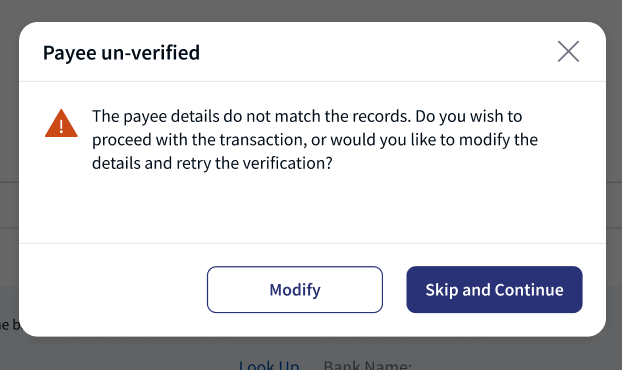
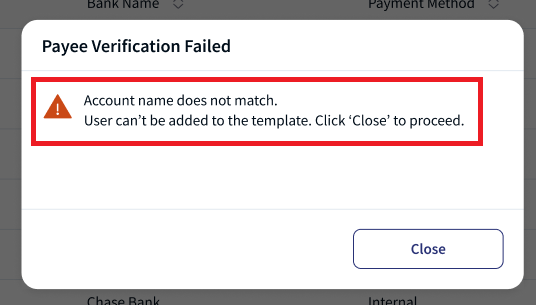
- After entering all the required information. Perform payee verification for all the records with Payee Verification status as Need Verification. The user cannot add the payee with the status Need Verification.
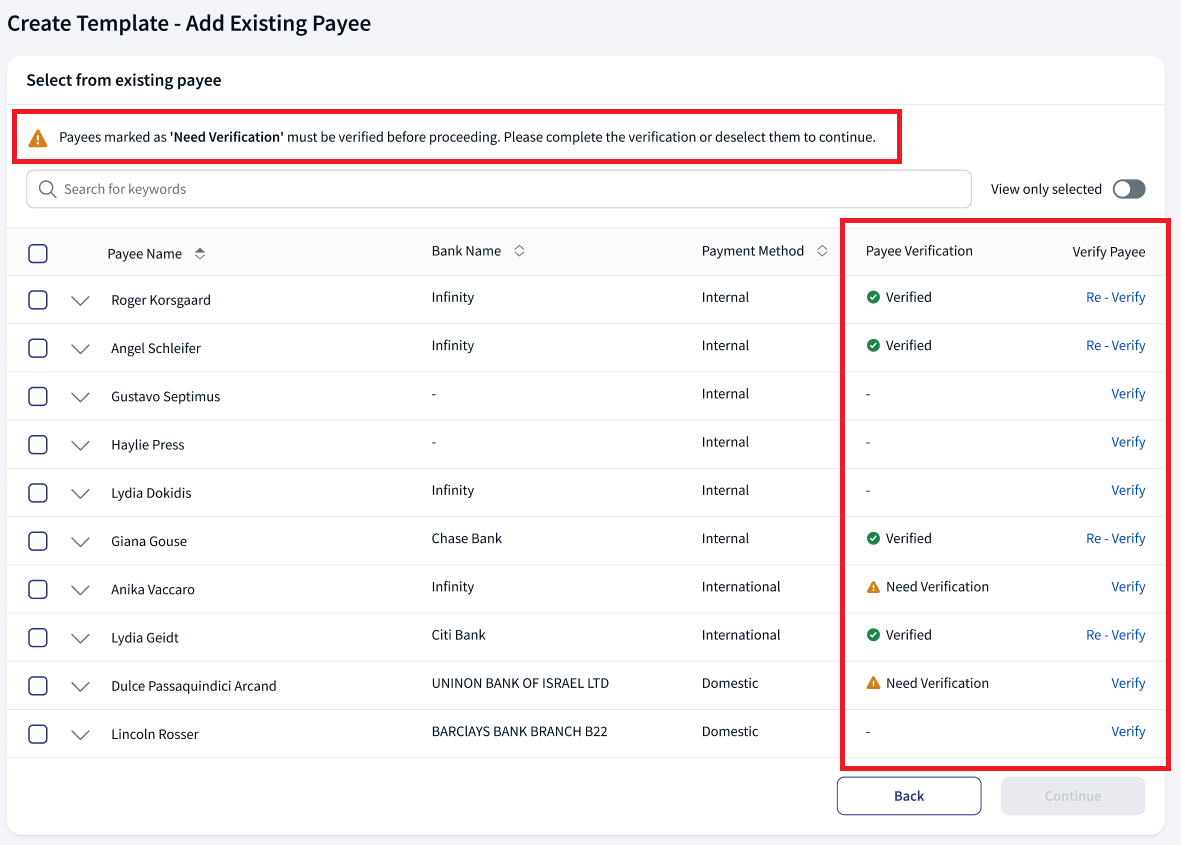
- Review all the selected payee and click Continue.
When the processing mode is selected as Single / Multiple, the user can add payee having same bank account, domestic account, and international account.
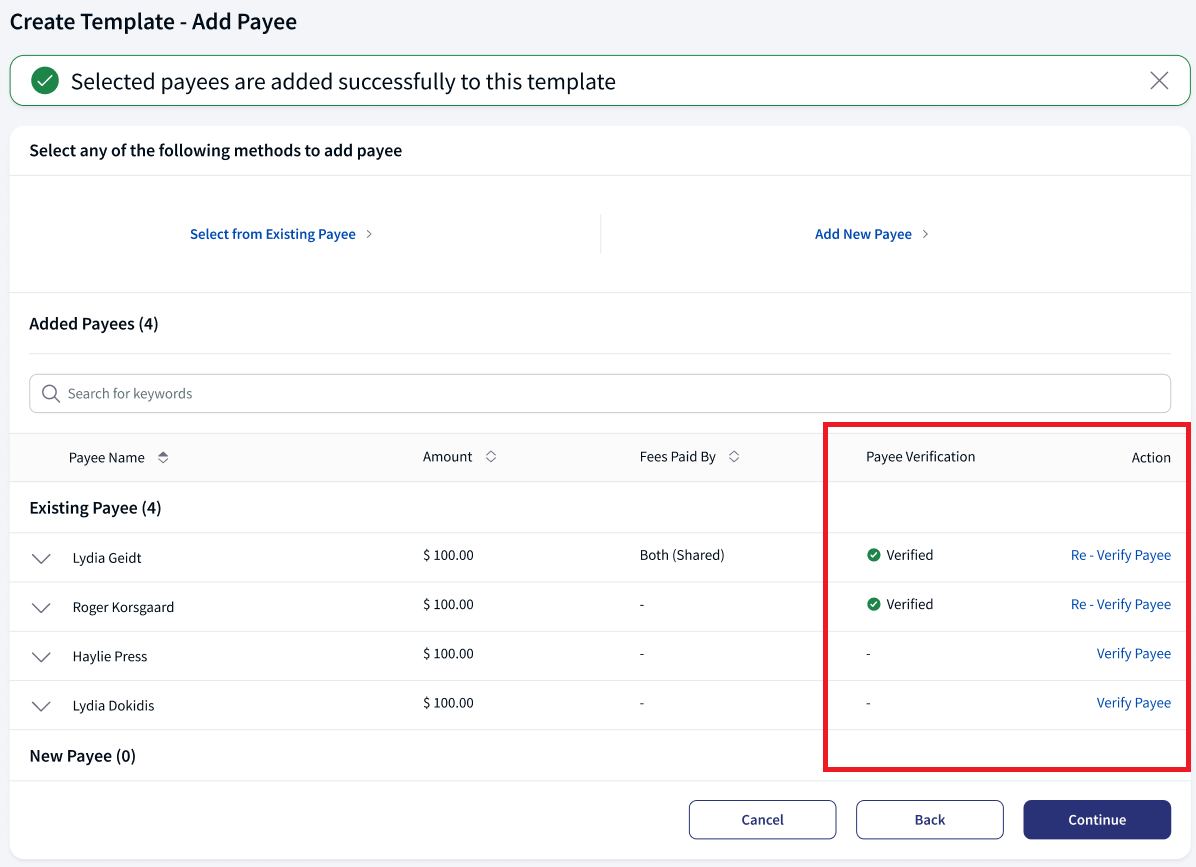
- The application displays an acknowledgment that the payee is added successfully.
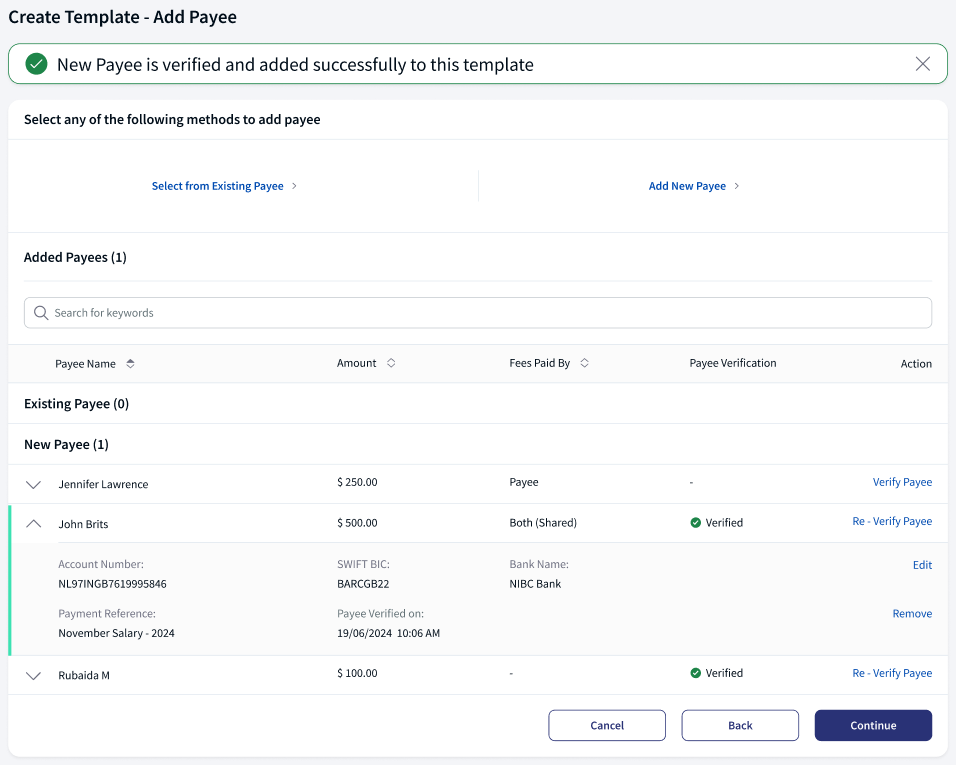
- Click Continue.
- On the add payees screen, click Add New Payees. The user is provided with two options. Add a payee account that resides in the same bank or add a payee that resides in another bank.
- In the similar way add all the payees and click Continue. The application displays Verify and Create Template screen.
The Add Payee screen display the fields shown in the image. The user can perform Verify payee action for the records with Payee Verification status is empty and Re-Verify Payee for the Payee Verification status is Verified. - Verify and Create Template
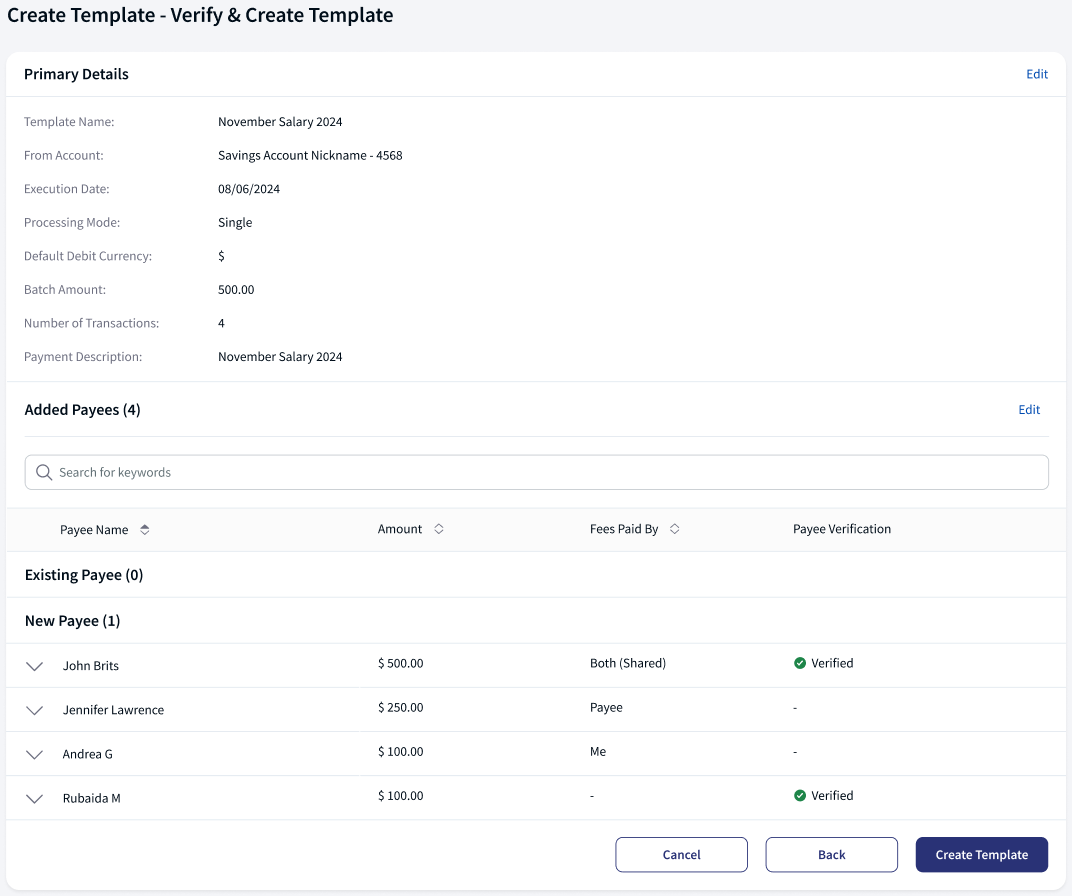
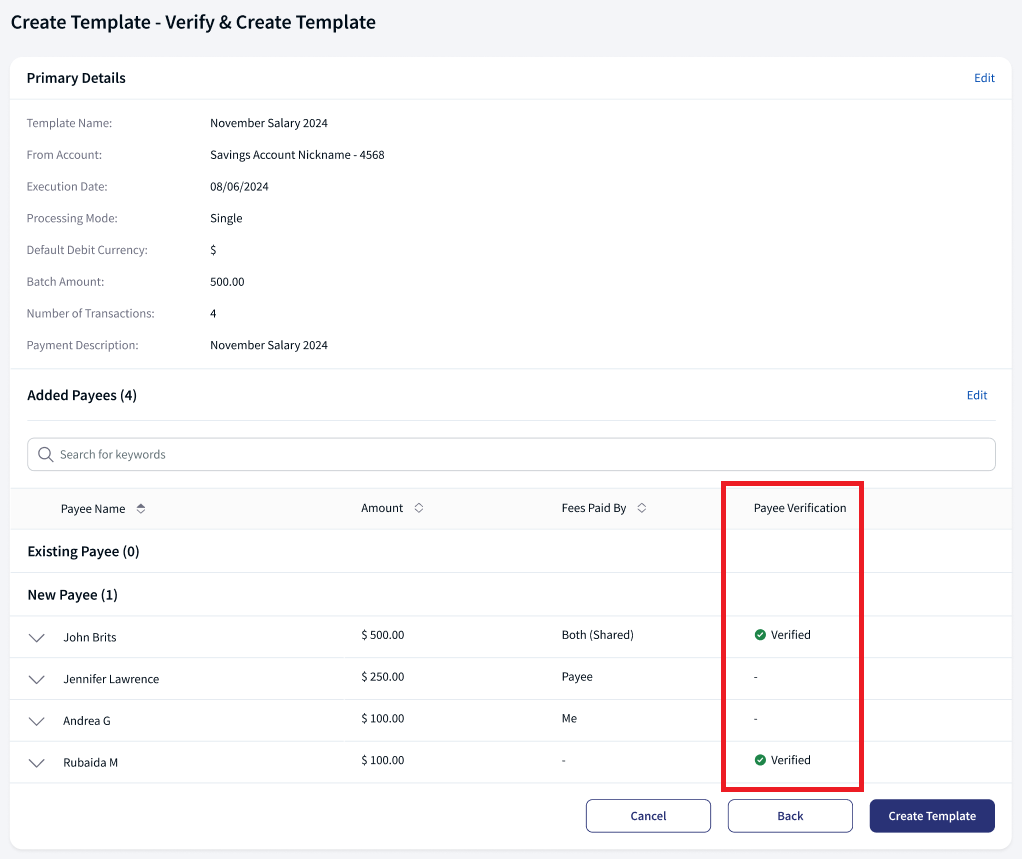
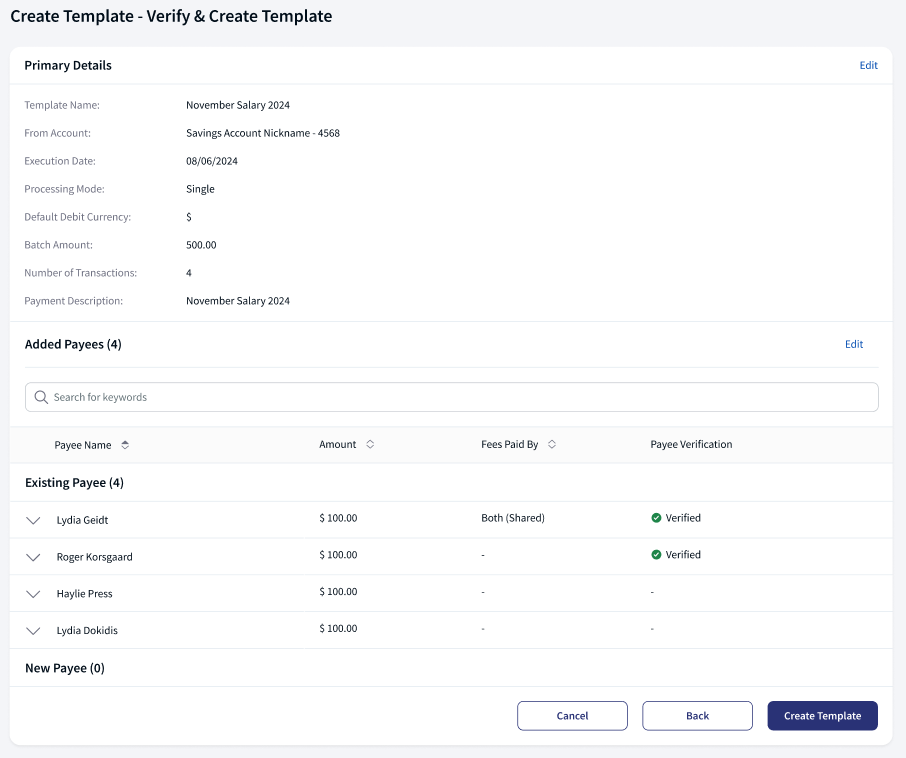
- On the verify template screen, verify the information and make changes as required.
- Click the Edit link to modify the Primary Details and Added Payees sections.
- Search for the recipients using the search bar.
- Sort the Payees list using the sort icon.
- Click the down arrow to view the payee details.
- Displays the Payee Verification status for all records, if the status is blank, the can re-verify the payee by editing the payee details.
- After making the changes, click Create Template. The template is created, and the application displays an acknowledgment screen.
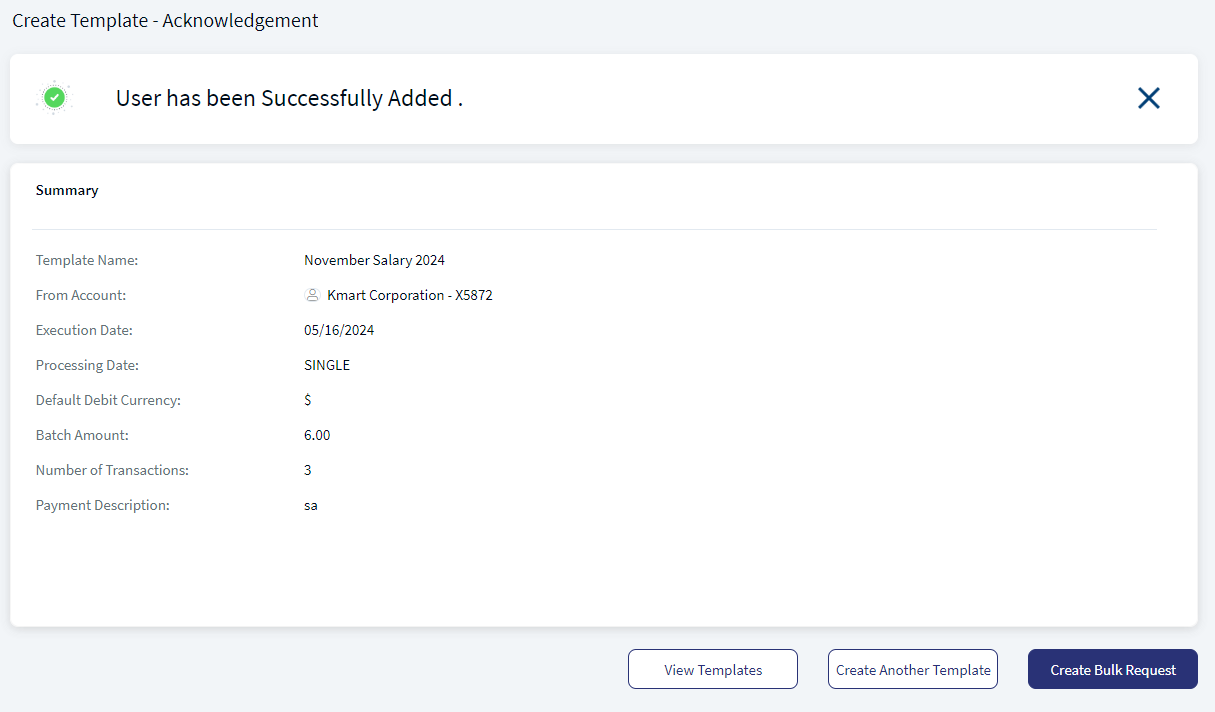
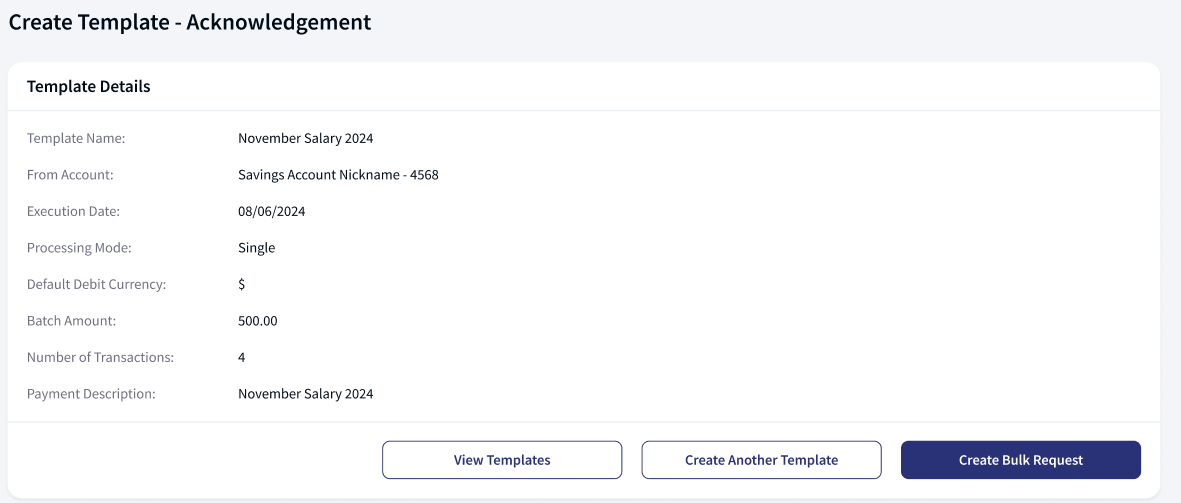
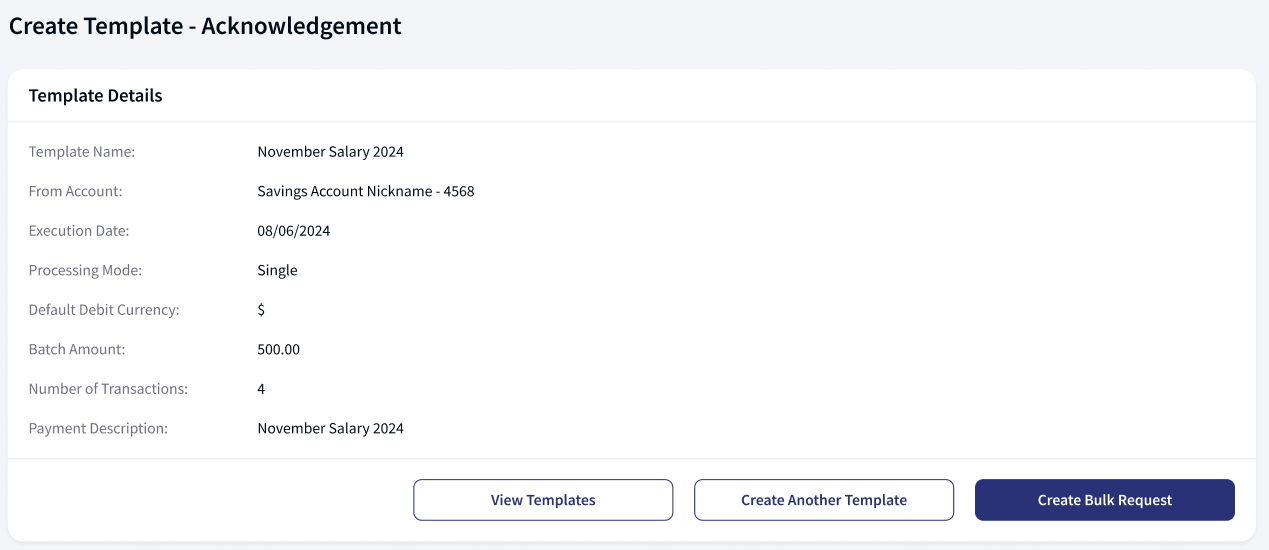
- Acknowledgment.
- After the template is successfully created, the application displays an acknowledgment screen with the following details: Template Name, From Account, Execution Date, Processing Mode, Total Amount with Currency Code, Number of Transactions, and Payment Description.
- Do any of the following:
- Click Create Bulk Request to carry out a bulk payment request with this template.
- Click View Templates to navigate to the list of templates.
- Click Create Another Template to create another template again.
Click Back to go the previous screen or click Cancel to cancel the process at any time. The changes are not saved.
Create New Template using Add New Payee
Create New Template using Existing Payee
Upload File and Make Payment
Use the feature to initiate a bulk payments transaction by uploading an XML or a CSV file that has the details of multiple payments.
Web Channel menu path:
- Side menu > Bulk Payments > Upload File
- On the right-side bar > Upload File & Make Bulk Payment
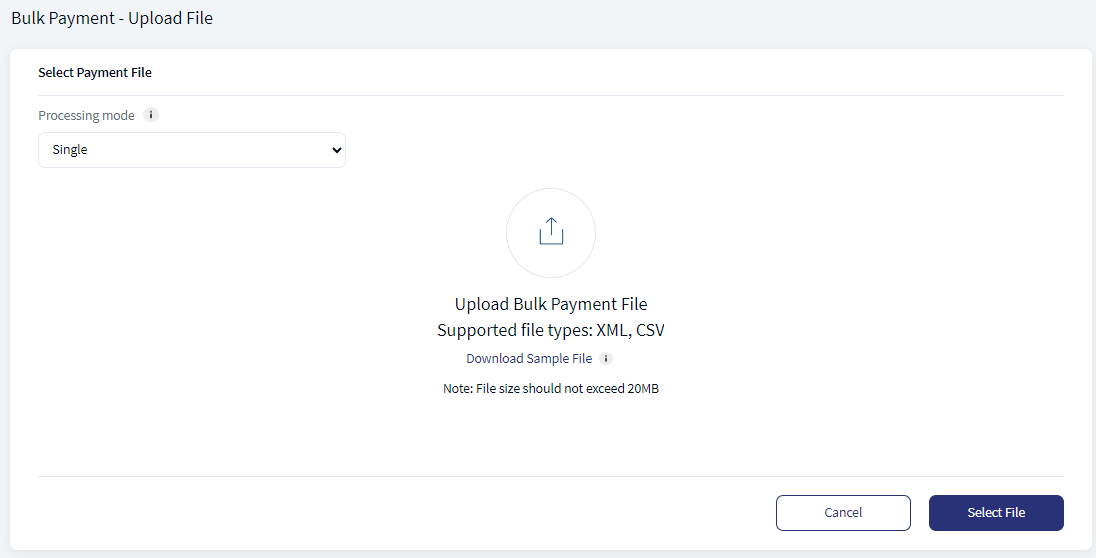
The application displays the screen to upload a bulk payment file. Follow these steps:
- The following file formats are supported: XML and CSV. The file not complying the recommended formats are not uploaded into the processing application.
- CSV file format is a Transact proprietary format.
- XML file format is Pain 001.03 format and Pain 001.001.09 format.
- Click the Download Sample File to download the .csv file generator Excel template. Using this template, the user can generate the .csv file to upload and process the payments. The file size cannot exceed 20 MB.
- Select the Processing Mode from the list. It can be Single or Multiple.
- Click Select File and locate the file to be uploaded.
- The application displays the screen to check the upload file details.
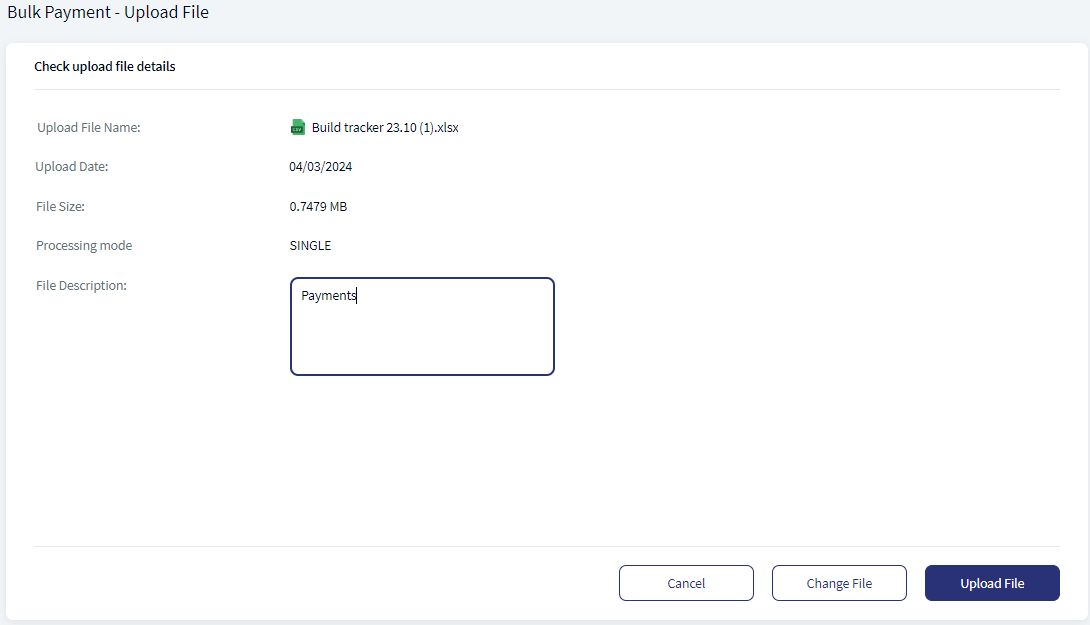
Bulk Update - Upload File - Enter the File Description not exceeding 50 characters.
Click Change File to select another file to upload or click Cancel to cancel the operation. The changes are not saved.
- Click Upload File.
- The application parses the file and if no errors are encountered, then displays a message that the upload is successful. The file is added to the list of already upload status for reference.
The application displays an error message if the file has data errors or any of the following error occurs during file upload resulting in the upload not being successful. The user must fix the error first and then only can upload the file.
- Incorrect file format
- Incorrect debit account
- Incorrect execution date
- Incorrect processing mode
- Insufficient permissions
- Do any of the following:
- Click Upload New File to add or upload another file.
- Click Back to Upload Files to navigate to the list of uploaded files.
Upload Status
Use the feature to view the list of uploaded files (to create requests) and track the status of the uploaded files.
Web Channel menu path: Side menu > Bulk Payments > Upload Status
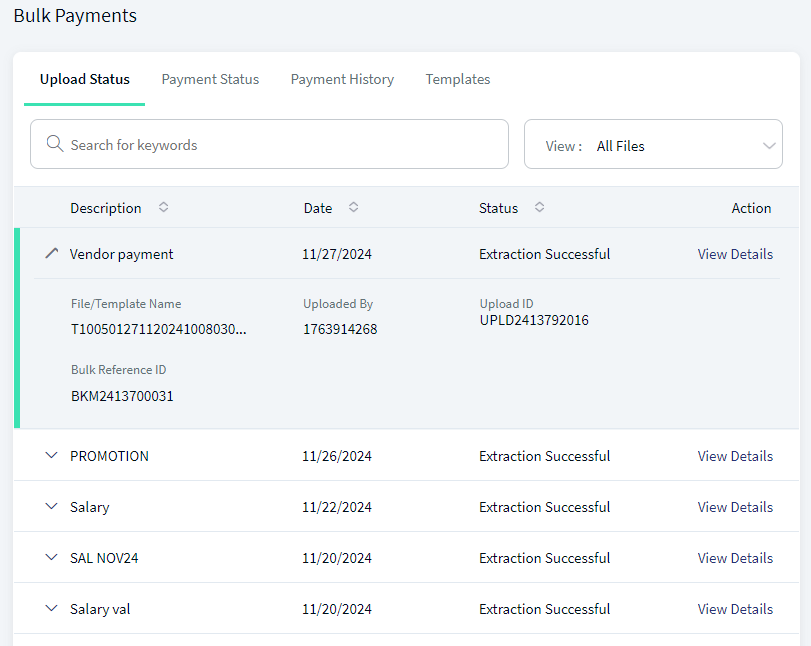
The application displays the list of uploaded requests with Description, Date uploaded, Status, and Action. The following status are displayed:
| Upload Status | Action |
|---|---|
| Uploaded | No action |
| Extracting Payments | View Details |
| Extraction Successful | View Details |
| Extraction Failed | Upload again |
Uploaded. The status indicates that the file is uploaded and is pending to be read and extracted by the system. If you select View Payment while the extraction is still in progress the following error message is displayed as Extraction is still under process, please view after sometime with OK button to revert to Upload tab.
Extracting Payments. After the file has been uploaded into the processing application and the details are extracted. If you select View Payment while the extraction is still in progress the following error message is displayed as Extraction is still under process, please view after sometime with OK button to revert to Upload tab.
Extraction Successful. This indicates the payment details are extracted and the request has been created in the processing application which needs to be reviewed and submitted for processing by the user.
- If you click View Details after the extraction is successful, the application redirects to Payment Status tab with the expanded view of the Bulk File Reference ID.
- If you click View Details after the extraction is successful and the bulk file in Completed status, the application redirects to Payment History tab with the expanded view of Bulk File Reference ID.
Extraction Failed. The file is not processed due to incorrect values or validation failure.
If you click Upload with the file status as "Extraction Failed", the application redirects to Upload File tab to the upload the file again.
Do any of the following:
- Use the down arrow to view the following details: File Name, Description, Uploaded Date, Request Status (processed), Upload ID, Uploaded by, and Bulk Reference ID.
- Use the search bar to look for specific payment requests using the Upload Reference ID, File Name, and Description.
- only single upload CSV, single upload XML can create and view bulk request with single mode.
- only multi-upload CSV, multi-upload XML can create and view bulk request with multi-mode.
- both single and multi-upload CSV, single and multi-upload XML can create and view bulk request with single and multi-mode.
Payment Status
Use the feature to view the list of requests for review and take actions such as review and submit the request details, download, print, or cancel the bulk payment request. The downloaded PDF file is password protected, click here to see more information.
Web Channel menu path: Side menu > Bulk Payments > Payment Status
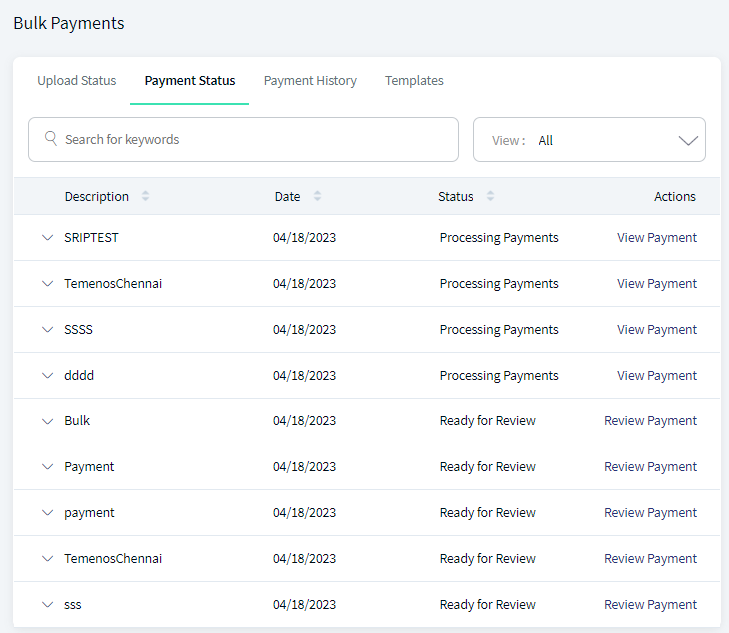
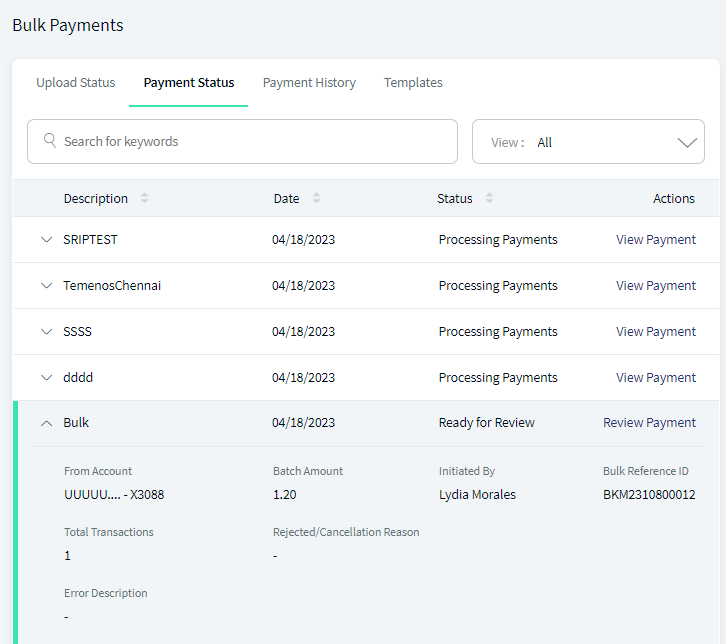
Do any of the following:
- Use the down arrow to view the following details: From Account, Total Amount, Initiated By, Bulk Reference ID, total transactions, error description, and if applicable the reason for rejection or cancellation.
- Use the search bar to look for specific payments.
- Use the View list to filter the requests by their status and applicable actions. By default, all requests are displayed:
- Ready for Review. Indicates the request has been created in the processing application and it is ready to be reviewed and submitted for approval or execution. A user can Review Request or View Request (if permission is only View).
- Pending for Approval. The request has been submitted for approval and it is pending for authorization. The uploaded user can only view the request.
- Rejected by Approver. The request has been rejected by the approver. The uploaded user can review request or view request (if permission is only View). The user having review permission can either re-submit the request for approval or cancel the request.
- Cancelled. The request has been canceled by the initiator. The user can only view the request.
- Processing Payments. The request has been approved by the approver and the processing application has started processing the request.
- Scheduled. The request has been submitted for future date and the user can cancel the request, if required. The file will be moved to Cancelled, once Cancel function is executed.
- Click Review Payment to take further action on the specific request to view the details and submit for executing or canceling the bulk payment request.
- only single upload CSV, single upload XML can view payment status with single mode.
- only multi-upload CSV, multi-upload XML can view payment status with multi-mode.
- both single and multi-upload CSV, single and multi-upload XML can view payment status with single and multi-mode.
Review and Submit Payment Request
Use the feature to review and submit the request details or cancel the bulk payment request.
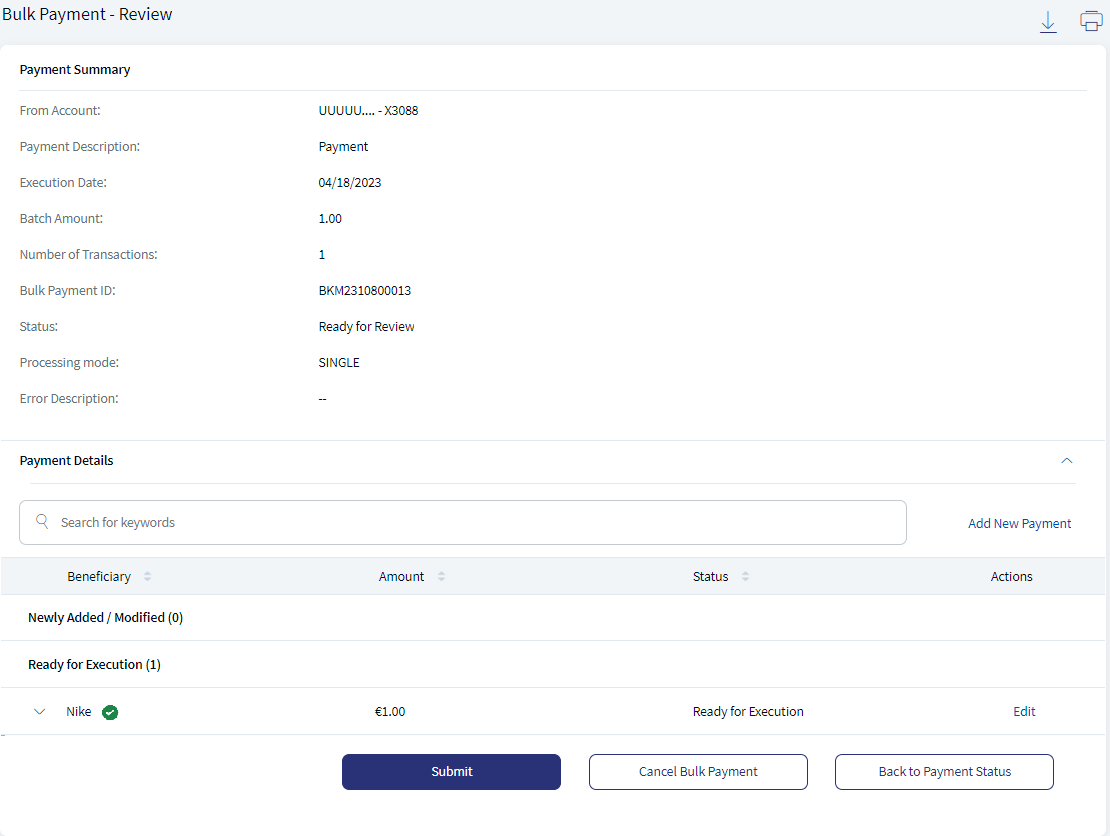
Do any of the following:
- Back to Payment Status. Click to go back to the payment requests list.
- Cancel Bulk Payment. Click to cancel the bulk payment.
- On the confirmation pop-up that appears, select a reason from the Cancellation Reason list.
- Enter comments.
- Click Yes to confirm.
- The status of the request is changed to "Canceled" and moves to view payment mode.
You can cancel a future dated scheduled bulk payment.
Review Payment. Click Review Payment on the Payment Status tab. The application displays the request with the following details for review:
- Payment Summary details with From Account, Payment Description, Execution Date, Total Amount, Number of Transactions, Bulk Payment ID, Status, Processing Mode, and Error Description.
- Payments Details with Beneficiary Name, Amount, and the Payment Status.
- Use the search bar to look for specific payments.
- After review, click Submit.
User is restricted from submitting the request if any of the payment orders are in error state in the Payment Details list. The application restricts the user from submitting and does not allow for execution or for approval.
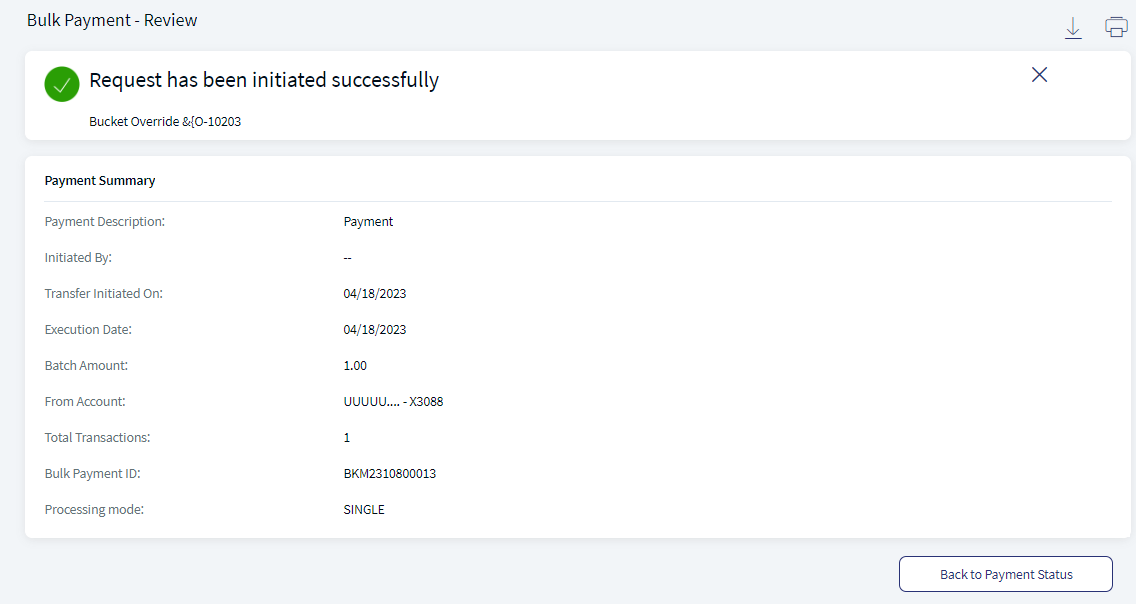
Bulk Payments - Review - The application displays an acknowledgment screen. Click Back to Payment Status list to go back to the list.
- If the user has sufficient permissions for execution, then the payment request is initiated for execution. Otherwise, the request is submitted for approval.
- The approvers can approve and initiate the payment request. Once the request is approved, the request goes for processing and until all payments are processed, the request is listed on the Payment Status tab. See approvals and approval matrix for more information.
- When the request is approved and initiated for payments, the request status will be Processing Payment and listed on the Payment Status tab.
- After the payments are processed and completed, the request status is updated to Completed and listed on the Payment History tab.
- If the user has
- only single upload CSV, single upload XML can review and submit payment request with single mode.
- only multi-upload CSV, multi-upload XML can review and submit payment request with multi-mode.
- both single and multi-upload CSV, single and multi-upload XML can review and submit payment request with single and multi-mode.
Payment History
Use the feature to view the list of processed or executed payment requests. The use can also download the payment history. The downloaded PDF file is password protected, click here to see more information.
Web Channel menu path: Side menu > Bulk Payments > Payment History
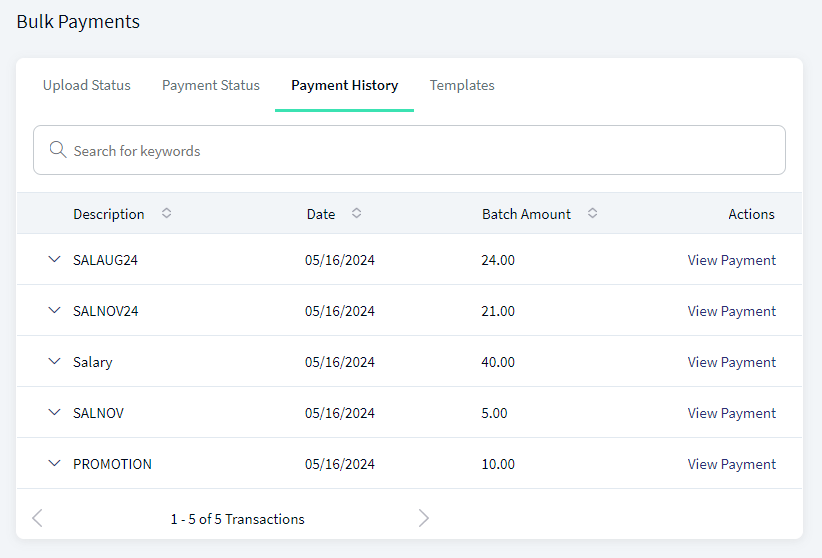
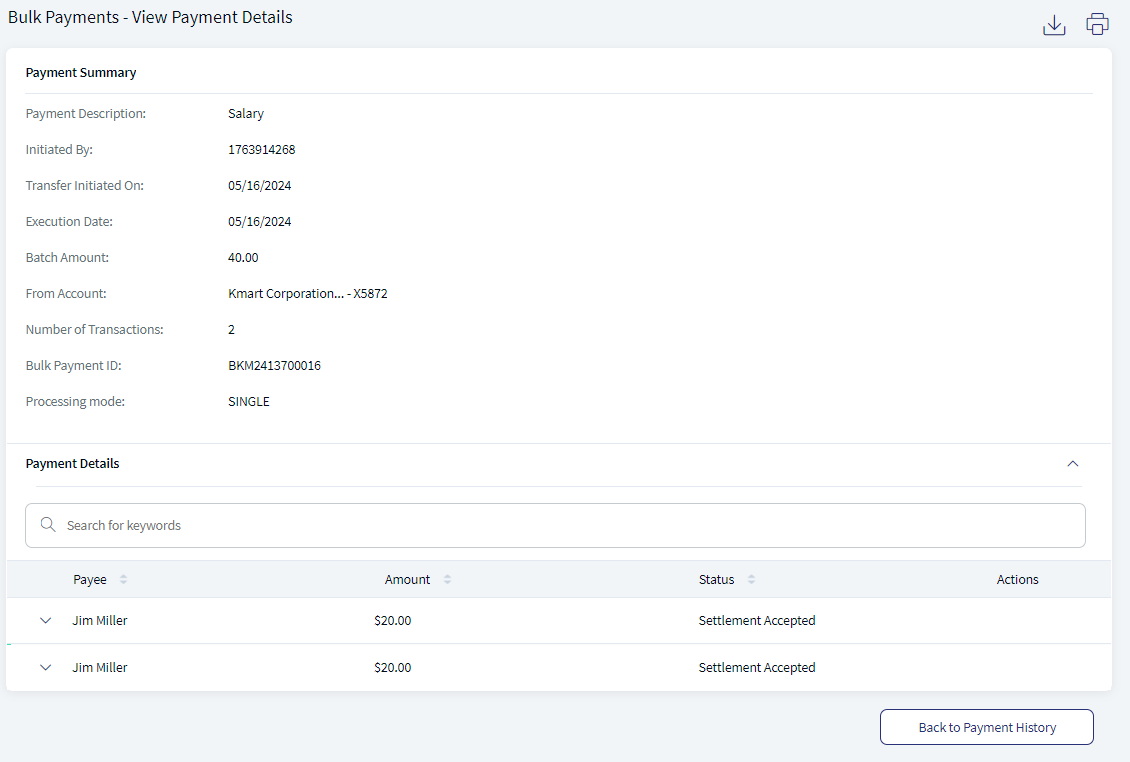
Do any of the following:
- Use the down arrow to view the following details: Request File Description, Uploaded Date, Total Amount, From Account, Total Transactions, Payment ID, Payment Initiated By, Number of Approvals as approval status, and Payment Status (executed).
- Use the search bar to look for specific requests.
- Under Actions, click Back to Payment History to view the processed payment request details.
- only single upload CSV, single upload XML can view payment history with single mode.
- only multi-upload CSV, multi-upload XML can view payment history with multi-mode.
- both single and multi-upload CSV, single and multi-upload XML can view payment history with single and multi-mode.
Templates
Use the feature to view the list of bulk payment templates that have already been created.
If no templates are found, the application displays an appropriate message.
Web Channel menu path: Side menu > Bulk Payments > Templates
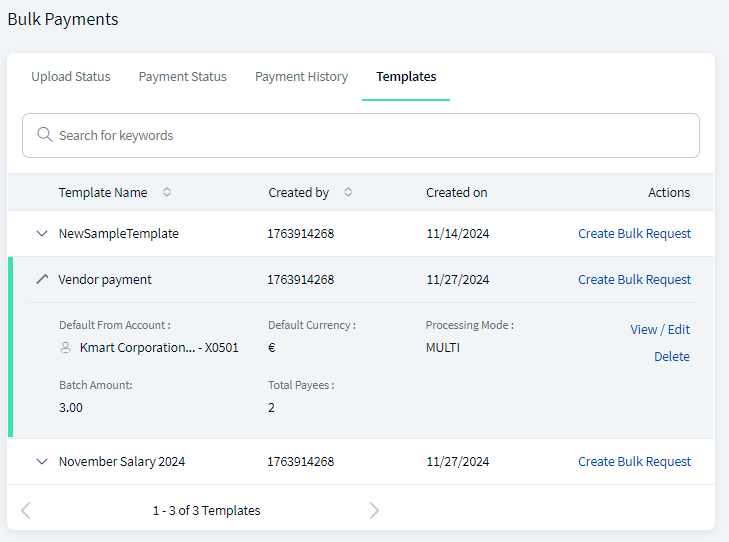
The list is sorted by Template Name by default, but you can also sort the list based on Created by column using the sort  icon.
icon.
Do any of the following:
- Search for a template by using search keywords.
- Click the down arrow to do the following:
- View the template details such as the template name, template created by, created on date, default from account, default currency, processing mode (single or multiple) total amount, and total payees in the template.
- Click View / Edit to view or edit the template details.
- Click Delete to remove the template if it is no longer required.
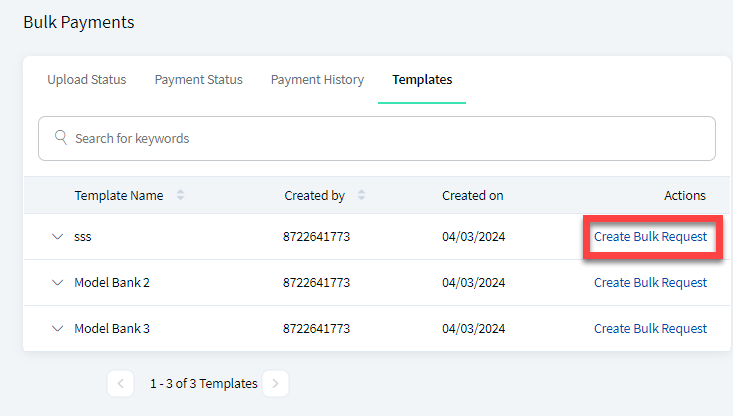
- Click Create Bulk Request to initiate a bulk payment request.
- only single upload CSV, single upload XML can view templates with single mode.
- only multi-upload CSV, multi-upload XML can view templates with multi-mode.
- both single and multi-upload CSV, single and multi-upload XML can view templates with single and multi-mode.
View / Edit Template Details
The user have option to view and edit the past dated template and initiate the bulk request with current or future date from existing template. Use the feature to edit the template details.
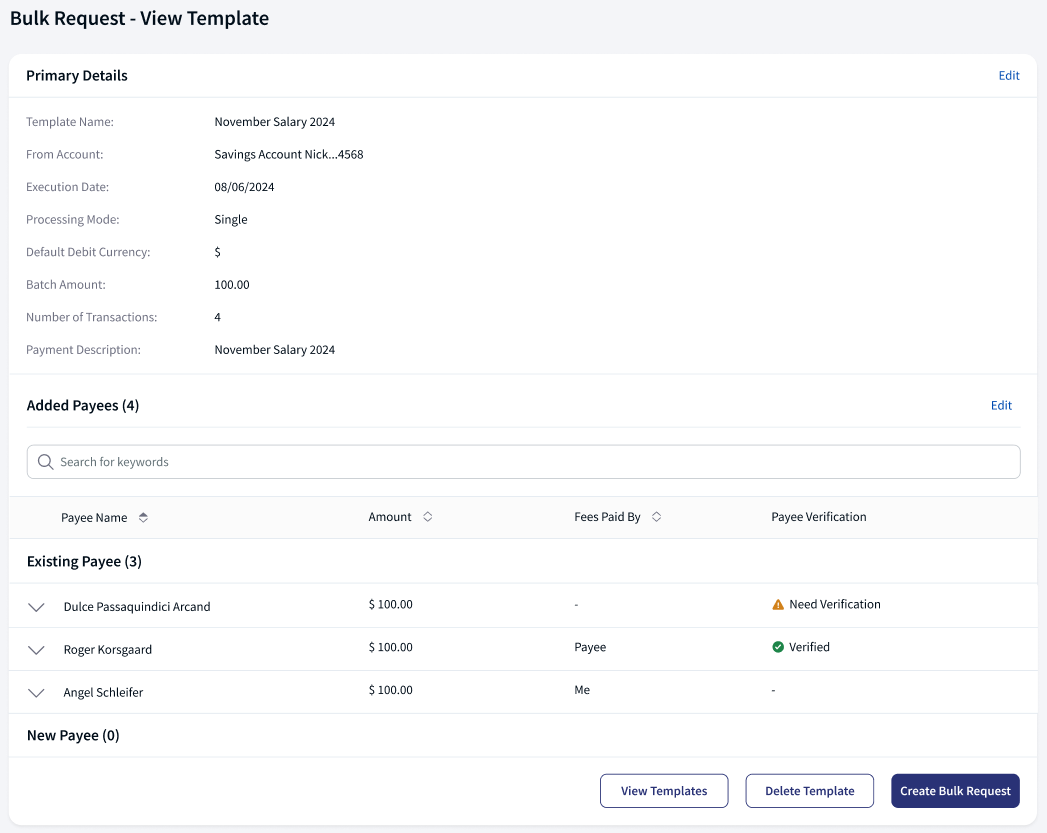
Do any of the following:
- Edit Primary Details.
- Click Edit to modify the details as required. In the Edit Template. Primary Details page the user can edit Template Name, From Account, Default Debit Currency (Updates automatically as per the Default From Account), Processing Mode, Execution Date, short Description.
- Click Save & Update. The changes are updated.
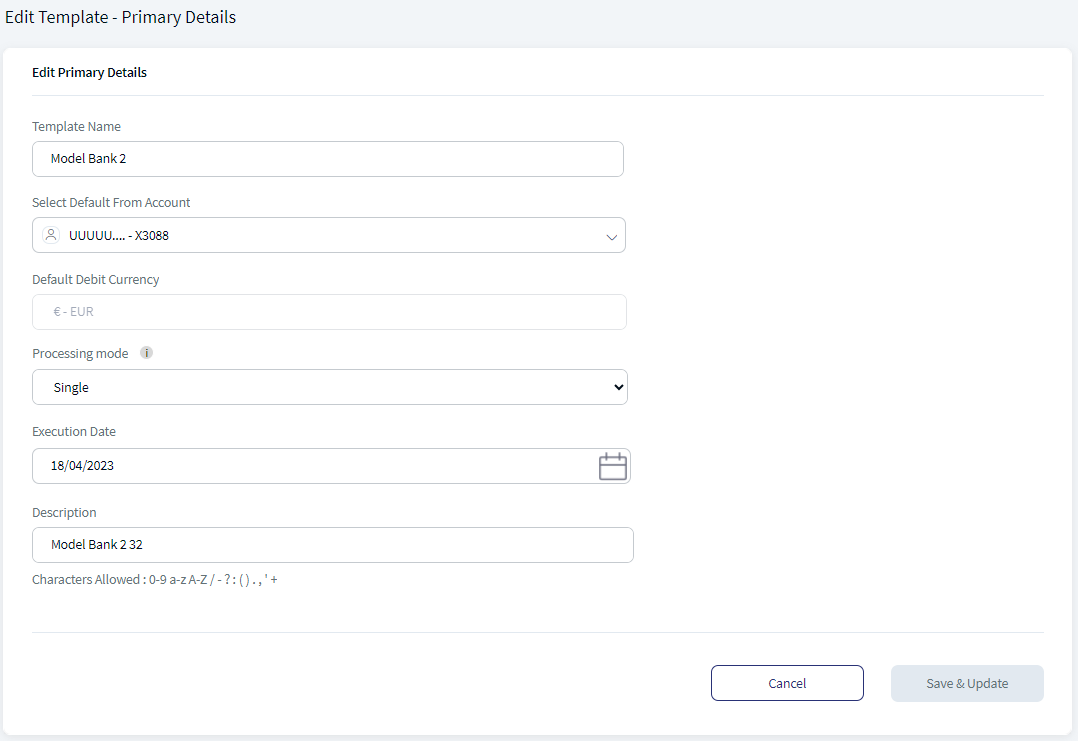
Bulk Payments - Edit Template
- Edit Added Payees
Click Edit to edit the Added Payees list.
Do any of the following in Edit Template - Select Payees page.- Add new Payees from any of the two options Select From Existing Payees or Add New Payees.
- Remove Existing Payees. Click Remove to delete the payees as required.
- You can also edit the payment details. Expand the Existing payee by clicking the down arrow.
- Click Edit. This navigates to Edit Template - Add Payee page.
- The user can edit Account Number / IBAN, SWIFT BIC, Payment Reference, Bank Name, Fees Paid By.
- Payee Verification using the action, Re-Verify Payee when the Payee Verification check is success, Verify Payee when the payee records with confirmation of payee status as skipped or blank or mandatory configuration payment category.
- Click Save & Update to update the details.
- Click Back to discard the changes and go to previous page.
- Click Continue. The changes are updated.
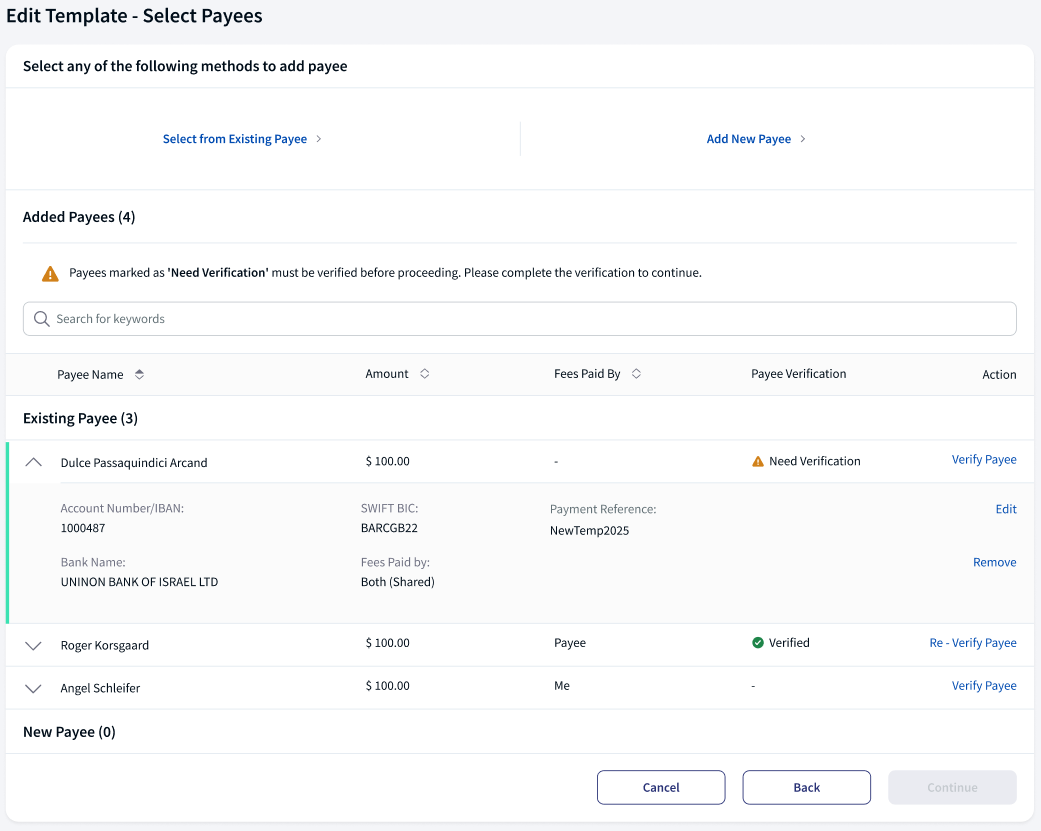
Bulk Payments - Edit Template - Select Beneficiaries
- Click View Templates to go back to the templates list.
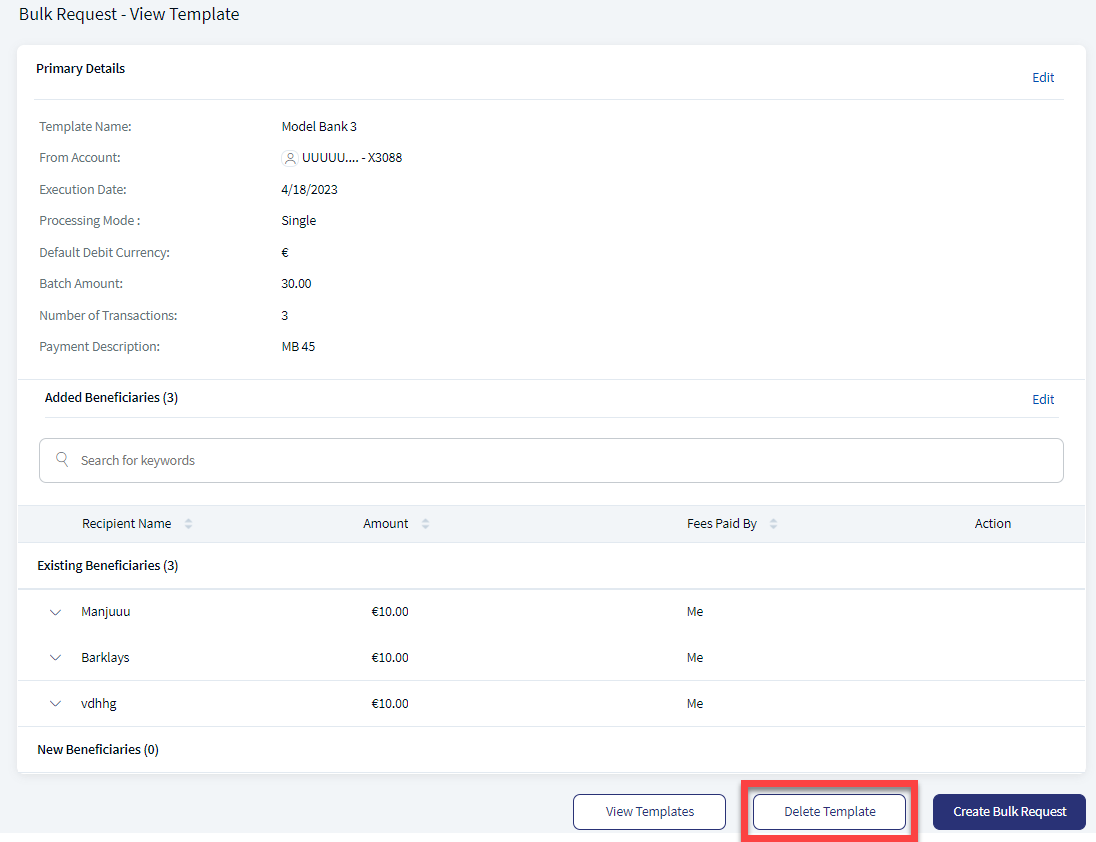
- Click Delete Template to remove the template if it is no longer required. On the pop-up that appears, click Yes to confirm.
- Click Create Bulk Request to initiate a bulk payment request.
If the user has made changes in the template, click Continue after the changes and the application displays an acknowledgment screen that the details are updated successfully.
Delete Template Details
The user has option to delete any past dated existing templates. Use this feature to delete the template if it is no longer required.
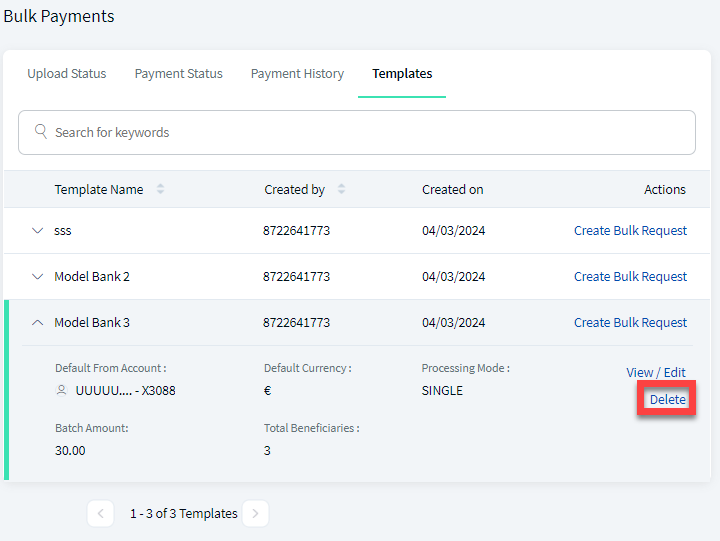
- Click Delete from the expanded template details to remove the template if it is no longer required. On the pop-up that appears, click Yes to confirm.
- Click Delete Template from the Bulk Request - View Details page to remove the template if it is no longer required. On the pop-up that appears, click Yes to confirm.
Create Bulk Request
Use the feature to execute a bulk payment request using an already created template so that multiple payment details are uploaded by the user and the payments are initiated in a single instance.
Web Channel menu path: Side menu > Templates tab> Create Bulk Request link
To create a bulk payment request, follow these steps:
- On the Templates tab, from the list of templates, click the Create Bulk Request link of the template using which, the bulk payment request is made. The templates should have already been created. See Create New Template for more information.
- The application displays the Create Bulk Request - Verify & Confirm screen.
Bulk Payments - Create Bulk Payment - The application displays the following:
- The template name and the number of payees on top of the screen.
- List of segregated payee details such as Account in same bank and Account in another bank with the following details: Beneficiary Name, Currency, Amount, and Fees Paid by Person. The list is sorted by Beneficiary Name by default, but can also be sorted by currency, amount, and fees paid by using the sort icon.
- Select the Execution Date to current or upcoming date.
- Verify the details before confirming the payment. Do any of the following:
- Use the search bar to search for specific payees.
- Update in bulk for selected payees: Select the check box of the required payees and update the data in bulk. The following information can be updated:
- Enter the changed amount.
- Enter the Payment Reference.
Only 0-9 a-z A-Z / - ? : ( ) . , ' + characters allowed to enter in the field.
- Click Apply Changes. The data of the selected payees is updated.
- Click the View only selected toggle button to display only the selected payees.
- Change the currency (applicable only if the processing mode is Multiple) and payment amount of individual payees.
- Remove payees from bulk payment request.
- Select the check box of the required payees to be removed.
- Click Remove.
- View All Removed Beneficiaries. When editing an existing template and removing payees, the user can view the list of remove payee and add it back if needed.
- After all updates are made on the Payment Details screen, click Continue to save the details and go to Verify & Confirm screen.
- After verifying the details, click Create and Upload Request.
- If the request is initiated successfully, the application displays an acknowledgment screen summarizing the transaction details.
- Do any one of the following:
- Click Create Another Request to carry out another bulk payment request with the same template.
- Click View Templates to navigate to the list of templates.
- Click View Upload Status to navigate to the list of uploaded files to view their status.
- An extra validation for the execution date while creating a new Create Bulk Request. The execution date should be a current or upcoming date and not a past date.
- If the user has
- only single upload CSV, single upload XML can view templates with single mode.
- only multi-upload CSV, multi-upload XML can view templates with multi-mode.
- both single and multi-upload CSV, single and multi-upload XML can view templates with single and multi-mode.
File Status Filter
You can filter the requests by their status and applicable actions. By default, all requests are displayed. The following table displays the list of statuses for each tab to filter the records.
| Tab | Filter Options |
|---|---|
| Upload Status |
|
| Payment Status |
|
| Processing Type |
|
| Payment History | Date range |
Error Handling for Bulk Payment Validation Failure
You can handle a bulk request that is created in error state due to a validation failure post upload.
- If the bulk payment record initiated is displayed in the Payment Status dashboard with error description, you must cancel the request and upload a new file as the error is not amendable.
- If the bulk payment file uploaded has multiple erroneous payment, the error message is displayed along with the payment. You can either modify the error of that payment, remove the payment in error or cancel the bulk payment request.
Confirmation of Payee
The feature Confirmation of Payee is an account name-checking service offered by the central authorities to help reduce misdirected payments and provide greater assurance that payments are being sent to the intended account holder. Application allows the user to validate the payee account name check. The bank application verifies these details with the central system or the third-party system. This feature is available while adding a new payee and performing a transaction.
The bank admin user have to configure the Verify Payee. The admin user is also allowed to configure this Verify Payee at the entity level, payment type level, and country level. The following are the options available for the admin user. See Configuration section for procedure to activate Confirmation of Payee.
The following are the Confirmation of Payee validations:
| Account Number Matched | Account Names Matched | Validation Outcome |
|---|---|---|
| Yes | Yes | Payee Verification Success |
| Yes | No | Payee Verification Failed |
| No | Yes | Payee Verification Failed |
| No | No | Payee Verification Failed |
The following is the application behavior when user selects:
- Add New Payee. While adding a new payee, the application displays the check box Verify Payee. The following is the application behavior for various configurations (Mandatory/ Optional/ No Configuration):
- Mandatory. By default, Verify Payee field is checked and the users cannot enable or disable the check box. The following are the expected responses after the validation.
- Success. Entered fields are correct.
- Failure. The user either corrects the details and performs the validation again or aborts the procedure.
In case of a close match, the correct name along with the error reason will be displayed.
- Application timeout. The user either retries with the same details and performs the validation, or aborts the procedure.
- Optional. By default, Verify Payee field is unchecked and the users can enable or disable the check box. The following are the expected responses after the validation.
- Success. Entered fields are correct.
- Failure. The user either corrects the details and performs the validation again or skips the procedure.
In case of a close match, the correct name along with the error reason will be displayed.
- Application timeout. The user either retries with the same details and performs the validation, or skips the procedure.
- No Configuration. The application does not display the Verify Payee field.
- Mandatory. By default, Verify Payee field is checked and the users cannot enable or disable the check box. The following are the expected responses after the validation.
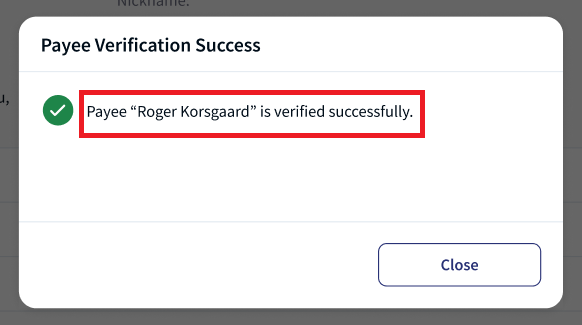
- Select from Existing Payee. While adding an existing payee, the application displays check box to select the payee, Payee Name, Bank Name, Payment Method, Payee Verification, and Verify Payee. In Verify Payee status when the user clicks Verify or Re-Verify the application perform Confirmation of Payee check. A pop-up box displays success or failure message and Payee Verification Status is updated accordingly. The following is the application behavior for various configurations (Mandatory/ Optional/ No Configuration):
- Mandatory/ Optional. By default, Verify Payee field is unchecked and the users can enable or disable the check box for revalidation. The following are the expected responses after the validation.
- Success. Entered fields are correct.
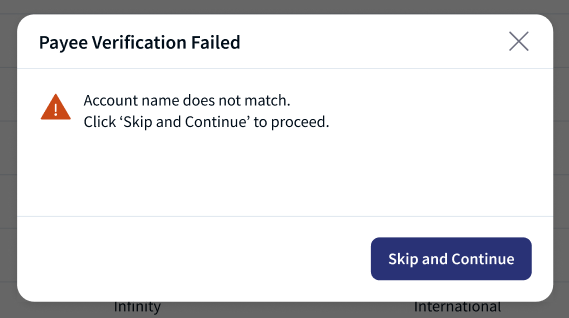
- Failure. The user either corrects the details and performs the validation again or skips the procedure. The Payee Verification field is updated as Verification Failed and the disables the check box and Verify link.
In case of a close match, the correct name along with the error reason will be displayed.
- Application timeout. The user either retries with the same details and performs the validation, or skips the procedure.
- No Configuration. The application does not display the Verify Payee field.
- Mandatory/ Optional. By default, Verify Payee field is unchecked and the users can enable or disable the check box for revalidation. The following are the expected responses after the validation.
Error Scenario - Payee Name Close Match
Based on the spotlight configuration(VERIFY_PAYEE_NAME_AUTO_UPD), when account number is matched and account names are closely matched, the application will enrich the name.
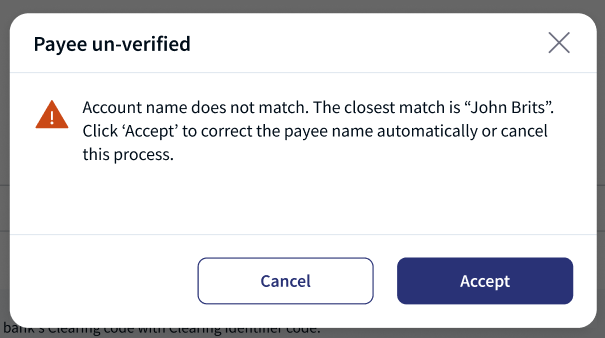
When the user is performing the Payee confirmation check, the application displays an error message Account Name does not match in a pop up box with following options.
- When Spotlight configuration is enabled, the application displays Update and Cancel options.
- Click Update, the payee name will be automatically enriched by the application.
- Click Cancel, the application aborts the payee verification process and the status is set to failure.
- Click Update, the payee name will be automatically enriched by the application.
- When Spotlight configuration is disabled, the application displays Modify and Cancel options.
- Click Modify, the application allows the user to modify the name and go for payee confirmation.
- Click Cancel, the application aborts the payee verification process and the status is set to failure.
- Click Modify, the application allows the user to modify the name and go for payee confirmation.
Payee Enrichment
For Same bank transfer the application behavior depends on the Spotlight bundle configuration CREDITOR_NAME_ENRICHMENT, Confirmation of Payee and close match scenario.
- If the application is not configured with Confirmation of Payee, then the payee name enrichment depends on the bundle configuration CREDITOR_NAME_ENRICHMENT.
- is enabled then payee name will be automatically updated/generated after entering the account number and re-enter account number. Even though the entered account name is different, the application enriches the name based on the account number.
- is disabled then payee name will not be updated/generated after entering the account number and re-enter account number.
- If the application is configured with Confirmation of Payee and close match scenario and bundle configuration VERIFY_PAYEE_CONFIG_BULK
- is mandatory or optional, payee name enrichment will not happen.
- is no configuration, then the payee name configuration CREDITOR_NAME_ENRICHMENT
- is enabled then payee name will be automatically updated/generated after entering the account number and re-enter account number. Even though the entered account name is different, the application enriches the name based on the account number.
- is disabled then payee name will not be updated/generated after entering the account number and re-enter account number.
Expiry Period - Confirmation of Payee
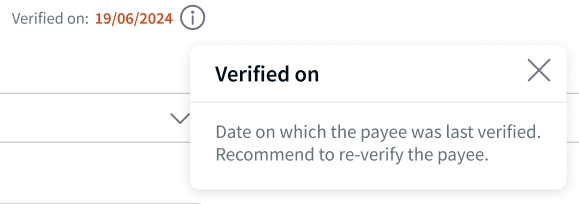
This Payee verification Expiry period is a warning for the banking user. This is to show the user that the beneficiary's last payee verification has crossed the threshold day limit set by the bank. The day limit is as per the Spotlight bundle configuration. The following are the changes the user can see after the expiry period.
- The payee verification time stamp color changes to orange after crossing the threshold day limit.
- The user can still proceed with the transaction without re-validating the confirmation of the payee check.
Protecting Your Downloaded PDF Files with a Password
The Temenos Digital application allows you to download documents in PDF format. To ensure your data remains secure, all downloaded PDF files is now protected with password. For enhanced security, the password for your downloaded PDF files will follow this format:
[First 4 letters of your lastname] + [Date of birth in the pattern "MMDDYYYY"]
The following are two examples:
| Name (First Name + Last Name) | Date of Birth | Password | Notes |
|---|---|---|---|
| Justin Alexander | 01/Jan/1980 | ALEX01011980 | |
| John Doe | 25/Mar/1990 | Doe03251990 | Since the last name is less than 4 characters, the logic will consider all the available characters in last name. |
Also see Spotlight Configuration.
Configuration
The following configurations are applicable for Bulk Payments:
- The visibility of each feature is controlled through the permissions defined for the user.
- This feature is applicable only in online banking application and integrated with Transact directly. The request is created in Transact and the Transact application processes the payments.
- Depending on the bank configuration, if Strong Customer Authentication(SCA) is enabled for the feature, SCA is triggered. The authentication type is configured and can be turned on or off in the Spotlight application. See Push Notifications for more information.
Backend Integration - Transact/MS/Mock
Using the runtime configurable parameter (Bulkpayment_Backend server property) at the Micro App level, an implementation team can configure the backend integration endpoint as Transact, or Mock as per customer needs for the following. The BulkPayments Fabric MA supports the integration.
- The backend integration for all the APIs is mocked (DBX DB) or SRMS based on customer needs.
- The validations are avoided if the module is directly integrated with Transact endpoints.
- When records are created, use these options: Use the DBX DB table records that already exist, or use the Fabric Java layer to build a stubbed or JSON data response directly.
Follow these steps:
- Sign-in to your Fabric console.
- From the left pane, select Environments.
- For your Fabric run-time environment, click App Services.
- Navigate to Settings > Configurable Parameters.
- On the Server Properties tab, go to
BULKPAYMENT_BACKENDField Name and set the Field Value depending on the integration (for example, MOCK).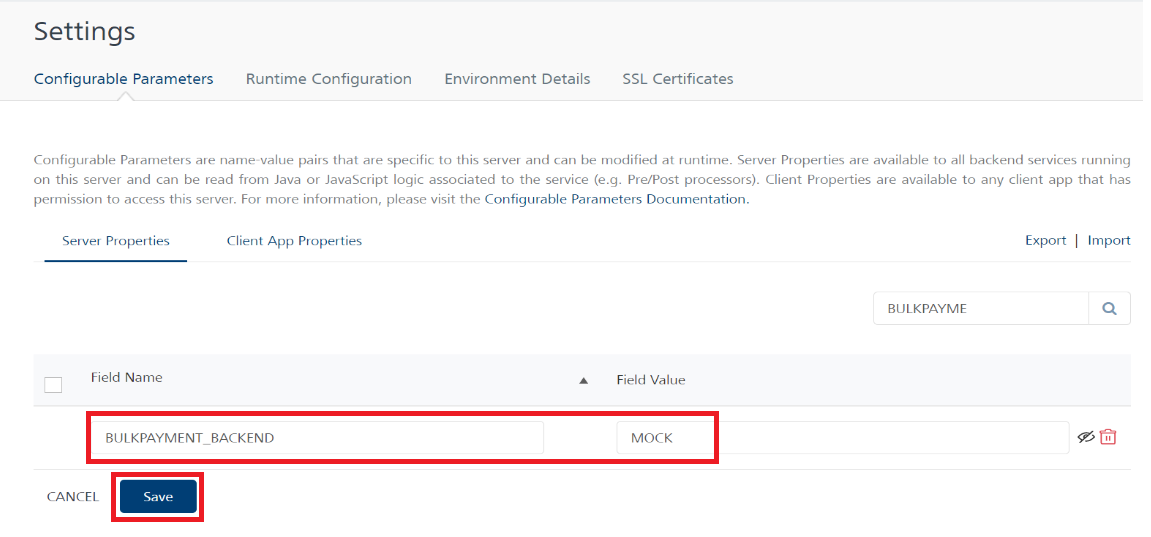
- Click Save.
Spotlight Configurations
The following are the spotlight configurations for the Bulk Payments.
Configuration to View Account Compact Dashboard
System configuration (Bundle DBP - ACCOUNTS_COUNT_COMPACT_DASHBOARD) is available in the Spotlight application to drive the visibility of Account Compact Dashboard. Based on the bank configuration, number of accounts are displayed on the combo box.
For example, the configuration is set as 10. The following are the scenarios:
| Scenario 1 | User with less than or equal to 10 accounts | The application displays accounts with their available balances grouped by account types (Favorite, Savings, Current, and many more). |
| Scenario 2 | User with more than 10 accounts | The application displays accounts grouped by account types (Favorite, Savings, Current, and many more). By default, the application displays favorite account as expanded and rest all account types are collapsed. If there are no favorite accounts, then one of the account types as expanded and rest all account types are collapsed. |
Configuration to Expiry Period
System configuration (Bundle DBP - VERIFY_PAYEE_EXPIRY_PERIOD_IN_DAYS) is available in the Spotlight application to set the threshold day limit for expiry period. The Expiry period is banks decision to set the threshold day limit. The bank can decide if the payee is validated once and remains the status for ever or set expiry period threshold value to display warning to the user.
- Default value is 180.
- Applicable values are 1 to 99999.
The following are the scenarios:
| Scenario 1 | Value is 180 | The application displays the orange color time stamp after the crossing 180 days from the last payee verification. |
| Scenario 2 | Other than values range 1 to 99999 | Any values other than 1 to 99999 considered as no expiry period. For example, 0 or null will be defined as no expiry period. |
Confirmation of Payee
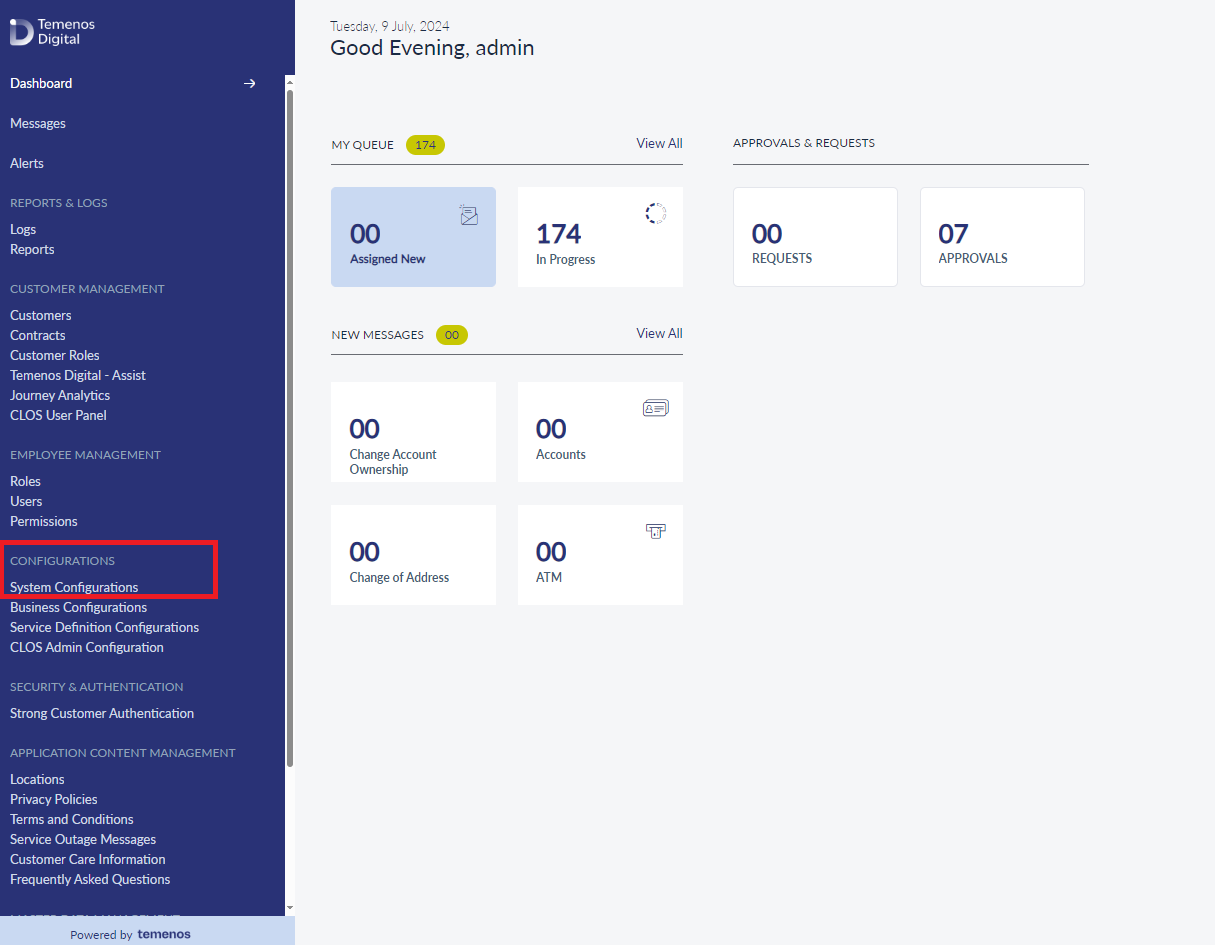
To enable the confirmation of payee, the bank user must have access to the spotlight application and perform the following steps.
- Sign-in to the Spotlight application, navigate to Configurations > System Configuration.
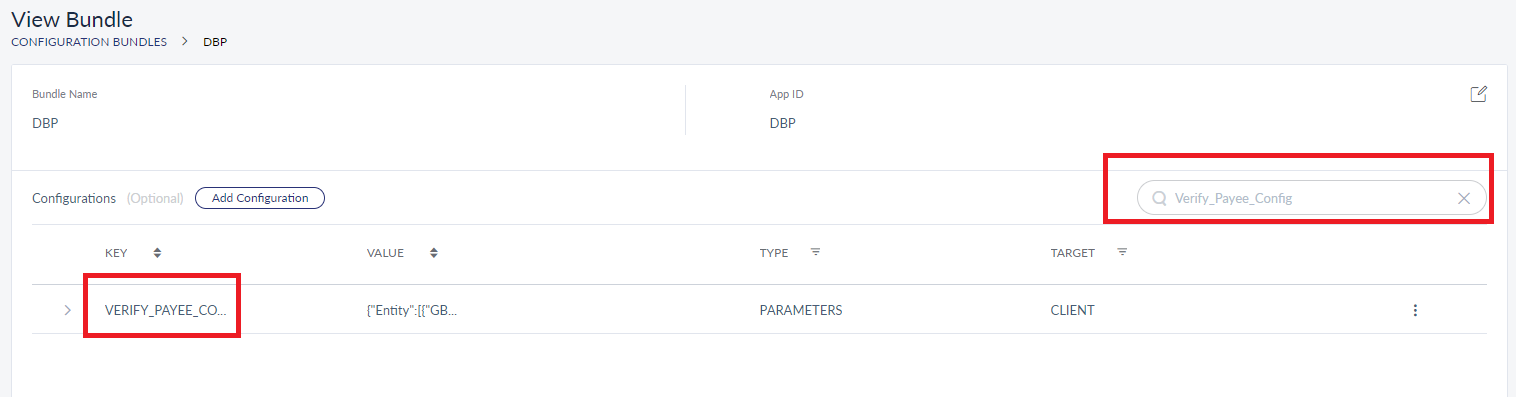
- Select DBP bundle, and search for VERIFY_PAYEE_CONFIG.
- Click ellipses and select Edit.
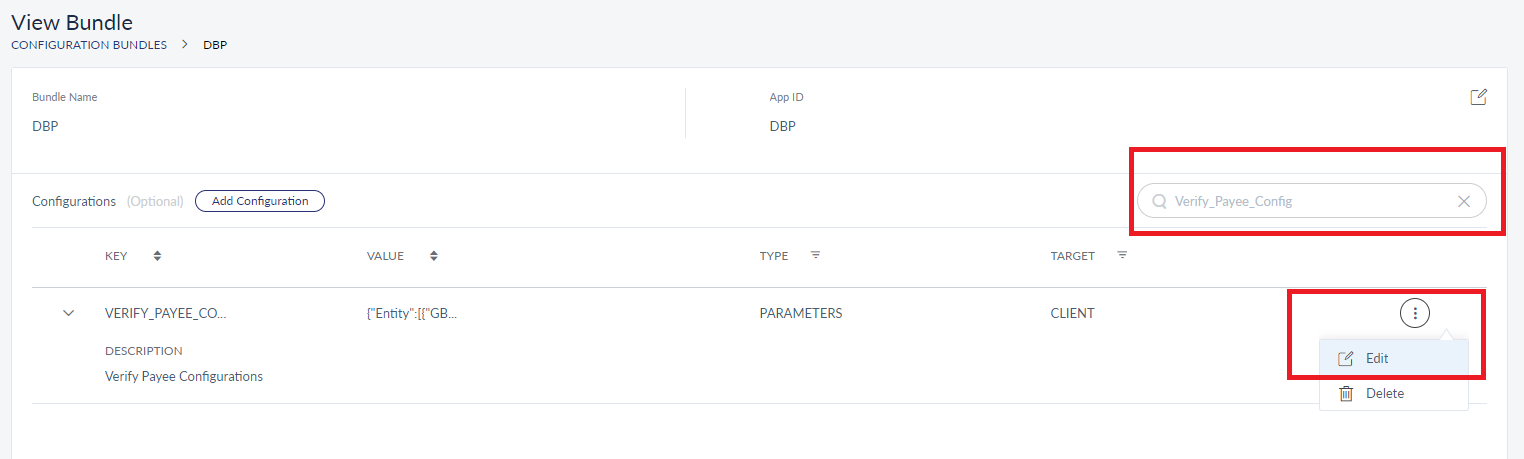
- Edit the configurations accordingly and select Update.
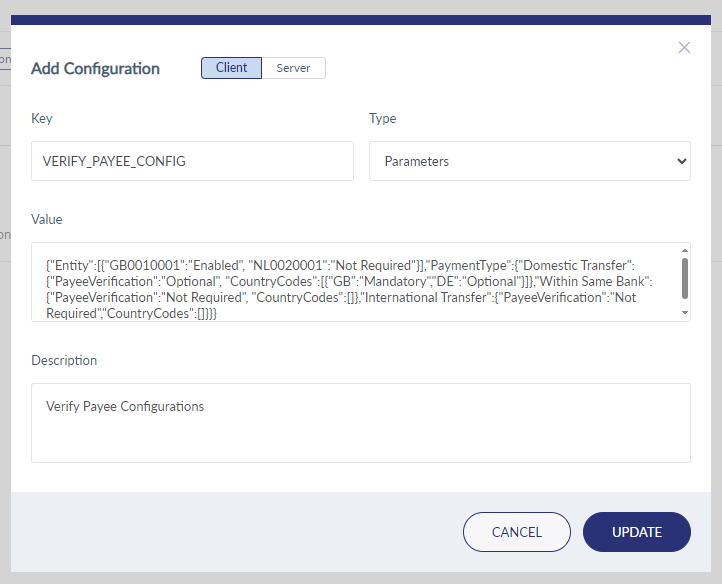
The following are the Spotlight configuration for Confirmation of Payee.
| Key | Definition | Value |
|---|---|---|
|
VERIFY_PAYEE_CONFIG_BULK |
Verify Payee configuration for bulk payments |
{"Entity":[{"GB0010001":"Enabled", "NL0020001":"Not Required"}],"PaymentType":{"Domestic Transfer":{"PayeeVerification":"Optional", "CountryCodes":[{"GB":"Mandatory","DE":"Optional"}]},"Within Same Bank":{"PayeeVerification":"Not Required", "CountryCodes":[]},"International Transfer":{"PayeeVerification":"Not Required","CountryCodes":[]}}} |
|
VERIFY_PAYEE_ERR_MAPPING |
Error Mapping scenarios for Verify Payee. |
{"ANNM":"Account name does not match","AC01":"Incorrect account number","OPTO":"Opted out of CoP scheme","CASS":"Account has been switched","CLOSE_MATCH":"Account name does not match"} |
|
VERIFY_PAYEE_NAME_AUTO_UPD |
Enable or disable close match scenario to update the name. |
Enable/Disable |
| CREDITOR_NAME_ENRICHMENT | To enable or disable the payee name enrichment on entering the account number while initiating a same bank transfer in the Bulk Payment - Internal transfer. | Enable/Disable |
Visibility of CBPR Fields
A new configuration BULK_PAYMENTS_CBPR_FIELDS is added in Spotlight DBP bundle configuration. This will control the visibility of optional fields, Payee Identification, Extended Party Details, and Remittance information.
| Key | Value | Description |
|---|---|---|
| BULK_PAYMENTS_CBPR_FIELDS | {"ISOAdditionalFields":"ON","Domestic":[{"PayeeIdentification":"ON","ExtendedPartyDetails":"OFF","RemittanceInformation":"OFF"}],"International":[{"PayeeIdentification":"ON","ExtendedPartyDetails":"ON","RemittanceInformation":"ON"}]} |
If the value is ON, the respective fields will be visible. If the value is OFF, the respective fields will not be visible. |
PDF Password Protection
In the Spotlight, a new DBP bundle configuration added. This logic helps the file to generate the password for the PDF file.
| Key | Value | Description |
|---|---|---|
| PDF_PASSWORD_CONFIG | {"USER":{"PART1":{"FIELD":"lastname","NUM_OF_CHARS":4} , "PART2":{"FIELD":"dateOfBirth","PATTERN":"MMDDYYYY"}}, "OWNER":"TEMENOSDIGITAL" } |
In PART1, The FIELD can be 'lastname' or 'firstname'. In PART2, the PATTERN can be any valid part like MMDD, DDMM, MMDDYYYY, YYYY, or MMDDYY. The generated password is the concatenated string of PART1 and PART2. |
APIs
The following APIs are shipped as part of this feature. For the complete list of APIs shipped as part of this feature, see Experience APIs documentation.
| Name | Description | Introduced In |
|---|---|---|
| UploadFile | This API uploads the Bulk Payment File. | 2020.10 |
| fetchUploadedFiles | This API retrieves the uploaded files. | 2020.10 |
| fetchOnGoingPayments | This API retrieves the list of ongoing payments. | 2020.10 |
| fetchHistory | This API retrieves the history of Bulk Payments. | 2020.10 |
| review | This API reviews the records. | 2020.10 |
| fetchRecordsWaitingForMyApproval | Retrieves the records that are in waiting for approval. | 2020.10 |
| fetchRecordsReviewedByMeAndInApprovalQueue | Retrieves the records that are reviewed and are in the approval queue. | 2020.10 |
| fetchRecordsHistoryActedByMe | Retrieves the history of Bulk Payments that have been executed out by the user. All the records that have been approved or rejected will be fetched. | 2020.10 |
| fetchRecordsHistoryReviewedByMe | Retrieves the history of Bulk Payments that have been reviewed by the user. | 2020.10 |
| approveBulkPaymentRecord | Approves the Bulk Payments record. | 2020.10 |
| rejectBulkPaymentRecord | Rejects the Bulk Payments record. | 2020.10 |
| cancelBulkPaymentRecord | Cancels the Bulk Payments record. | 2020.10 |
| updateBulkPaymentRecord | Updates the Bulk Payments record. | 2020.10 |
| addPaymentOrder | Creates a Payment order. | 2020.10 |
| editPaymentOrder | Edits the Payment order. | 2020.10 |
| deletePaymentOrder | Deletes the Payment order. | 2020.10 |
| fetchSampleFiles | Retrieves the sample Bulk Payment files. | 2020.10 |
| fetchPaymentOrders | Retrieves the payment orders. | 2020.10 |
| createBulkPaymentTemplate | This API creates a bulk payment template. | 2021.01 |
| deleteBulkPaymentTemplate | This API deletes the bulk payment template based on the template ID provided by the user. | 2021.01 |
| fetchBulkPaymentTemplates | This API retrieves bulk payment templates. | 2021.01 |
| initiateDownloadBulkPaymentAck | Initiates the bulk payment acknowledgment file download process. The acknowledgment file is generated after the payment is successfully completed. | 2021.01 |
| downloadBulkPaymentFileAck | Downloads the bulk payment acknowledgment PDF file. | 2021.01 |
| fetchBulkPaymentTemplatePOsById | This API fetches the bulk payment template of payment orders based on the template ID. | 2021.01 |
| editBulkPaymentTemplate | This API edits a bulk payment template. | 2021.01 |
| createBulkRequest | Creates a bulk payment request from the template. | 2021.01 |
| fetchBulkPaymentTemplateById | This API retrieves the bulk payment template details from the based on the template ID. | 2021.01 |
| fetchCancellationReasons | This API retrieves the cancellation reasons for bulk payments. | 2021.10 |
| fetchBulkPaymentRecordDetailsById | This API retrieves bulk payment record based on ID. | 2021.10 |
In this topic