User Management
The user management feature provides the following self-service options for business owners and other authorized users of business/company.
- Create new business users and manage information.
- View the list of enrolled business users.
- Control role permissions to access features and actions at user level at the time of user creation or editing the user permissions after the user has been created.
- Distinguish between logged-in user and other users in the user list. The logged-in user record is marked with (Me) after the name, for example - John (Me).
- View own permissions and edit permission details of other users if required.
The feature is available to only those users who are given explicit permission to manage business users. The business users can access the permitted business accounts in the banking application and perform the activities based on the permissions (access to features and actions) given to the user.
At the time of user creation, an authorized user can add online banking users for their companies by any of the following means:
- Enrolling from existing customer records only.
- Creating user profiles managed outside of the core banking system.
- Both based on the configuration set by the bank.
See Configuration section for more information on relationship configuration for authorized users and configuration for user creation process.
Menu Path:
- Online Banking: Side Menu > User Management > All Users. The application displays the User Management screen.
- Mobile Banking: Side menu > User Management
Business Process Diagram - Create Business User
UX Overview
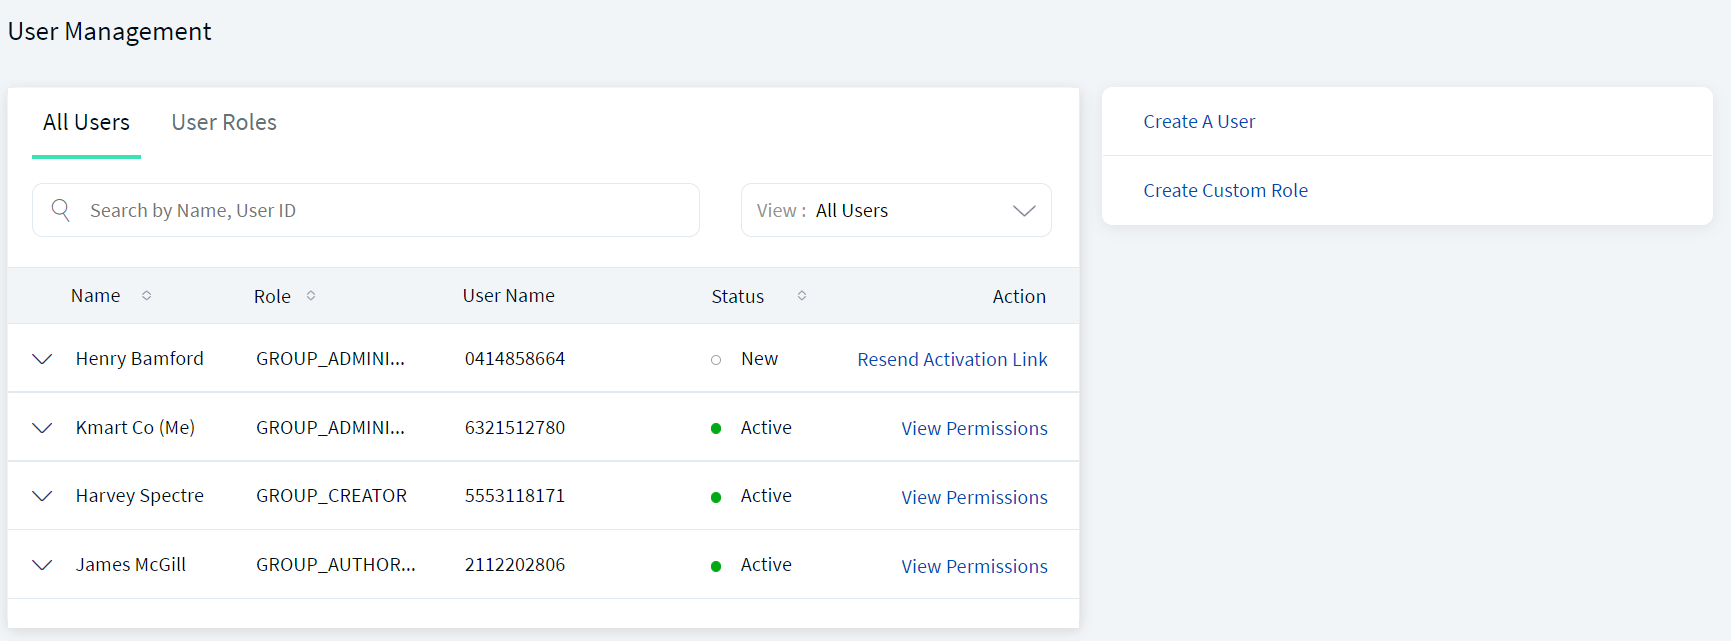
The User Management screen displays the list of business users who have access to the business accounts. This is also the landing page of the user management module. You can do the following:
- View the business users list
- Edit View permissions and edit user details
- Create business user
- Search or filter users
Feature Actions
Within the User Management feature, various feature actions are available. The following are the revised feature actions:
| Feature Action | Description |
|---|---|
| View Users | This action is associated with permission for viewing all the users and their list of permissions. |
| Create Users | Associated with permission for creating a new user. |
| Manage Users | Associated with permission for editing an existing user. A business user can view the list of users and their account access and all the associated permissions. |
View Business Users List
The application displays the User Management screen with a list of business users tagged to a legal entity as the signed-in authorized user and who have access to the business accounts.
Menu Path: Side Menu > User Management > All Users
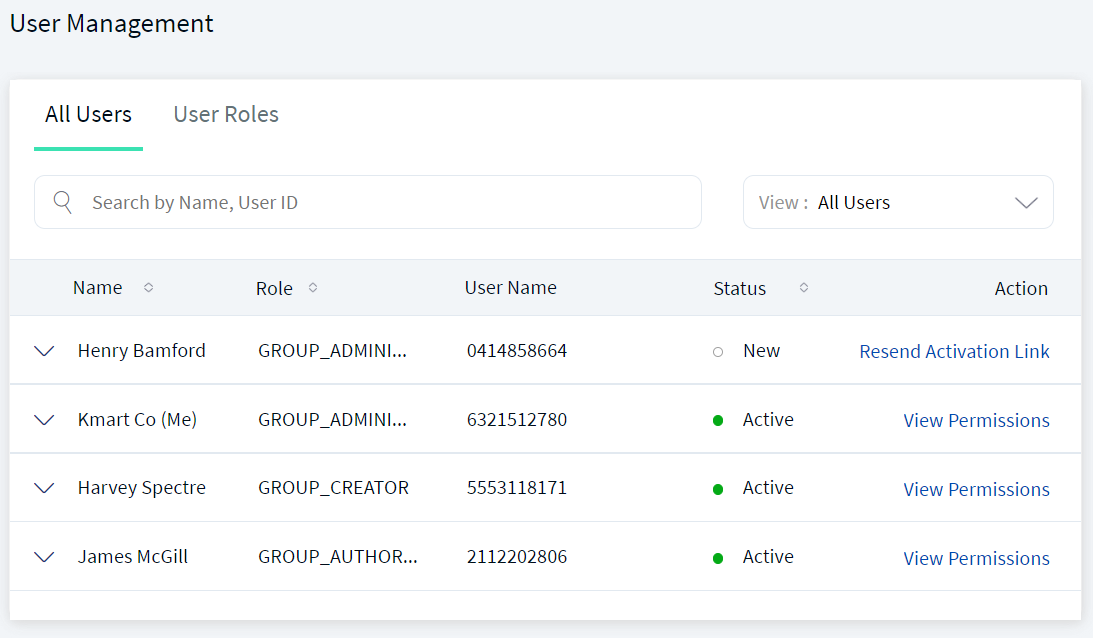
The list is represented as rows with the following details of business users:
- Name of the user. The logged-in user can distinguish between self-user and other users in the user list. The logged-in user record is marked with (Me) after the name, for example - John (Me). In online banking application, maximum 15 characters of name is displayed and includes (Me) in case of the logged-in user. If the first name (which is displayed in online banking) is very long, the (Me) suffix part will be truncated.
- Role of the user - Administrator, Creator, Authorizer, Viewer.
- User Name used to sign into the banking application.
- Status of the user - Active, Suspended, New.
- Actions such as send an activation link to new users or view permissions and edit the details depending on the permissions available to the business user. On clicking, the page navigates to user details page and the provision to edit the permission details. If the business user has only view permission, the Edit button is not visible. A signed-in user however can only view own permissions and cannot edit the details.
The list is sorted by Name by default, but you can also sort the list based on the Role and Status using the sort  icon.
icon.
Do any of the following:
- Click Create a User to add a business user.
- Click
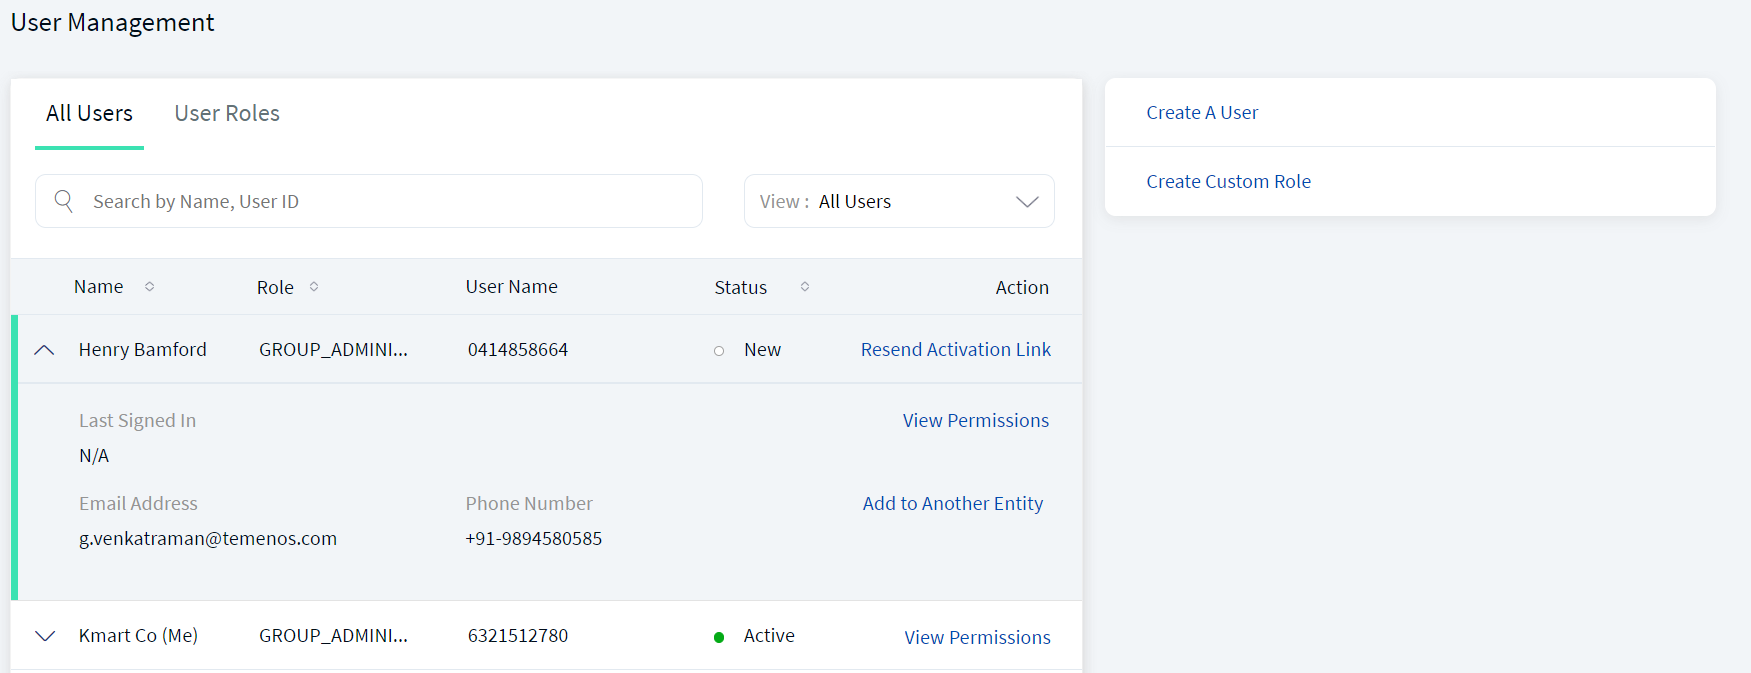
 the down arrow to view the following user details: Last signed in date, email address, phone number, and Add to another Entity
 - Search for a business user using the search criteria.
- Use the View list to filter users.
- Click View Permissions to view permissions and edit the details as required depending on the permissions available to the signed-in user.
A business user can view the list of users and their account access and all the associated permissions if "View Users" permission under User Management feature is enabled. Expanding the user details displays the user details.
View Permissions and Edit User Details
Use the feature to view and edit the details of a selected user and control permissions to access features and actions at user level in edit mode. A business user can edit only if "Manage Users" permission under User Management feature is enabled. Otherwise, the user will be able to only view the details. The signed-in user however can only view own permissions and cannot edit the details.
Menu Path: Side Menu > User Management > All Users > Click View Permission link
To edit the user details and control permissions to access features and actions at user level, follow these steps:
- From the user list, click View Permissions. The following screen is displayed.
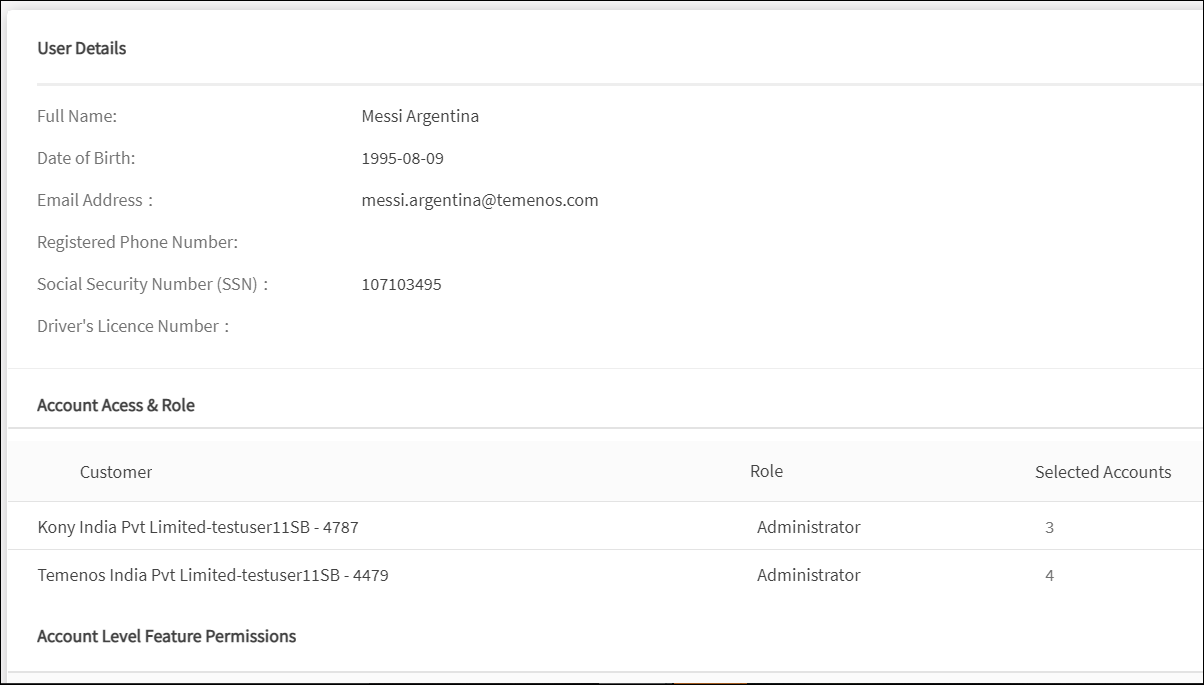
- The application displays the signed-in user name and email address on top of the screen and the User Details with the following information:
- Full name
- Date of birth
- Email address
- Registered phone number
- Social Security Number (SSN)
- Driver's licence number
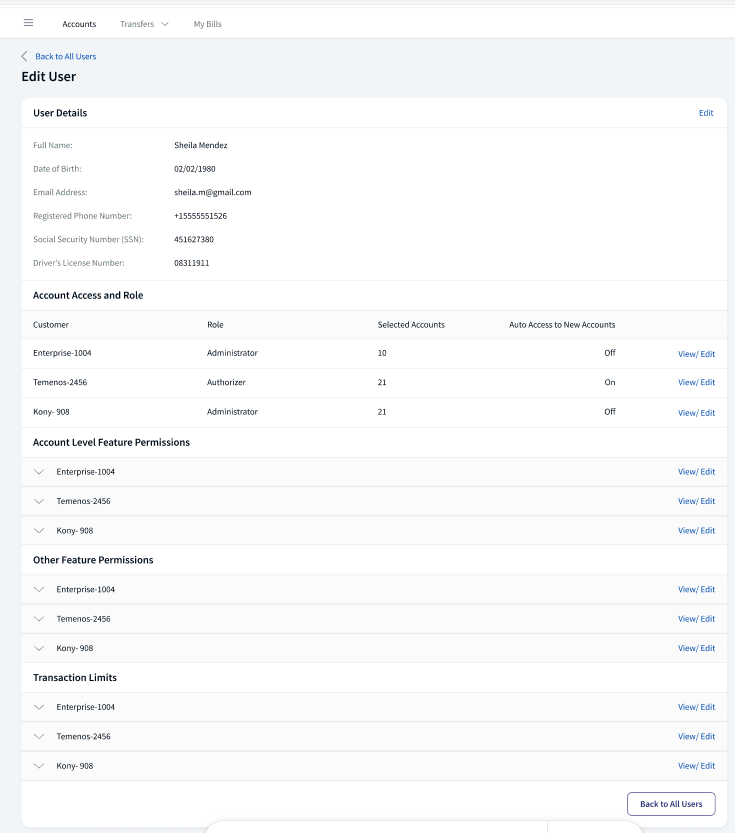
- The details on the screen are divided into the following sections. Click the respective View/Edit link and make the changes as required. See review permissions section on this page for more information on editing the details.
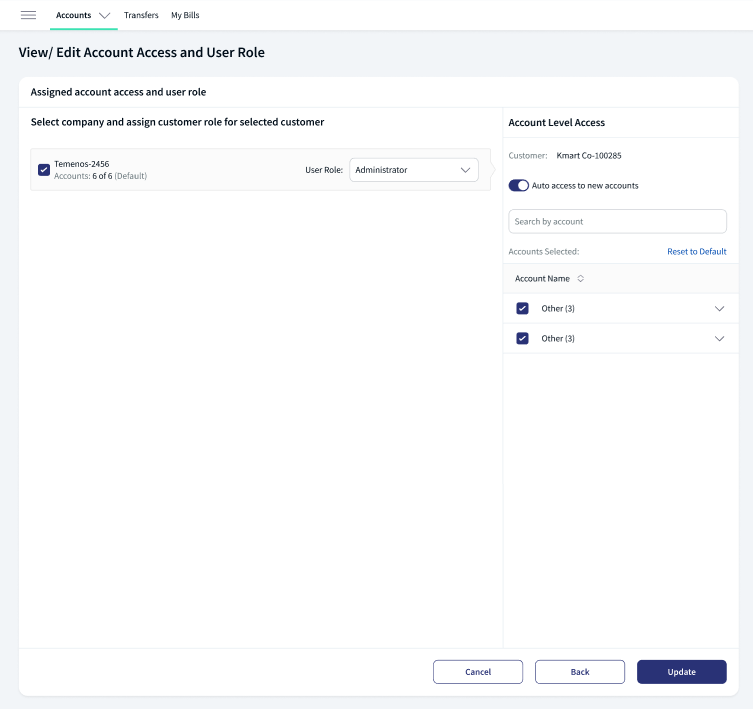
Account Access and Role
Displays the Customer ID, assigned Role of the user, and Selected Accounts. Assign a new role if required and click Update. The change is updated. The user will be able to view or operate only the selected contracts when the user signs in to the application. The user permissions and transaction limits changes based on the assigned role.
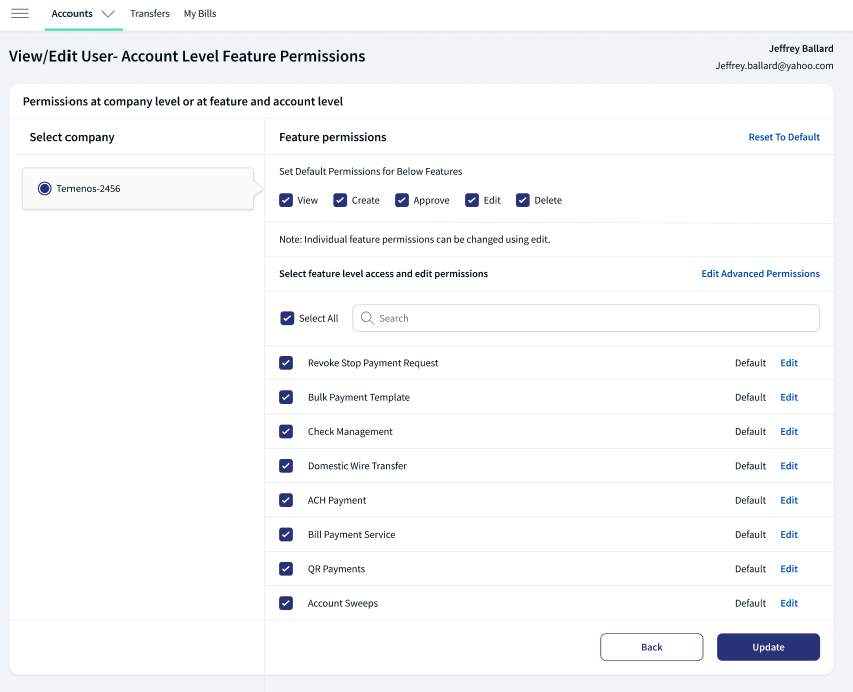
Account Level Feature Permissions
Displays the permissions given to the user to access the features and associated actions at the contract level. Make the changes by selecting or clearing the feature check boxes of respective accounts. Click Update. The changes are updated. The user permissions and transaction limits changes based on the changes.
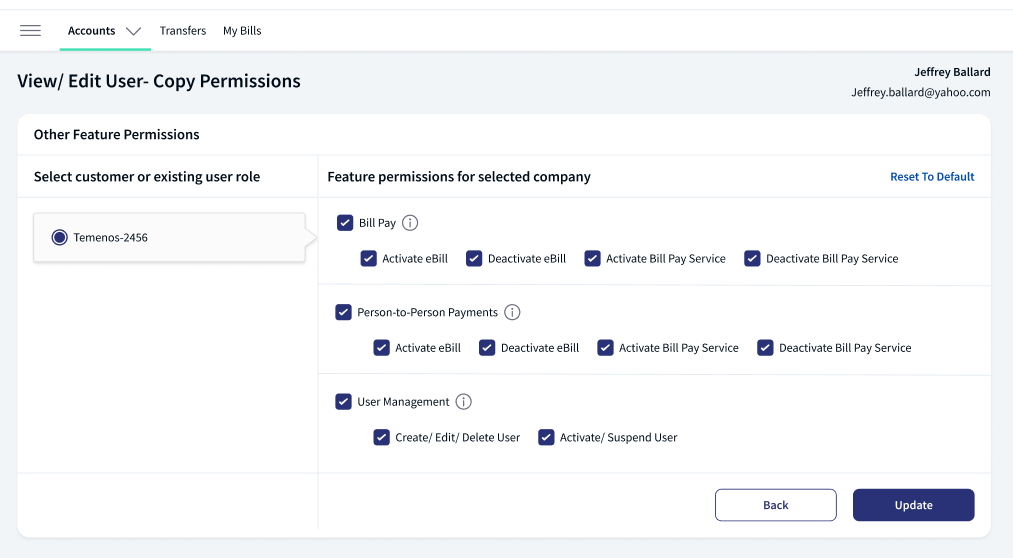
Other Feature Permissions
Displays the permissions given to the user to other non-transactional features. Make the changes by selecting or clearing the feature check boxes. Click Update. The changes are updated.
Transaction Limits
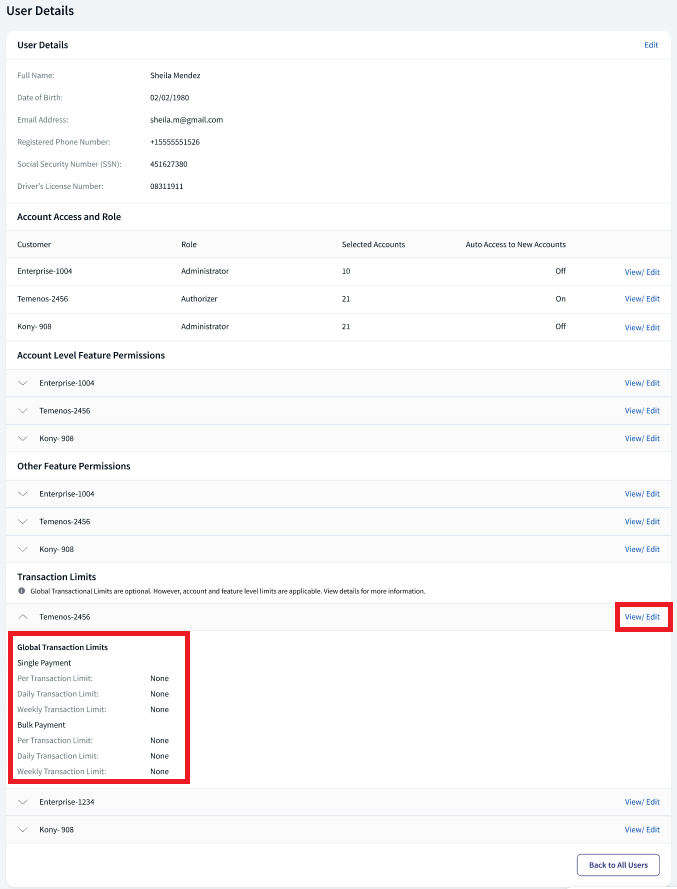
Displays the transaction limits defined for the various services of corresponding contracts. Make the changes to pre-approval and denial limits. Click Update. The changes are updated. Note that the changes will affect all future transactions. Click here to see more information on Transaction Limits.
- After all the updates are done, click Update.
- The application displays an acknowledgment with a notification Request to edit user has been sent for approval. with a reference number. After approval user can see the changes. For more information, see the User Management Approval Dashboard.
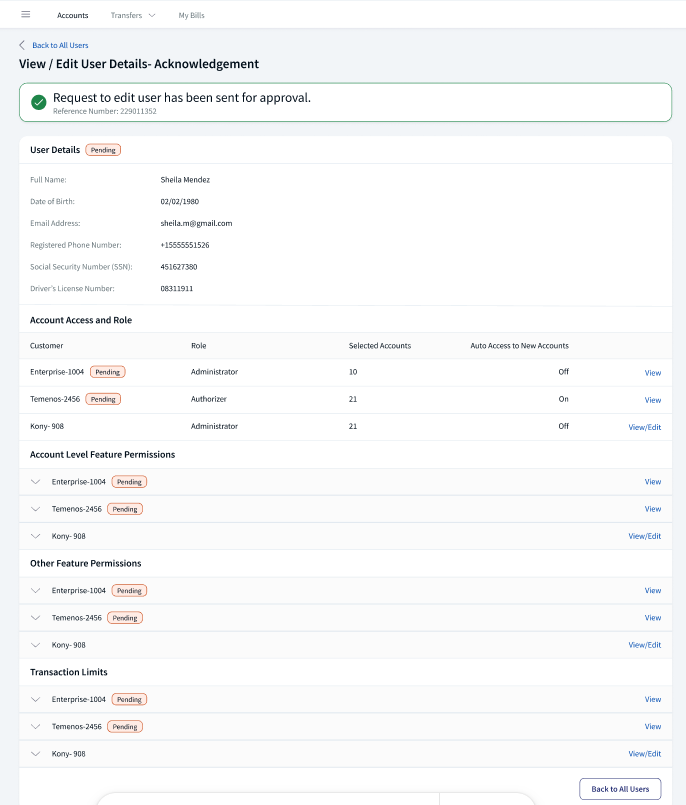
- In the User Details ( Edit User), if a record is pending, the user cannot raise one more request until the pending record is approved, rejected, or withdrawn.
- For Edit Account Access and Role, Account level Features Permissions, Other Feature Permissions , and Transaction Limits, the user can edit and send the permissions for approval and the record is shown as pending. The user cannot raise one more request until the pending record is approved, rejected, or withdrawn.
- If the record is pending, the user can see the notification Data with pending tag cannot be edited as there are changes that require approval.
Add to Another Entity
This feature helps the user to search the user of one entity and add to a contract of other entity.
To choose the required legal entity, follow these steps:
- Menu Path: Side Menu > User Management > All Users.
- Click on user, Add to Another Entity is shown.
- Add to another entity permission is enabled, when user have access to Multi entity and should have Edit and view permission.
- If the user has a single entity, the system will not allow the user to Add to another Entity permission.
- Click on “Add to another entity” it will show legal entity dropdown to display all the legal entity that user have access and select one of the legal entities from dropdown.
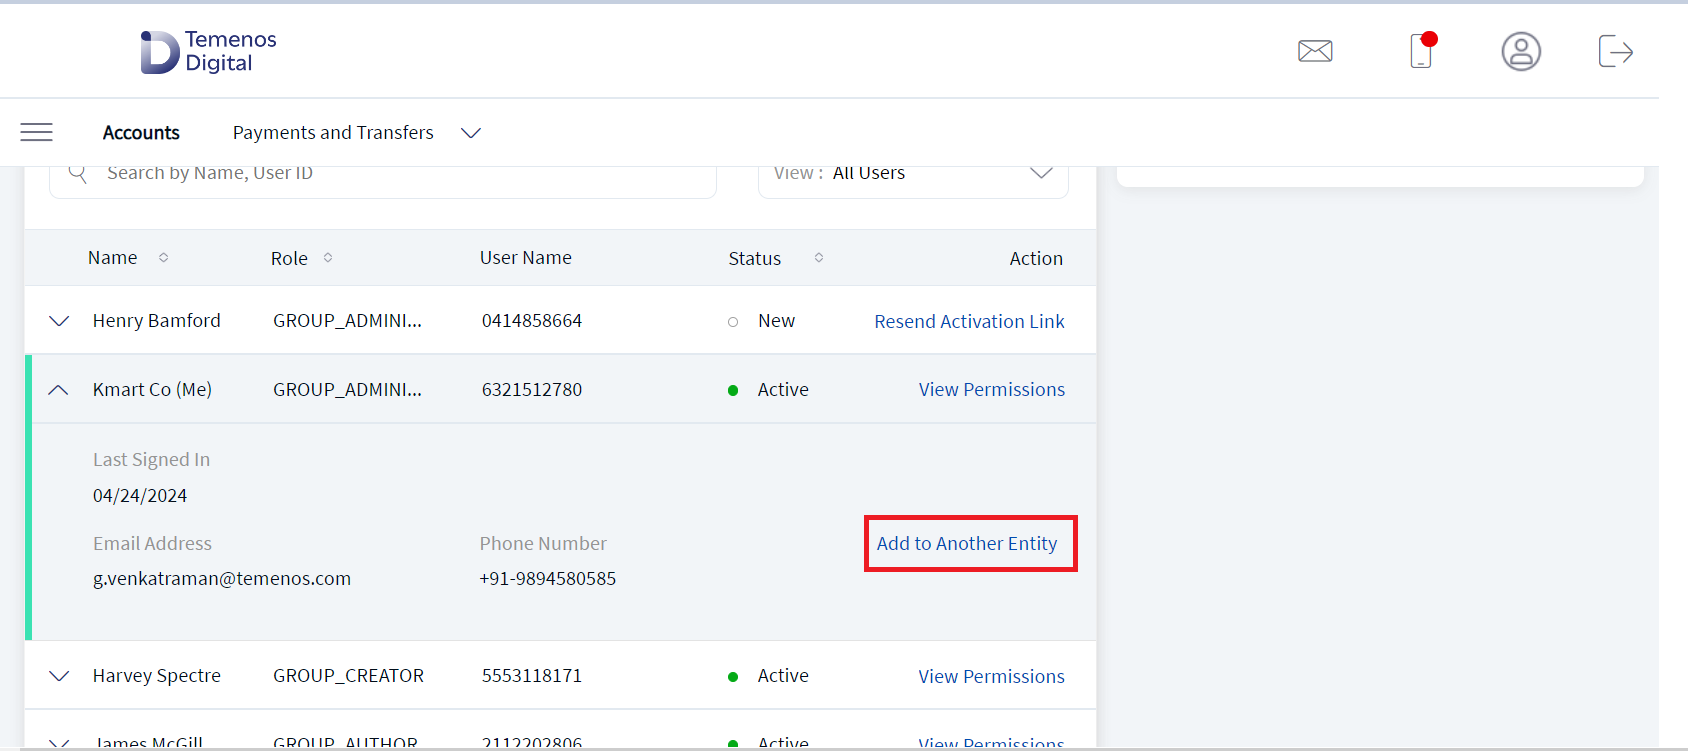
- Multi entity selection is not applicable. User can select only one legal entity at one time.
- Select the required legal entity and click Continue.
If the user is in the selected legal entity, the application will not ask to add the details like Name, DOB, Email and Phone number.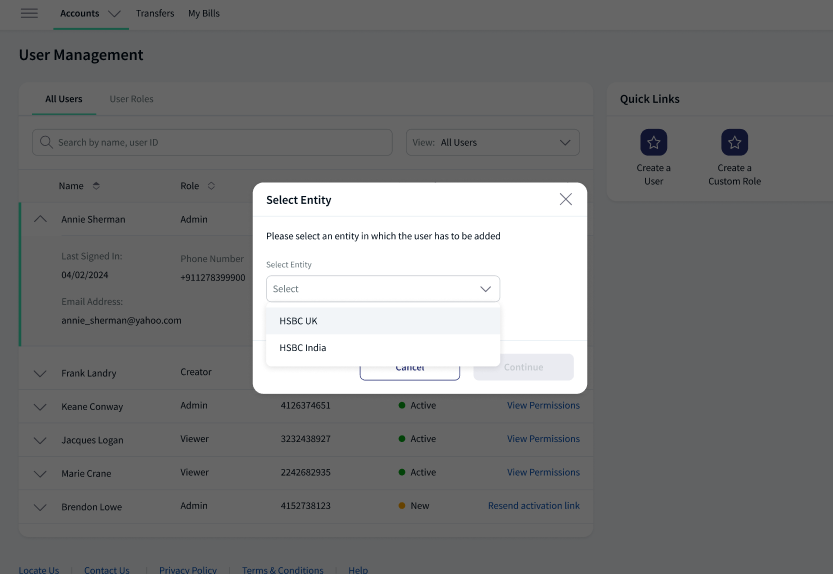
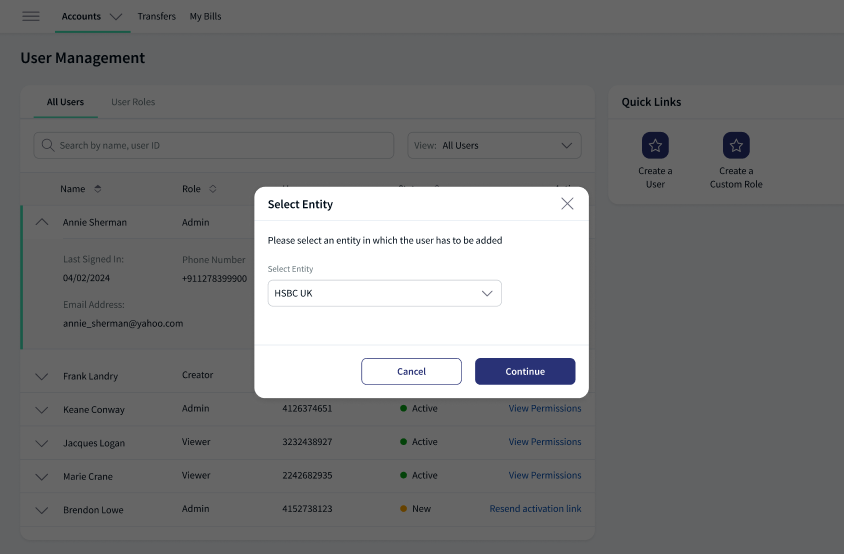
- If the user is already added to entity and the request is in pending the application displays an error.
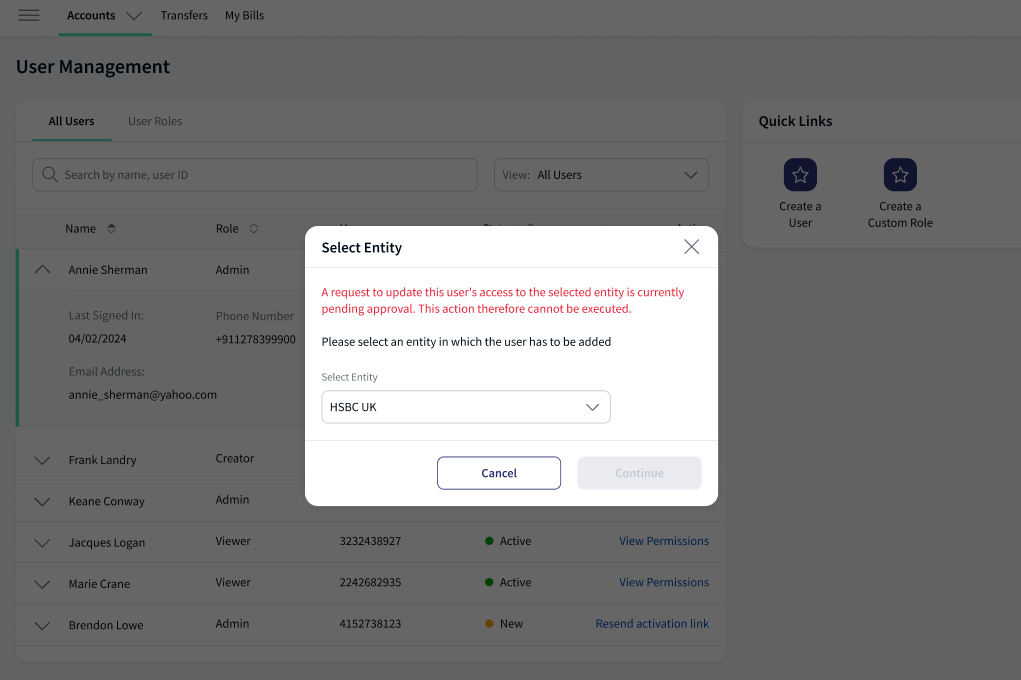
- If the user is already added to entity and the request is in pending the application displays an error.
- Enter Basic Details of the user.
User can edit the following fields (Email, Phone number, SSN, Driver’s license) and system will not allow to edit the details Name and DOB.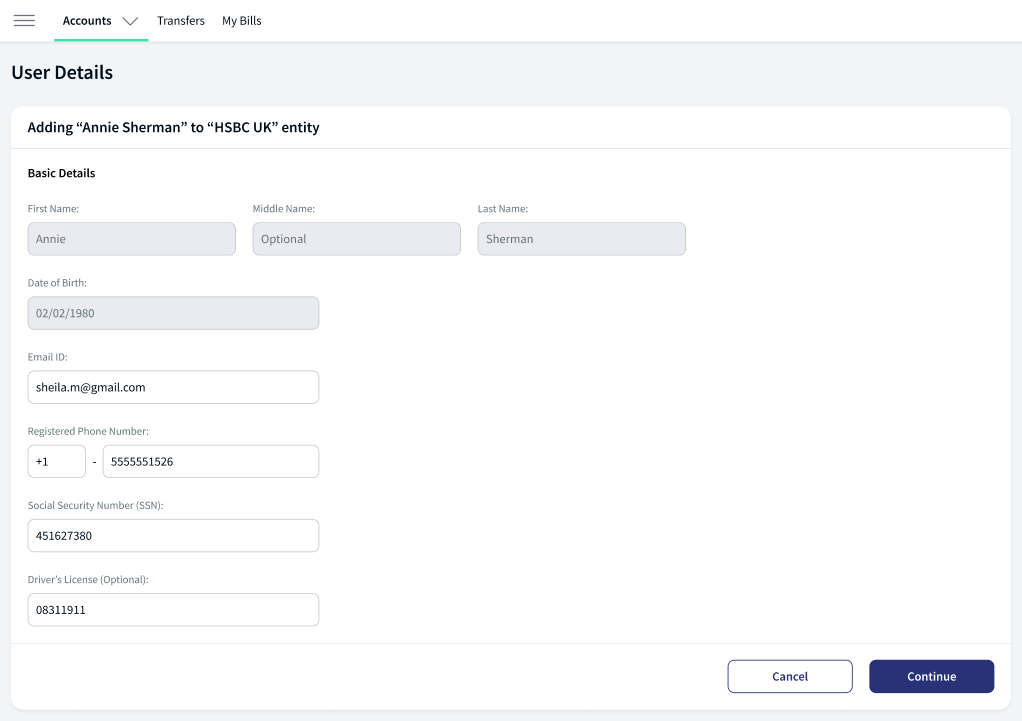
- Select customer role or existing user and click Copy and Continue.
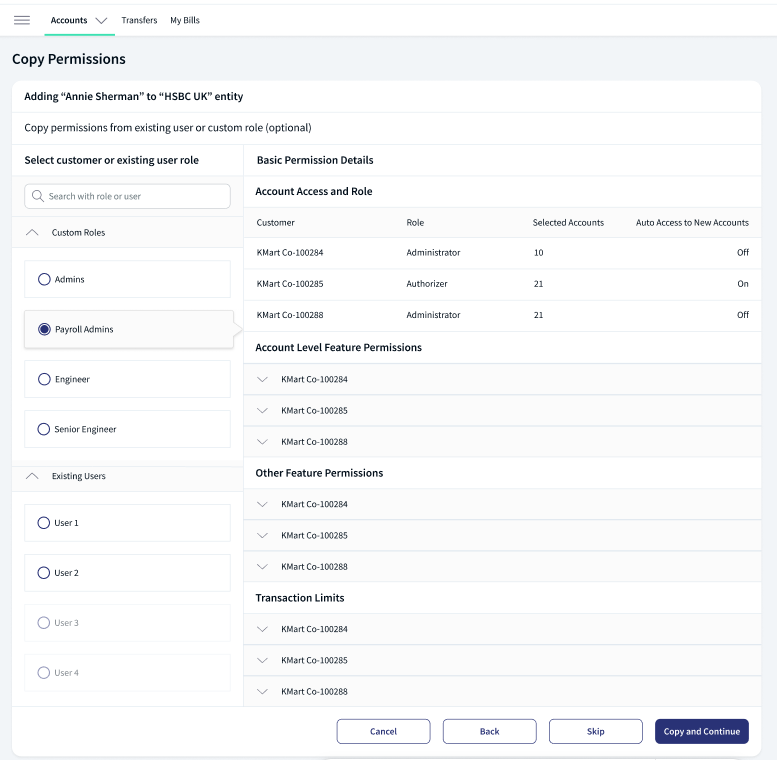
- If the existing user is already in pending request, the application will show a notification and Copy and Continue button is disabled.
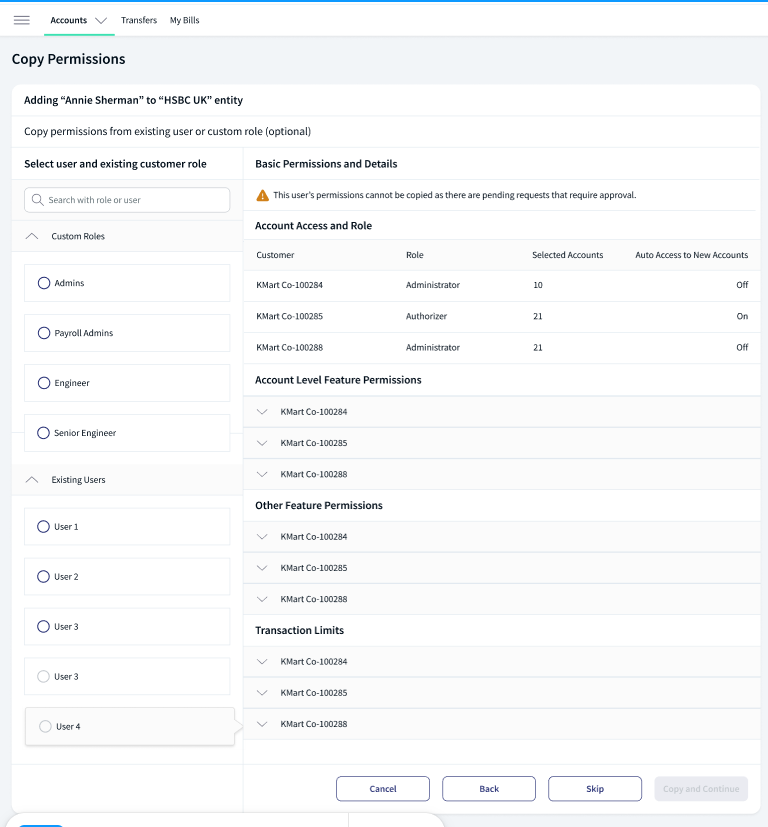
- If the existing user is already in pending request, the application will show a notification and Copy and Continue button is disabled.
- Select the company, assign the customer role, and click Continue.
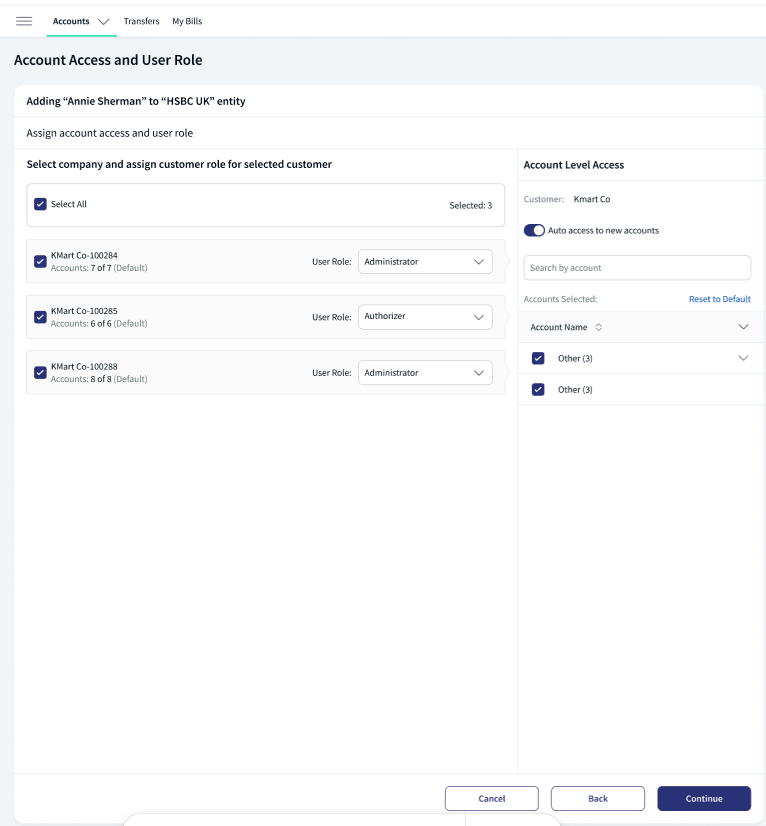
- Select signatory group and click Continue.
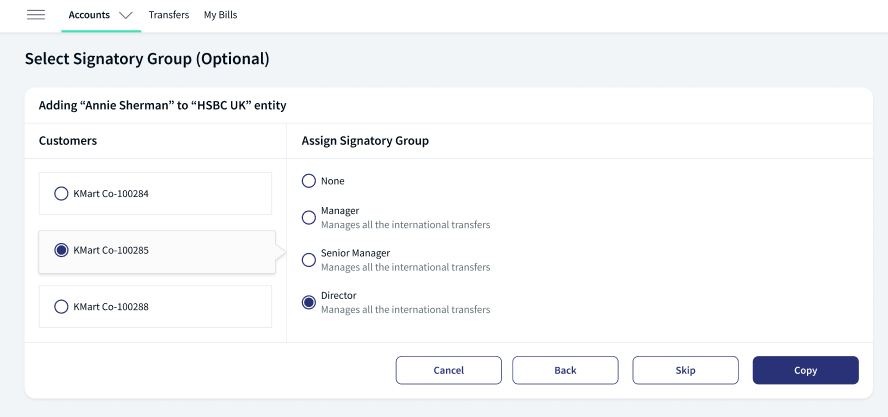
- If the selected Signatory Group request is pending, the continue button is disabled.
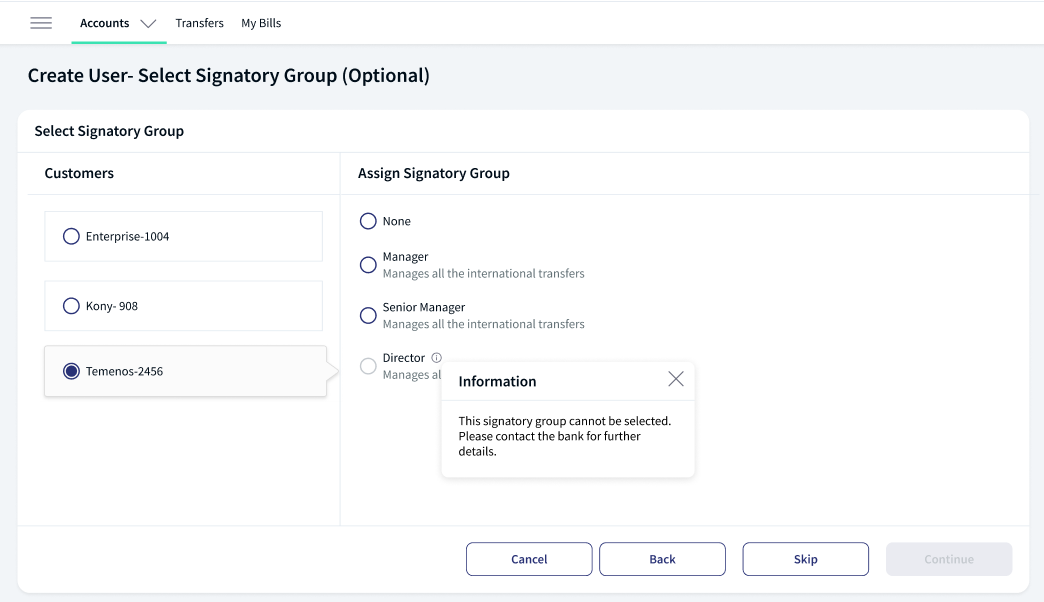
- If the selected Signatory Group request is pending, the continue button is disabled.
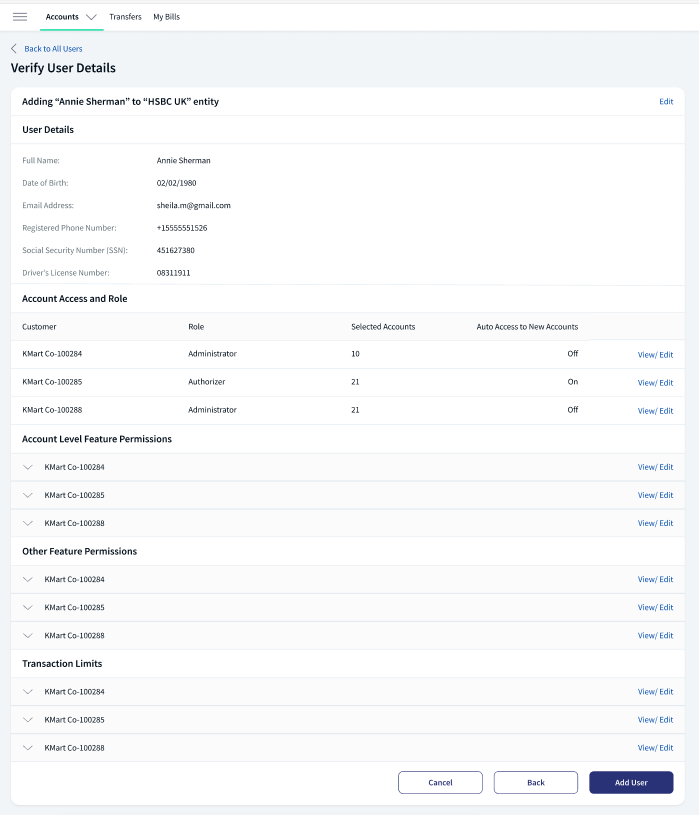
- Verify user details and click Add User.
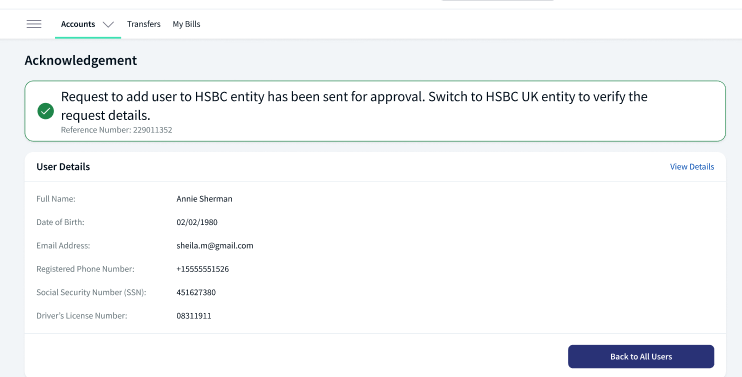
- The application displays an acknowledgment with a notification and reference number. For more information, see the User Management Approval Dashboard.
- Click view details to see the user details.
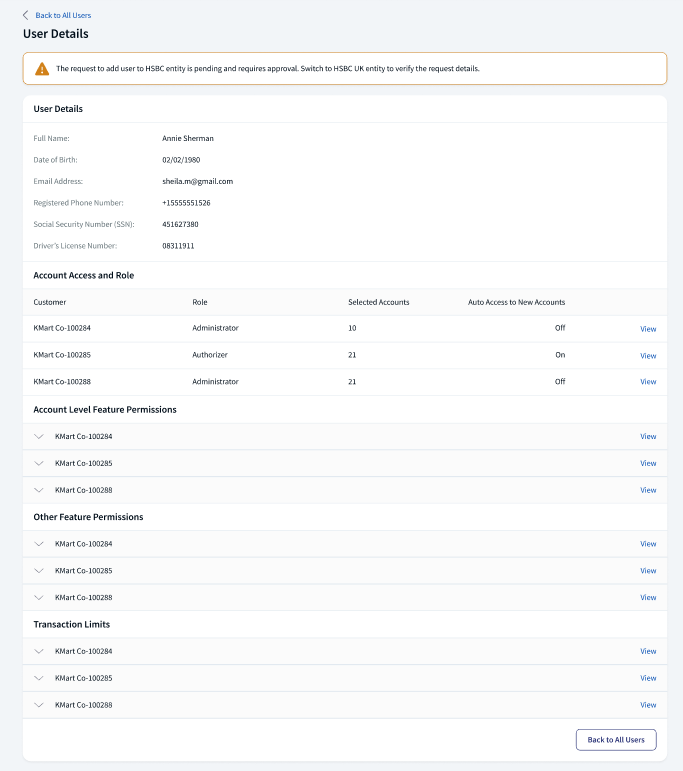
Click Back to go to the All Users screen.
Create Business User
Use the feature to create a business user and assign a role with permissions to access accounts and features. Authorized users can control access to various features at user level at the time of user creation or editing the user permissions after the user has been created. A business user can create a user only if "Create Users" permission under User Management feature is enabled.
At the time of user creation, an authorized user can add online banking users for their companies by any of the following means depending on the design-time configuration set for managing business users:
- Enrolling from existing customer records only managed in the core banking system.
- Creating user profiles managed outside of the core banking system.
- Both, based on the configuration set by the bank - Hybrid model where authorized users are managed in the core banking system and non-customers are managed externally.

Based on the configuration, either one or both (hybrid model) flows are available. See Configuration section for more information on the configuration setting for managing business users.
Menu Path: Side Menu > User Management > Create a User. Alternatively, on the User Management screen, click Create a User. The application displays the Create User - User Details screen.
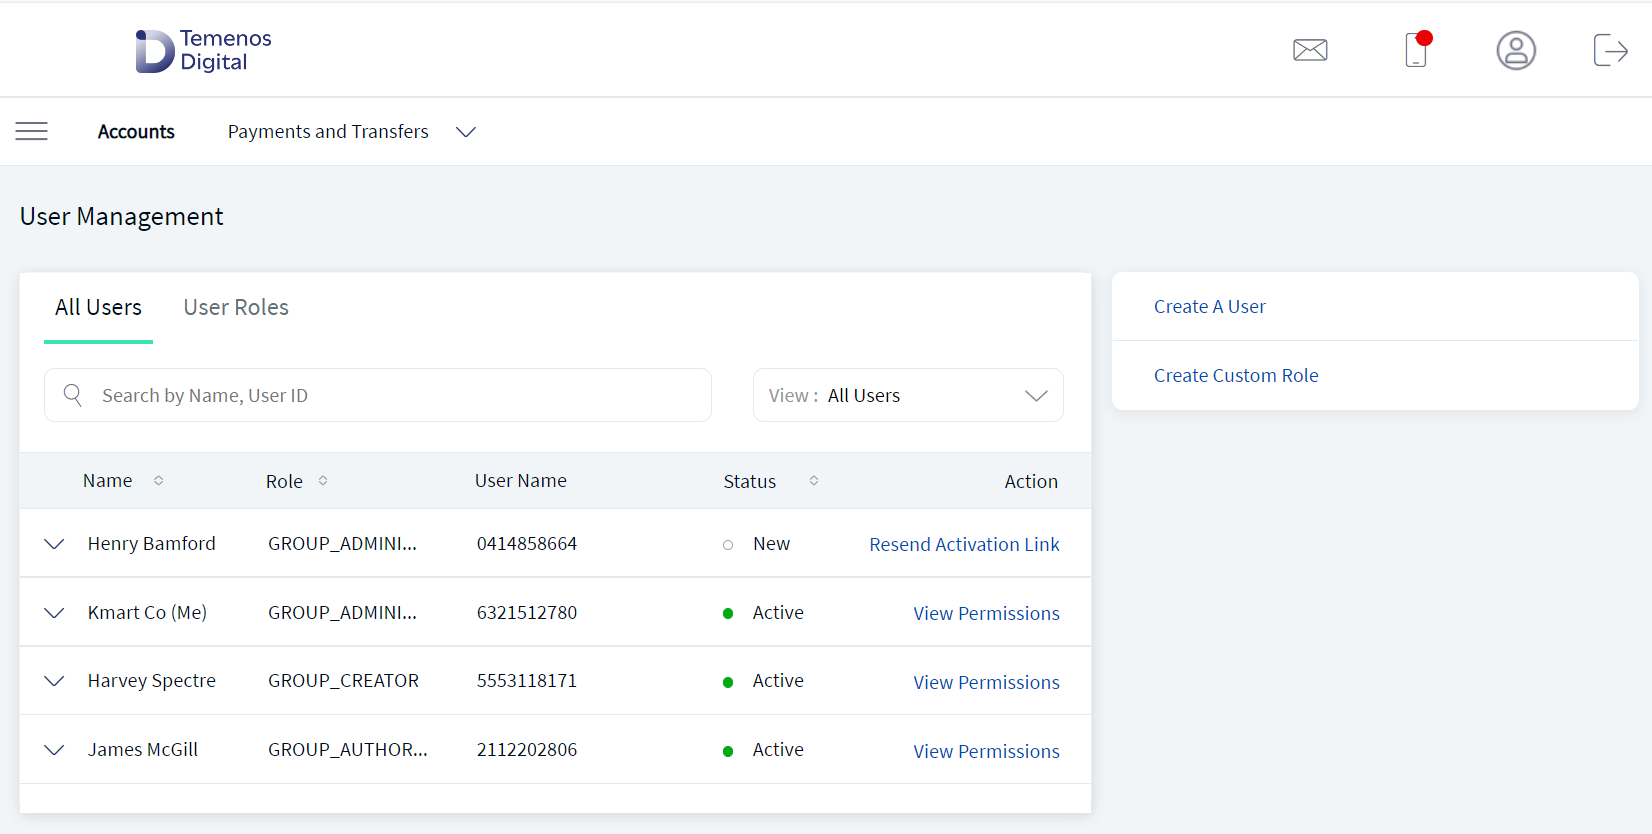
The user creation process is divided into the following sections. Follow these steps:
- Click Create a User on the user management dashboard
- Enter user details manually or by retrieving existing user
- Provide account access and user role
- Review permissions to features
- Define transaction limits
- Submit user details
User Details
The user creation flow starts with capturing the business user details. An authorized user can,
- Add new users manually (who are not customers of the bank) by providing their details.
- Retrieve the existing customers from the core banking system and have a relationship with the business.
- Do any one of the following:
 Create user manually
Create a user by providing the user details. Add the following details:
- First Name. Enter the first name of the business user. It is mandatory.
- Middle Name. Enter the middle name. It is optional.
- Last name. Enter the last name. It is mandatory.
- Date of Birth. Enter the date of birth in the prescribed format (for example, MM/DD/YYYY). The date format depends on the location selection.
- Email ID. Enter a valid email ID. It is mandatory.
- Registered Phone Number. Enter the registered phone number. It is mandatory. Select the country code from the list.
- Social Security Number. Enter the valid social security number (SSN). It is mandatory. The system validates that every contract has only one person with the same ID/SSN.
- Driver's License. Enter the driver license number. It is optional.
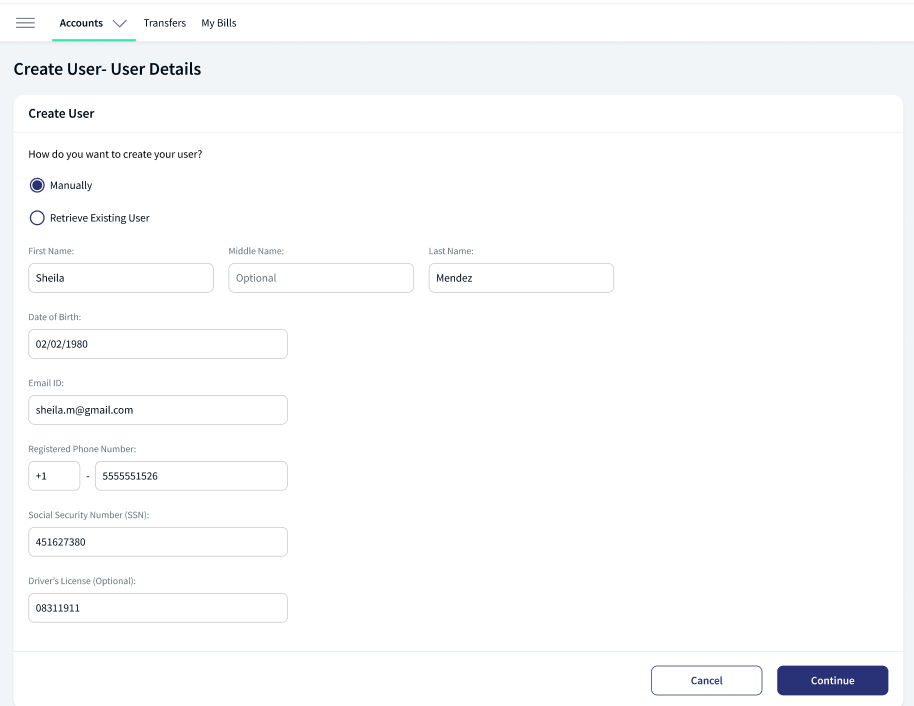
- Click Continue. The button is enabled only if all the required details are entered.
- Retrieve an existing user
The application displays the list of users for which the signed-in user has "User Management → Create User" permission with the following details:
- Name. Full name including first name and last name.
- Date of Birth
- Phone Number as specified on the customer record.
- Email Address as specified on the customer record.
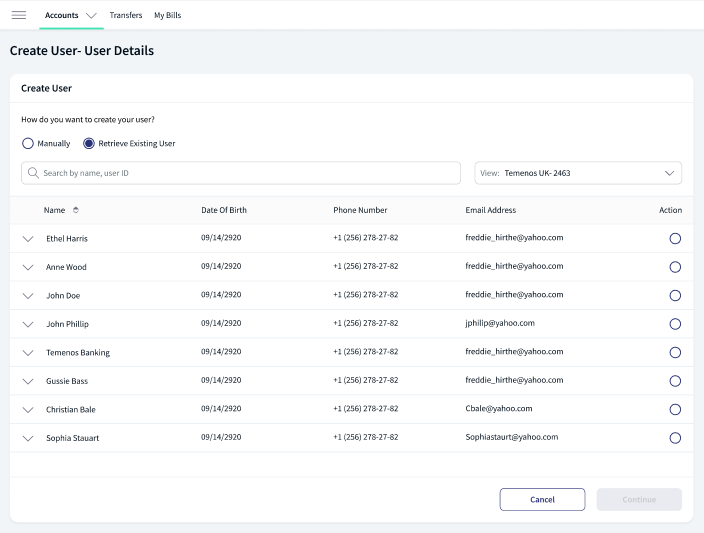
- Company selection list. Select the required company from the list to view the list of associated customer records. The fetched records are of customers that have accounts associated with them or external users.
- The list is sorted by the Name by default.
- View the user details (customer name and customer ID) by using the down arrow placed in front of the user record.
- Select the required user. Only one user record can be selected.
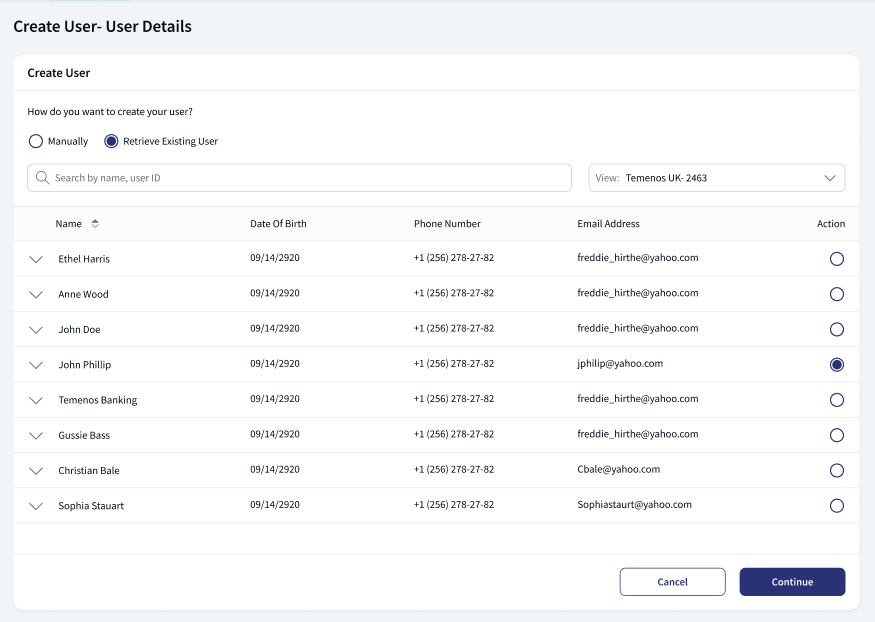
- If the user request is in pending status, the continue button is disabled.
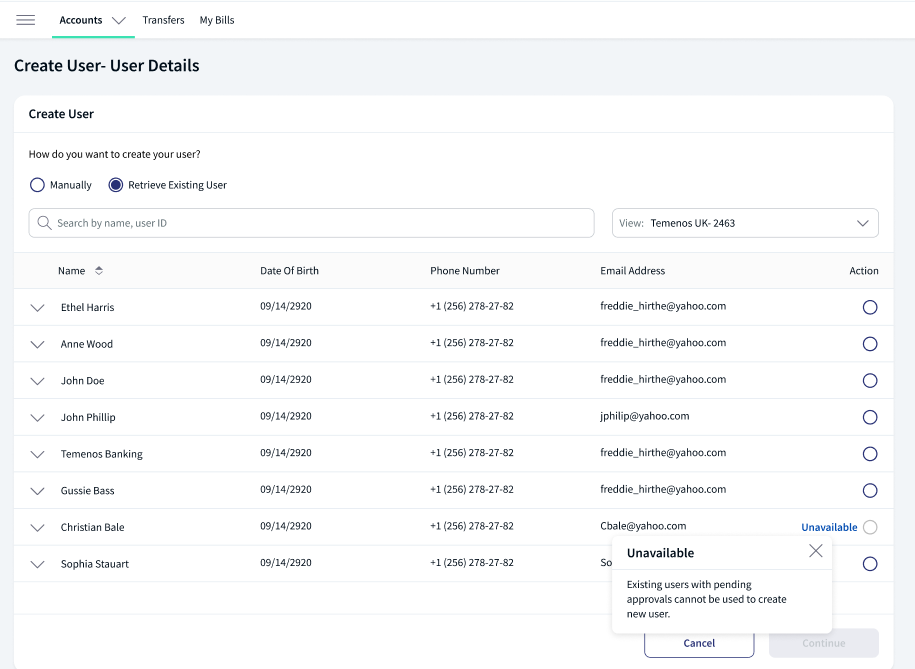
- If there are multiple Customer IDs in the company selection list, the first one in the list is selected by default and the results are fetched. If there is only a single Customer ID in the list, that one is selected automatically and the record is fetched.
- User records can be disabled based on few parameters and therefore cannot be selected. The application indicates if the user record cannot be selected in the following scenarios:
- If the user already has an online banking profile that is associated with this contract.
- If the user does not have an email ID or a phone number, and does not possess the following parameters: country, taxId, and coreCustomerId.
- For retail or business contract, only individual can be added as user.
- Customer filtration is performed based on the configuration defined in the Spotlight Configuration Bundle, specifically for the Individual/Organization parameters.
- The parameter as INDIVIDUAL_TYPE_ID and BUSINESS_TYPE_ID can be a single value, a comma-separated list of multiple values, or a range (e.g., 1000-2000).
- Integration will be implemented using the Sector ID from Transact.
- Click Continue. The button is enabled only if an existing user is selected.
- The application displays the copy permissions screen.
- Select the custom roles or existing user and click Copy and Continue.
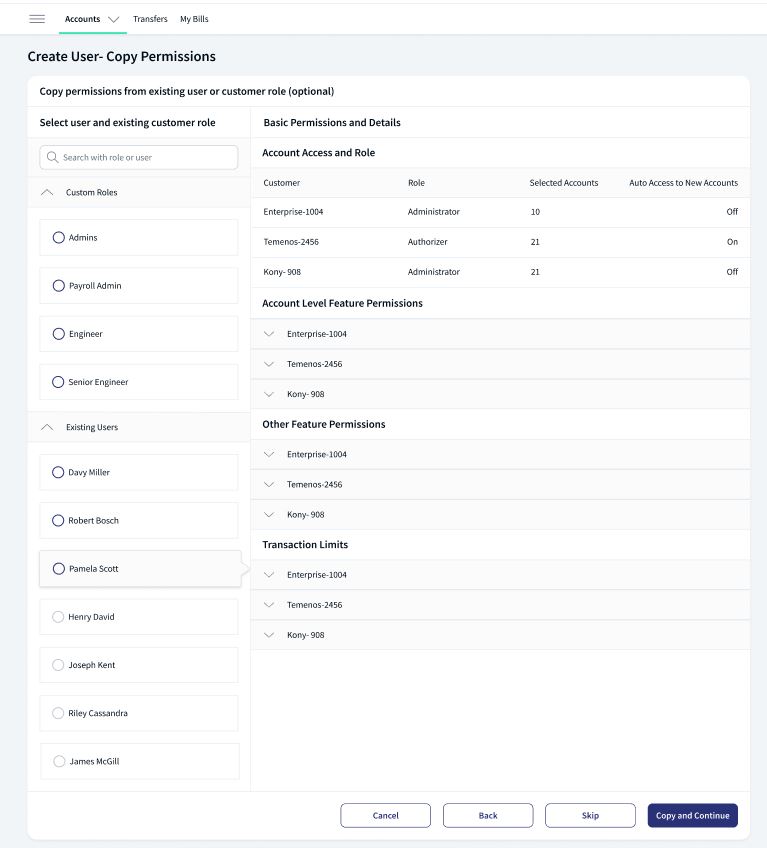
- If the selected existing user is pending for approval, the Copy and Continue button is disabled with a notification.
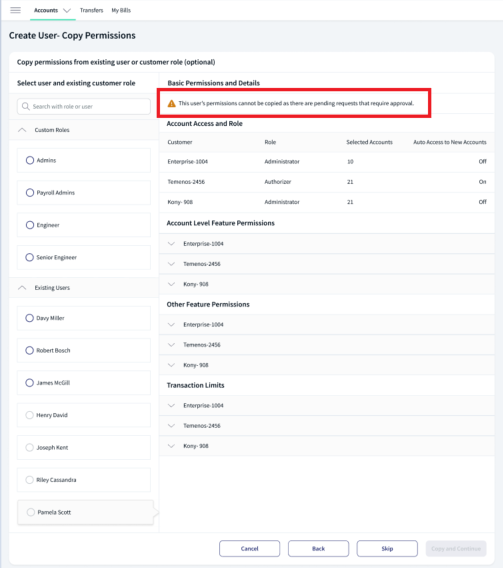
- Select the custom roles or existing user and click Copy and Continue.
- Copy permissions from an existing user or a custom role. Select from the Custom Roles or Existing Users list.
- The application displays the assigned account access and user role. The new user will inherit all the permissions of the selected custom role or the existing user. Click Continue to Proceed.
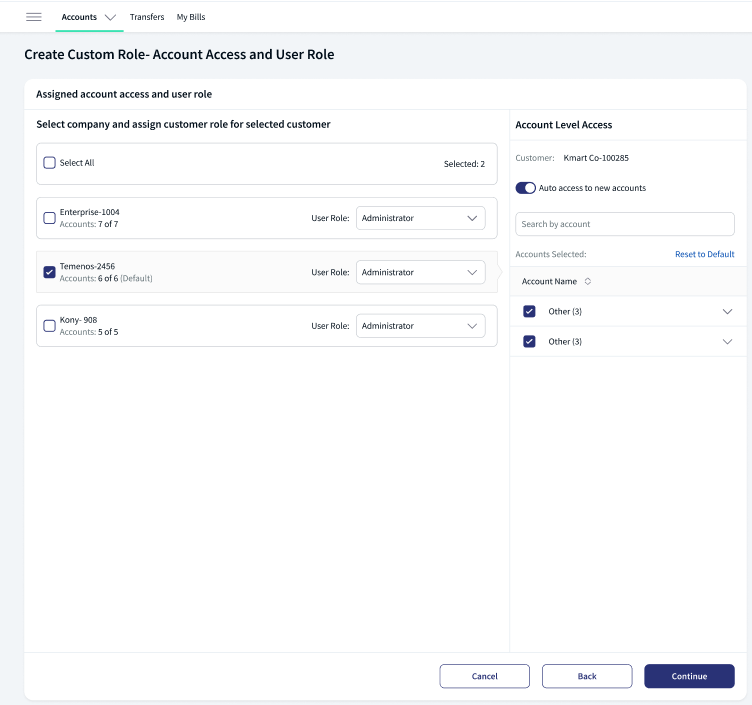
- The application displays list of customers and Signatory Groups, select the customer and assign the Signatory Group and click Copy.
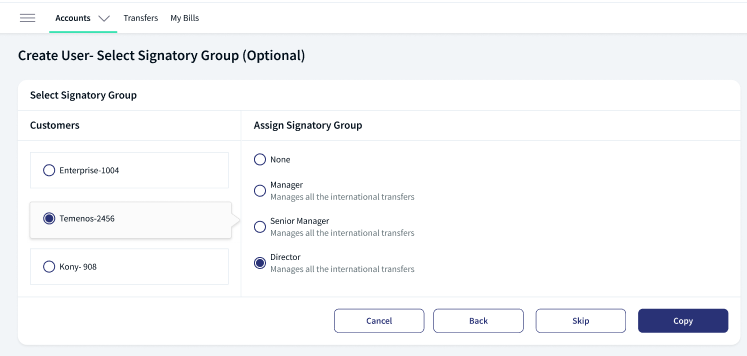
- In the selected Customer ID, if the Signatory Group is in pending status, the Copy button is disabled.
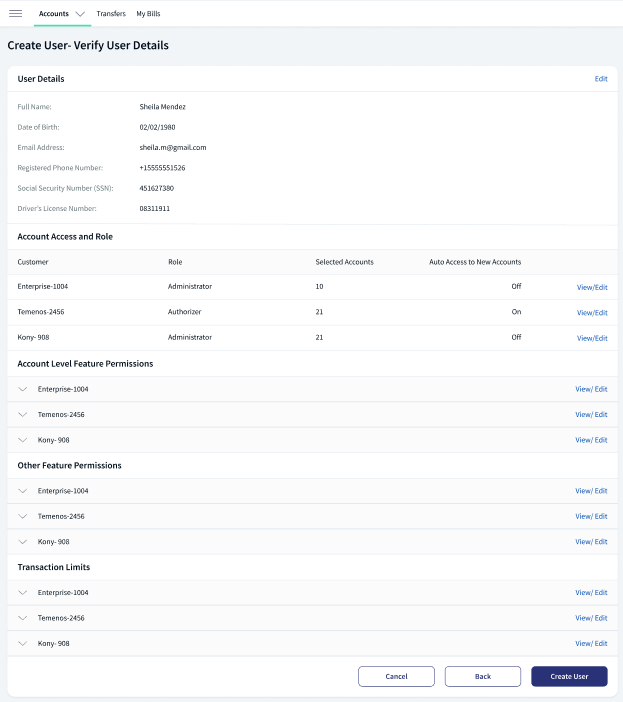
- The application displays a page to Verify the User Details. To edit the details, see View Permissions and Edit User Details. Click Create User to proceed.
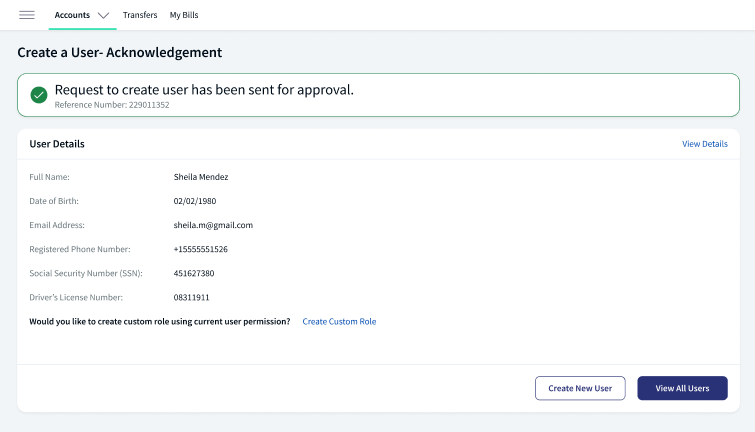
- The application displays an Acknowledge screen with a notification showing that a Request to create a user has been sent for approval with a reference number. Users can see the options View Details, Create New User, and View All Users in the acknowledgment screen. For more information, see the User Management Approval Dashboard and Request Dashboard.
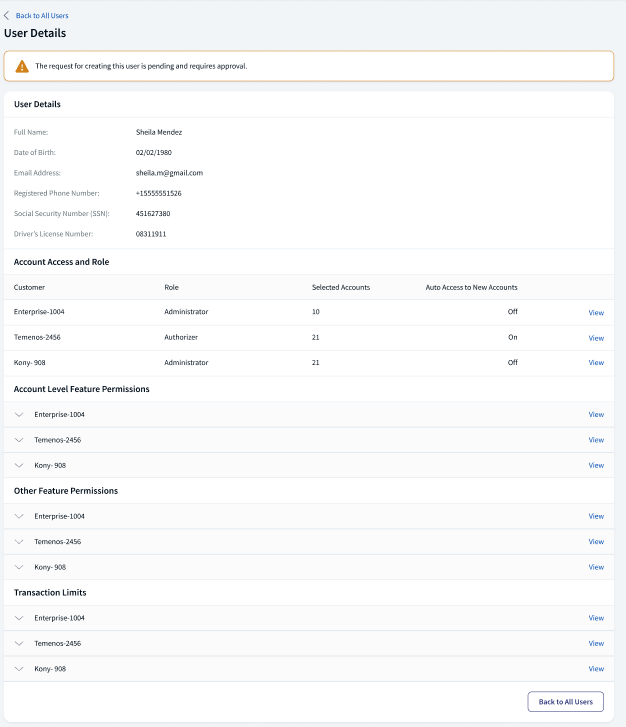
- Click Skip to proceed to Account Access and user Role screen to assign account access and user role to the user manually.
- Click Back to go to the previous screen.
- Click Cancel to cancel the operation. The changes are not saved.
- Click Copy and Continue. The button is enabled only if a custom role or an existing user is selected. The application navigates to the review screen.
Account Access and User Role
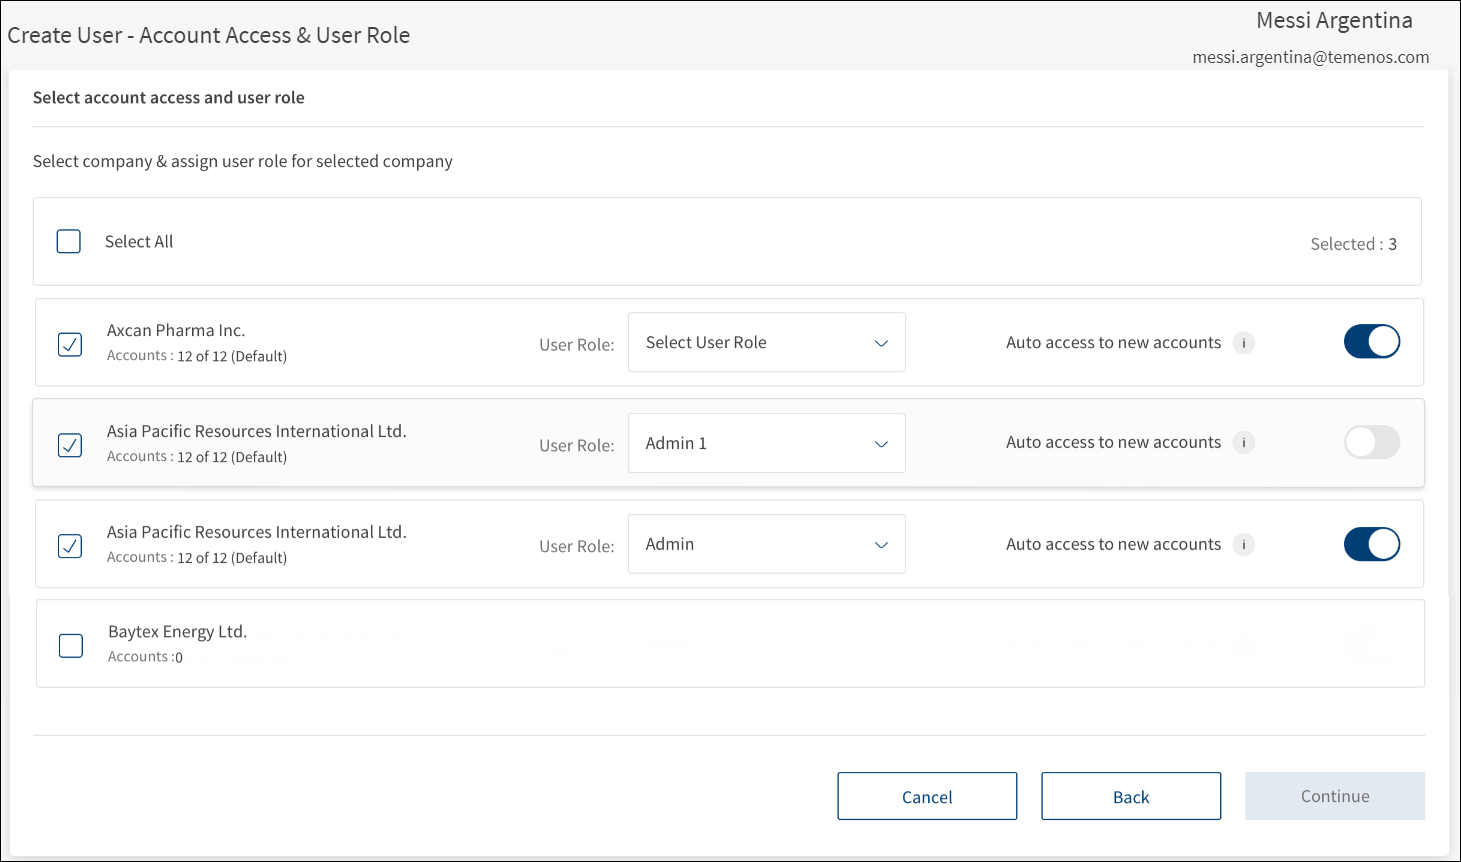
Set up customer IDs that the signed-in user has access to and assign account access and user role for the selected company/customer ID. This step is applicable only if the copy permissions step is skipped in the previous screen.
Customer IDs list
Set up the Customer IDs that the user has access.
The application displays the Customer IDs belonging to the same contract or to multiple contracts with the following details. These are the IDs to which the signed-in user has User Management → Create New user permission.
- Name of the company.
- Number of accounts as in, "Accounts: X of Y (<Default / Custom>)" where X is the total number of accounts that the user has been given access and Y is the total number of accounts that the new user can be given access. The count is based on account access delegation configuration.
- Delegate Access: Total number of accounts that the signed-in user has access or,
- Open Access: Total number of accounts associated with this customer ID in the contract.
Do any of the following:
- Select one or more of the Customer IDs as required.
- When an ID is selected, all the accounts associated with the Customer ID are selected based on account access delegation configuration.
- Delegate Access: Only the accounts that the signed-in user has access are selected or,
- Open Access: All the accounts associated with this customer ID in the contract are selected.
- The count of selected IDs is displayed on top of the Customer IDs list.
- When an ID is selected, all the accounts associated with the Customer ID are selected based on account access delegation configuration.
- Use the Select All check box to select all the Customer IDs.
User Role
The application displays the list of bank defined roles that are specific to the legal entity mapped to the logged-in authorized user.
For every Customer ID that the user is being given access, there must be a role assigned which defines the permissions for the user on the accounts associated with the Customer ID.
It is mandatory to assign a role for each of the selected Customer ID before proceeding to the next step of the user creation process. Select a User Role from the list for each of the selected Customer ID (for example, Administrator, Creator, Authorizer and more).
After a role is selected for the user, all the permissions and limits from the role as provided by the bank, are inherited by default. See Default permissions set up for more information.
Auto Access to New Accounts
Auto access to new accounts is a functionality through which an authorized user with User Management permission can define whether a user will inherit access automatically to a new account opened against a Customer ID that is assigned to the user in the backend/core banking system. A user can use the feature while creating a user or editing a user at the user level as well as at the Customer IDs level within user access.
Use the toggle button if the user is to inherit access automatically to a new account opened against a Customer ID that is assigned to the user in the backend/core banking system.
Do the following:
- Select one or more Customer ID from the list.
- Select the corresponding User Role from the list.
- Use the toggle button if user is to inherit access automatically to a new account opened against a Customer ID that is assigned to the user in the backend/core banking system.
- Click Continue to proceed to the verification and confirmation screen with all the entered values.
Click Back to go back to the previous screen or click Cancel to can the operation. The changes are not saved.
Review Permissions to Account Level Features, Other Features and Define Transaction Limits
Review the details that have been already entered, assign account level permissions to features to users if required, and define transaction limits. After reviewing the details, click Create User to submit the form.
The permissions and transaction limits are set up with default values and a user can submit the form and complete the user creation process from here later. However, it is possible for users to review and change the default values.
The application displays the following sections. Use the view/edit option as applicable to modify the details:
- User Details
- Account Access and Role
- Account Level Feature Permissions
- Other Feature Permissions
- Transaction Limits

Account Access and Role
The list of selected customer IDs with the provision to assign a user role for the selected customer ID. Add or remove customer IDs from the list.
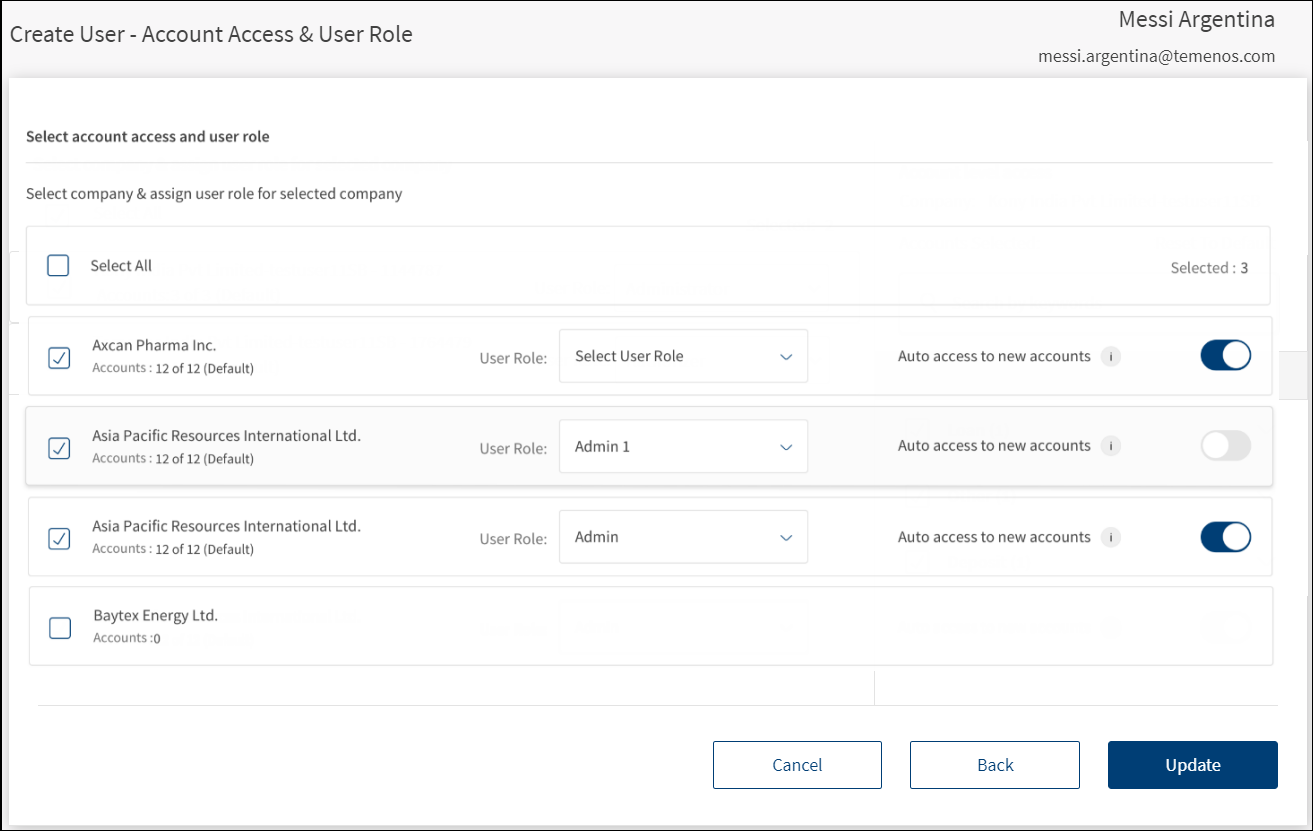
- Click View/Edit to add or remove customer IDs and corresponding user role from the list.
- Select or clear the check boxes as required. The user will be able to view or operate only the selected customer IDs when the user signs in to the application.
Suspend User: An authorized user with the required User Management permissions can suspend a user if all associated customer permissions are removed from user management.
An authorized user with the required User Management permissions can completely or partially remove access to customer IDs for a user. After removing the access to specific customer IDs,
- Suspend User: If a user does not have any other customer IDs other than those removed, then the user will be Suspended and the user will not be able to sign into the banking application again.
- If the user has access to other customer IDs other than those removed, then the user will not be suspended, but the access to the specific customer IDs will be removed.

On updating the changes, the application displays a confirmation pop-up. Click Remove Access.
- Click Update. The changes are updated.
Account Level Feature Permissions
Set up permissions for each customer ID to which the new user has been given access.
- On the verify user details screen, click View/Edit to add or remove features for a selected Customer ID.
- Make the changes as required. The user will be able to view or operate only the selected features when the user signs in to the application.
- Click Update. The changes are updated.

The application displays all the customer IDs that the user has access. By default, the first customer ID in the list is selected and all the corresponding permissions and the list of features to which the new user has access are displayed. An authorized user can change the selection to any of the other Customer IDs as required.
Every user has a default set of features that are available as derived from the role and contract as defined in default permissions set up. If for a specific Customer ID, the user has access to the complete default set, then all actions in the default set are selected for all the accounts and shown as "Default". Otherwise, shown as "Custom".
If a feature is selected, the entire default set of permissions becomes available to the user for all the accounts that the user has access under the specific Customer ID.
Select All. Use the check boxes to select or remove the features individually or use the Select All check box to quickly select or remove all features.
Search. Use the search box to search for a feature by feature name to add and remove feature permission. The search does not affect selection and Select All works on the search results. Also, the full selection, partial selection, and no selection states of the Select All are dependent on the search results.
Edit the permissions at an access level across all features. Select or remove the permissions such as view, create, approve, edit, or delete as required for the selected Customer ID. This is the list of access levels derived from the default permission set across all features for the selected Customer ID.
- Access level is not selected if all the actions at this access level have been removed for the user across all features for all accounts of the Customer ID to which the user has access.
- Access level is selected if all the actions at this access level in the default set have been added for the user across all features for all accounts of the customer ID to which the user has access.
- Access level is partially selected if a partial set of actions at this access level in the default set have been added for the user across all features across all accounts of the customer ID to which the user has access.
Edit the permissions on each feature separately. The edit option appears only if the feature is selected. Select or remove the permissions as required for the selected Customer ID. This is the list of access levels derived from the default permission set for the specific feature for the selected Customer ID.
- Access level is not selected if all the actions at this access level have been removed for the user for all accounts of the Customer ID to which the user has access.
- Access level is selected if all the actions at this access level in the default set have been added for all accounts of the customer ID to which the user has access.
- Access level is partially selected if a partial set of actions at this access level in the default set have been added for the user across all accounts of the customer ID to which the user has access.
Reset to Default. Click to remove all the custom edits made to permissions at a user level and restore the default permissions as defined in default permissions set up. Click Update to save the changes.
Edit Advanced Permissions. Modify permissions at an account level. Click to switch to the advanced view to change settings at an account and action levels or update in bulk . This option is available for each Customer ID to which the user has access. Select the required accounts from the accounts list to modify permissions across the selected accounts. The accounts can be selected by selecting the entire group (account type) or by selecting specific accounts only.
- The application displays the following:
- Details of the user whose permissions are modified with name and email ID on the top-right of the screen.
- Selected Customer ID for which the permissions are modified with customer name and customer ID.
- Accounts list. The list of accounts with account name and feature permissions count under the selected Customer ID to which the user has been given the permission to access and grouped by account type.
- The account groups are collapsible and collapsed by default. One group can be expanded at a time.
- Name of the product (or nickname) suffixed by the last four digits of the account number.
- Feature permissions count as in, Accounts Selected: X of Y, where Y is the total number of actions in the user’s default permission set for this account and X is the number of actions in the user’s selected permission set for this account.
- Click the down arrow to expand and view the accounts list under the selected account type.
- The following details are displayed: Account Name, Permission Type (Default or Custom), Feature Permissions count, and provision to select accounts or edit the permissions of a specific account.
- Select the required accounts from the accounts list to modify permissions across the selected accounts (bulk update). The accounts can be selected by selecting the entire group (account type) or by selecting only specific accounts.
- Sort the accounts by account name or permission type.
- Edit Account Level Permission. Click the Edit link available for every account to view and modify the feature and action permissions for one account at a time.
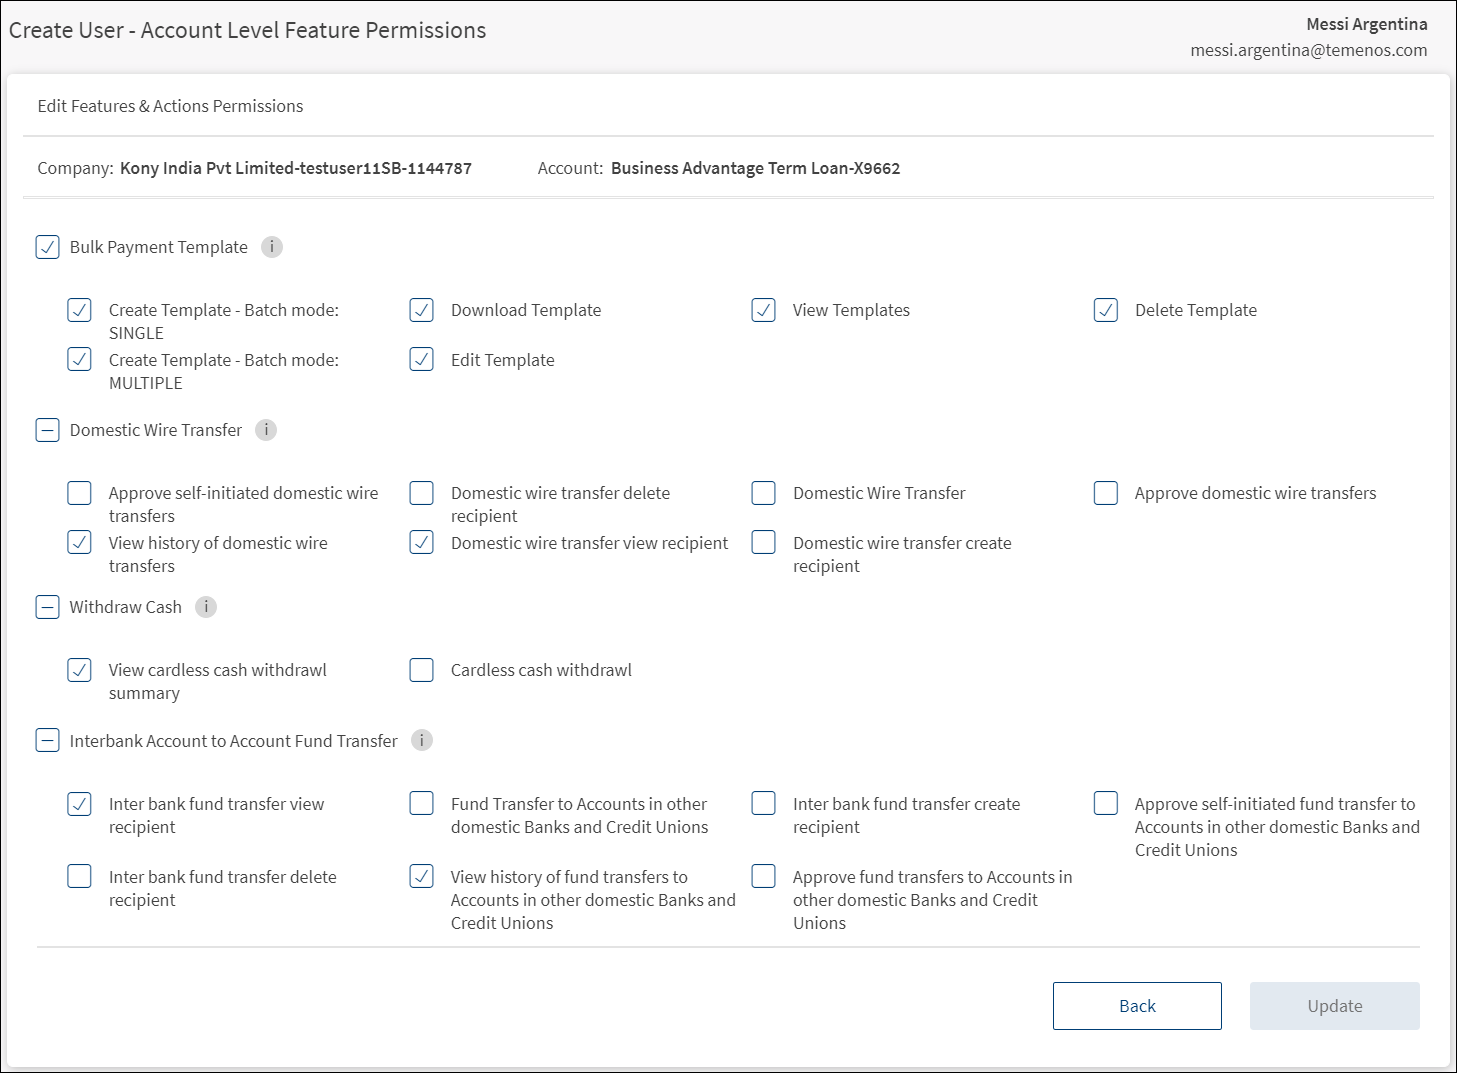
- The customer name and customer ID are displayed on top of the screen.
- This is followed by the details of the selected accounts with account name and account number with the list of all features and actions applicable to the account and whether or not they are enabled for the user. The list of all features are from the user’s default set of permissions, which are applicable on the selected account.
- Select or clear the list of features and actions applicable to the account as required. If a feature is selected, the full default set of actions under this feature (for the account) are selected. At the feature level, full, partial, and no selections are allowed.
- Use the
 Info icon to show the feature description that is configured in the Spotlight application.
 - View and modify permissions as required.
- Click Update to save the account level permission changes. The button is enabled only if there are any changes to be committed. The button is disabled if there are no other uncommitted changes.
- Search Accounts. Use the search bar to filter the accounts by account name or account number. The search works on the full set of accounts or if "View only selected" option is on, then the search works only on the listed accounts after applying this option.
- View only selected. Click to view only the list of selected accounts on which the bulk changes in permissions can be applied.
- Permission Bulk Update. Set up and modify permissions in bulk for selected accounts.
- Select the required accounts from the accounts list to modify permissions across the selected accounts. The accounts can be selected by selecting the entire group (account type) or by selecting specific accounts only.
- Select the feature from the Select Features List (for example, Bill Pay Service). The list shows the set of features from the user’s default set of permissions that are applicable on the selected Customer ID.
- Select the corresponding actions from the Actions list. The list shows the full set of actions for the selected feature from the user’s default set of permissions (see Default permissions set up) on the selected Customer ID. If a single action is selected, then the action name is shown; otherwise, the count of X of Y selected is shown (for example, Selected 3 of 8).
- Select the Permission Type from the list - Enable or Disable the selected feature and action.
- Click Apply. The button is enabled only if the feature, action, and the permission type are selected.
- The changes are applied to the selected accounts.
- The Permission Type (Default or Custom) is updated in the accounts list.
- The changes are temporarily done and will not be applied until the Update button is clicked. If multiple changes are bulk applied, then the Update action updates all the changes together.
- Update. After making all the changes, click Update to save the changes to the account level permissions and navigate to the verify screen. The Permission Type appears as Default or Custom (accounts in which changes were made) for the edited account.
Other Feature Permissions
Set up other feature permissions for each customer ID to which the new user has been given access. Other feature permissions are not at an account level but at a user level per customer ID.
- On the verify user details screen, click View/Edit to add or remove other features for a selected Customer ID.
- Make the changes as required. The user will be able to view or operate only the selected features when the user signs in to the application.
- Click Update. The changes are updated.
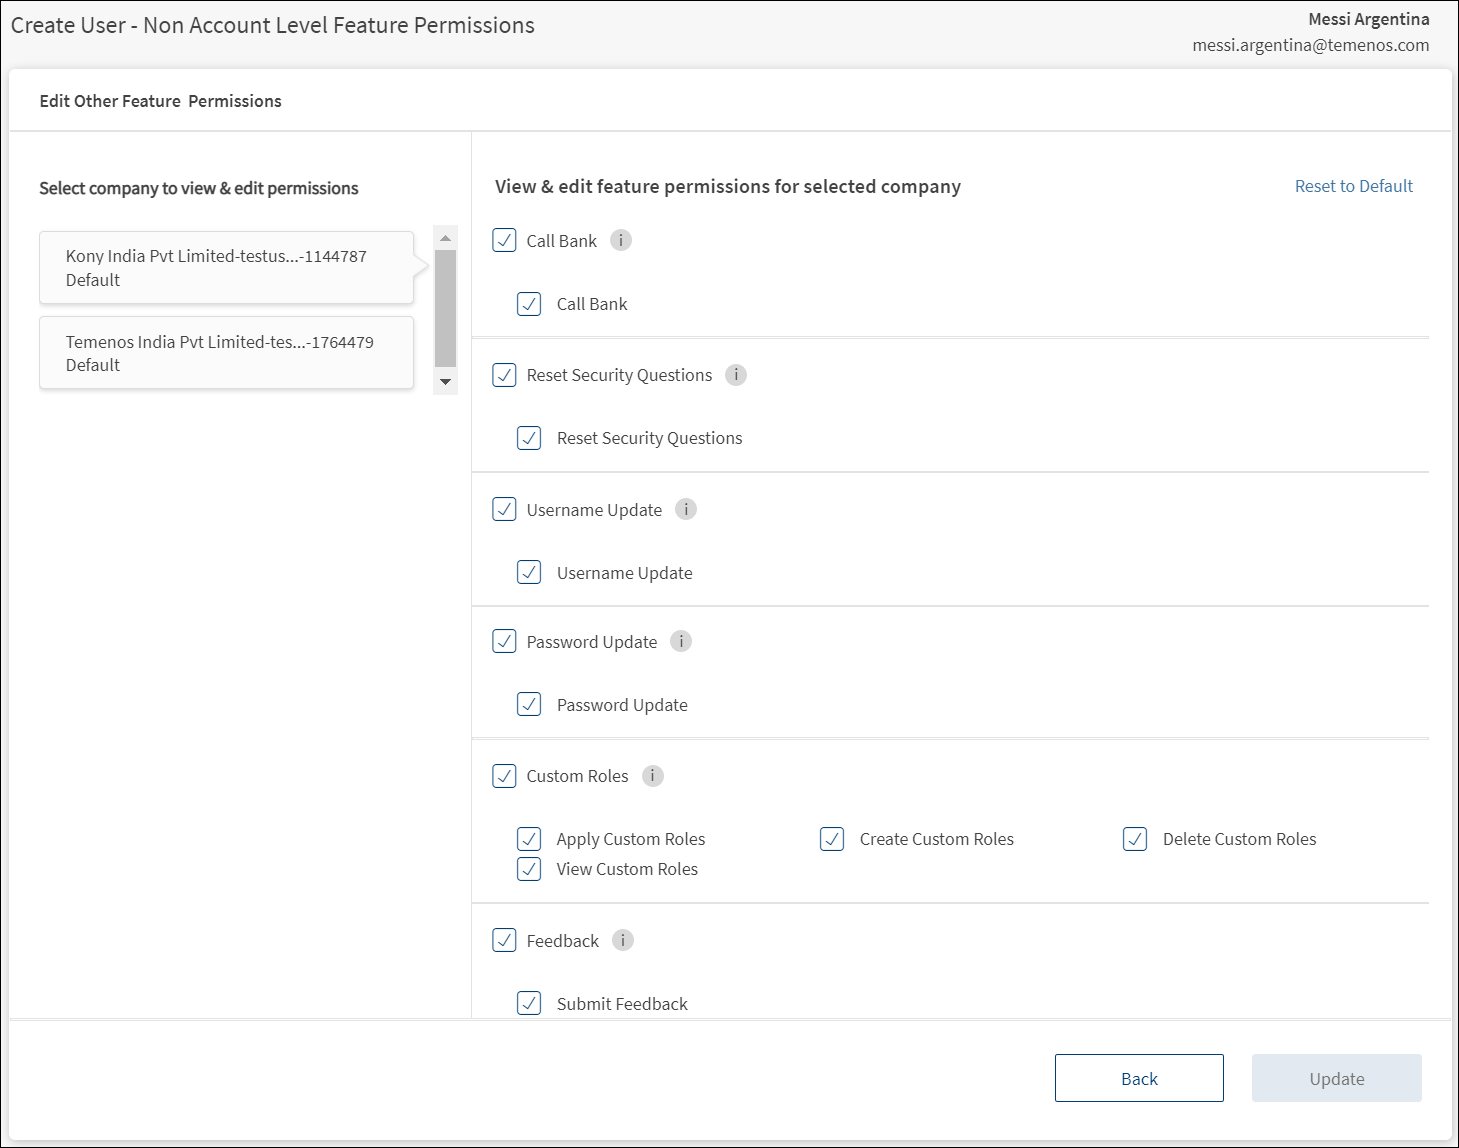
The application displays all the customer IDs that the user has access. By default, the first customer ID in the list is selected and all the corresponding other feature permissions (not account level) and actions are displayed. An authorized user can change the selection to any of the other Customer IDs as required.
- Use the Info icon to show the feature description that is configured in the Spotlight application.
- If a feature is selected, the entire default set of actions under the feature for an account is selected.
- Reset to Default. Click to reset all the custom edits made to non-account level permissions for each customer ID to which the user has been given access. Click Update to save the changes. The button is enabled only if there are any unsaved changes.
Update. Make changes to the other feature permissions across all customer IDs as required and click Update to save the changes and navigate to the verify screen. The button is enabled only if there are any unsaved changes.
Transaction Limits - Manage transaction limits in all accounts and monetary features
As an authorized user, view and set transaction limits (per transaction, daily, and weekly limits) at a customer ID level for every monetary type of transaction. Based on these limits, a transaction can either be executed, be sent for approval, or denied. Edit the pre-approved and denial limits as required. The application validates the pre-approved and denial values as defined at the FI level where pre-approved amounts does not require approval and the user cannot create a transaction beyond the auto-denied limit. The max transaction limit, max daily limit and max weekly limit are defined by the user.
See more on transaction limits
By default, for a new user the application sets the limits to null. At the time of adding the bank user can define the limits to the user by assigning them to a limit group. The application also ensures that the limits are subject to restrictions that FI has imposed on the customer ID and the role that has been assigned to the user for the customer ID. See Transaction Limits for more information.
The group limits is an optional field. By default, the value is set to null for all actions. Here, entering zero is also considered as a value and it effects the limit validations.
The user can update the group limit fields with required value. Once the value is updated, the validations based on the group limit is applicable to the future transactions.
Auto denied limits. By default, this value is null for all actions.
See more on Auto denied limits
The following are the conditions for Create/ Edit custom role, Create/ Edit user and Add user to another entity.
The default value for the auto deny limits is null and this is an optional field. Here, entering Zero is also considered as a value while calculating and executing the limit validations.
The user can update the auto deny values for each account. Once the values is entered, the same is considered for future transactions. The user can also update the field to blank/ null by deleting the value.
Use the function Reset to Default to restore all the values to Null. This will reset the value to default for All Accounts and All Features.
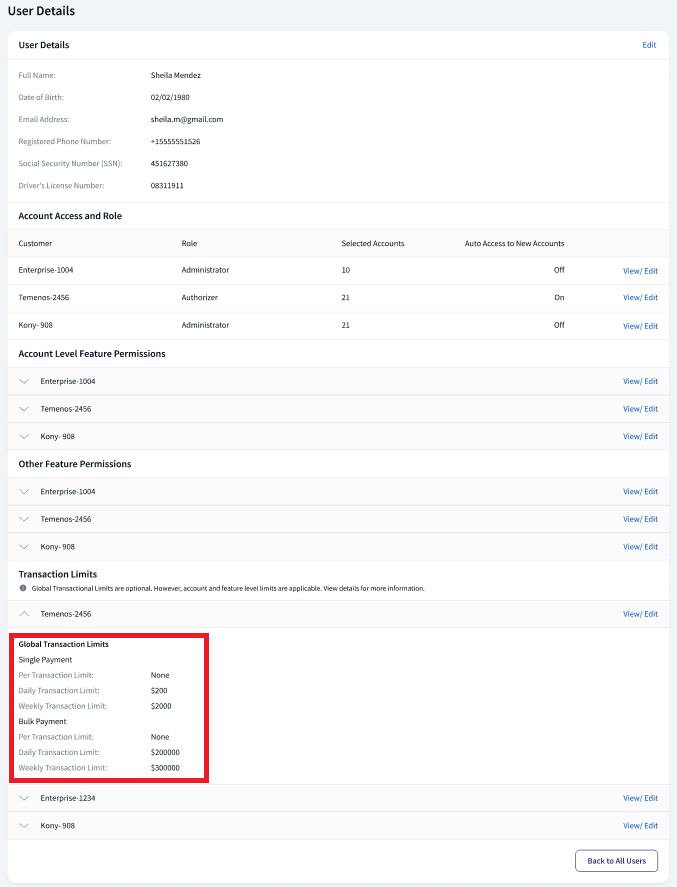
The business user can initiate a transaction of the value which is less than or equal to the maximum transaction limit. If the transaction is not pre-approved, the transaction is put into the approval queue with status as Pending Approval. If the value exceeds the maximum transaction value, the application will not execute the transaction.
The application checks the maximum transaction limit for recurring, nonrecurring, non-scheduled, and scheduled transactions.
The application checks the transactions initiated for all the services. The business user can initiate a transaction for any service of a value within the per transaction, daily, or weekly limit balance available on the transaction execution date. The transaction execution date can be a current date or a future date.
If the value exceeds the maximum daily limit, the application will not execute the transaction, or the transaction is put into the approval queue with status as Pending Approval.
See Approval and Requests and Approval Matrix for more information.
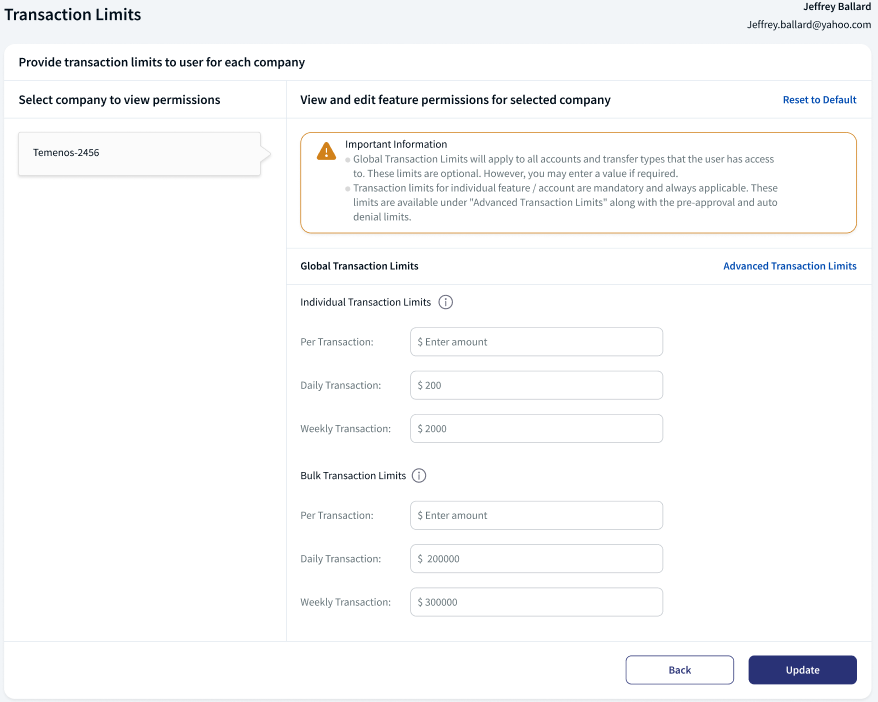
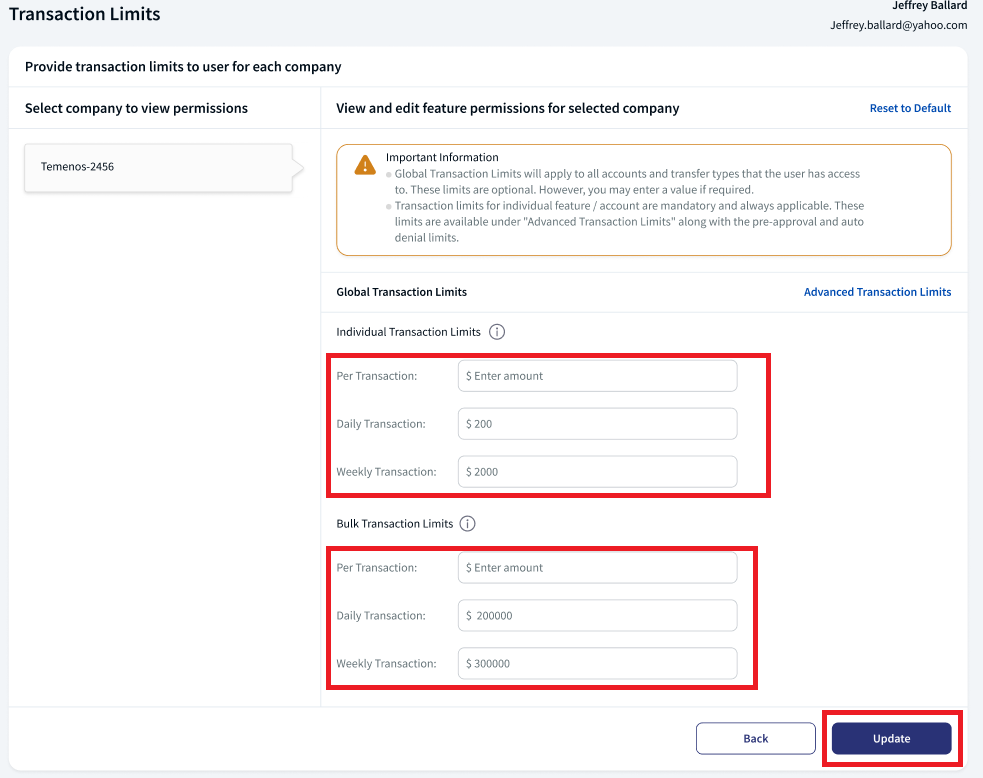
The application displays all the customer IDs that the user has access. By default, the first customer ID in the list is selected and all the corresponding limits (per transaction, daily and weekly) at a limit group level (global limit of individual and bulk payments) are displayed. An authorized user can change the selection to any of the other Customer IDs as required.
On the right pane, the application displays the limit groups section (Global Transaction Limits) for the selected customer ID with limit group name and associated limits. There must be at least one monetary action that the user has been given permission to any account in the customer ID. For instance, if the user has been given view-only access to the Customer ID, then limits set up for the customer ID will not be relevant.
- Per Transaction
- Daily Transaction
- Weekly Transaction
Validation. Change the limits as required. However, the limits must meet the following validation criteria:
- These limits cannot be higher than the prescribed limits for a Customer #A and Limit Group LG #1
- Per Transaction Limit. The max of (Max Per Transaction limits → for all actions classified as LG #1 across all the accounts under Customer #A that the user has access)
- Daily Transaction Limit. The sum of (Max Daily Limit → for all actions classified as LG #1 across all the accounts under Customer #A that the user has access).
- Weekly Transaction Limit. The sum of (Max Weekly Limit → for all actions classified as LG #1 across all the accounts under Customer #A that the user has access).
- The validation criteria is checked on clicking Update. The application displays as appropriate message on the limit which is violated, "Cannot be higher than <currency><value>".
Info icon. Use the Info icon to show the limit group description that is configured in the Spotlight application.
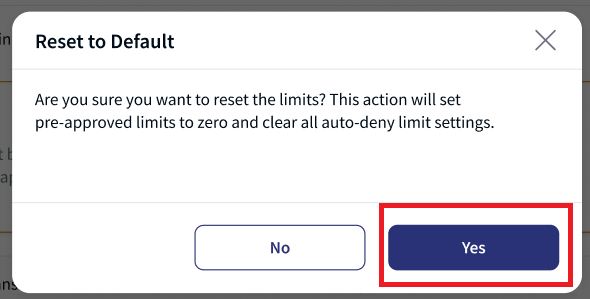
Reset to Default. Click to reset the user level limits on each customer ID to their default values. This will only reset the user level limits to their default value as null. In the pop up box, click yes to reset to default and click no if the does not want to reset the values.
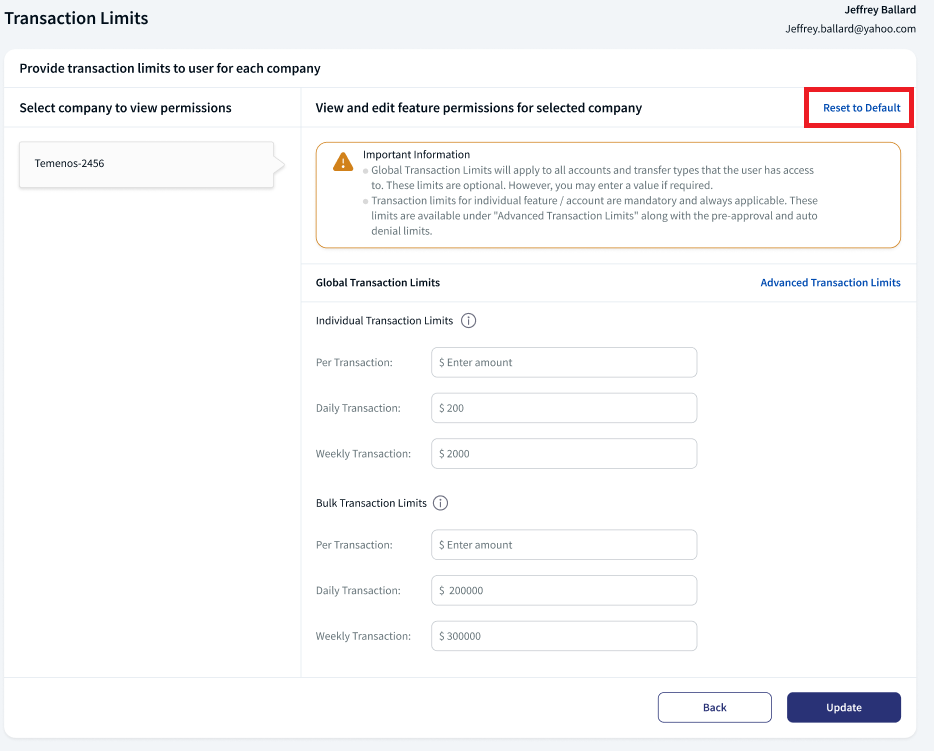

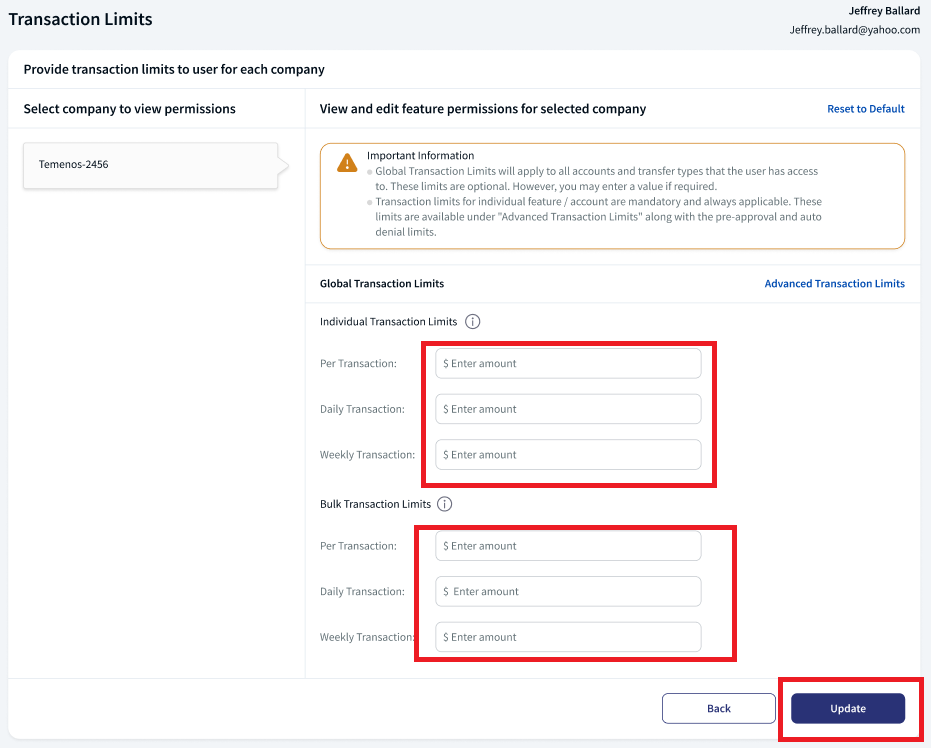
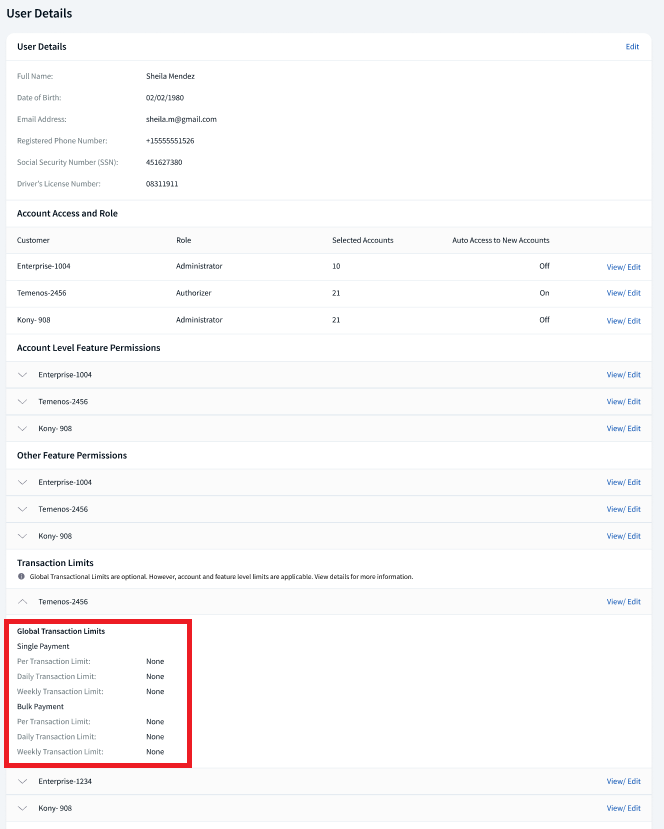
Advanced Transaction Limits
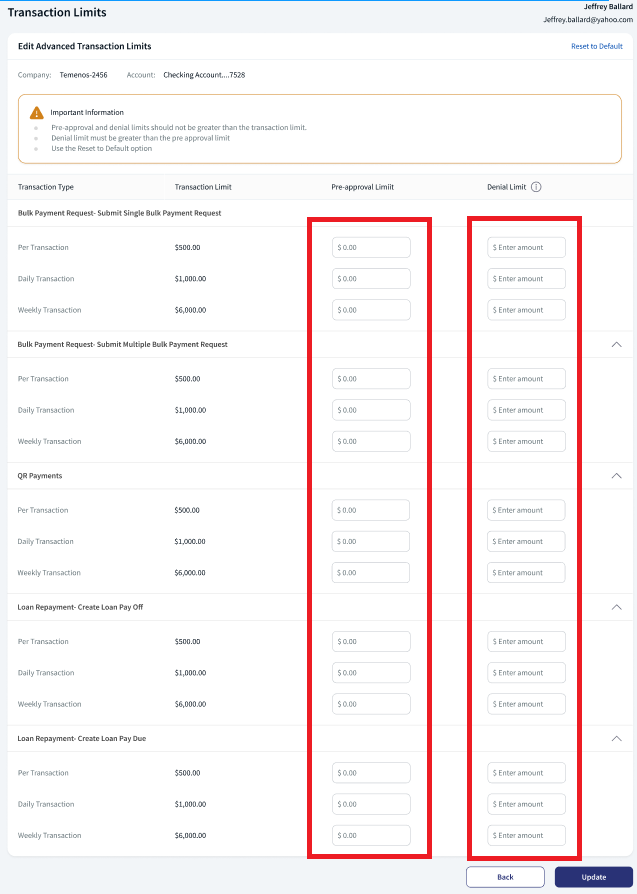
Click to view and manage limits at per accounts. This is an advanced set up for limits that is used only where limits are to be modified at a more granular level.
- Bulk set up of limits on accounts for different features.
- To view limits on a single account.
- Change the limits per account.
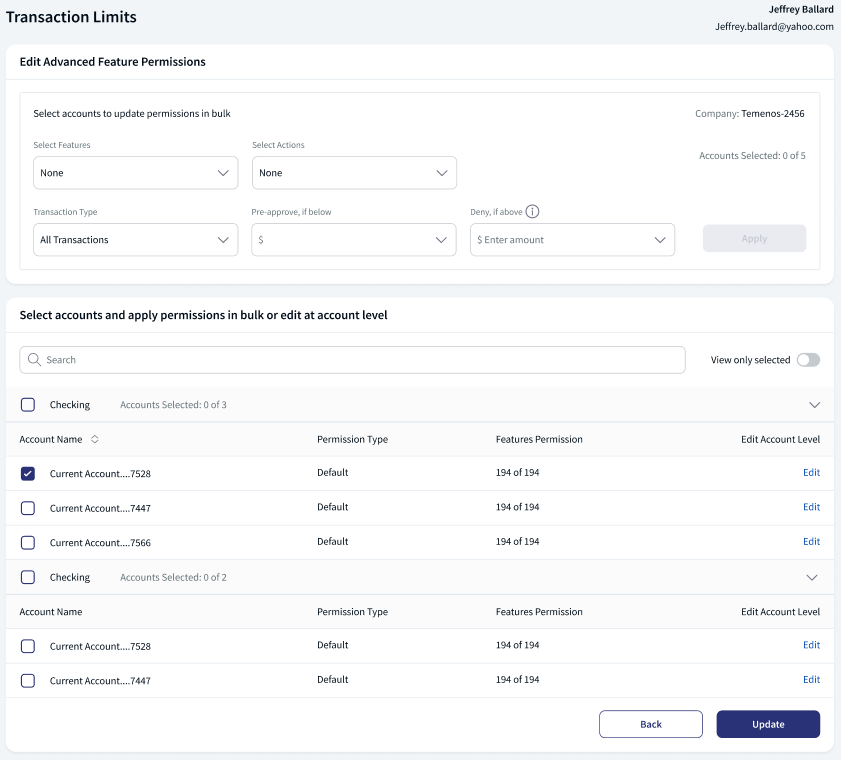
- The application displays the following:
- Details of the user whose permissions are modified with name and email ID on the top-right of the screen.
- Selected Customer ID for which the permissions are modified with customer name and customer ID.
- Accounts list. The list of accounts with account name and feature permissions count under the selected Customer ID to which the user has been given the permission to access and grouped by account type.
- The account groups are collapsible and collapsed by default. One group can be expanded at a time.
- Name of the product (or nickname) suffixed by the last four digits of the account number.
- Feature permissions count as in, Accounts Selected: X of Y, where Y is the total number of actions in the user’s default permission set for this account and X is the number of actions in the user’s selected permission set for this account.
- Click the down arrow to expand and view the accounts list under the selected account type.
- The following details are displayed: Account Name, Permission Type (Default or Custom), Feature Permissions, and provision to select accounts or edit the permissions of a specific account.
- Select the required accounts from the accounts list to modify permissions across the selected accounts (bulk update). The accounts can be selected by selecting the entire group (account type) or by selecting only specific accounts.
- Sort the accounts by account name or permission type.
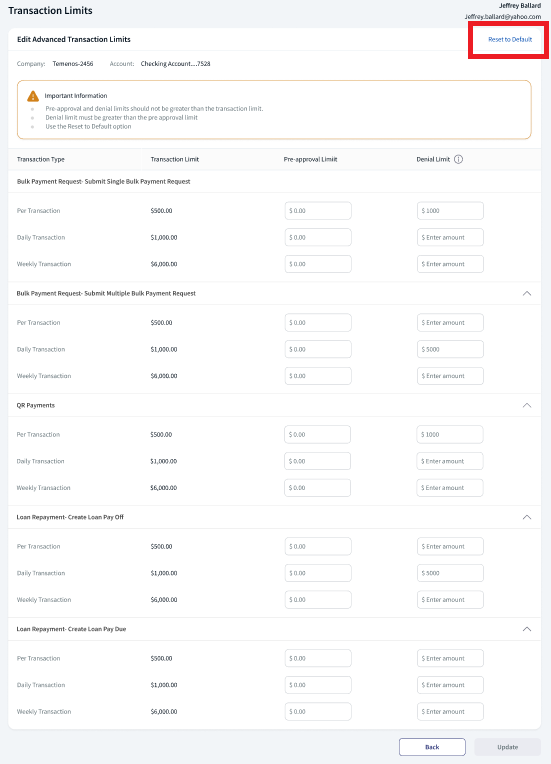
- Edit Account Level Permission. Click the Edit link available for every account to view and modify the transaction limits for one account at a time.
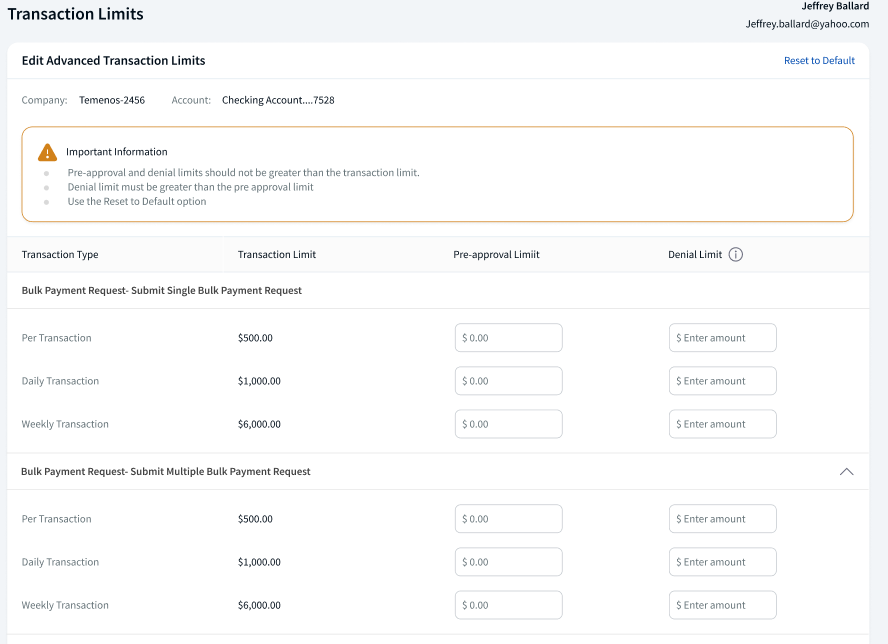
- The customer name and customer ID are displayed on top of the screen.
- This is followed by the details of the selected accounts with account name and account number with the list of all features (shown as Feature Name - Action Names. The list of all features are from the user’s default set of permissions, which are applicable on the selected account.
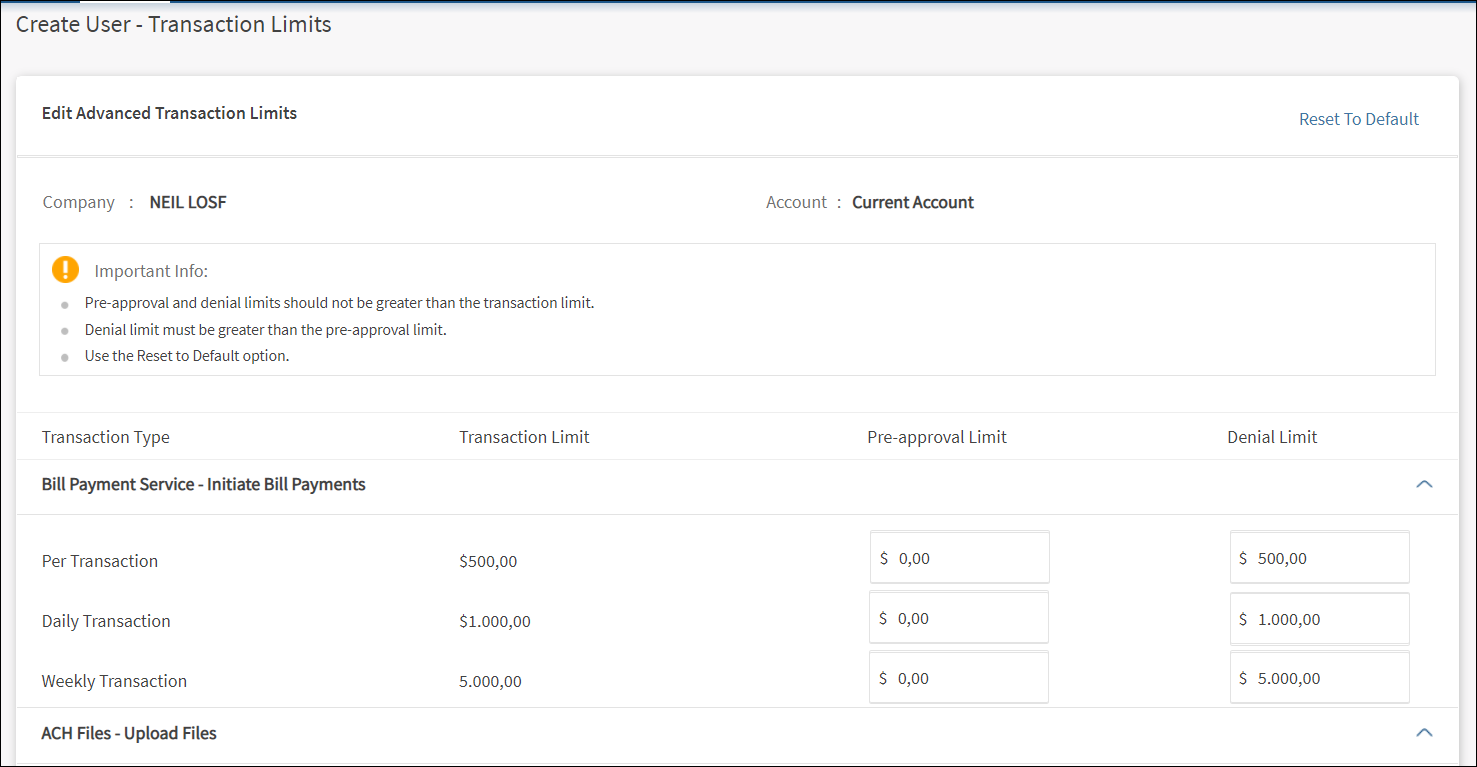
- The Transaction Limit for each of the Transaction Types (Per Transaction, Daily and Weekly) is shown,
- Enter the Pre-approval Limit and Denial Limit as required.See more on Auto denied limits
The following are the conditions for Create/ Edit custom role, Create/ Edit user and Add user to another entity.
The default value for the auto deny limits is null and this is an optional field. Here, entering Zero is also considered as a value while calculating and executing the limit validations.
The user can update the auto deny values for each account. Once the values is entered, the same is considered for future transactions. The user can also update the field to blank/ null by deleting the value.
Use the function Reset to Default to restore all the values to Null. This will reset the value to default for All Accounts and All Features.
Reset to Default Pop-up Box Transaction Limits - Reset to Default - Click Update to save the transaction limit changes and navigate to the verify screen. The button is enabled only if there are any changes to be committed. The button is disabled if there are no other uncommitted changes.
- Search Accounts. Use the search bar to filter the accounts by account name or account number. The search works on the full set of accounts or if "View only selected" option is on, then the search works only on the listed accounts after applying this option.
- View only selected. Click to view only the list of selected accounts on which the bulk changes in limits can be applied.
- Permission Bulk Update. Set up and modify permissions in bulk for selected accounts.
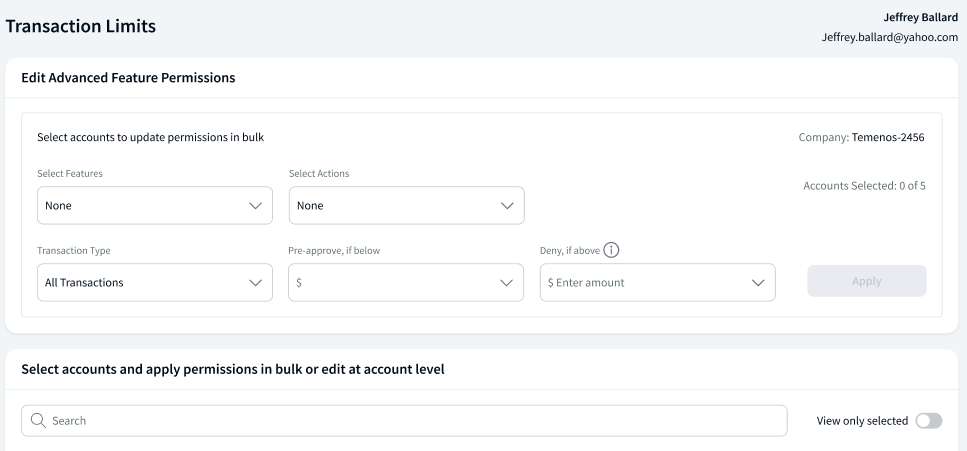
- Select the feature from the Select Features list (for example, Bill Pay Service). The list shows the set of features from the user’s default set of permissions that are applicable on the selected Customer ID.
- Select the corresponding actions from the Select Actions list. Only monetary actions are shown.
- Select the Transaction Type from the list - Per Transaction, Daily, or Weekly.
- Enter the amount for which approval is not required. The value can be from 0 (no transaction is pre-approved) to the Max Transaction Limit (all transactions are pre-approved). Must be less than or equal to the Deny if Above value.
- Enter the amount above which will be denied. The value can from 0 (all transactions are auto-denied) to the Max Transaction Limit (no transaction is auto-denied until the max transaction limit is exceeded). Must be greater than or equal to the Pre-Approve if Below value.
- Click Apply.
- The Apply button is enabled only if,
- The feature, action, and the transaction type are selected.
- Pre-approve and deny above values are entered
- At least one account is selected.
- If the selected action is enabled on the selected account, the limits are applied. Otherwise, not applied at the account level.
- For every action per account, there is a max transaction limit that is derived from the Contact and the Role. Note that since the limits at a contract level are at a customer ID level, all accounts under the customer ID have the same limit for an action. Since the role level limits are also at an Action level only, and the role is set at a customer ID for a user, the same limits are applicable across all the accounts under the customer ID. Therefore, the max transaction limit for a user for a specific Action is the same across all the accounts under one Customer ID.
- The change updates the earlier limits set on the account and action.
- The selection of accounts is not changed after the limits are applied.
- The changes are temporarily done and will not be applied until the Update button is clicked. If multiple changes are bulk applied, then the Update action updates all the changes together.
Submit create user form. After reviewing the user details, permissions to features, and defining the transaction limits, click Create User.
Submit Form - Success Page
After reviewing the user details, permissions to features, and defining the transaction limits, click Create User.
On successful user creation, the application displays an acknowledgment screen with a unique reference number and few details of the user. The user is tagged to the same entity as the creator. An email is triggered with the user ID to the user's email address and an activation code is sent to the user's phone number. The user can use this user ID and activation code to activate his/her profile.
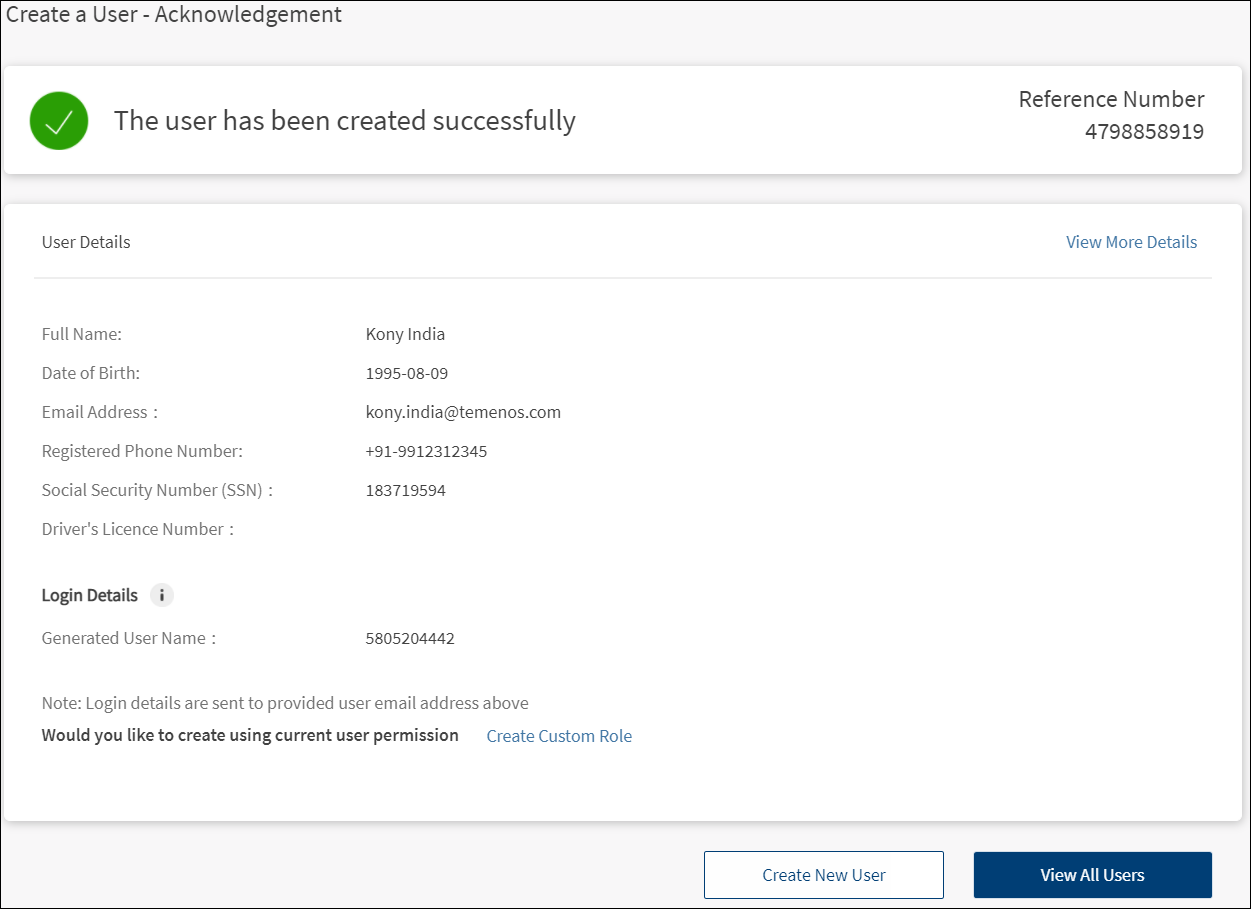
You can do any one of the following on this screen:
- Click View More Details. The application displays the screen with filled-in user details.
- Click Edit to modify the required sections and click Save & Update.
- View the details and click Back to All Users to go to the user list.
- Click Create Another User.
- Click View All Users.
- Click Create Custom Role to create a role based on the current user's permissions.
The user record is added to the list of users.
Search or Filter Users
Use the search option or the filter to shortlist users based on the search criteria or filter respectively.
Menu Path: Side Menu > User Management > All Users > Search option and View filter

Search
Enter the search keyword in full or in part. The keyword can be from any of the following fields.
- Name
- User ID
The (Me) suffix is to identify the logged-in user and in case of the search, typing "me"’ will not render the user name with suffix "me" as a result.
The application displays the matching records based on the search criteria.
Filter
Use the View filter to filter the user by contract ID. The application displays the matching records based on the applied filter.
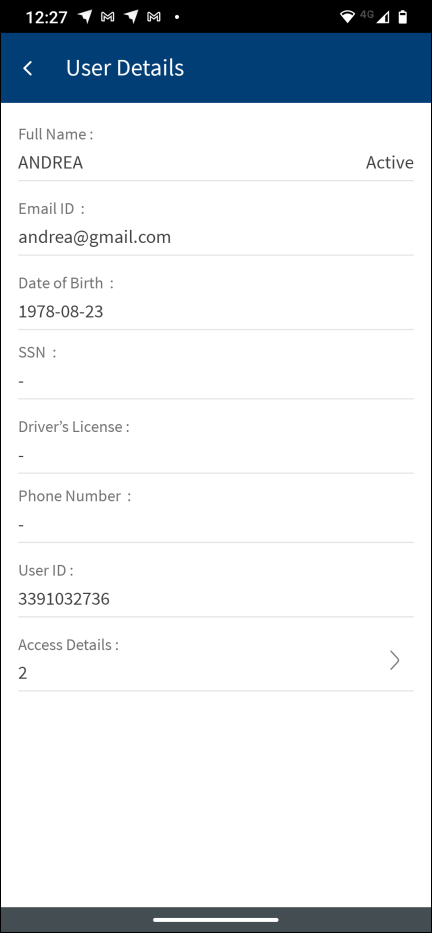
User Management - Mobile Banking
Use the feature to do the following:
- View the details of all users having access within a virtual account.
- View the permissions accessed by the users.
Menu path: Side menu > User Management
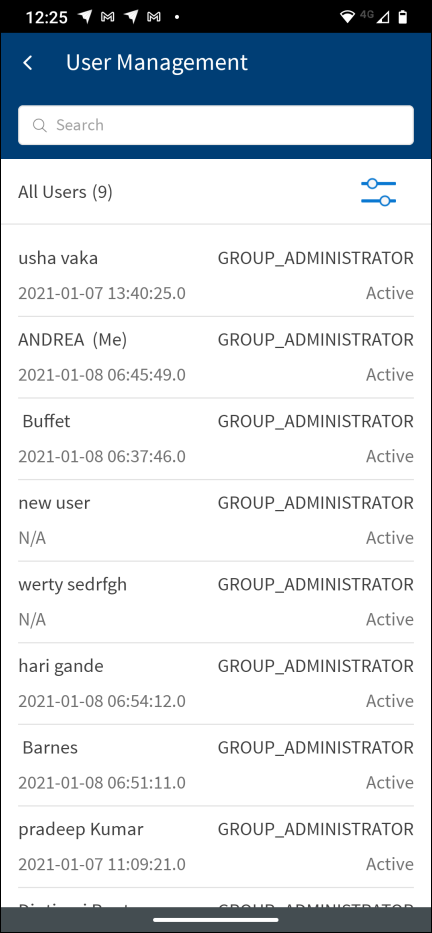
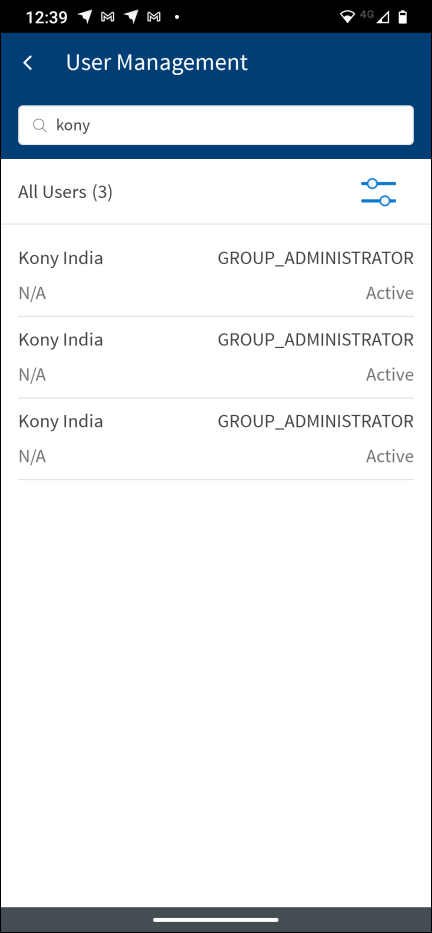
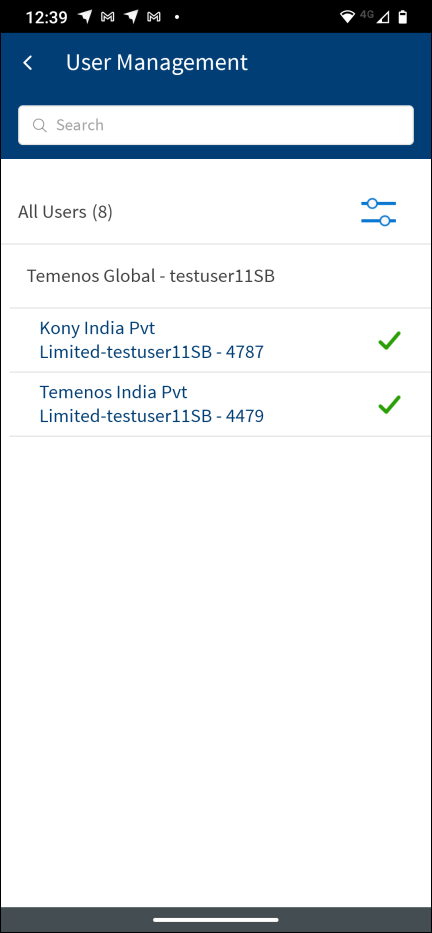
The application displays the list of users with the following details:
- First name and last name of the user.
- Role of the user.
- Status of the user - Active, Suspended, or New.
- Last sign in date. In case of a new user, the last sign in details is not applicable and N/A is displayed.
Use the search option to search for a business user using the search criteria. Enter the search keyword in full or in part. Search by name, user name, role, or status.
Use the filter  to view users contract-wise.
User Details
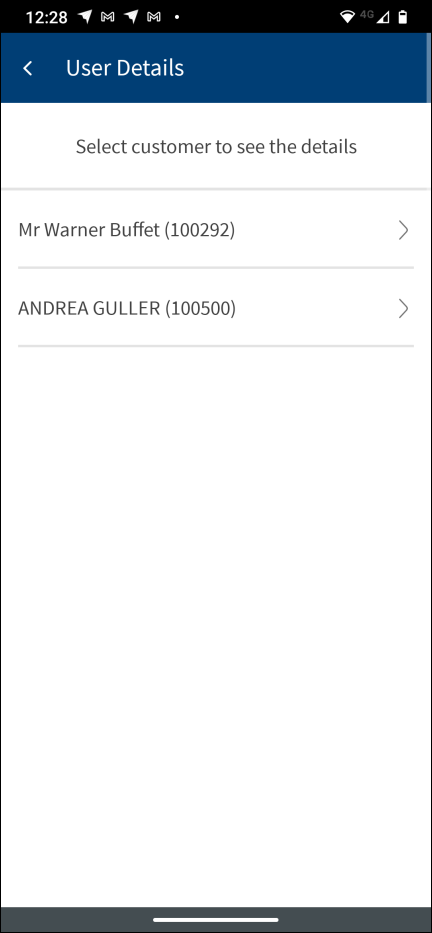
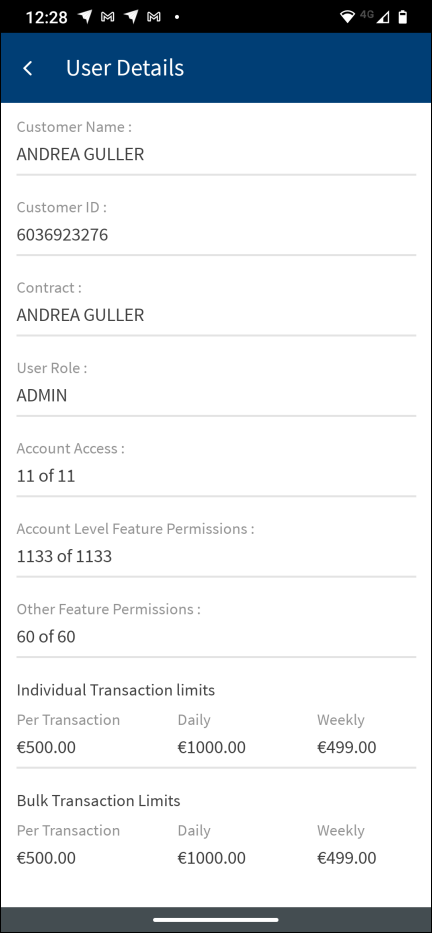
Tap any user row on the User Management dashboard to do the following:
- View the user details such as full name, email ID, date of birth, SSN, driver's license number, phone number, and access details.
- Click the right arrow of Access Details to view the contract-wise details.
Configuration
General configuration
- The visibility of each feature is controlled through the permissions defined for the user. See permissions for more information. The permissions at user levels are defined during user creation and while editing the user details after the user is created. In case the user does not have access to any of the features, that option will not be visible on the form and on the menus. The permissions at the company level and role level are defined in the Spotlight application.
- The User Management menu is available on the menu only if a business user has any one of the following permissions:
- Create Users
- View Users
- Manager users
- The credential policies for updating user name are fetched from the Spotlight application.
- The user name rules are managed within the Spotlight (Customer 360) application.
- The customer roles are managed in the Spotlight application.
- Changing a user’s role requires the permissions to be reset.
- If a new permission is added to a role, it will be added to the set of permissions for every user who has been assigned the same role.
- If a permission is removed from a role, the same will be revoked from the permission set for each user who has been assigned the role.
- The Feature/Role/Company level transaction limits for recurring, nonrecurring, non-scheduled, and scheduled transactions are managed in the Spotlight application. User level limits can be managed in Spotlight and the customer-facing application.
- Clicking the Info icon shows the feature description configured in the Spotlight application.
Configuration for user creation process
- A financial Institution (FI) can select from one of the following configurations of managing business users based on how the customers are managed in the core banking system:
- All business users managed in the core banking system.
- All business users managed externally.
- Hybrid model - Authorized persons managed in the core banking system and non-customers managed externally.
- A design-time configuration setting is added to capture the financial institution’s preference for managing users.
Configuration setting - Manage business users
- Business Users with Customer Records
- This configuration establishes that there will be a customer record in the core for all the users.
- This record will be created by the bank.
- The application will provide business owners/super administrators a facility to enroll these customers into online banking (Any user with the permission to create new users will be able to perform this action).
- No new customer records will be created from the front-end application.
- Business Users have no Customer Records
- This configuration establishes that there will be no customer record in the core for any user.
- All the business users will be created and managed in the DBX DB.
- The application will provide business owners/super administrators a facility to create these users for access to online banking.
- Hybrid Model
- Combination of above two settings.
- This configuration establishes that the FI would maintain the records of the primary customers in the core banking system while all other business users managed in DBX DB.
Relationship configuration for authorized users
- A Financial Institution (FI) can manage configurations that control the allowable relationships a customer needs to have with a company/contract in the Spotlight application, so that the customer can,
- Have an online banking profile to access the company accounts.
- Enroll the company for online banking through the self-enrollment channel.
- The list of relationships that can be selected from a drop-down list is maintained in the relationship table in the core banking system.
- For each of the relationships selected, the FI another indication is added to specify if a customer with this relationship can self-enroll for business banking.
- When an authorized user is created, the customer record must have one of the specified relationships.
- If there are no configured relationships for online banking access, all relationships in the core will be allowed to have online banking access.
- During self-enrollment for business, the application checks if person enrolling has a relationship that can self-enroll.
Configuration for account access delegation
Banks can delegate access to another user from the user administration in the customer-facing application. This is a run-time configuration and can be managed and changed through the Spotlight application.
Delegate access to own accounts
In this method, if User A is creating another User B,
- User A can delegate access to only those accounts and Customer IDs to which User A has access.
- Temenos
- Kony Accounts – K1, K2, K3, K4
- Avoka Accounts– A1, A2, A3, A4
User 1 – Bidisha (User Management Permission on Kony and Avoka)
- Kony – K1, K2
- Avoka – A1, A2
User 1 is delegating access to User 2 in this mode.
User 2 – Vidhya
- Kony – K1, K2
- Avoka – A1
Configuration for account level access
A Financial Institution can control the granularity of the setup options that authorized users will have when they setup access for other users.
Banks can choose whether to allow the business administrator from the customer facing application to modify permissions at an account level. By default, it is on - the authorized users can modify the permissions at an account level. If the bank decides to turn it off, the relevant screens are modified to not allow the user to define/modify access at an account level. Only Customer ID level delegation is available.
This is a run time configuration and can be managed and changed through the Spotlight application.
Default permissions set up
For every Customer ID that the user is being given access, there is a role that defines the permissions for the user on the accounts associated with the Customer ID.
For a Customer ID #A
- Permissions:
- The user’s permission on Customer ID #A is an intersection of what is offered by the role and what is allowed to the customer ID # A in the contract - a permission is in the role and in the contract for the user to inherit the permission.
- These permissions are internally associated with every account (belonging to Customer #A) to which the user has access.
- This is true for all account level and user level permissions (per customer ID).
- Limits:
- The user’s limits on Customer ID #A is derived as per the most restrictive rule between limits for the role and limits for Customer ID # A in the contract.
Configuration for advanced permissions set up
A Financial Institution can control the granularity of the setup options that authorized users will have when they set up access for other users.
Banks can choose whether to allow the business administrator from the customer facing application to modify permissions at an account and action levels. By default, it is on. If the bank decides to turn it off, the "Edit Advanced Permission" will not appear in the customer facing application.
This is a design time configuration and cannot be changed at run-time.
Feature and action names
A retail/business banking user who has the required permissions to create/edit users can see the Feature Actions listed by the FEATURE_ACTION name when trying to Edit the Advanced Transaction Limits. A user going into the Advanced Transaction Limits flow of the User management module can see the Feature Name - Action Names under the Transaction Type column.
| Environment Variable Parameters | Description | Mandatory | Expected Values (Examples) |
|---|---|---|---|
| ENABLE_NEW_ACTION_PROCESSING | getFeatureAndPermissions | True | This service will verify permissions at all levels and return intersection of permissions. |
| False | This service will return from customer-level permission. |
APIs
For the complete list of APIs shipped as part of this feature, see Experience APIs documentation.
Alerts and Notifications
To manage the alerts and notifications for approvals user management scenarios, Refer to the document User Management Alerts and Notifications.
Block Scenarios
Users can view the following scenarios when the record is pending. If multiple approver requesters or bank admins access the request at the same time, the user will see one of the following scenarios based on the type of request.
| User Logged in App | Pending record in which App | Action | Scenario | Expectation |
|---|---|---|---|---|
| Online Banking (OLB) | Spotlight | Create User - Manual | Online Banking mapping of Signatory Group: When there is a pending record for authorization for "Delete" existing Signatory Group in Spotlight. | The record should show as inactive / grey-out in Online Banking, so that it is not allowed for mapping the new user to that group. |
| Online Banking | Spotlight | Create User - Retrieve Existing User | Existing customer(related party), if it is already submitted by the Spotlight maker for user creation and pending for authorization in Spotlight | It should not allow to select the same customer record in Online Banking. There should be block message for the same. (This is already done as part of fund bank and to use the same logic for this scenario as well). |
| Online Banking | Spotlight | Create User - Retrieve Existing User | Online Banking mapping of Signatory Group: When there is a pending record for authorization for "Delete" existing Signatory Group in Spotlight. | The record should show as inactive / grey-out in Online Banking, so that it is not allowed for mapping the new user to that group. |
| Online Banking | Spotlight | Add User to Another Entity | Online Banking Add user to another entity – a record is already pending in spotlight for add to entity, it can be for any contract/customer | It should not allow to select the same customer record in Online Banking. There should be block message for the same. (This is already done as part of fund bank and to use the same logic for this scenario as well). |
| Online Banking | Spotlight | Add User to Another Entity | Online Banking mapping of Signatory Group: When there is a pending record for authorization for "Delete" existing Signatory Group in Spotlight. | The record should show as inactive / grey-out in Online Banking, so that it is not allowed for mapping the new user to that group. |
| Online Banking | Spotlight | Edit User | Online Banking Edit User-> Update User Details - When there is a pending record in Spotlight for a edit of Permissions for a "user-customer" combination. | System should not allow to edit the User's permissions in OLB for that respective "user-customer" combination. The details can only be viewed and the edit should be disabled. (This is already done as part of fund bank and to use the same logic for this scenario as well). A message to be shown at the top "Please contact the Bank as there is some pending record" |
| Online Banking | Online Banking | Create User - Retrieve Existing User | Existing customer(related party), if it is already submitted by the Online Banking maker for user creation & pending for authorization in Online Banking. And another Online Banking user is trying to select the same customer to create user | It should not allow to select the same customer record in Online Banking. There should be block message for the same. (This is already done as part of fund bank and to use the same logic for this scenario as well). |
| Online Banking | Online Banking | Edit User | Online Banking Edit User-> Update User Details - When there is a pending record in OLB for user's basic info or contact detailsOROLB Edit User-> Update User Details - When there is a pending record in OLB for a edit of Permissions for a "user-customer" combination.Andanother OLB user is trying to select the same User or "User-Customer" record for edit | It should not allow to select the same customer record for edit in Online Banking. The details can only be viewed and the edit should be disaled. (This is already done as part of fund bank and to use the same logic for this scenario as well). |
| Online Banking | Online Banking | Add User to Another Entity | OLB Add user to another entity – a record is already pending in OLB for add to entity, it can be for any contract/customerAndanother OLB user is trying to select the same User - entity combination for add to entity | System should show the blocker message very similar to what we currently have a for the same scenario when the user is already part of that entity. We can have a similar message. |
| Online Banking | Online Banking | All Actions | When there is a pending record in OLB for user - for create or edit or add user to entityandtwo users are trying to access the same record in parallel either to approve or reject or withdraw the request- (in approver dashboard or request dashboard as the case may be),andOne of the user takes the decision first | Then the rest of admin users who are accessing the record should get a message to go back to the dashboard. |
| Online Banking | Online Banking | OLB mapping of Signatory Group: When there is a pending record for authorization for "Delete" existing Signatory Group in OLB. | The record should show as inactive / grey-out in OLB, so that it is not allowed for mapping the new user to that group. | |
| Online Banking | Online Banking | All Actions | Error Scenario: If more than one users are on the same record and trying to submit a request (for create user or edit user or add user to another entity) & (it can be as requesters or approvers) | Then should throw an error message and block the users from submitting the request |
| Spotlight | Online Banking | Create User - Existing User(Related Party) | Existing customer (a related party) if it is already selected for creating a User, submitted by a OLB user & pending for authorization in OLB | - On final submit for "Add User", System should show a warning message to the spotlight user - with a Proceed / cancel button. - If the user cancels, then it should stop the user creation and remain in the screen. - If the user proceeds, then should be allowed to select the existing customer and continue the user creation activity. The corresponding pending record in OLB for the same existing customer should get rejected once the override is accepted. - In the OLB, the reject reason should be updated accordinlgy against that respective request. |
| Spotlight | Online Banking | Create User - Existing User(Related Party) | Existing customer (a related party) if it is already selected for creating a User, submitted by a OLB user & pending for authorization in OLBAnd an Approver user is already viewing the request in "Approval Screen". | Apart from the expectations listed in "Create User - Existing User(Related Party)", the following should beimplemented: - In OLB, since the approving user is already viewing the request in the approval screen - if they try to click the Approve or Reject button, a Pop-up should display "Record updated by another user, kindly go back to dashboard and check". - On clicking ok, the user should be navigated to the Dashboard and the pending records should be refreshed. The particular request should be moved to History. |
| Spotlight | Online Banking | Create User - Existing User(Related Party) | Existing customer (a related party) if it is already selected for creating a User, submitted by a OLB user & pending for authorization in OLBAnd an Approver user is already viewing the request in "Approval Screen".Similar to the previous scenario, when both the users are on same record - the OLB approver in the Approval screen and the Spotlight maker is in the final "Add User" submit - Override pop-up - to proceed with the override or cancel. | If the OLB approver - Approves - Then in spotlight the maker should not be allowed to "proceed" with the Override and should cancel the action using the cancel button in the pop-up.If the OLB approver - Rejects - Then in spotlight the maker should not be allowed to "proceed" with the Override, They should redo the Add user.If the OLB requestor - Withdraws - Then in spotlight the maker should not be allowed to "proceed" with the Override, They should redo the Add user. |
| Spotlight | Online Banking | Create User - Existing User(Related Party) | When the OLB user and the Spotlight maker are submitting the create user request at the same moment - when both user do the final submit at the same moment | System should provide a block message to both the users from submitting the record - "There is another user accessing the same record, kindly retry".It should not allow either of the actions to be completed. |
| Spotlight | Online Banking | Spotlight -> Edit User | Spotlight Edit User-> Update User Permission - When there is a pending record in Spotlight for a edit of Permissions for a "user-customer" combination. | - On final submit for "Edit User", System should show a warning message to the spotlight user - with a Proceed / cancel button. - If the user cancels, then it should stop the edit user permissions and remain in the screen. - If the user proceeds, then should be allowed to select the user record and continue the edit user permissions for that customer. The corresponding pending record in OLB for the same "user-customer" should get rejected once the override is accepted. - In the OLB, the reject reason should be updated accordinlgy against that respective request. |
| Spotlight | Online Banking | Spotlight -> Edit User | Spotlight Edit User-> Update User Permission - When there is a pending record in Spotlight for a edit of Permissions for a "user-customer" combination.And an Approver user is already viewing the request in "Approval Screen".Similar to the previous scenario, when both the users are on same record - the OLB approver in the Approval screen and the Spotlight maker is in the final "Edit User" submit - Override pop-up - to proceed with the override or cancel. | If the OLB approver - Approves - Then in spotlight the maker should not be allowed to "proceed" with the Override and should cancel the action using the cancel button in the pop-up. They should redo the edit user.If the OLB approver - Rejects - Then in spotlight the maker should not be allowed to "proceed" with the Override, They should redo the edit user.If the OLB requestor - Withdraws - Then in spotlight the maker should not be allowed to "proceed" with the Override, They should redo the edit user. |
In this topic