UTF Transfer Activities
Use the feature to manage past and scheduled transfers. This page displays the consolidated list of the scheduled and past transfers.
Menu path:
- Web Channel: On the Accounts Dashboard screen > under Payment and Transactions > Manage Transactions.
Alternatively, you can also access the Manage Transactions feature from the side menu under Payments and Transfers.
- Mobile Native: Hamburger menu > Unified Transfer Flow > Transfer Activities
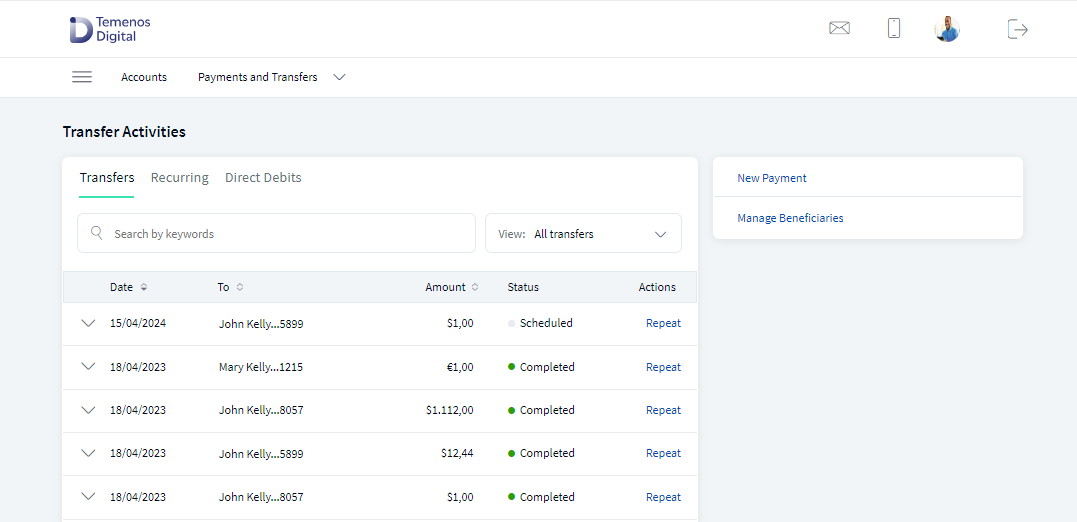
The Transfer Activities screen is displayed with Transfer tab selected by default. The app displays the list of one-time transactions as determined by the service response (10 transactions by default).
The application displays different screen to the user based on the contract. See Account listing and Customer listing dashboard for more information on users having large number of accounts and contracts. In Spotlight, the bank needs to configure the system configurations(Bundle DBP - ACCOUNTS_COUNT_COMPACT_DASHBOARD) to enable the different views.
The following are the different scenarios on how the applications behaves:
Scenario 1: The user having access to single customer ID
For the users having access to a single customer ID. The application displays Transfers, Recurring, Direct Debits with Search functionality and View filter.
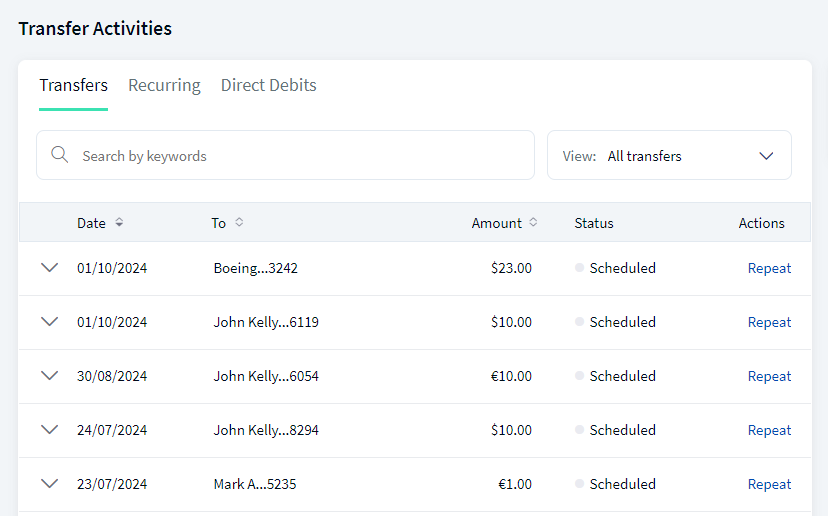
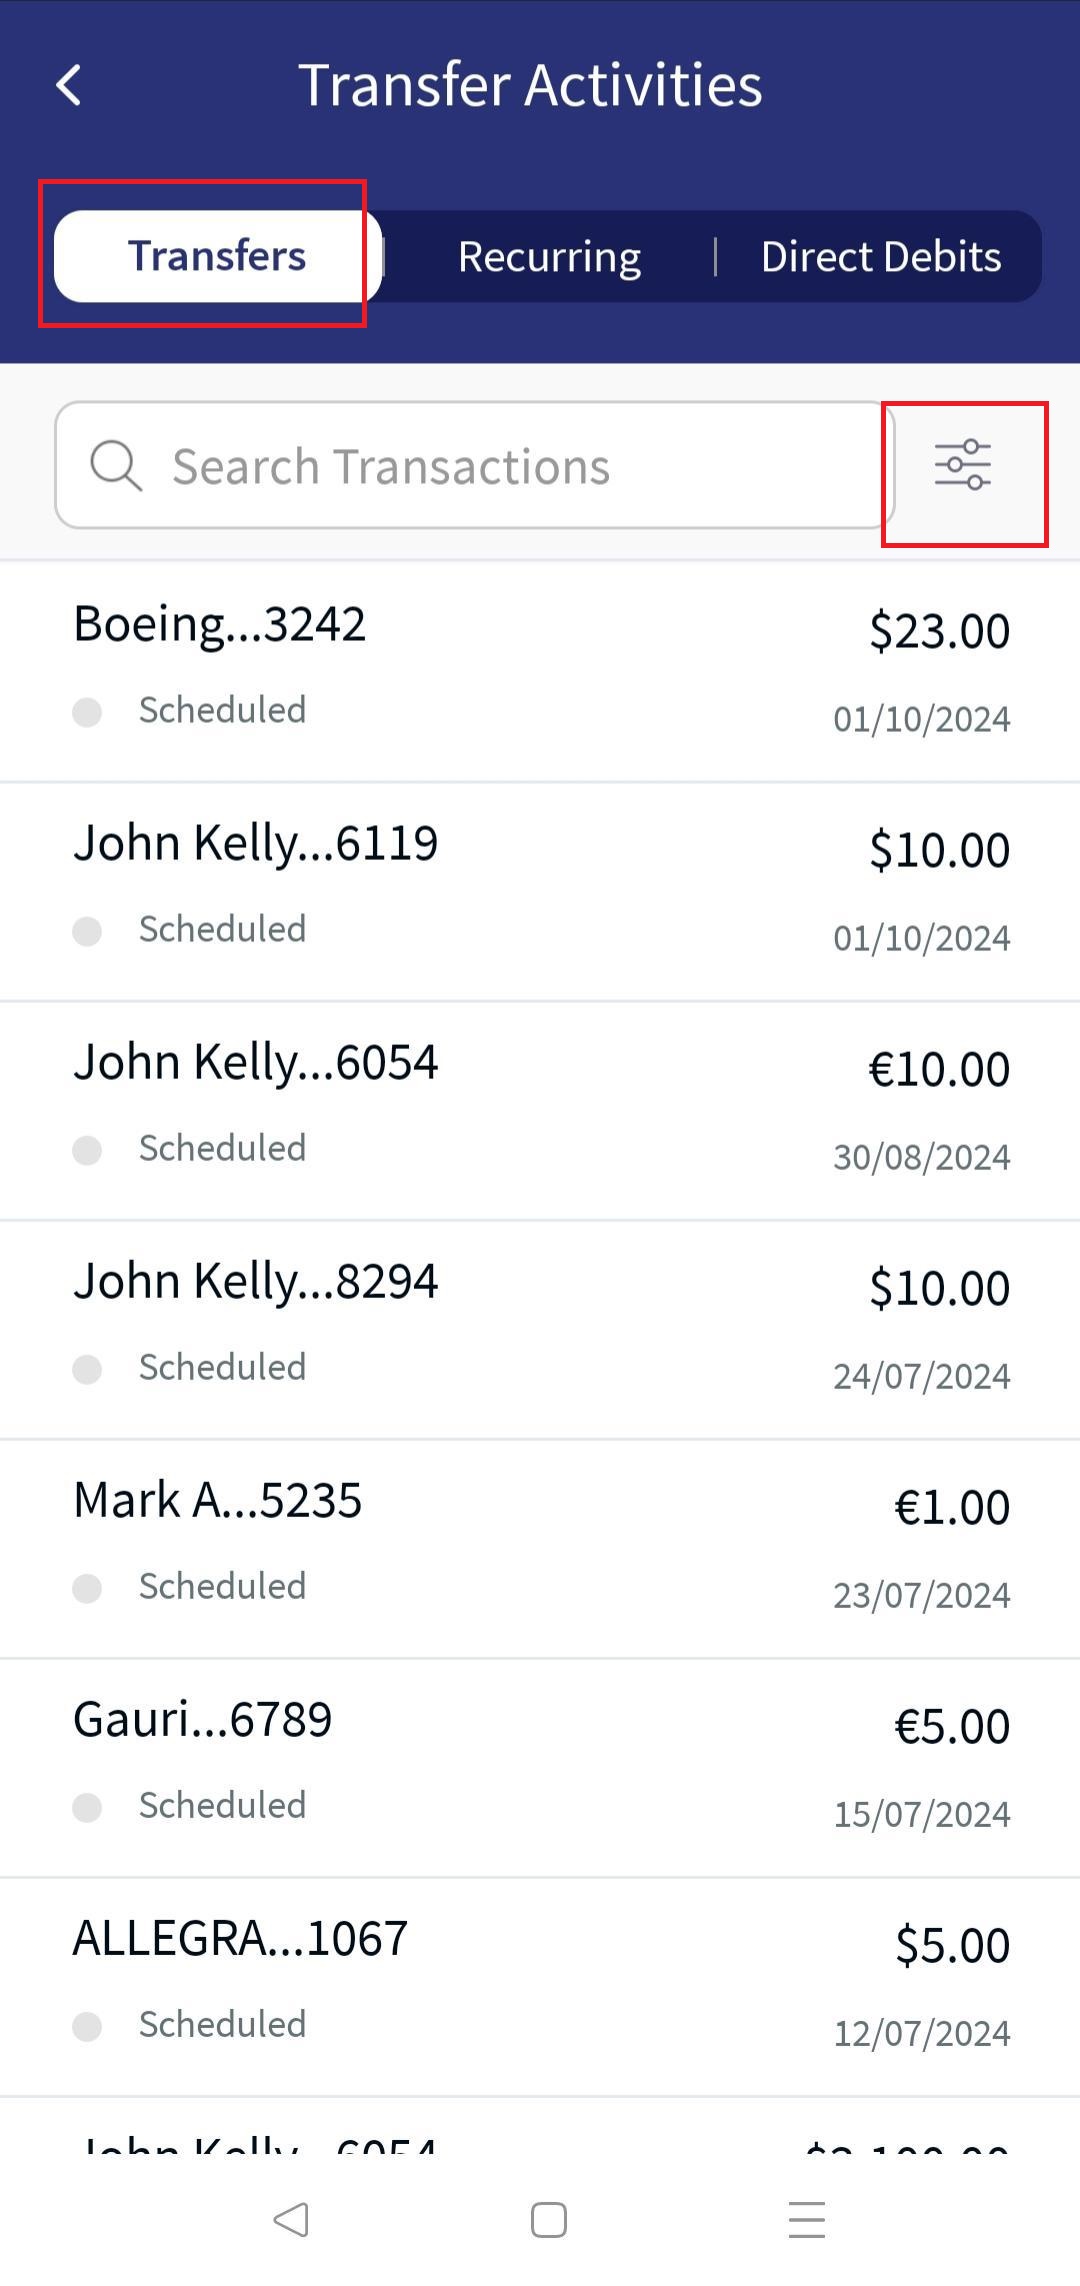
Scenario 2: The user having access to multiple customer IDs
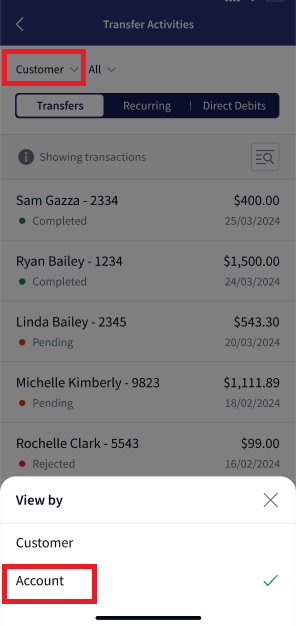
For users having access to multi-customer IDs, the application displays Transfers, Recurring, Direct Debits with filter option(View by Customer or Account ), combo box (which the user can use to search or select from the drop-down list), Advanced Search functionality.
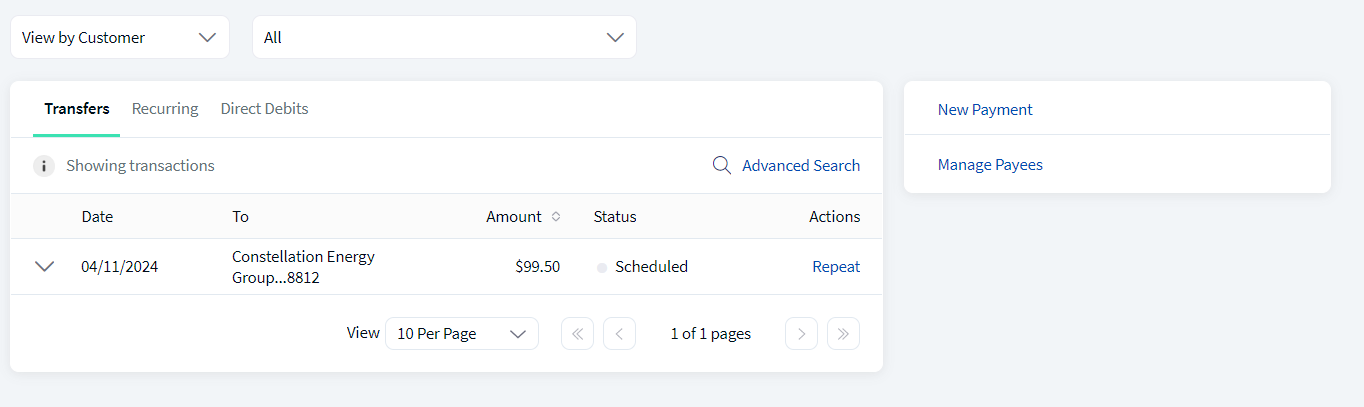
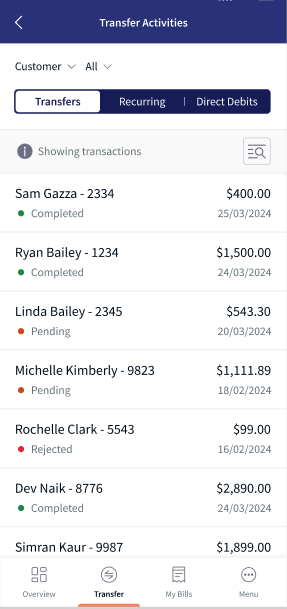
- The View By filter has two values Customer and Account. By default, View by is selected as Customer.
- When View By is selected as Customer. The application will display
- Combo box (which the user can use to search or select from the drop-down list) . The search can happen using customer name and customer ID or select the customer from the drop-down list. If the search does not retrieve any matching results, the application displays a No results found message in the drop-down box.
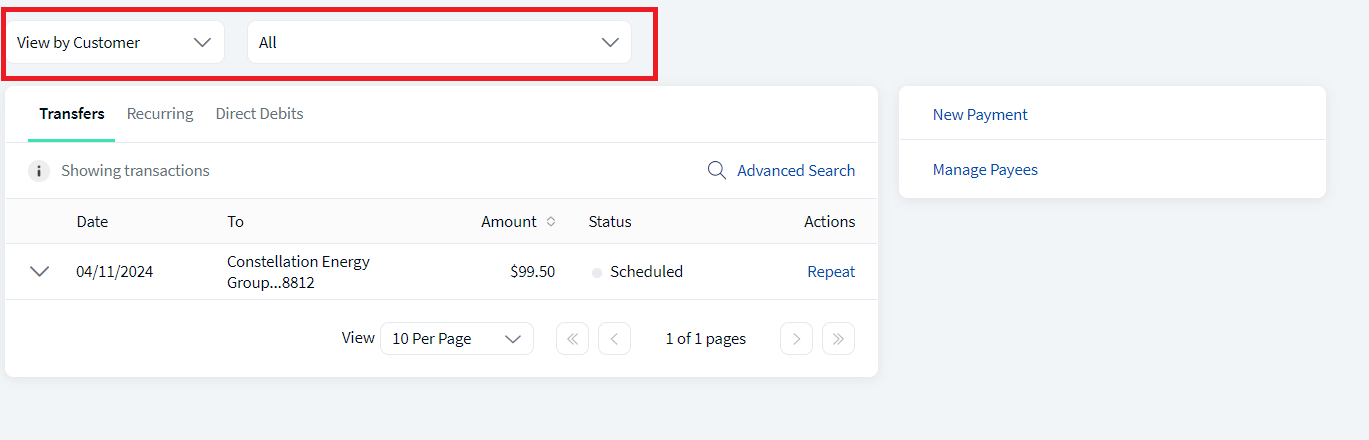
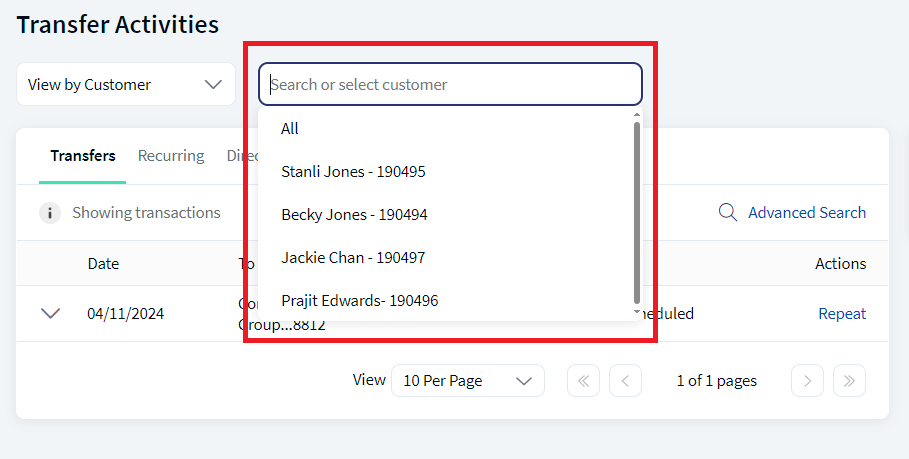
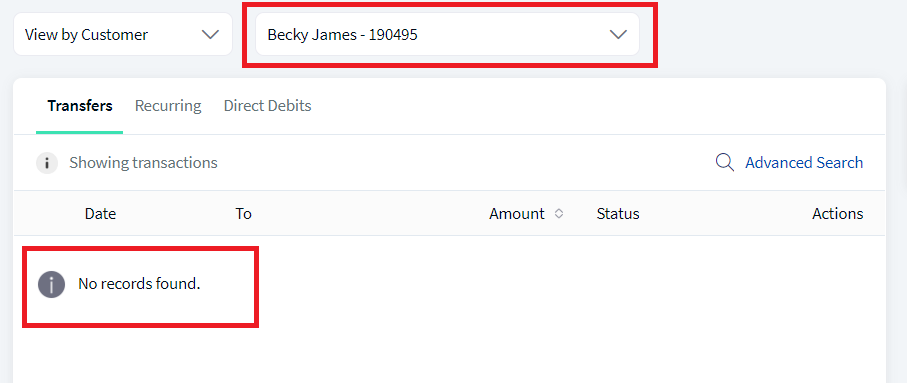
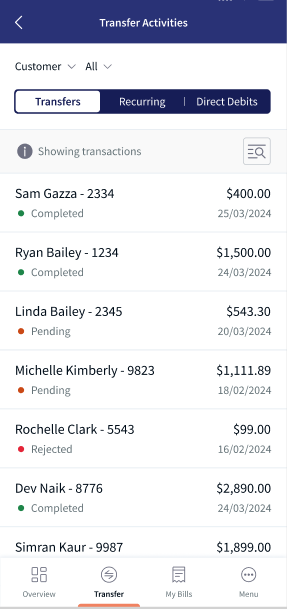
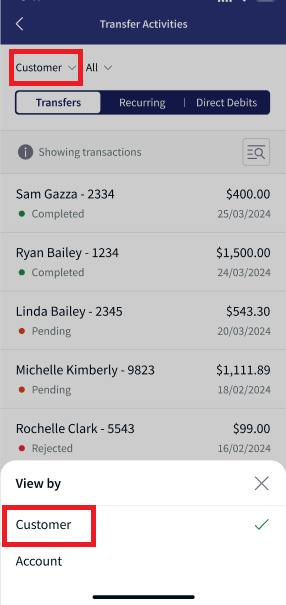
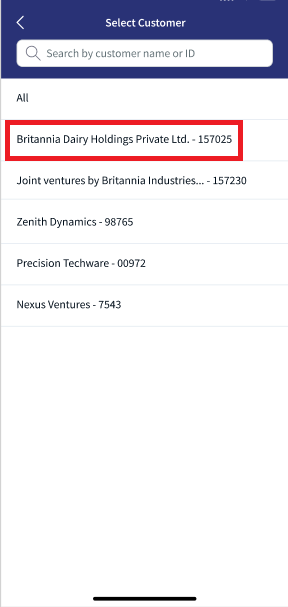
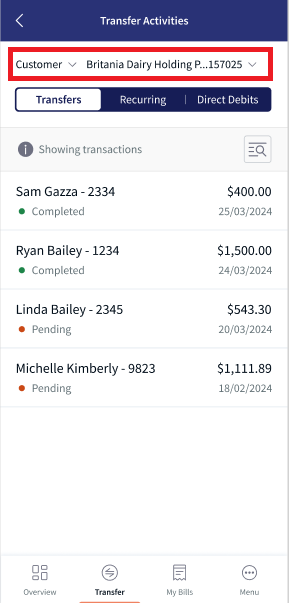
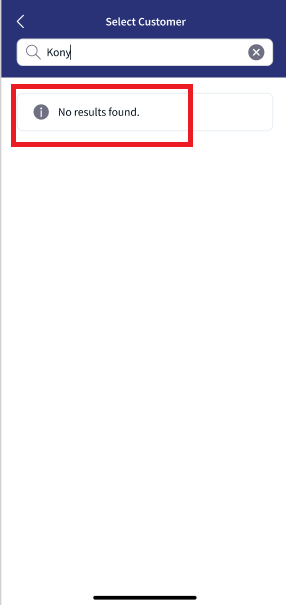
- The application selects All as default for the user with less accounts and selects the primary customer for the user with more accounts.
- Combo box (which the user can use to search or select from the drop-down list) . The search can happen using customer name and customer ID or select the customer from the drop-down list. If the search does not retrieve any matching results, the application displays a No results found message in the drop-down box.
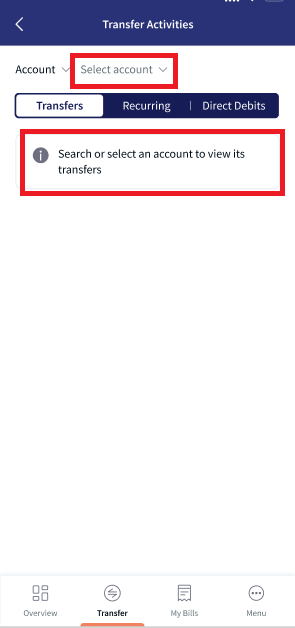
- When View By is selected as Account. The application will display
- Combo box (which the user can use to search or select from the drop-down list) field with place holder as Search or select account . The user can search for an account using account number or account name or select the account from the drop-down list. If the search does not retrieve any matching results, the application displays a No results found message in the drop down box.
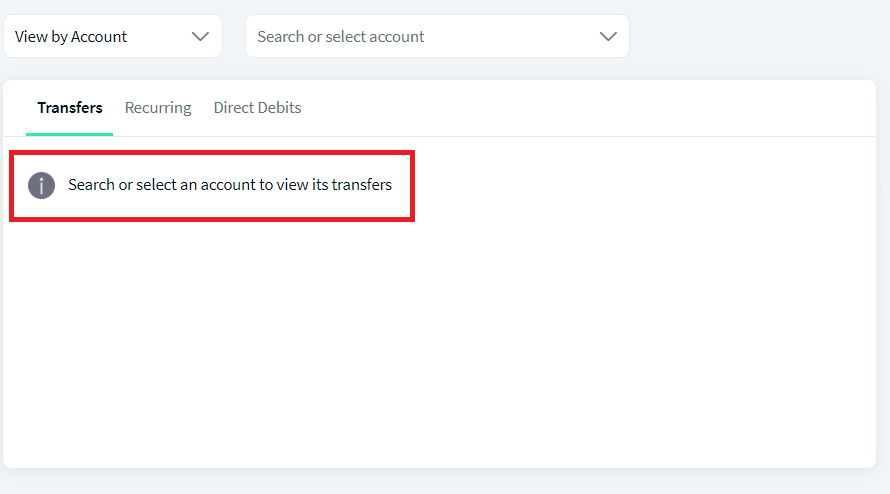
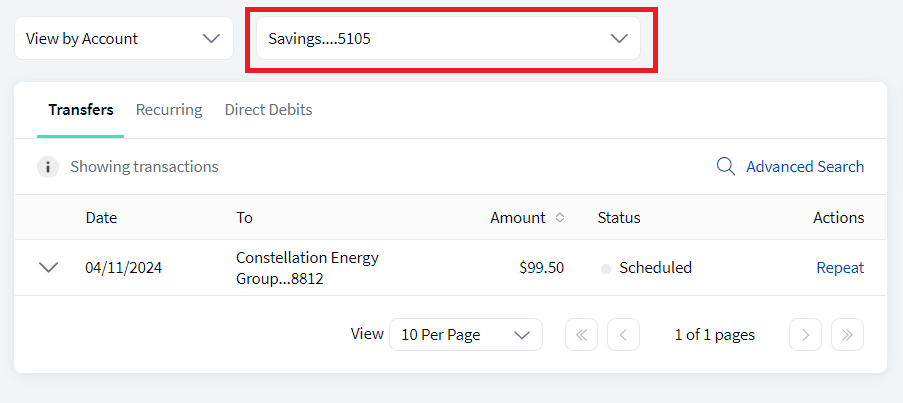
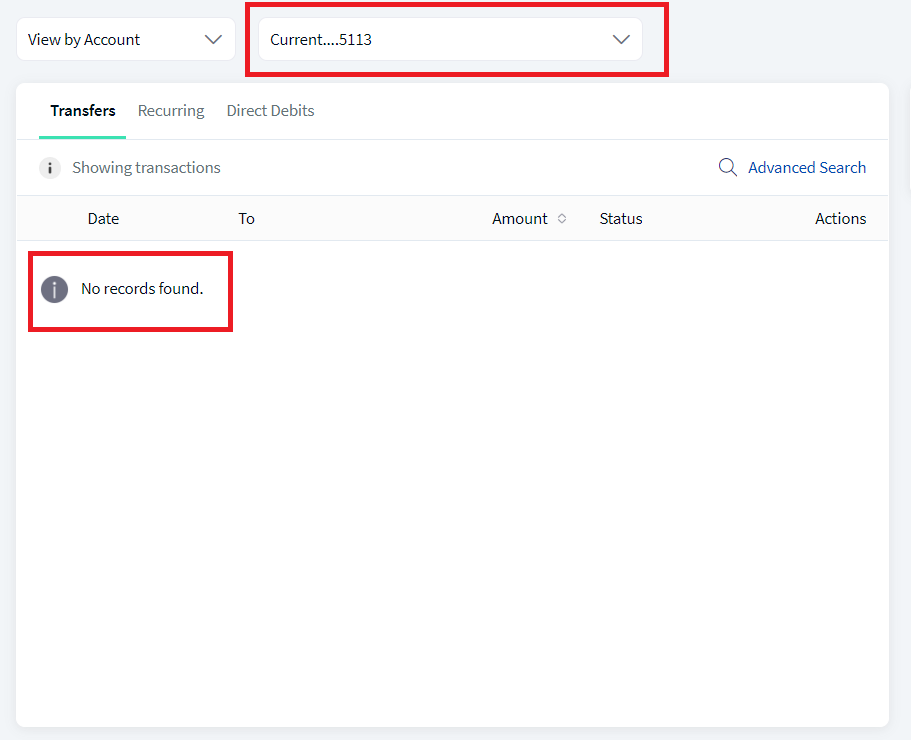
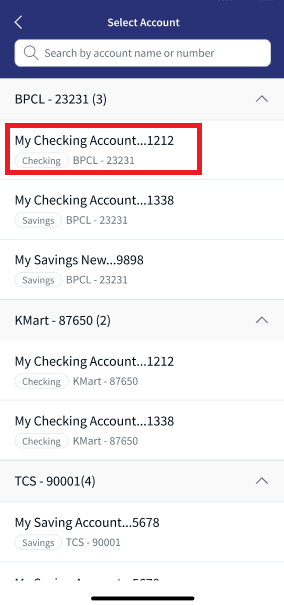
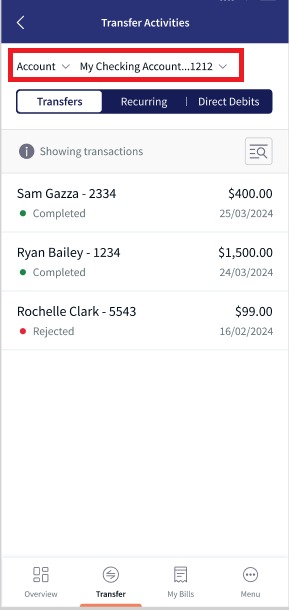
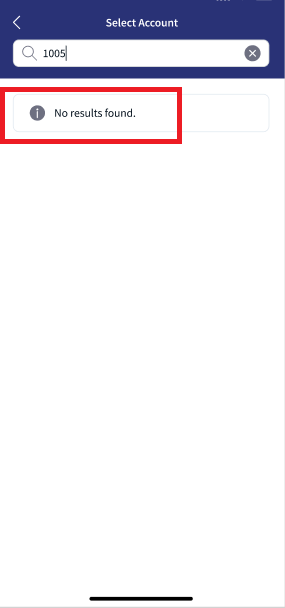
- If the user have access to less accounts then the application displays accounts grouped by customer name with ID.
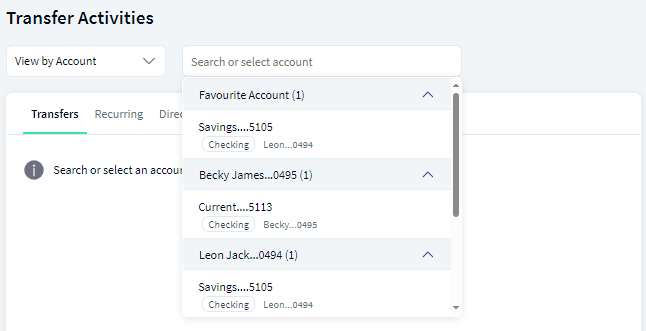
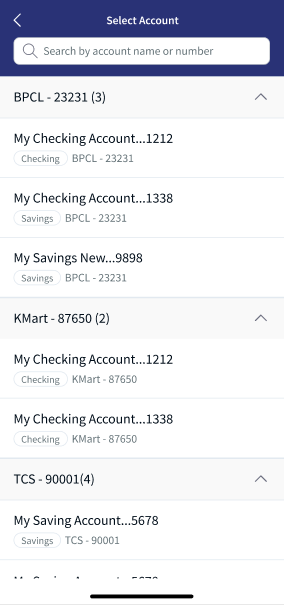
- If the user have access to more accounts then the application displays accounts grouped by customer name with ID. By default, primary customer accounts is expanded and rest all customer accounts are collapsed.
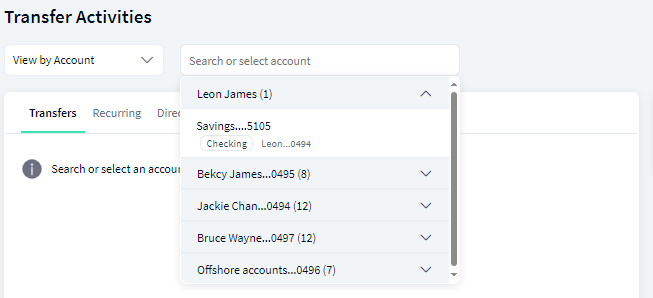
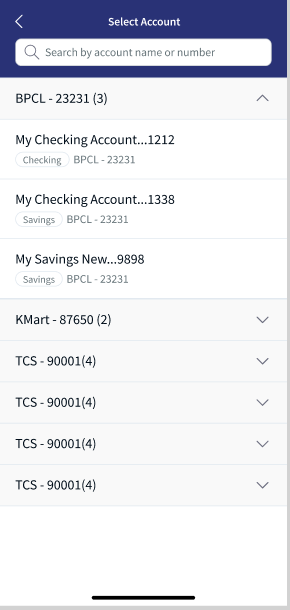
- Combo box (which the user can use to search or select from the drop-down list) field with place holder as Search or select account . The user can search for an account using account number or account name or select the account from the drop-down list. If the search does not retrieve any matching results, the application displays a No results found message in the drop down box.
- When View By is selected as Customer. The application will display
Transfer Activities screen displays only single transfers. Bulk transfers are not displayed on this screen.
 Multi entity support
Multi Entity Support: Customers can view the dashboard, perform transfers, or view any request summary and submit requests against the entity associated with the customer during login. The feature is enhanced with Experience APIs to retrieve and post based on the Entity ID of the signed-in user.
- The Entity ID selected by the signed-in user flows through the application through the respective Experience API.
- For all fetch (GET) API calls, the system retrieves the results based on the Entity ID of the signed-in user.
- For all add/update/delete calls, the system passes and posts requests against the Entity ID of the signed-in user.
The feature supports the following modules:
| Authentication | Dashboard | Account Overview |
| Credit Card overview | Cheque Management | Card Management |
| Statements | Dispute Transactions | Service Requests |
| PFM | Account Settings | Consent Management |
| Sign In Settings | Profile Settings | Manage Beneficiaries |
| Unified Transfers | Manage Transfers | Foreign Exchange |
| Bulk Payments | Bill Payments | Approval Matrix |
| Portfolio Management | WealthOrder |
Transfers
The Transfers tab displays the list of all past and future dated one-time transactions. The user can user filter options to narrow down the results. In case of user having access to single customer ID, the application displays view filter and user having access to multiple customer IDs, the application displays Advanced search option.
The View by filter have the following options: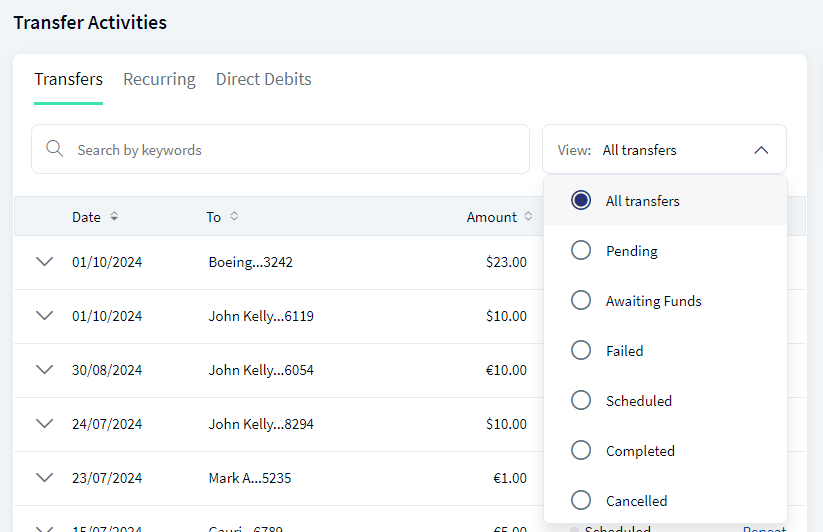
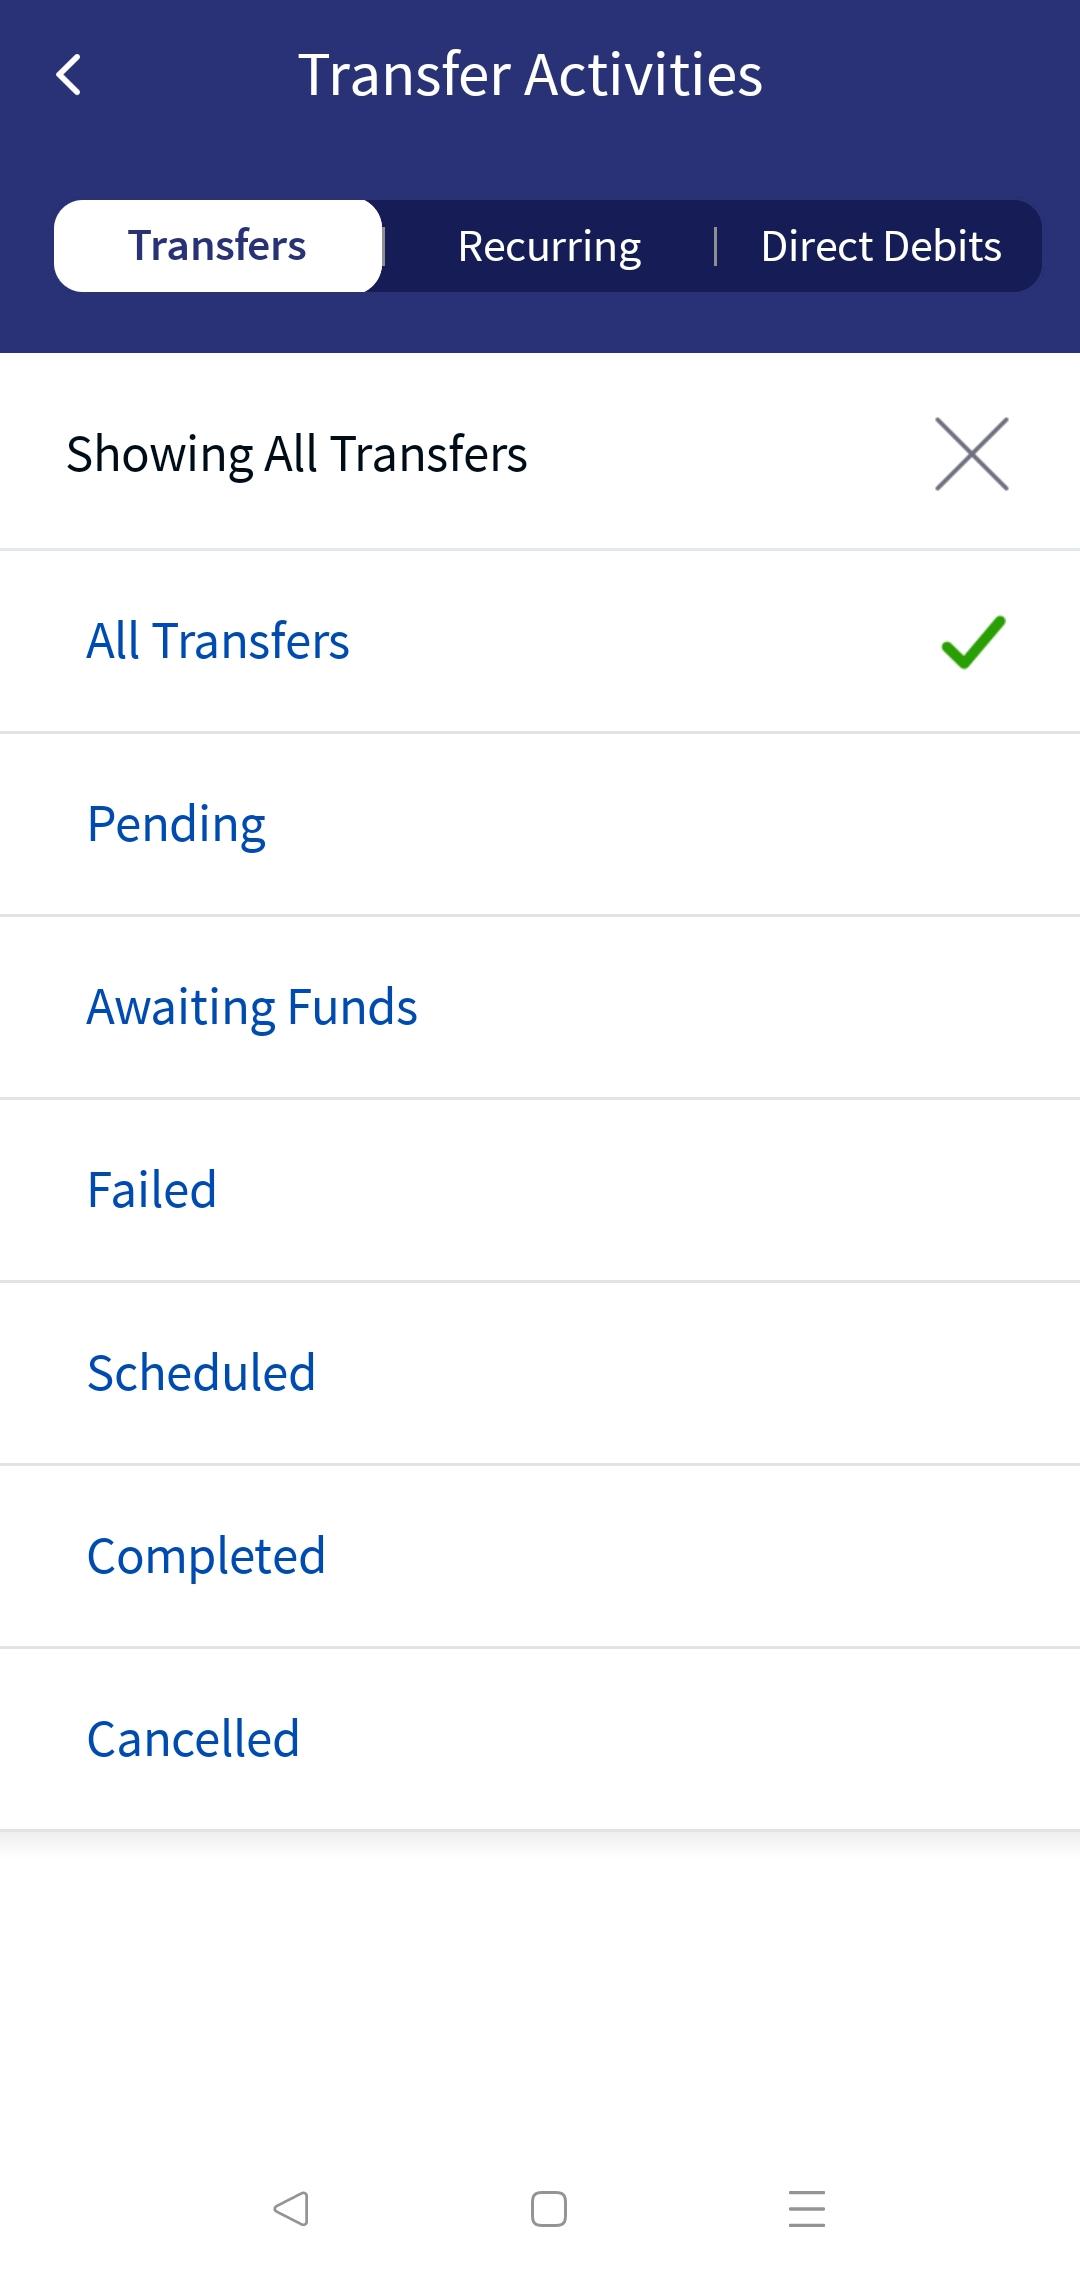
- All transfers
- Pending
- Awaiting Funds
- Failed
- Scheduled
- Completed
- Cancelled
The Advanced Search have following fields: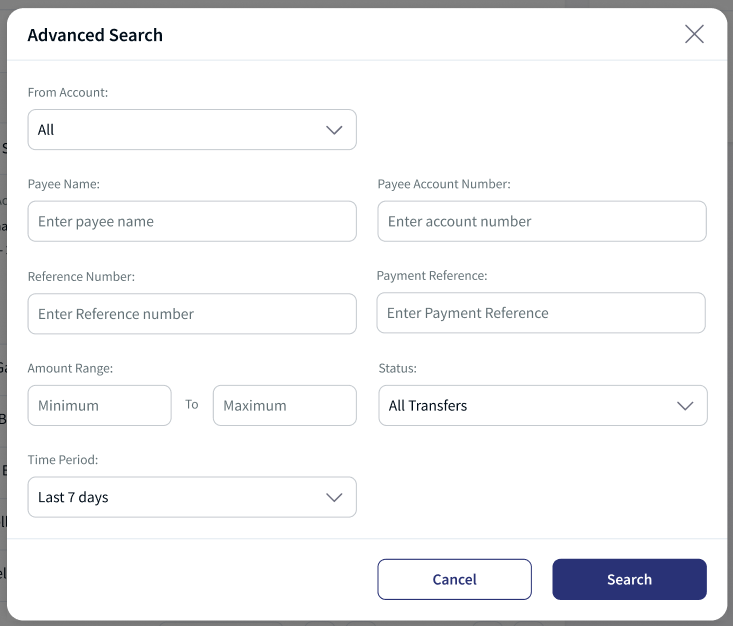
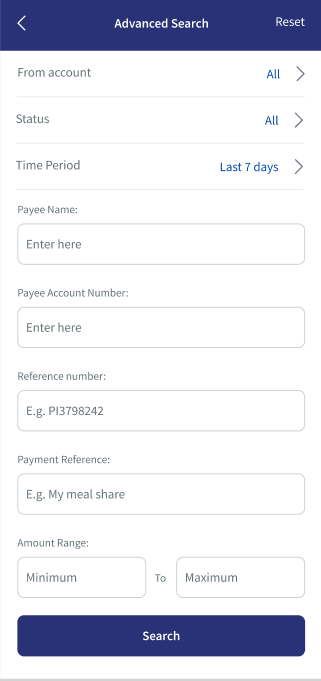
- From Account. This is a combo box field, the user can search using account name or number or select the account from the drop down list.
- If the user have access to less accounts then the application displays accounts grouped by favorite accounts and customer name with ID. If no accounts are marked as favorite the application does not display this category.
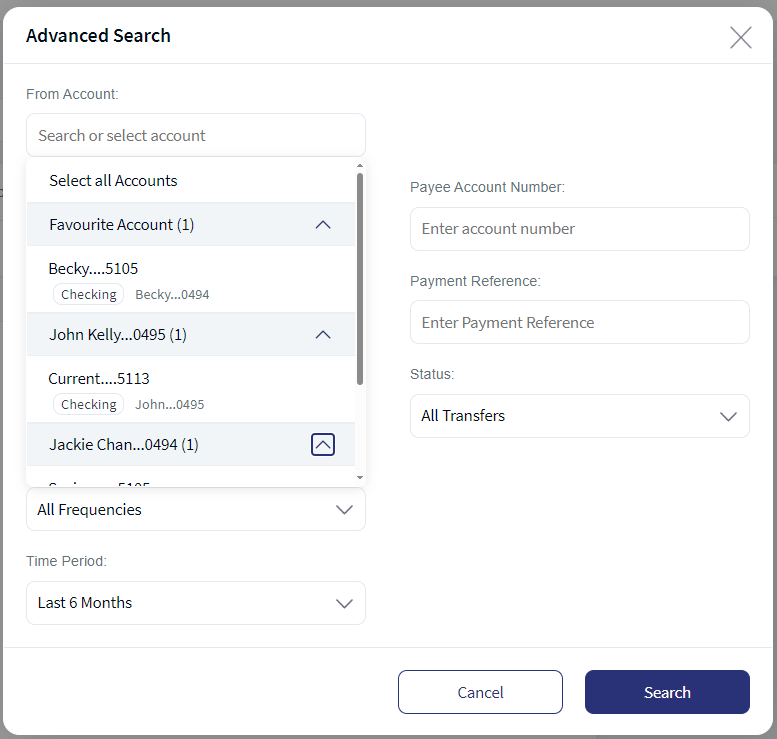
- If the user have access to more accounts then the application displays accounts grouped by favorite accounts and customer name with ID. By default, the application displays favorite account as expanded and rest all customer accounts are collapsed. If no accounts are marked as favorite, then primary customer account is expanded and rest all customer accounts are collapsed.
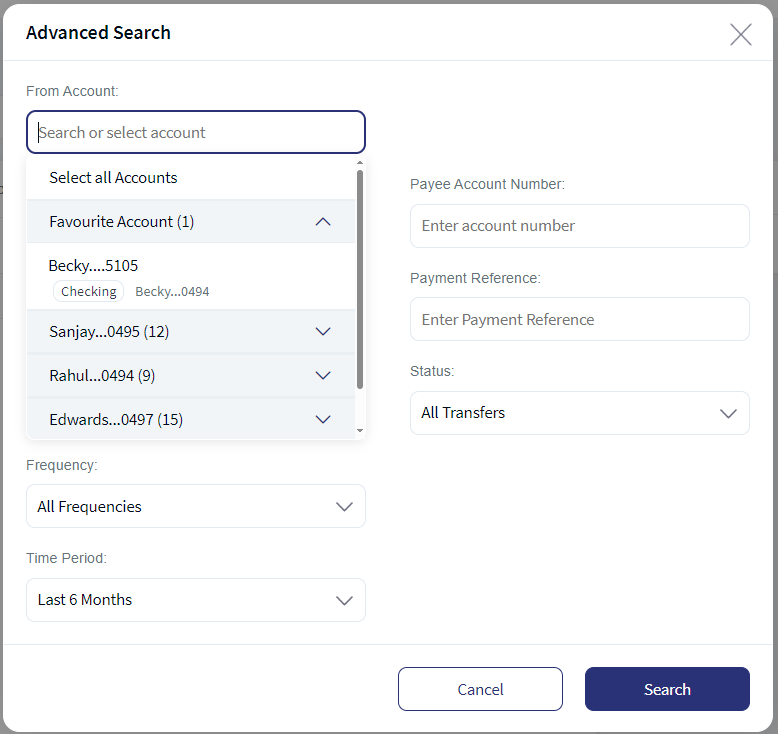
- If the user have access to less accounts then the application displays accounts grouped by favorite accounts and customer name with ID. If no accounts are marked as favorite the application does not display this category.
- Payee Name
- Payee Account Number
- Reference Number
- Payment Reference
- Amount Range
- Status
- Time Period
If no transactions are retrieved from the banking service, the app displays a relevant message. The following details are displayed in the transfers list:
- Date
- To Account details
- Amount
- Status
- Actions that you can perform on a transaction - Repeat
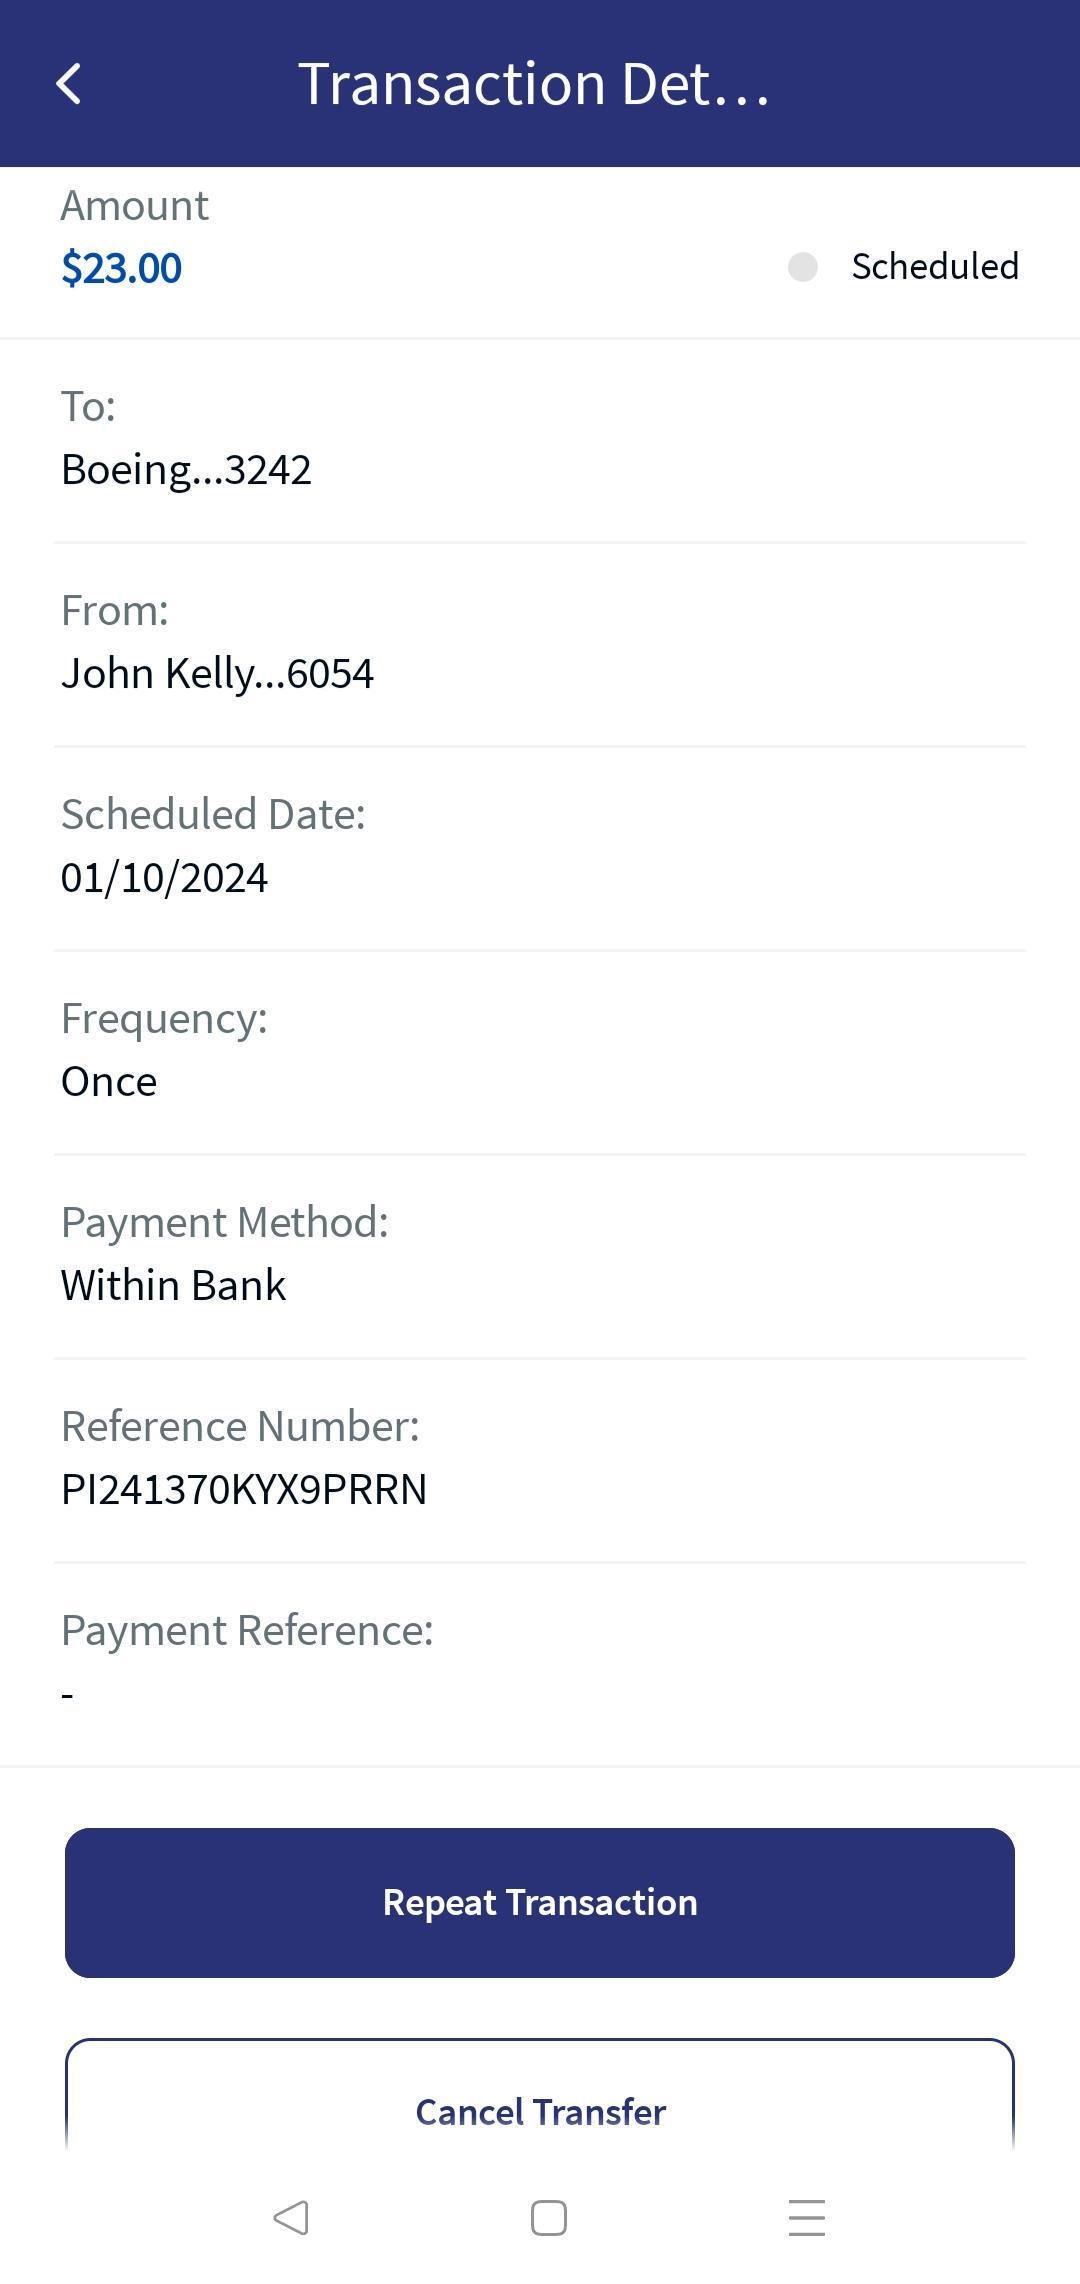
You can select any transaction to view further details such as
- Transaction Reference number
- Source account
- Attachments (if available)
- Frequency of the transaction
- Notes
- Payment Method
You can perform the following actions in this screen:
- Repeat a Transaction
- Download Report
- View Attachments
Repeat a Transaction
You can repeat a completed transaction from your Transfers screen.
To repeat a completed transaction, follow these steps:
- Click Repeat beside a transaction from the list to recreate the same transaction. The application navigates to Create Transfer screen.
- The application auto-fills the field descriptions for the new transaction as the original transaction. You can modify any of the fields and confirm the transaction.
When clicked on Repeat for a same bank account transfer, you must do the following:
- The To Account/ Payee is non-editable.
- The following fields are editable:
- Transfer Amount
- Transfer Currency
- Frequency
- Payment Method
- Fees Paid By
- Intermediary BIC
- E2E Ref
- The Send On date is populated as the current date.
- The Payment Details and Add Supporting Documents are blank and you can choose to include these details.
Download Report
Use the feature to download the report of a completed transaction.
To download the report, follow these steps:
- Click
 icon beside a transaction to view the transaction details.
The transaction details appears for the selected transaction.
- Click Download Report to download the transaction report.
A PDF is generated with the transaction details. The downloaded file is password protected, click here to see more information.
The following details are displayed:
- Reference Number
- Transferred From account
- Date of Transaction
- Transferred To Recipient account
- Transferred Amount
- Note
- Frequency
- Recurrence (For a recurring transaction)
- Start Date and End Date (For a recurring transaction)
View Attachments
You can view the attachments used while performing a transaction for future reference.
To view an attachment, follow these steps:
- Select a transaction and click the down arrow to view the additional details. You can find the attachments option with the number of attachments available.
- Click attachments. A pop-up is displayed with the list of attachments available for a transaction.
- Click each attachment to view the details of the attachment.
- Click Close to close the pop-up window.
Recurring
The Recurring tab displays the list of transactions scheduled for the future date.
Click Recurring tab in Transfer Activities scree, the app displays the list of transactions as determined by the service response (10 transactions by default). The transactions are sorted by date (most recent on top). The user can user filter options to narrow down the results. In case of user having access to single customer ID, the application displays view filter and user having access to multiple customer IDs, the application displays Advanced search option.
The View by filter have following options: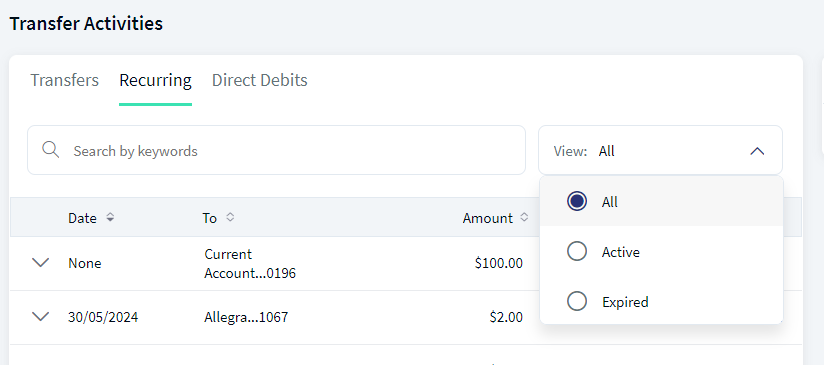
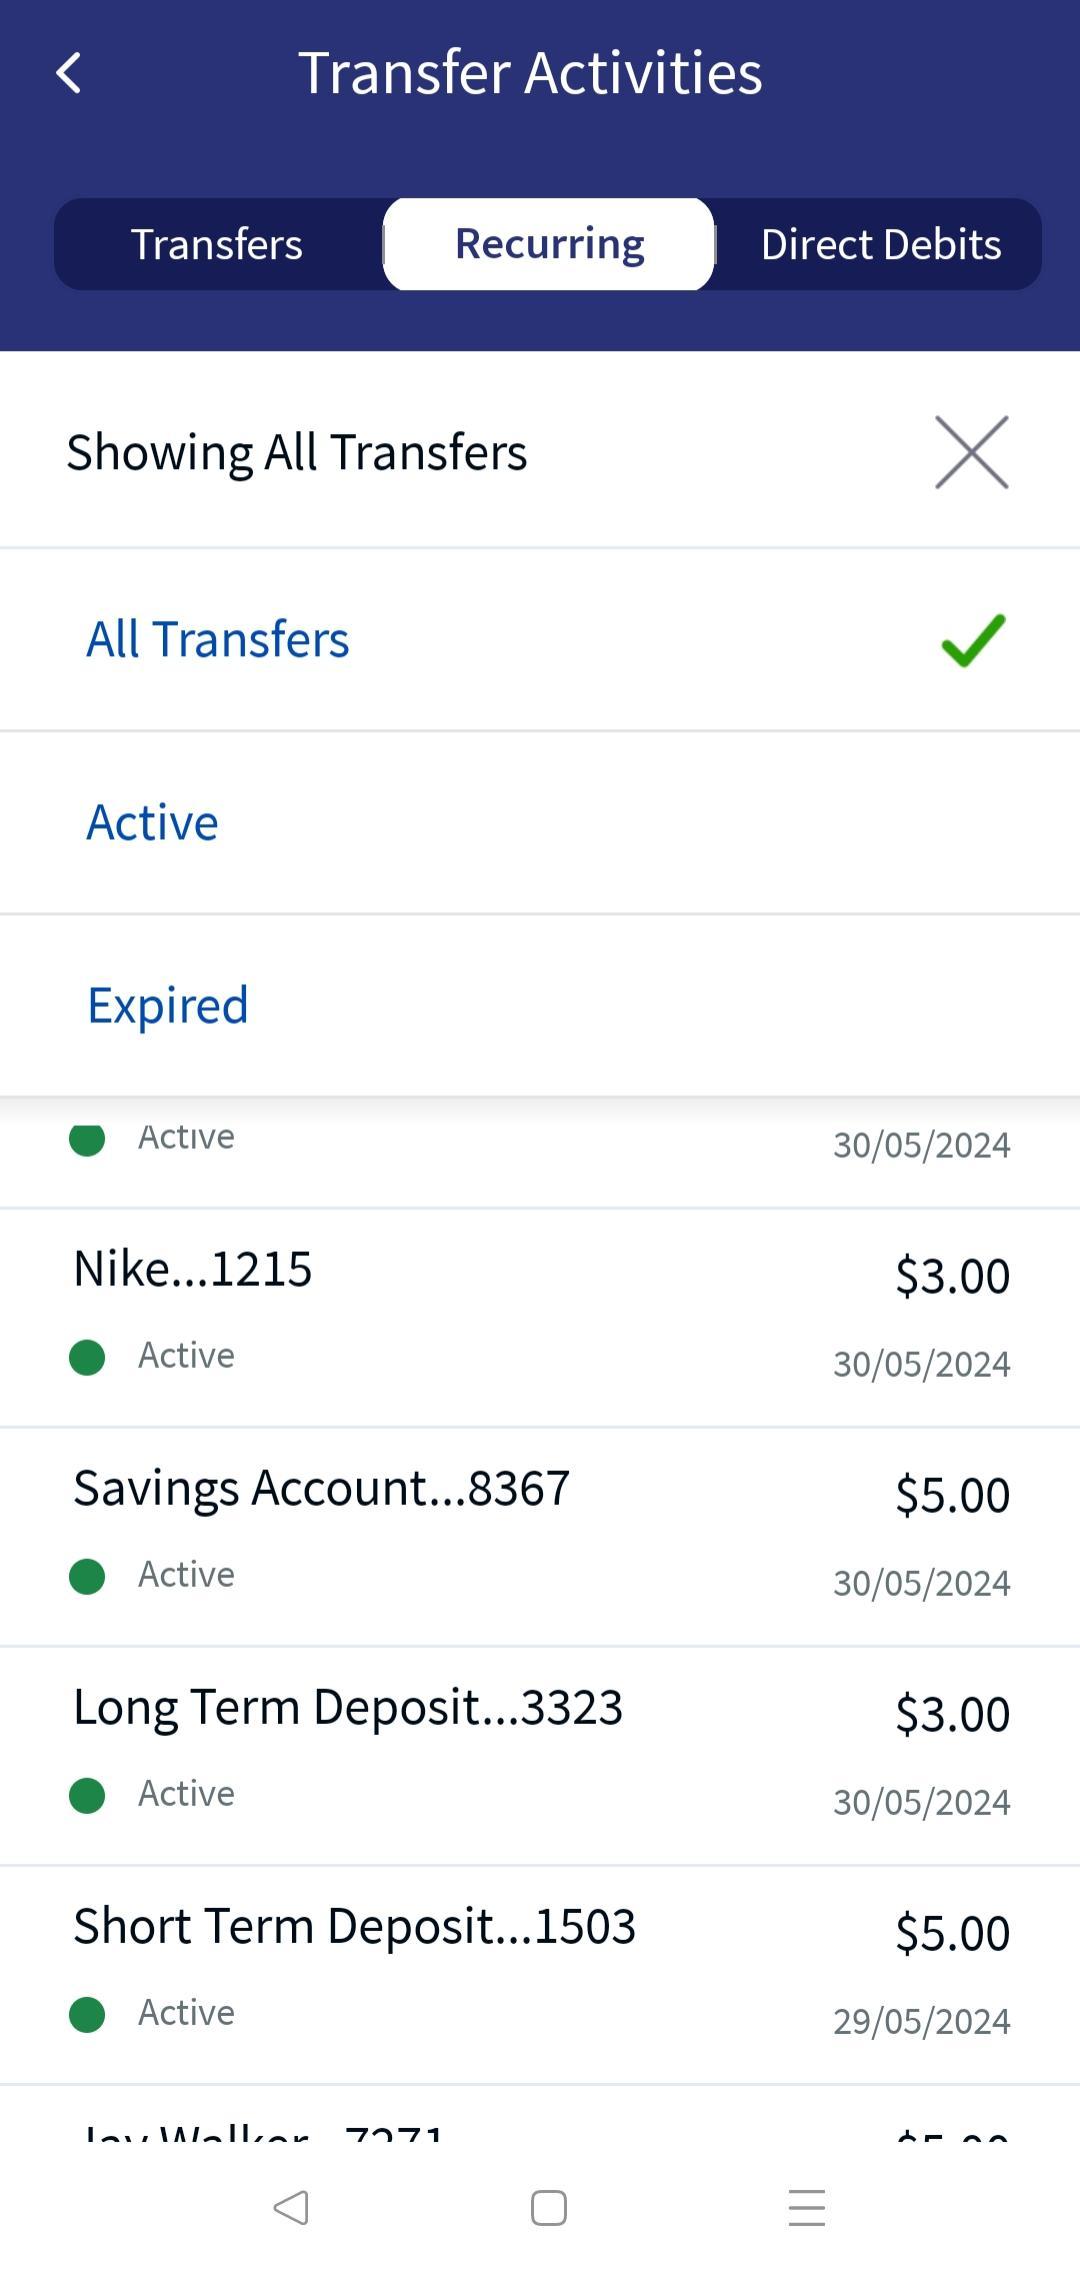
- All
- Active
- Expired
The Advanced Search have following fields: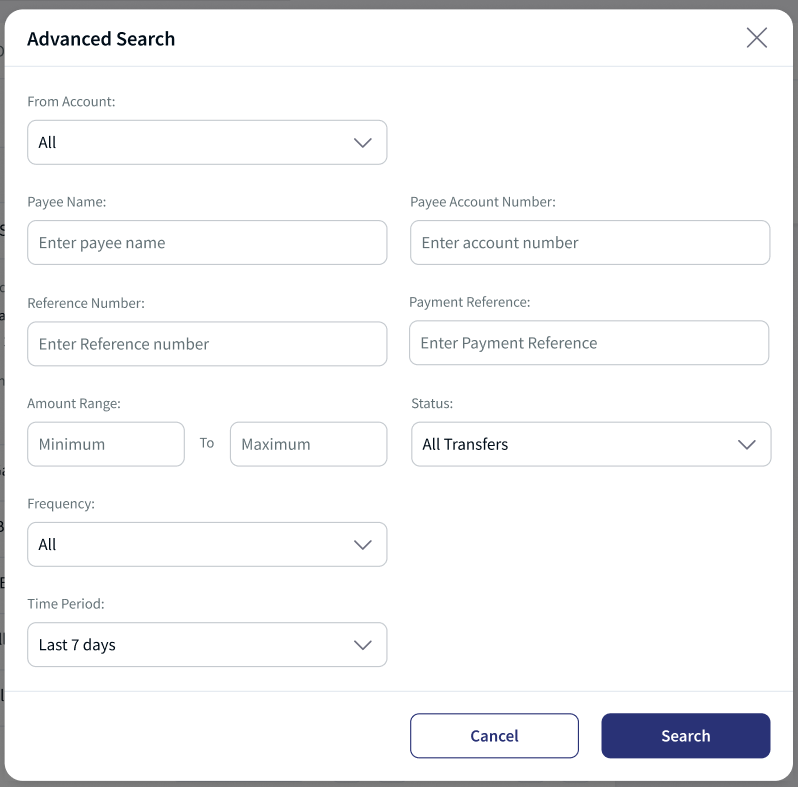
- From Account. This is a combo box field, the user can search using account name or number or select the account from the drop down list.
- If the user have access to less accounts then the application displays accounts grouped by favorite accounts and customer name with ID. If no accounts are marked as favorite the application does not display this category.
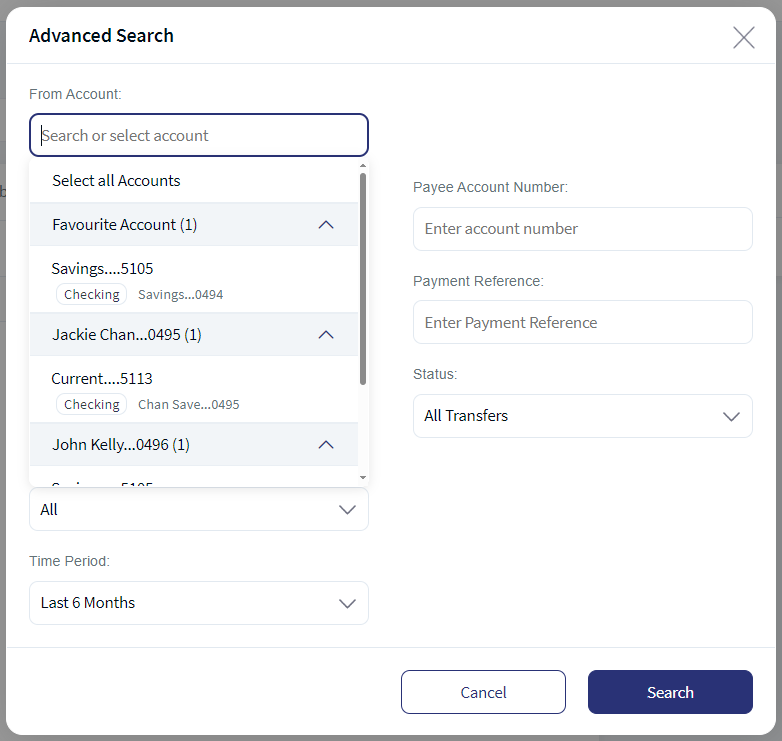
- If the user have access to more accounts then the application displays accounts grouped by favorite accounts and customer name with ID. By default, the application displays favorite account as expanded and rest all customer accounts are collapsed. If no accounts are marked as favorite, then primary customer account is expanded and rest all customer accounts are collapsed.
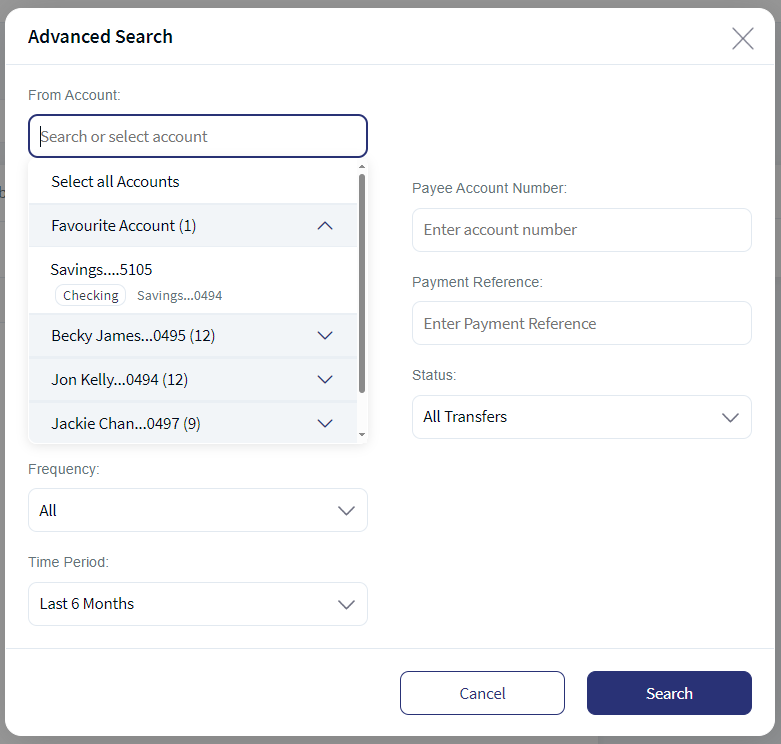
- If the user have access to less accounts then the application displays accounts grouped by favorite accounts and customer name with ID. If no accounts are marked as favorite the application does not display this category.
- Payee Name
- Payee Account Number
- Reference Number
- Payment Reference
- Amount Range
- Frequency
- Status
- Time Period
If no transactions are retrieved from the banking service, the app displays a relevant message.
View a Recurring Transfer
You can view the transfer details of a recurring transfer. The following details are displayed in the scheduled transaction list:
- Scheduled Date
- To Account details
- Amount
- Status
You can select any transaction to view further details such as:
- Reference number
- From account
- Attachments (if available)
- Frequency of the transaction.
- Notes
- Payment Method
Direct Debits
The Direct debits tab displays the list of direct debit transactions. The transactions are sorted by date (most recent on top). The user can user filter options to narrow down the results. In case of user having access to single customer ID, the application displays view filter and user having access to multiple customer IDs, the application displays Advanced search option.
The Advanced Search have following fields: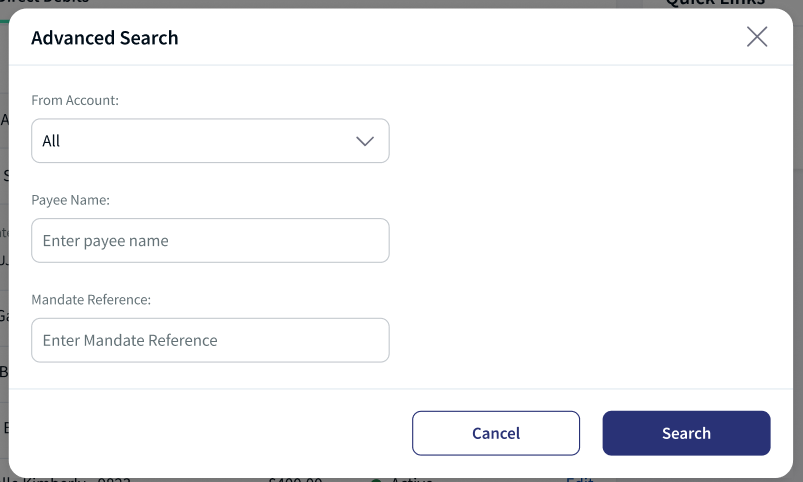
- From Account. This is a combo box field, the user can search using account name or number or select the account from the drop down list.
- If the user have access to less accounts then the application displays accounts grouped by favorite accounts and customer name with ID. If no accounts are marked as favorite the application does not display this category.
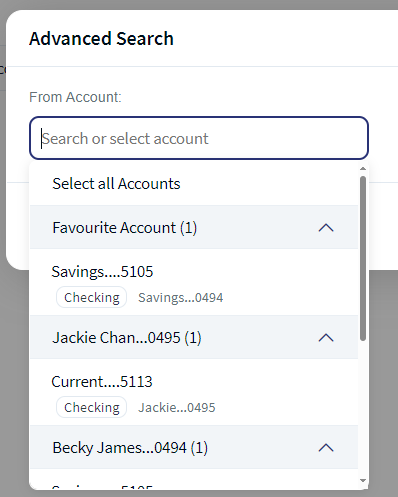
- If the user have access to more accounts then the application displays accounts grouped by favorite accounts and customer name with ID. By default, the application displays favorite account as expanded and rest all customer accounts are collapsed. If no accounts are marked as favorite, then primary customer account is expanded and rest all customer accounts are collapsed.
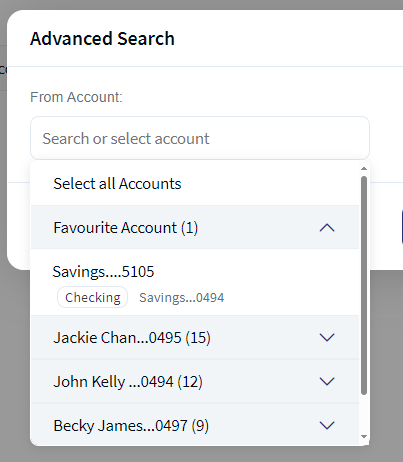
- If the user have access to less accounts then the application displays accounts grouped by favorite accounts and customer name with ID. If no accounts are marked as favorite the application does not display this category.
- Payee Name
- Mandate Reference
The following details are displayed in the Direct Debits:
- Date
- From Account details
- Payee Name
- Status
You can select any transaction to view further details such as:
- Signing Date
- Mandate Reference
Protecting Your Downloaded PDF Files with a Password
The Temenos Digital application allows you to download documents in PDF format. To ensure your data remains secure, all downloaded PDF files is now protected with password. For enhanced security, the password for your downloaded PDF files will follow this format:
[First 4 letters of your lastname] + [Date of birth in the pattern "MMDDYYYY"]
The following are two examples:
| Name (First Name + Last Name) | Date of Birth | Password | Notes |
|---|---|---|---|
| Justin Alexander | 01/Jan/1980 | ALEX01011980 | |
| John Doe | 25/Mar/1990 | Doe03251990 | Since the last name is less than 4 characters, the logic will consider all the available characters in last name. |
Also see Spotlight Configuration.
Configuration
- The status of a transfer is configured from Service Request Micro service (SRMS).
- The list of transfers displayed is based on the client configuration (last 3 months, 6 months, and so on) in SRMS.
Backend Integration - Transact/MS/Mock
Using the runtime configurable parameter (Payment_Backend server property) at the Micro App level, an implementation team can configure the backend integration endpoint as Transact, or Mock as per customer needs for the following. The Payments Fabric MA supports the integration.
- The backend integration for all the APIs is mocked (DBX DB) or SRMS based on customer needs.
- The validations are avoided if the module is directly integrated with Transact endpoints.
- When records are created, use these options: Use the DBX DB table records that already exist, or use the Fabric Java layer to build a stubbed or JSON data response directly.
Follow these steps:
- Sign-in to your Fabric console.
- From the left pane, select Environments.
- For your Fabric run-time environment, click App Services.
- Navigate to Settings > Configurable Parameters.
- On the Server Properties tab, go to
PAYMENT_BACKENDField Name and set the Field Value depending on the integration (for example, MOCK or SRMS or SRMS_MOCK). - Click Save.
Fabric Server Properties
Current Transfers is via SRMS, as per the requirement, configuration name and configuration values should be as following:
| Module | Configuration name | Config Possible values |
|---|---|---|
| Payments | PAYMENT_BACKEND (Existing) | SRMS/STUB/T24 |
| Standing Orders | PAYMENT_BACKEND (Existing) | SRMS/STUB/T24 |
PDF Password Protection
In the Spotlight, a new DBP bundle configuration added. This logic helps the file to generate the password for the PDF file.
| Key | Value | Description |
|---|---|---|
| PDF_PASSWORD_CONFIG | {"USER":{"PART1":{"FIELD":"lastname","NUM_OF_CHARS":4} , "PART2":{"FIELD":"dateOfBirth","PATTERN":"MMDDYYYY"}}, "OWNER":"TEMENOSDIGITAL" } |
In PART1, The FIELD can be 'lastname' or 'firstname'. In PART2, the PATTERN can be any valid part like MMDD, DDMM, MMDDYYYY, YYYY, or MMDDYY. The generated password is the concatenated string of PART1 and PART2. |
In this topic