Accounts Details and Transactions List
Use the feature to view the details of the selected account and manage transactions. From the accounts dashboard screen, tap any account row (for example, Savings account) to view the account details and get the required information. A user with access to both retail and business accounts can view the details of an account for the accounts to which the user has been given permission. The accounts are segregated by personal and business type at all relevant places in the application during transfers and other flows and icons against each account indicates the type of account.
For authorized users, the account details including the list of all the transactions and balances pertaining to the selected account are integrated with Transact using IRIS APIs. See integration for more information.
This feature is integrated with Transact using IRIS APIs and also with Holdings Microservices to pull and display the details of a selected account (includes Savings, Checking, Loans, and Deposits) to which the authorized user has access. The date format shown in the Account details screen can be configured in the Fabric app based on which the format can be changed between DD/MM/YYYY and MM/DD/YYYY.
Islamic banking product is supported with only direct Transact integration.
User have an option to switch between the entities. A Multi entity customer is someone who has digital banking for entities in multiple regions. For more information, see Multi Entity and Entity login.
Temenos Digital baking has been enhanced to support Islamic product [Savings, Current and Deposits) for direct Transact integration in Online banking and Mobile banking.
The transaction listing view has been redesigned for better user experience and performance handling.
Accounts Overview
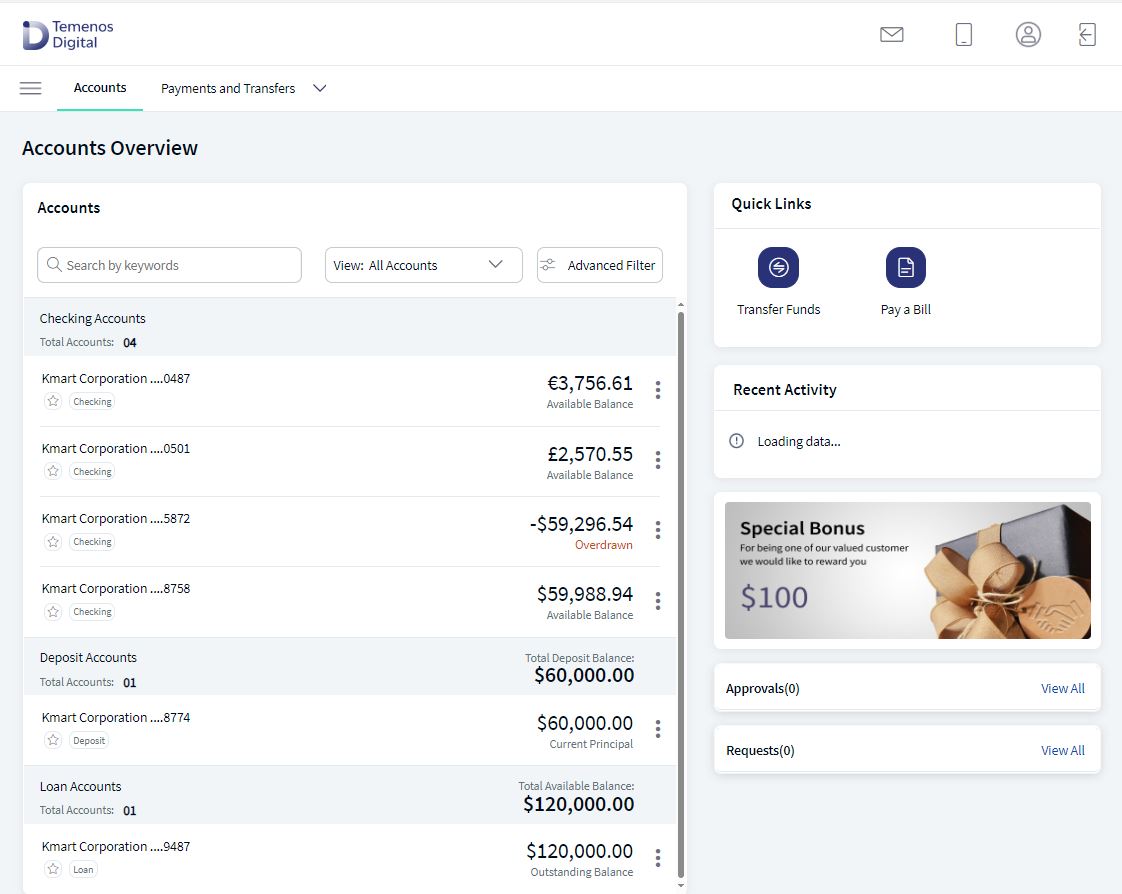
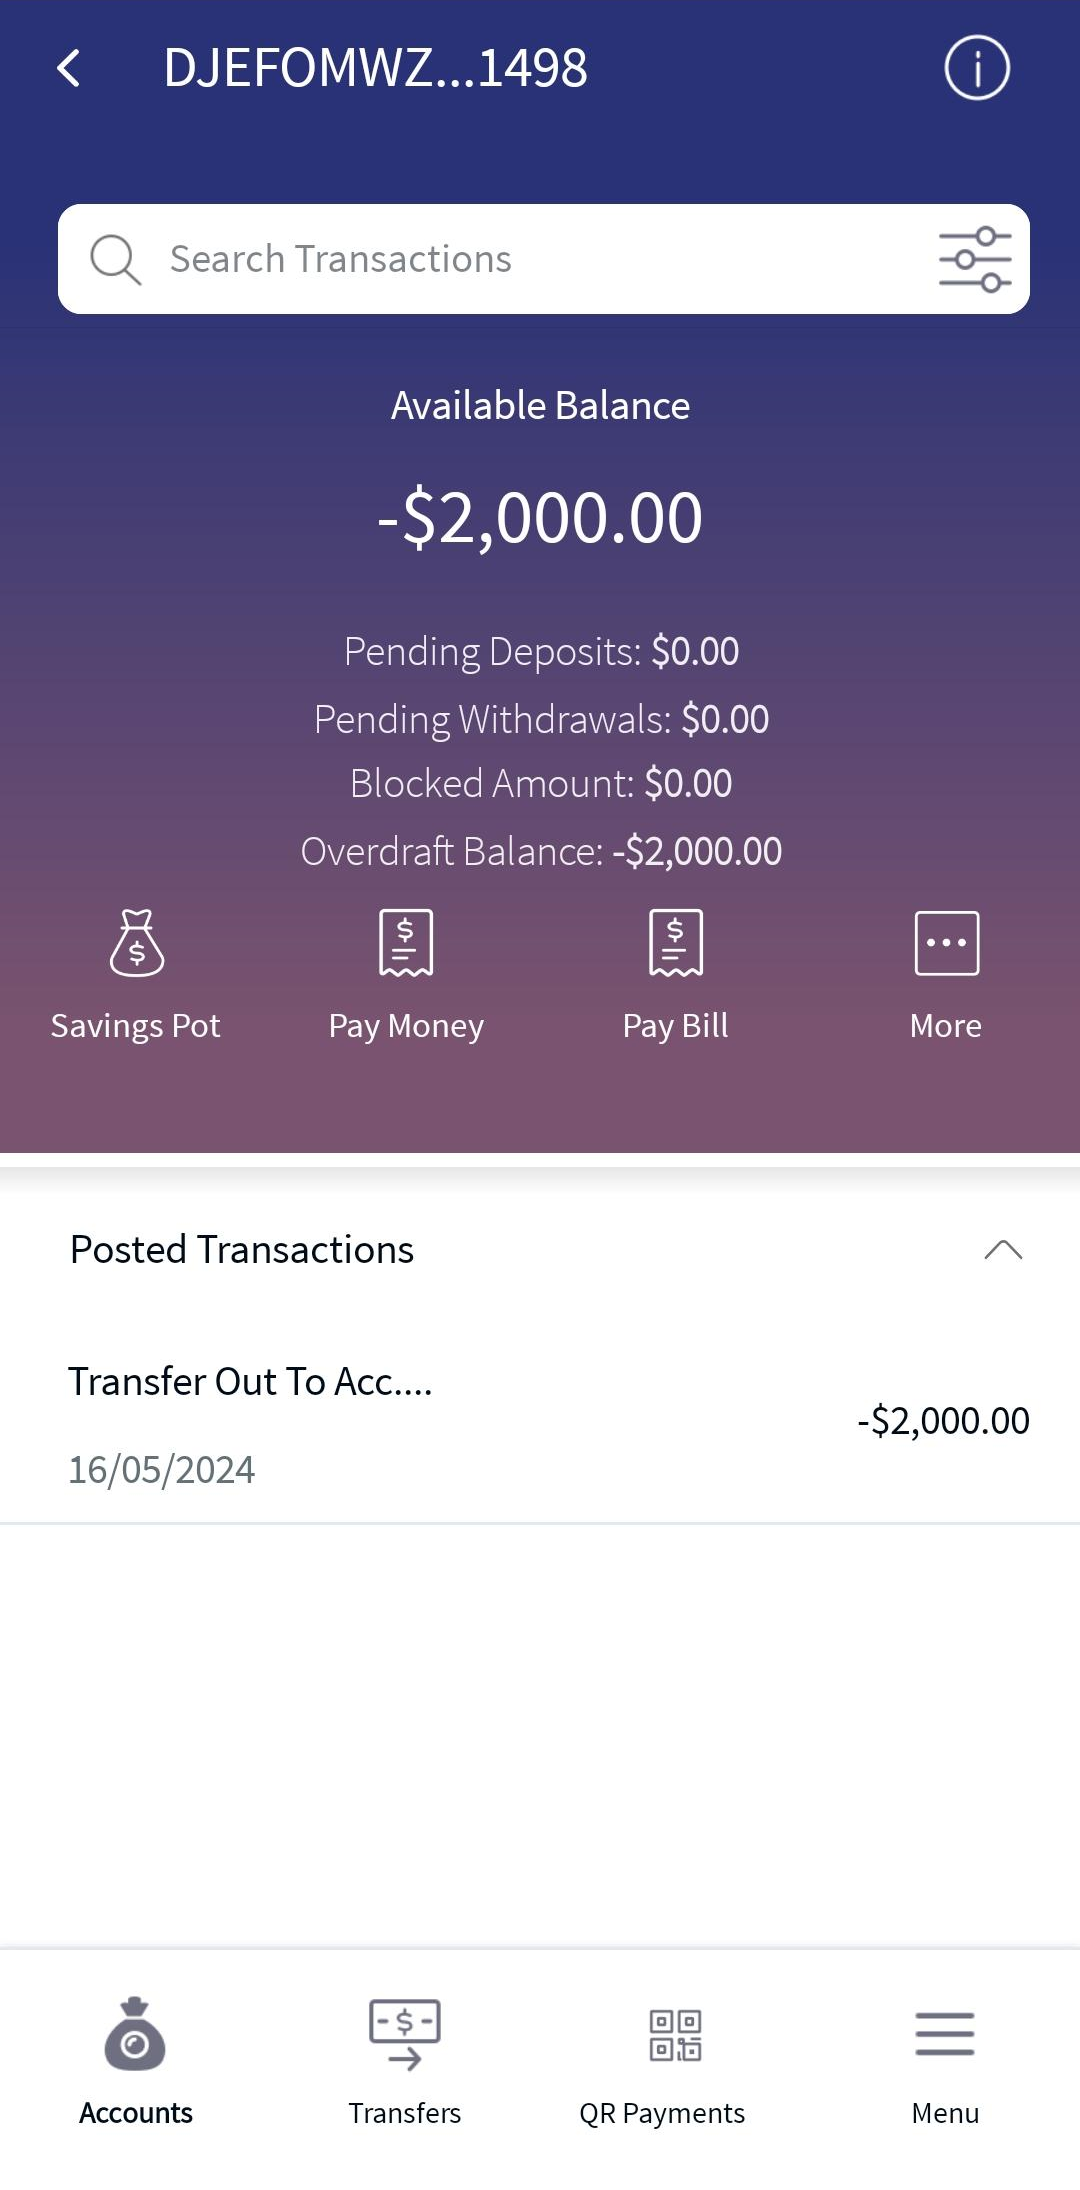
In the accounts dashboard screen, the user can see Current and Savings Accounts with Available Balance Amount. Click on any account to view the account details and get the required information. For more information see Account Summary.
Conventional Product (Savings and Current)
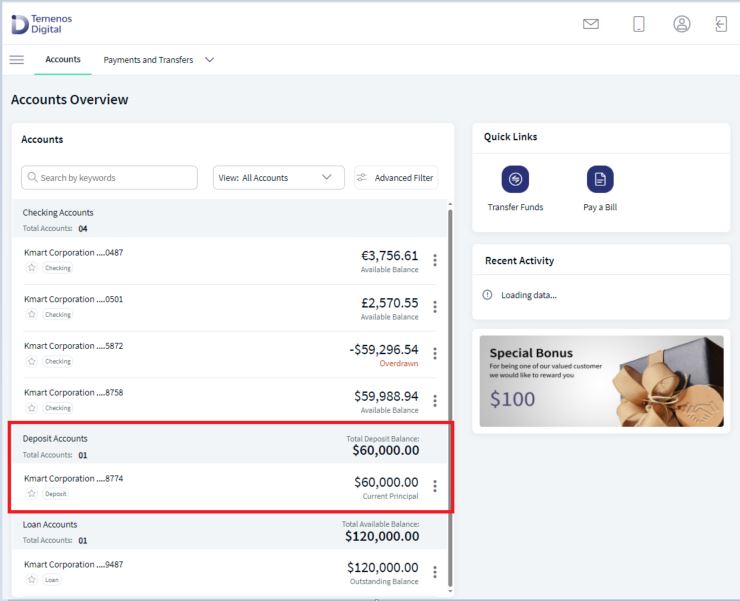
Conventional Product (Deposit)
In the accounts dashboard screen, the user can see Deposit Accounts with Total Deposit balance and Current Principal Amount. Click on any Deposit account to view the account details and get the required information. For more information see Account Summary.
Islamic Product (Savings and Current)
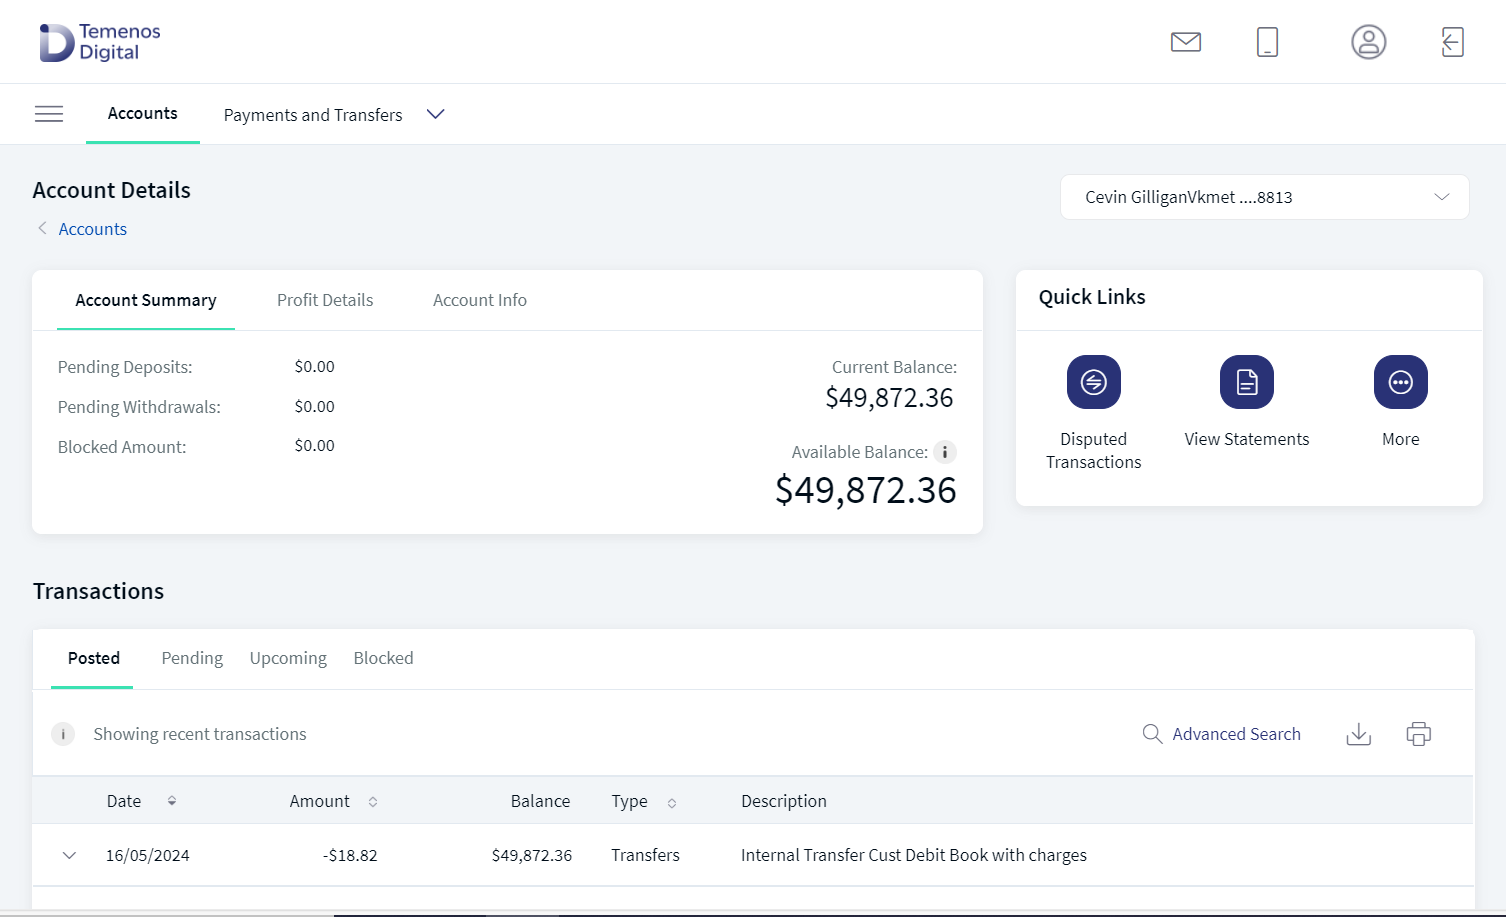
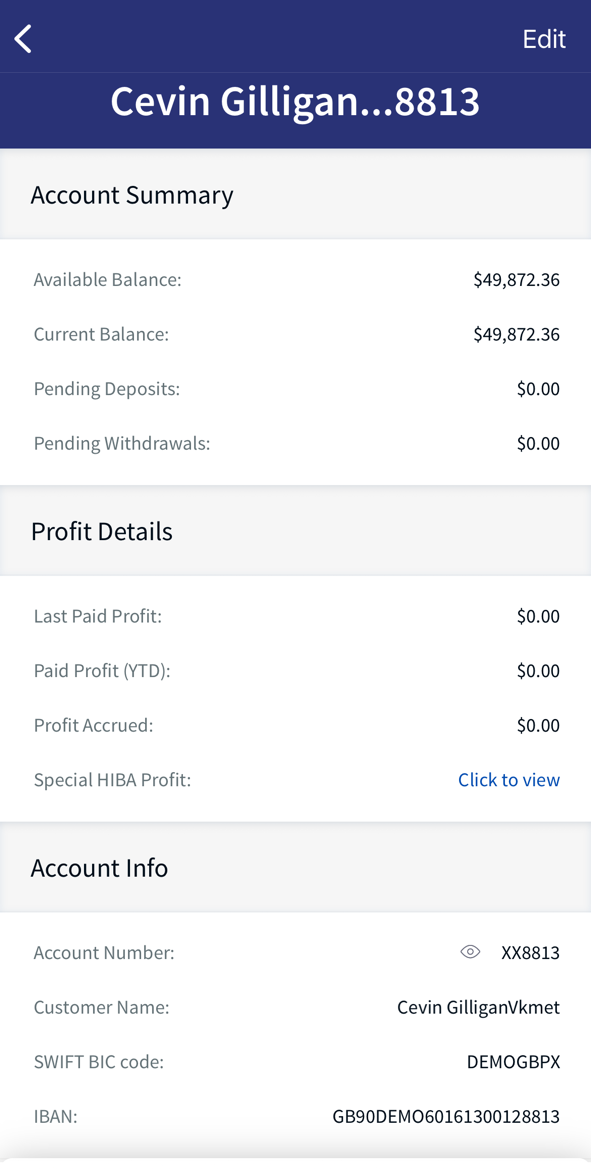
The application displays the details of the selected account, and you can do the following:
- View the account summary, interest details, and account info of the selected account.
- View recent pending, posted and blocked transaction details.
- Perform quick actions such as pay money, pay a bill and more.
The details of each account is shown as following:
A. Account summary tab
B. Installment Details (for Loan accounts)
C. Interest detail tab (Current, Checking, Savings, and Loans)
D. Profit Details tab (Islamic Banking Product- Current, Savings, and Deposits)
E. View account information (Current, Checking, Savings, and Loans)
Business Process Diagram - View and Manage Accounts and Transaction Details
Account Summary Tab
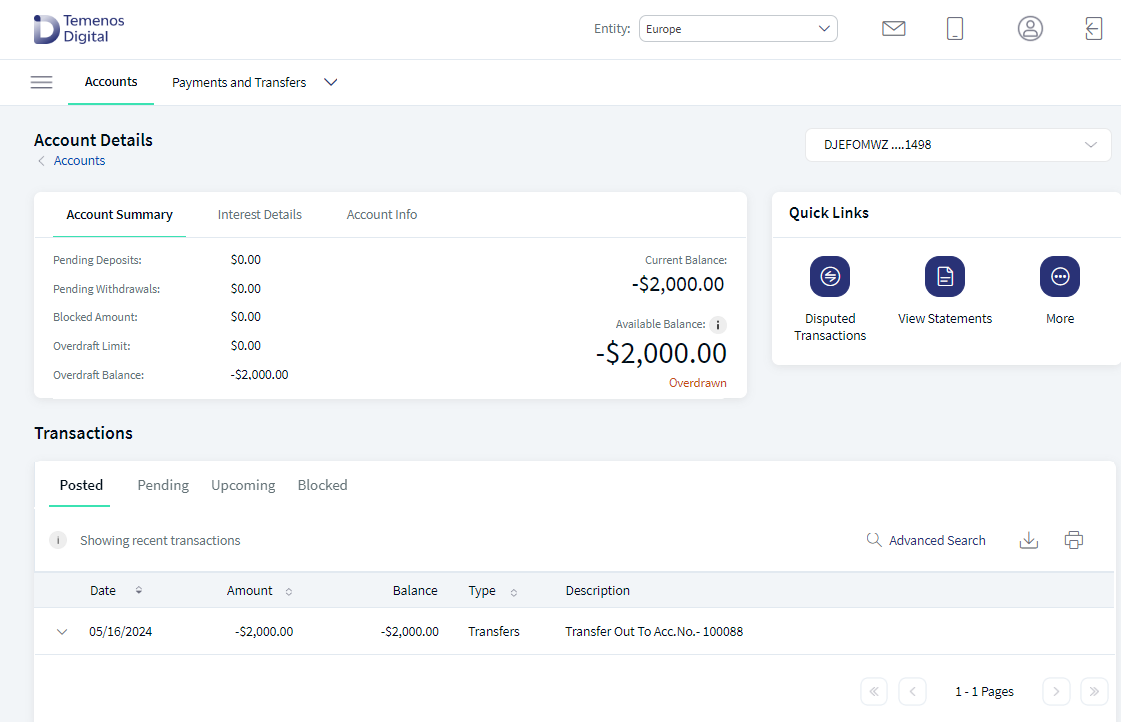
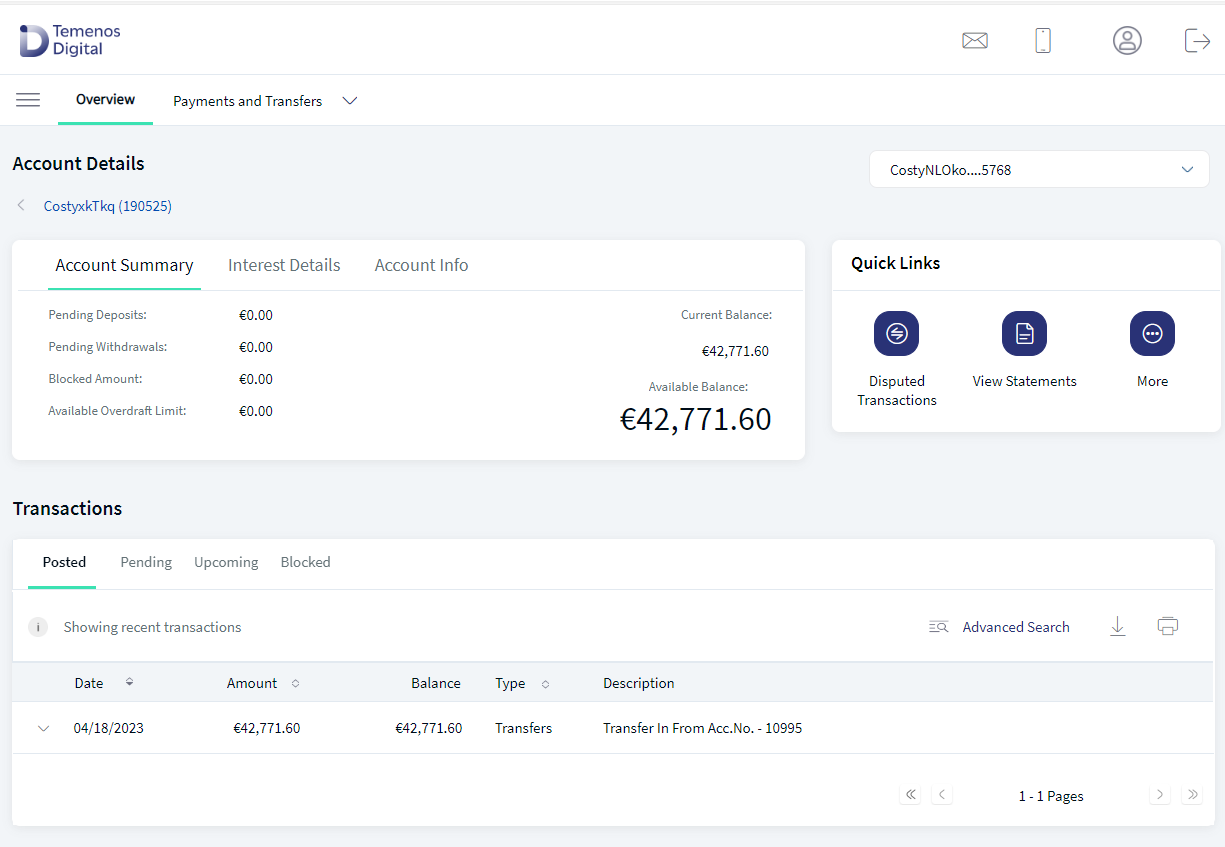
In the Account summary tab, user can see the account name with last four digits account number and few details such as:
- Pending Deposits
- Pending Withdrawals
- Blocked Amount
- Overdraft Limit
- Overdraft Balance
- Current Balance
- Available balance
If the available balance of an account is negative due to an overdraw, the application displays the overdraft limit and the expected overdraft balance. If the available balance is positive and the overdraft is linked to the account, the overdraft balance and overdraft limit are displayed accordingly. If the available balance is positive and the overdraft is not attached to the account, overdraft limit will display as zero and overdraft balance field will not be displayed.
This feature is integrated with Transact using IRIS APIs and also with Holdings Microservices to pull and display the details of a selected account (includes Savings, Checking, Loans, and Deposits) to which the authorized user has access.
The Account summary tab displays the following details.
 View Details
| Account Type | Summary Details |
|---|---|
| Savings |
|
| Islamic Savings |
|
| Islamic Checkings |
|
| Islamic Deposits |
|
| Checking |
|
| Credit Card |
|
| Loan/Mortgage |
|
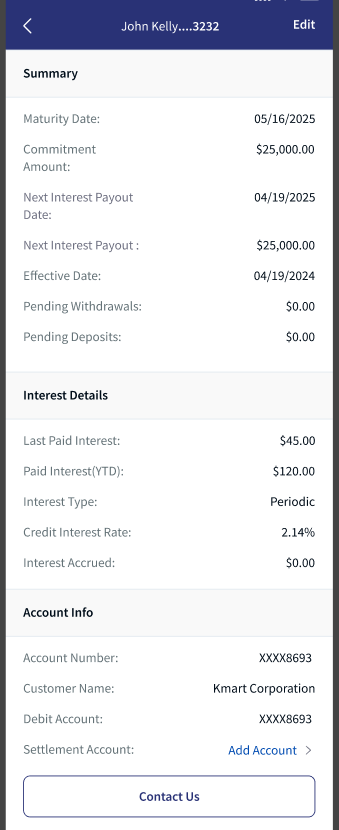
| Deposit |
|
Installment Detail (for Loan Accounts)
This section is applicable only for loan account.
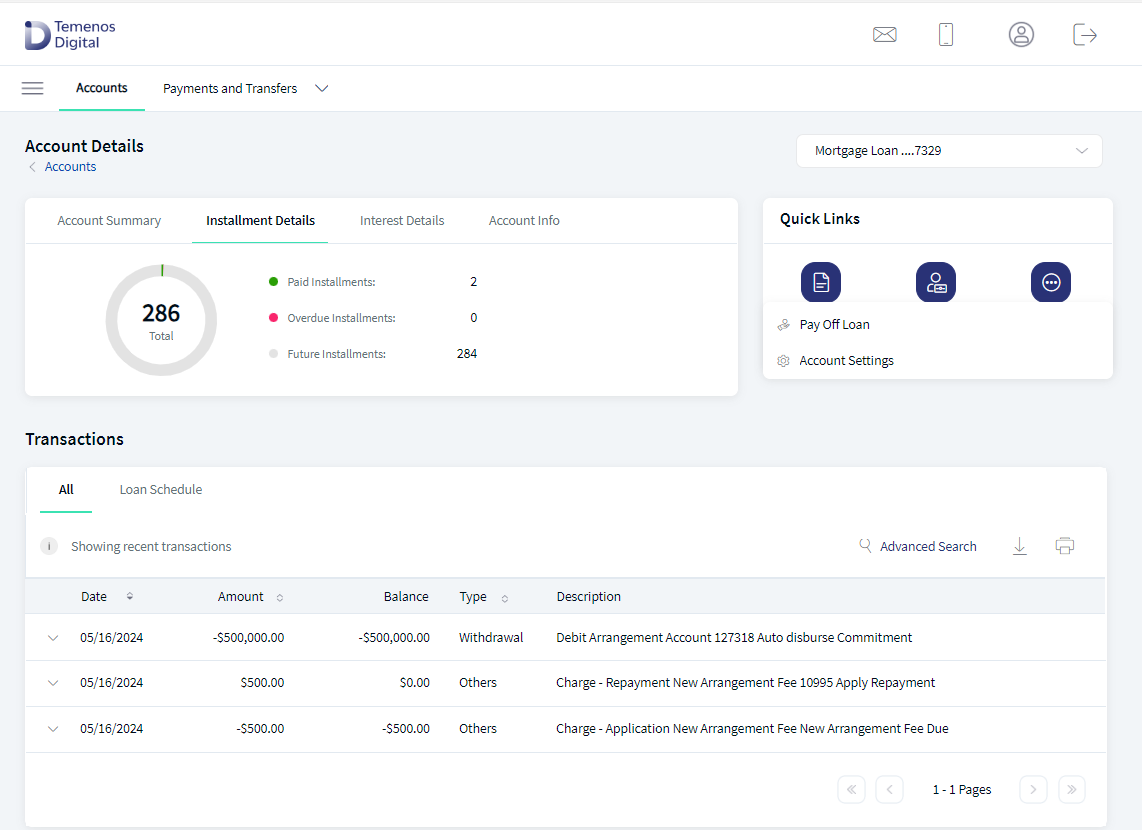
You can view the summary of paid installments, overdue installments, and the installments you must pay in the future on your loan account.
This tab displays the following details:
- The total summary of all the installments (paid, overdue, and future) is represented in the form of a pie chart with the count.
- Each type of installment is represented in a different color.
For example, if Charles has an active loan account of total 240 installments out of which 37 are paid, 03 overdue, and 200 for the future. The pie chart is represented in three colors with each color representing the type of installment.
Installment Type Color code Paid Green Overdue Pink Future White
Interest Detail Tab
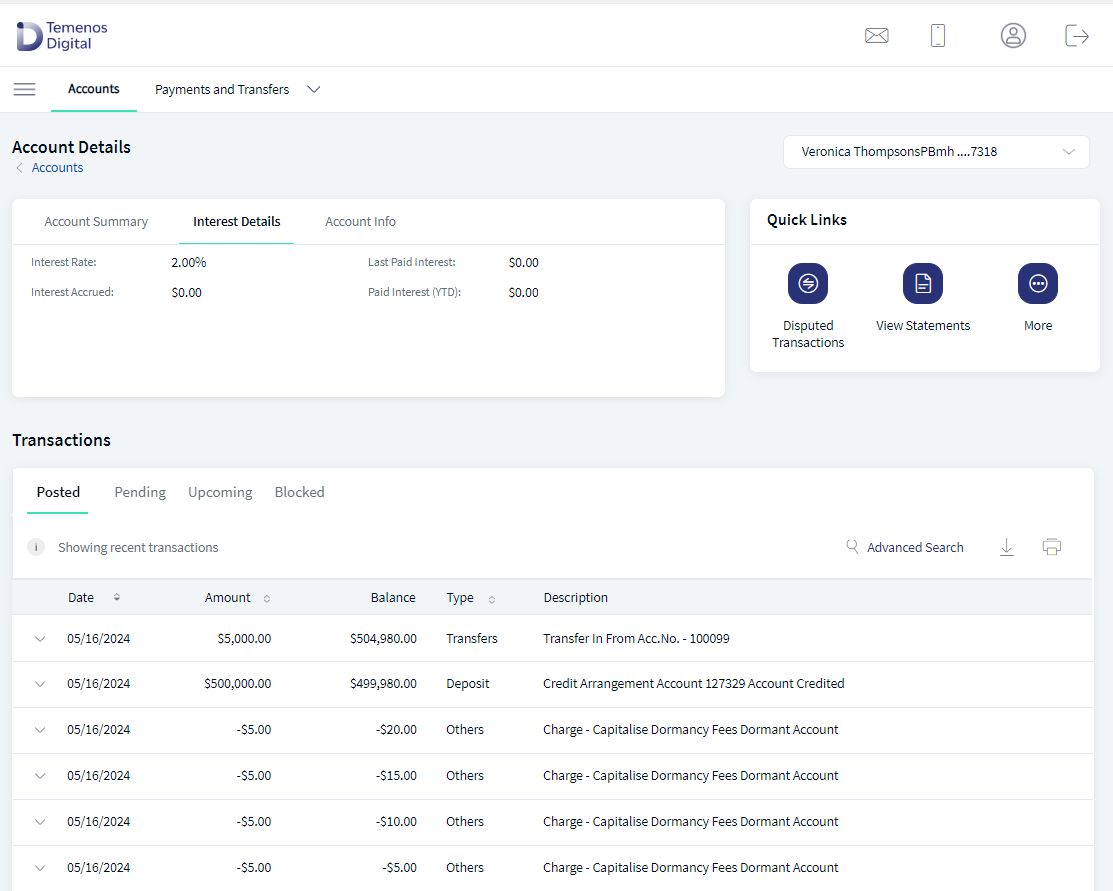
In the interest details tab, user can view the account balance and interest details with the following details.
- Interest Rate
- Interest Accrued
- Last paid interest
- Paid Interest (YTD)
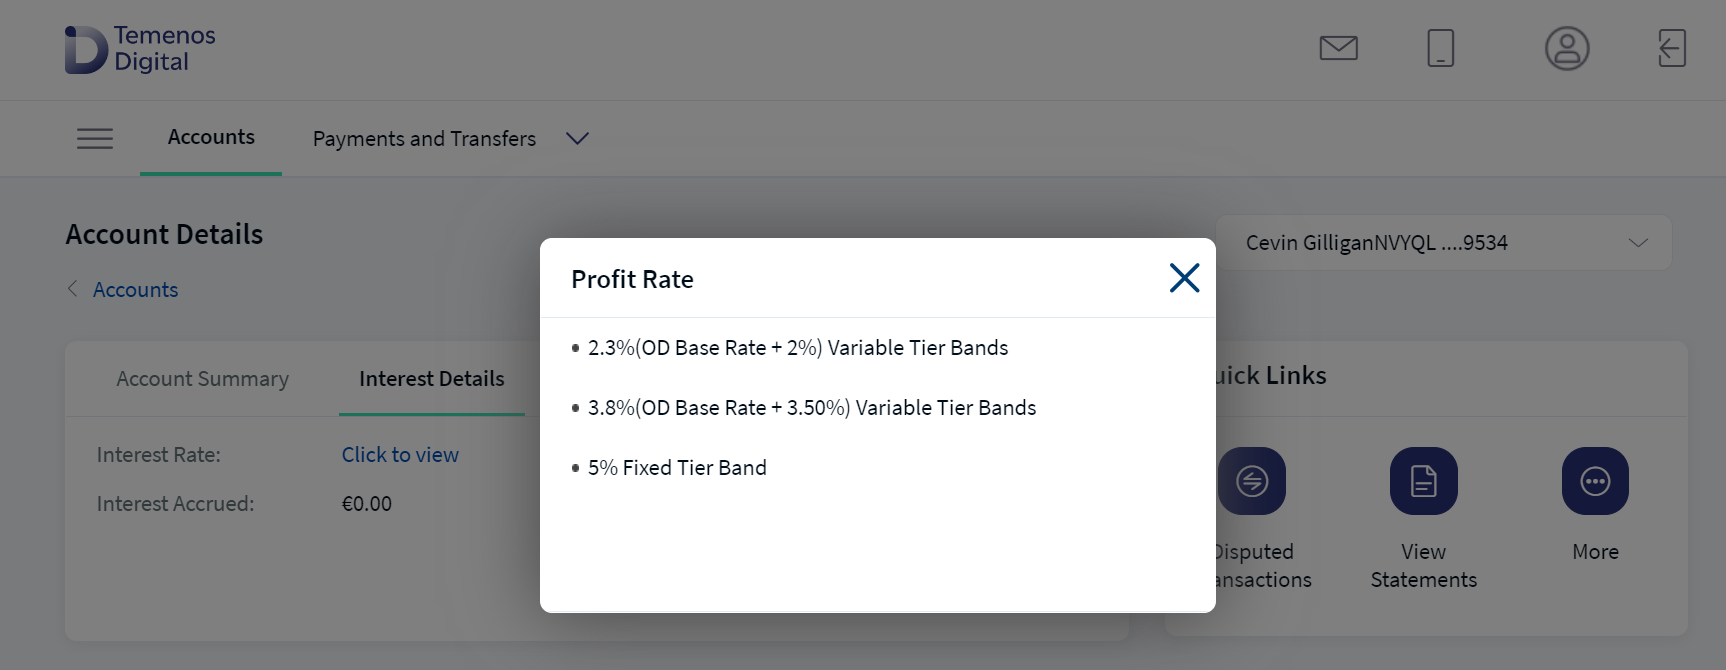
The Online banking and Mobile banking is enhanced to show the interest rates in a tiered or slabwise.
The Interest details tab displays the following details.
View Details
| Account Type | Balance and Interest Details |
|---|---|
|
Savings and Checking |
|
|
Credit Card |
|
|
Loan/Mortgage |
|
|
Deposits, IRA, Certificate Share/Deposits |
|
Profit Detail Tab (Islamic Product)
This tab is applicable only for Islamic savings, current and deposits accounts. In the profit details tab, user can see the following details:
- Special HIBA Profit
- Profit Rate
- Profit Accrued
- Last Paid Profit
- Paid Profit (YTD)
The Online banking and Mobile banking is enhanced to show the profit rates in a tiered or slabwise.
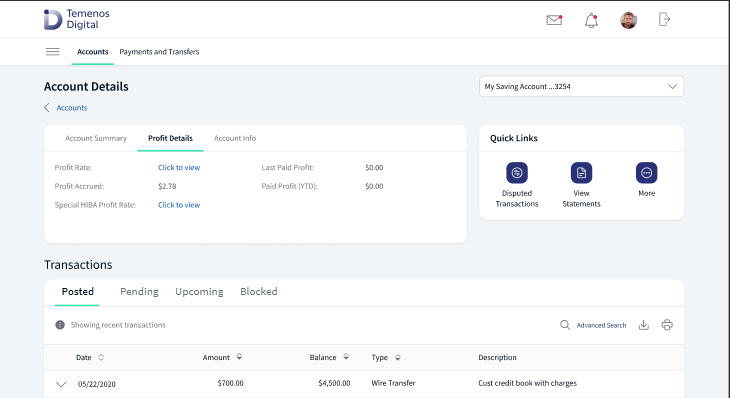
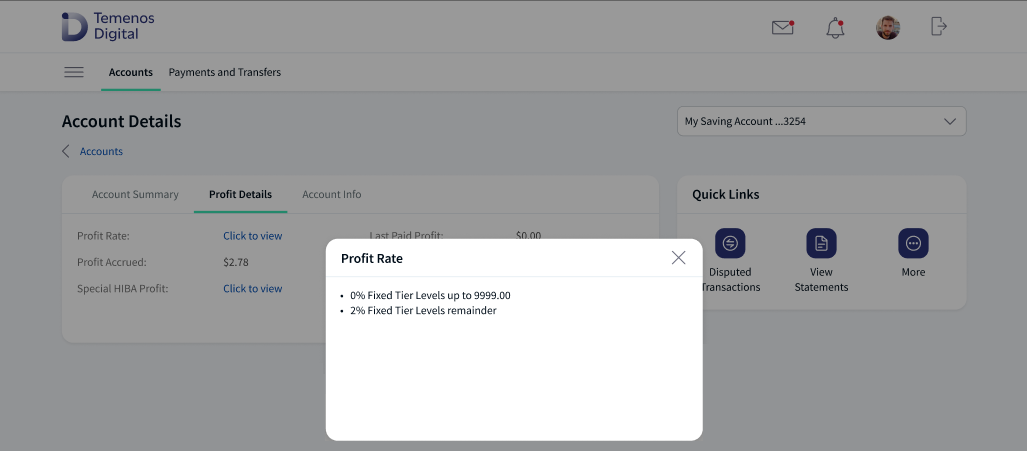
The Profit details tab displays the following details.
View Details
| Account Type | Summary Details |
|---|---|
| Savings/Checking |
|
| Deposits |
|
View Account Information
If the account is associated with a business CIF which is business/corporate, the company name is displayed. If the account is associated with a CIF which is retail/personal, the Primary Account Holder name is displayed.
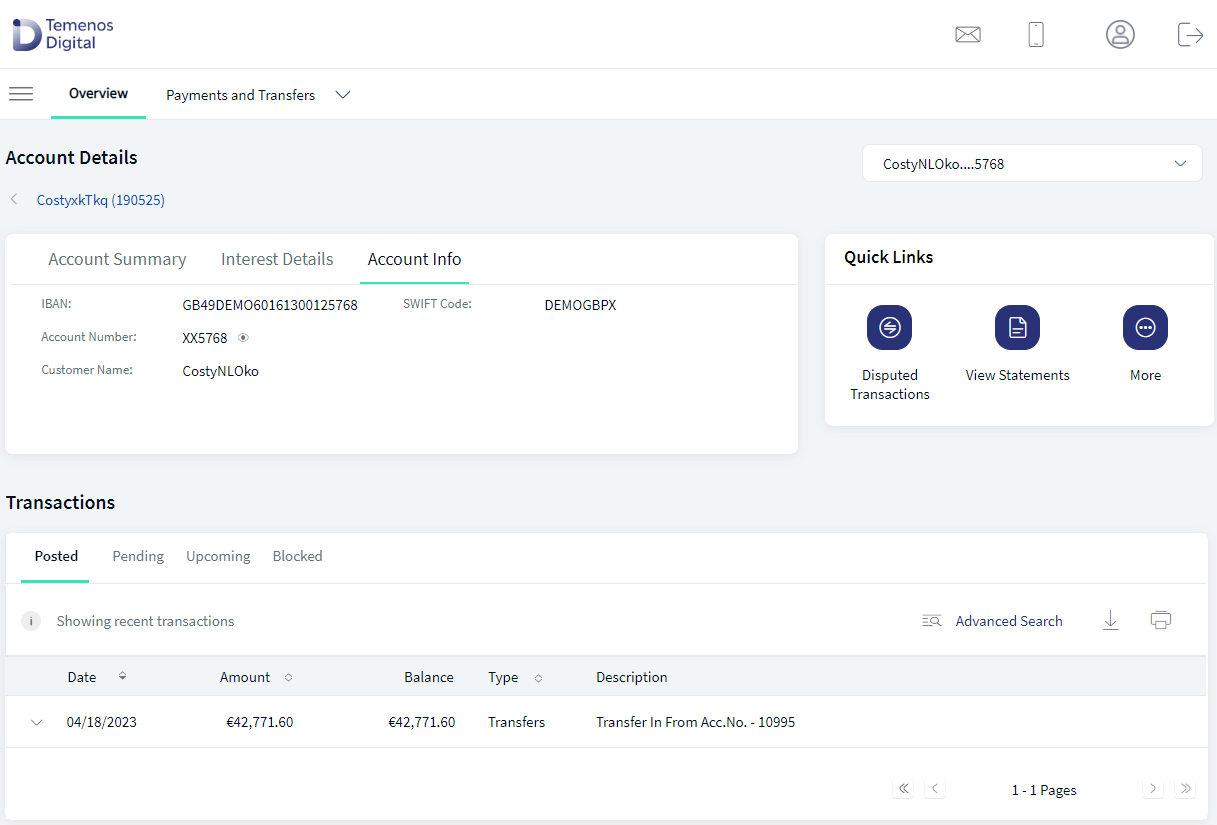
The fields vary depending on the account type:
View Details
| Account Type | Summary Details |
|---|---|
| Savings/Checking |
|
| Credit Card |
|
| Loan/Mortgage |
|
| Deposits, IRA, Certificate Share/Deposits |
|
Settlement Account (Deposits Account Info)
The user have an option to add a settlement account for the selected deposit account.
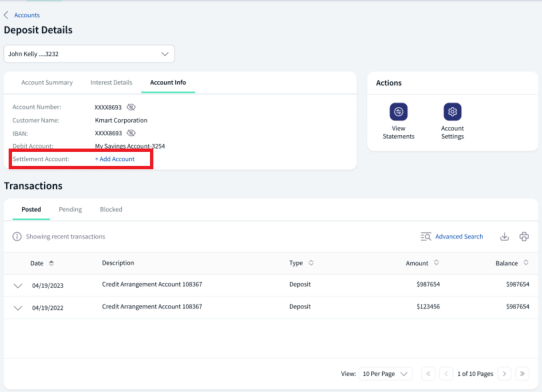
Add Settlement Account
To add the settlement account do the following:
- Click on +Add account to add the account.
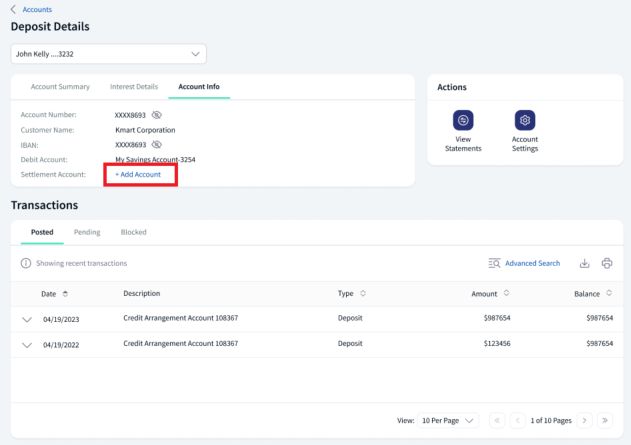
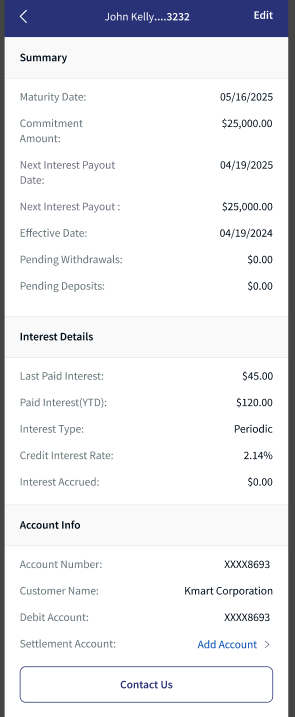
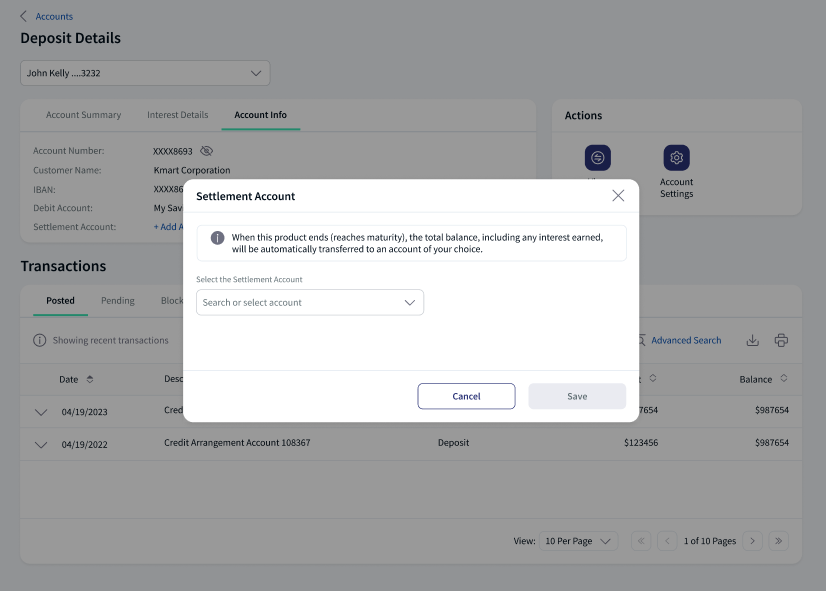
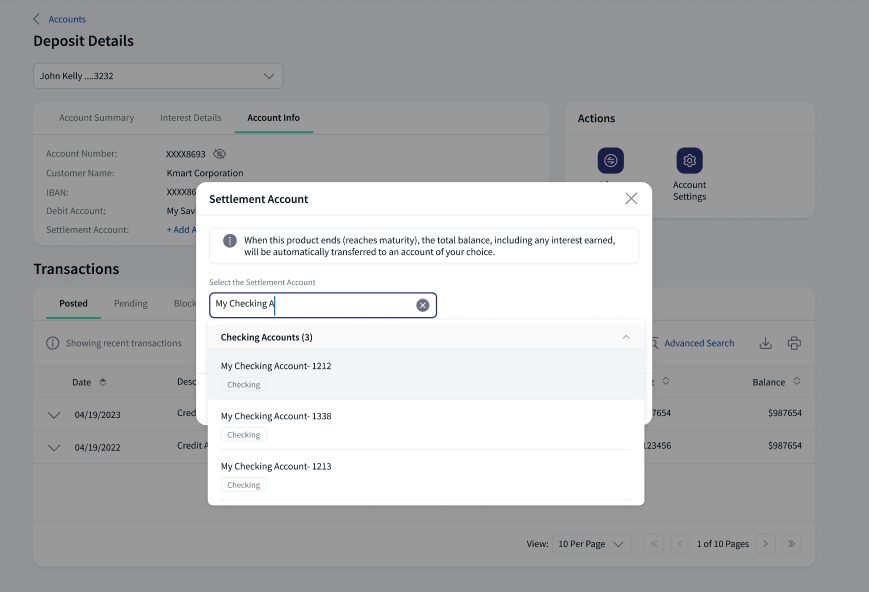
- If the user click on +Add account, the application displays a pop-up screen with a Select a Settlement Account dropdown or list, Cancel and Save option.
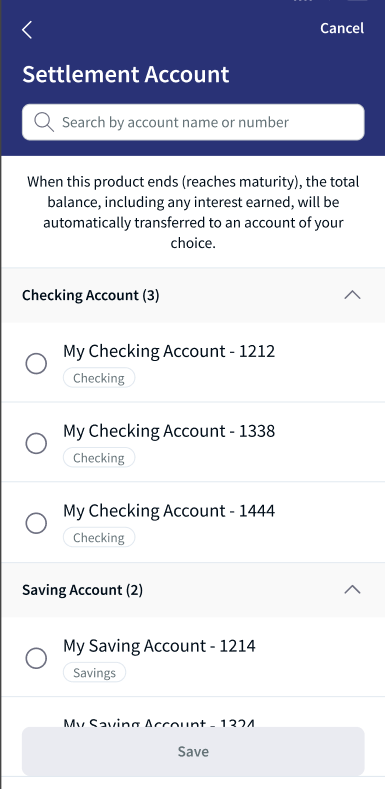
- User can search and select the account from the drop down or list.
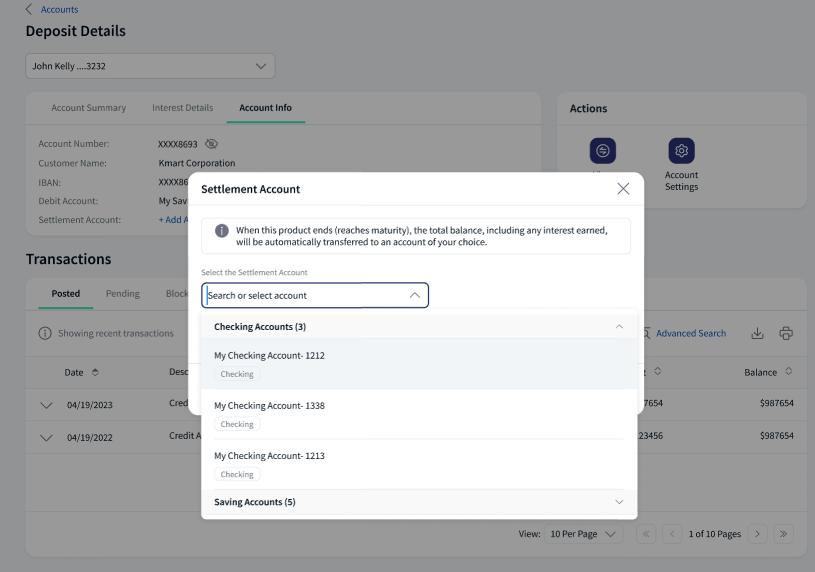
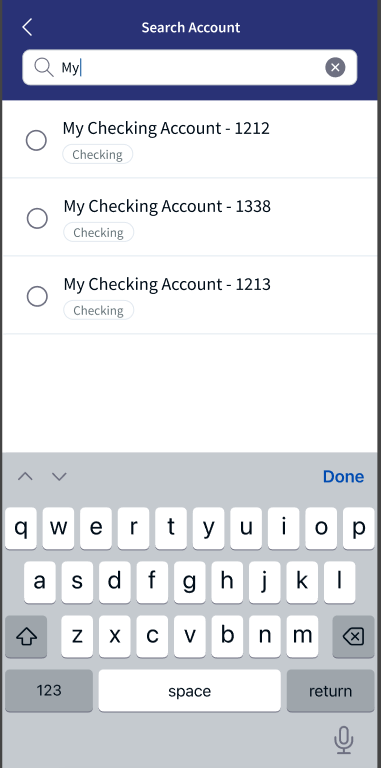
- User with a single contract will have all savings and checking accounts displayed in the list.
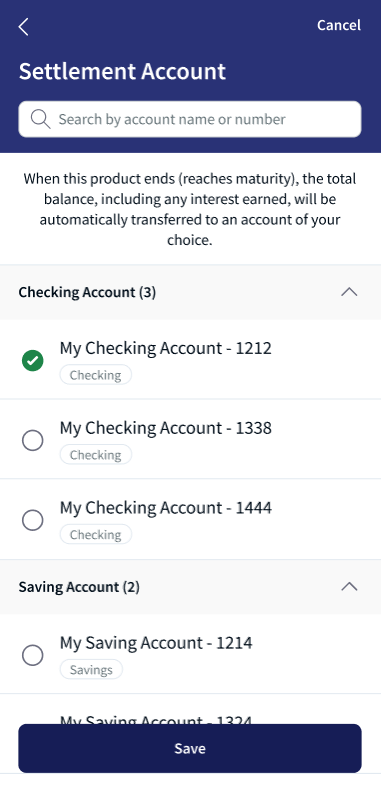
- User with multiple contracts will have account listed below the header of contract name.
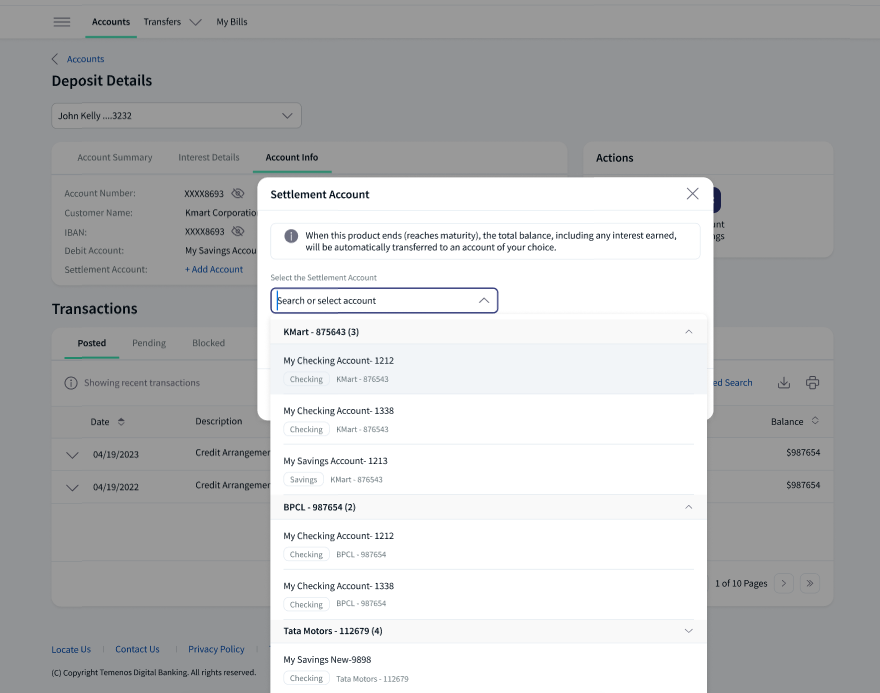
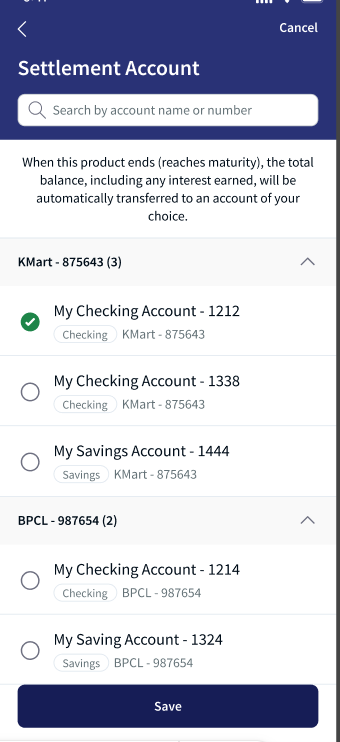
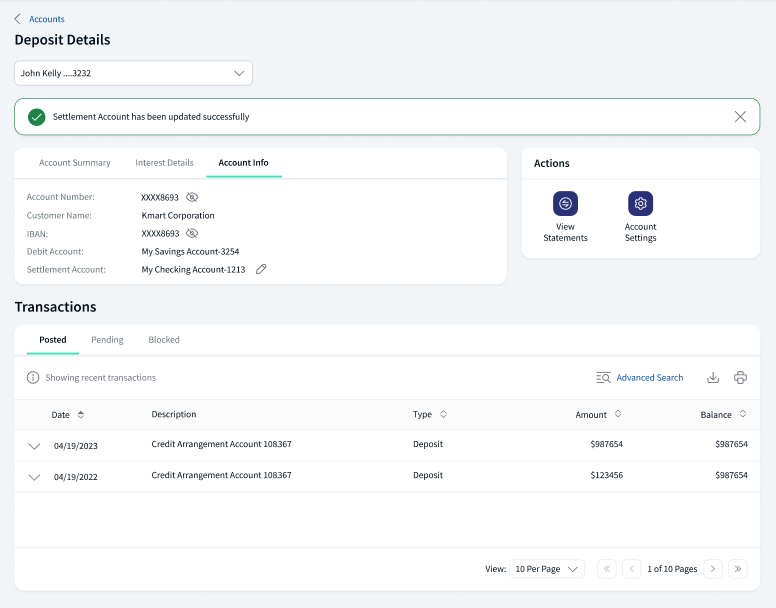
- After selecting the account, click Save button, you can see a message Settlement Account has been updated Successfully.
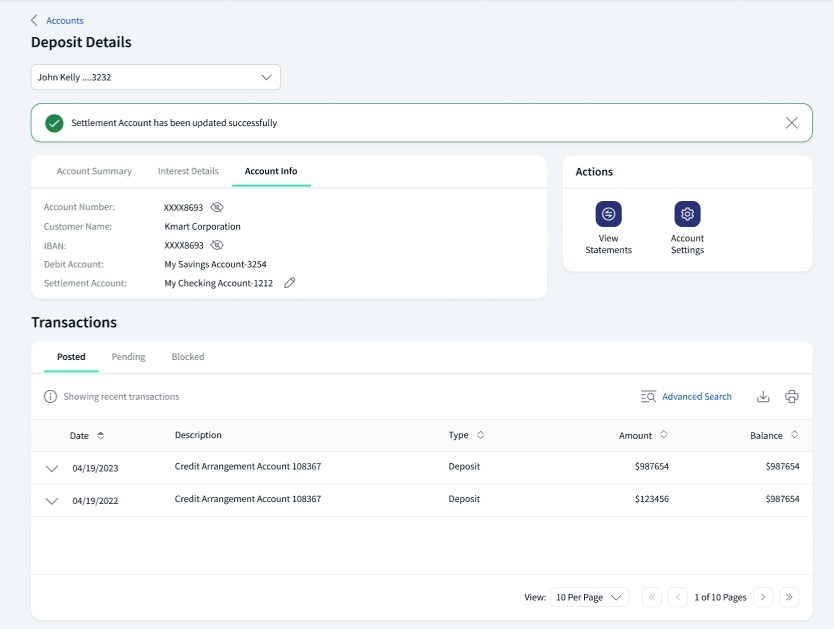
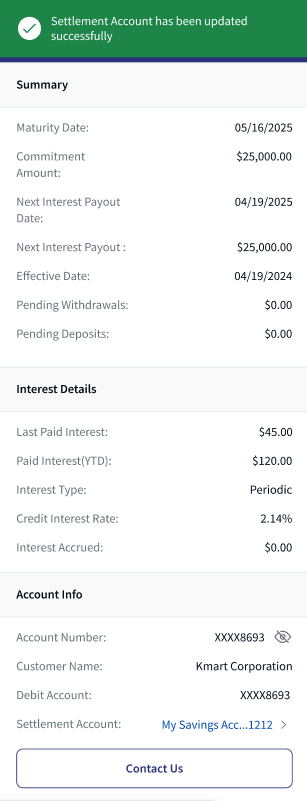
- Users can see the account details in settlement account field.
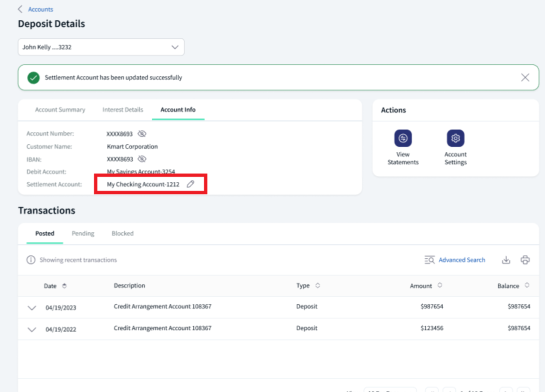
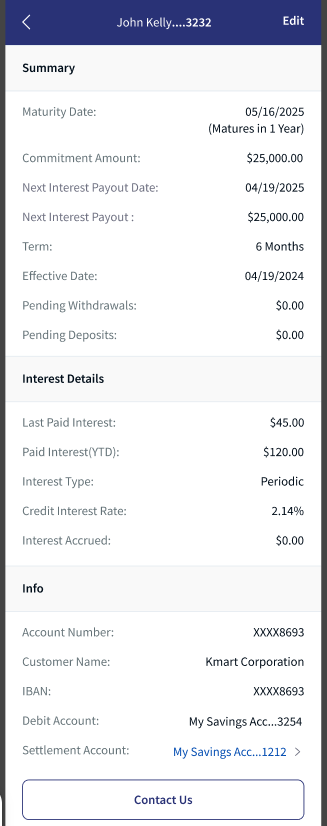
User can view only Savings and Checking accounts.
Cancel: If the user click cancel button user will navigate to deposit details screen.
Save: If the user click save button the selected settlement account will get updated.
Edit Settlement Account
User have an option to edit the account. To change the account number do the following:
- After the account is added, you have an edit option to change the account.
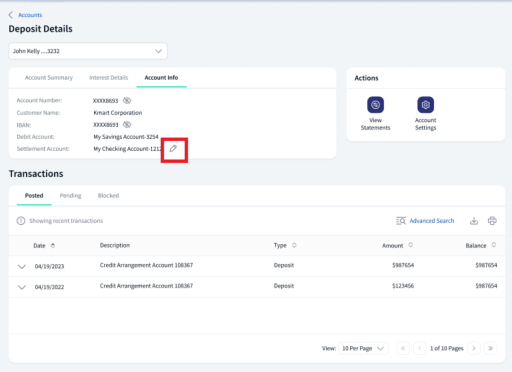
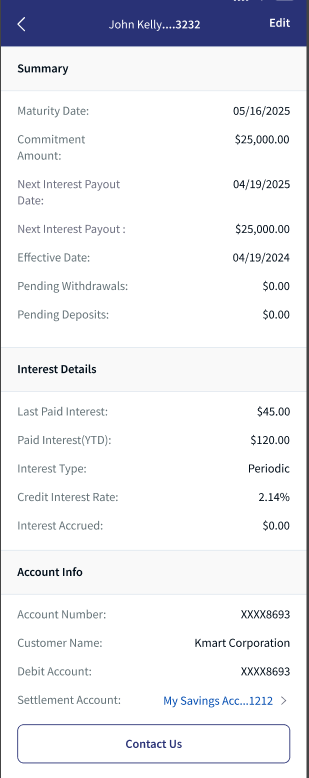
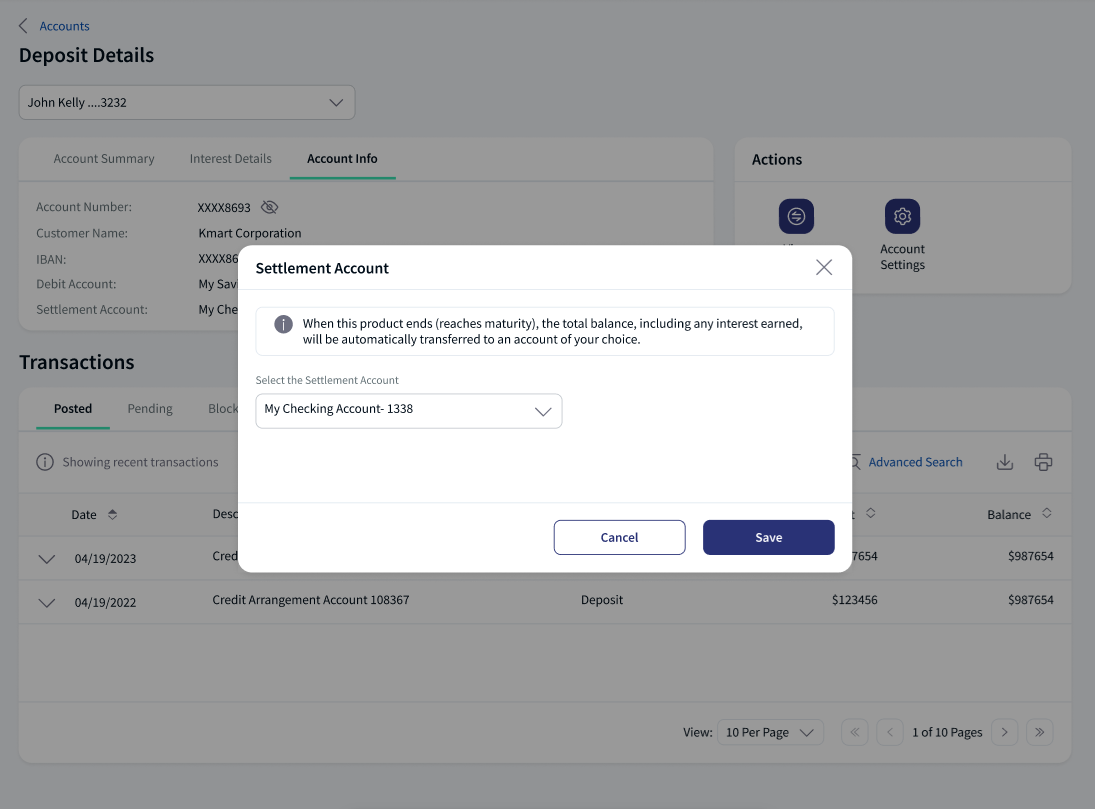
- Click edit button the application displays a Settlement Account pop-up screen with the dropdown option, Cancel and Save options.
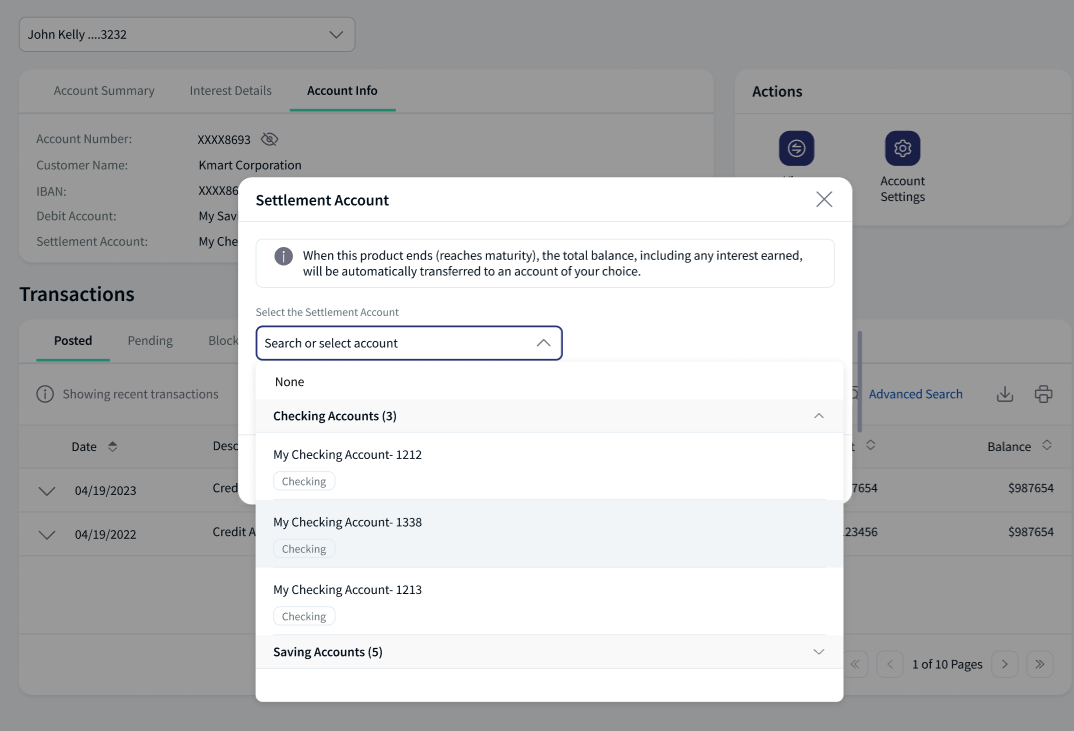
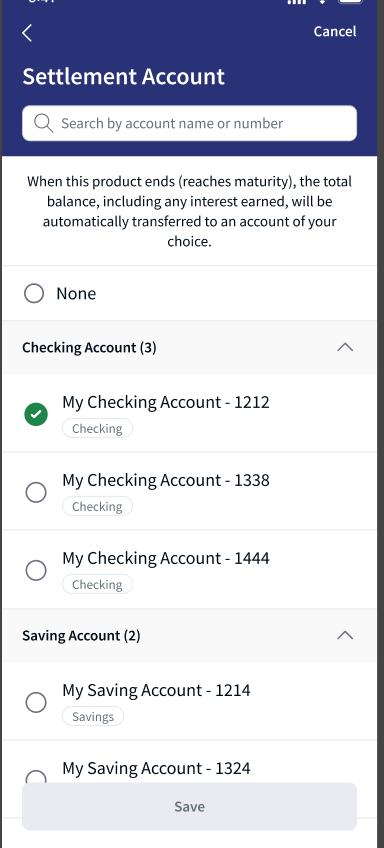
- User can update the account to the settlement account field and click Cancel or Save.
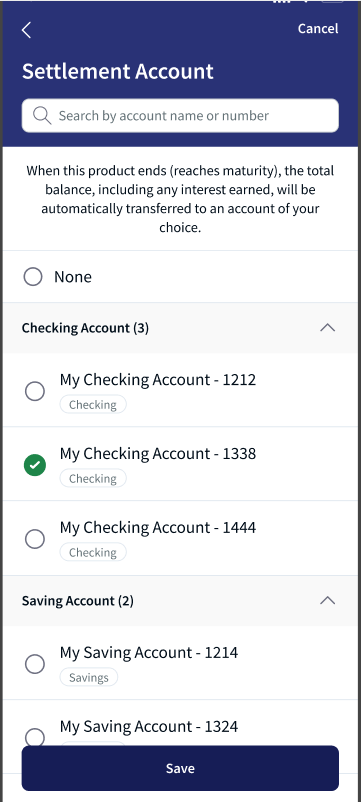
- After account is updated, the user will see a success message.
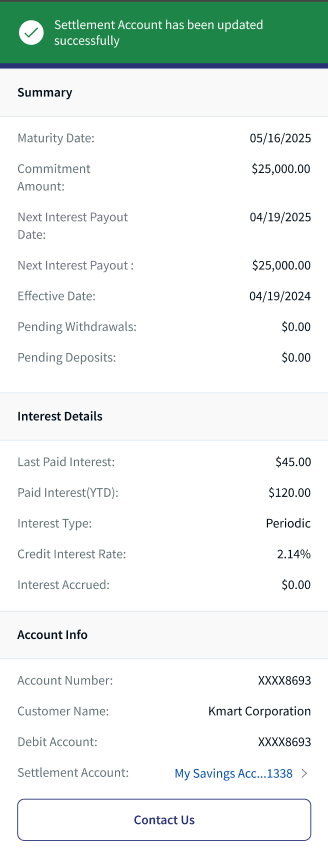
Remove Account
User have an option to remove the account. To remove the account number do the following:
- After the account is added, you have an option to remove the account from the Settlement Account field.
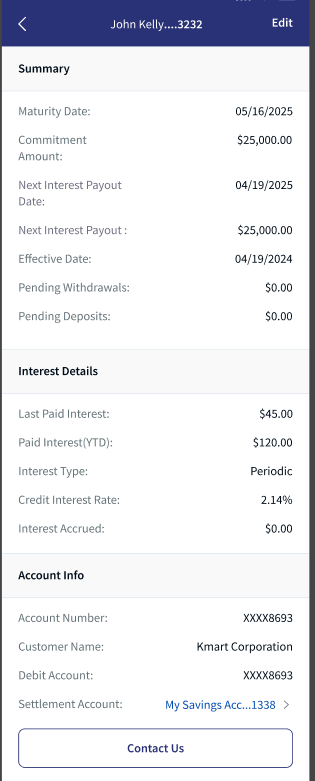
- Click edit button the application displays a Settlement Account pop-up screen with the drop down or list, Cancel and Save options.
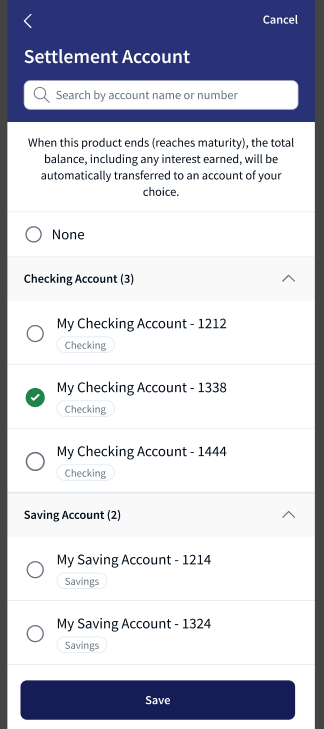
- Select the None option from the dropdown and click Save.
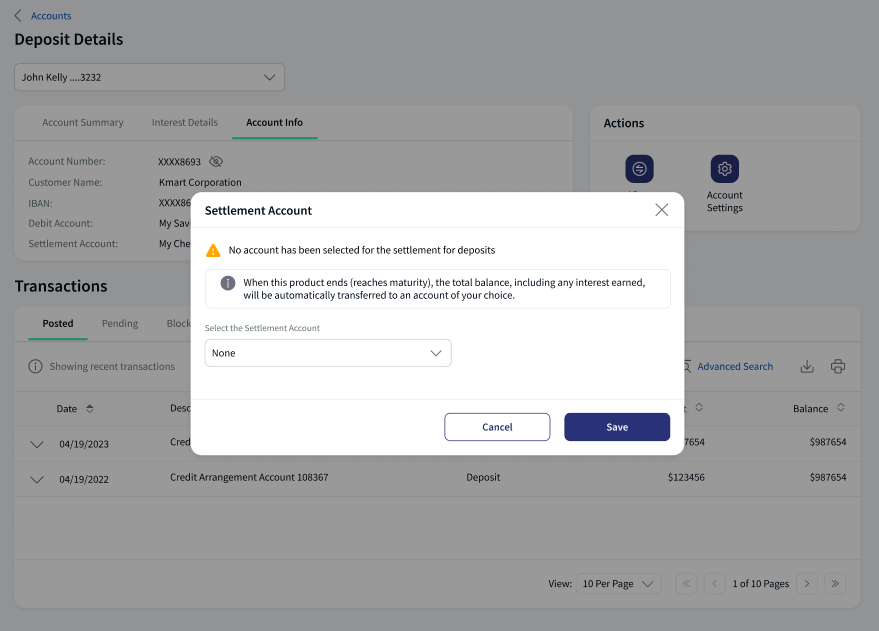
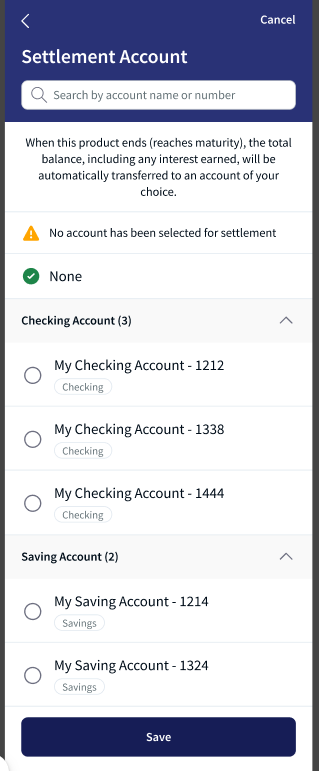
- If the user click save button, the application displays a success message.
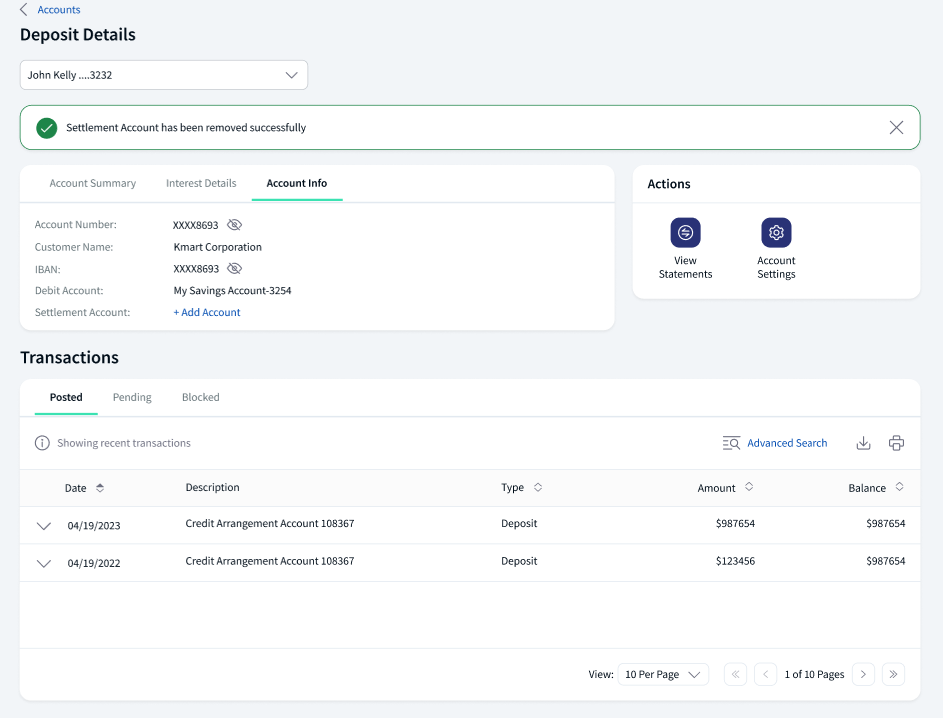
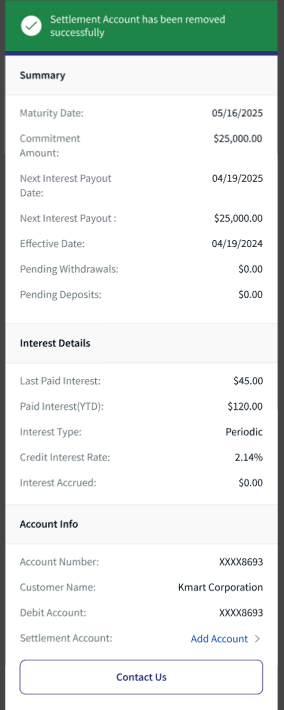
- After removing the account, the user can see add account option in Settlement Account field.
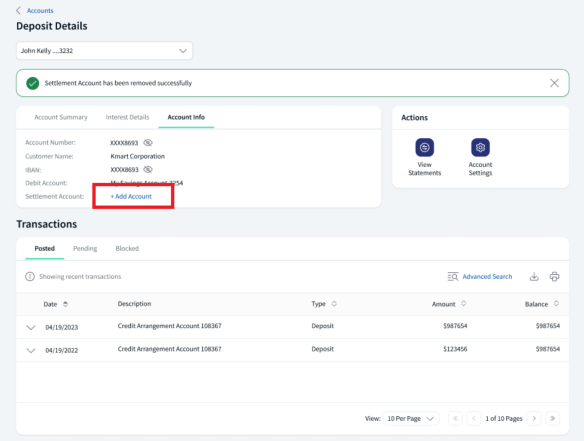
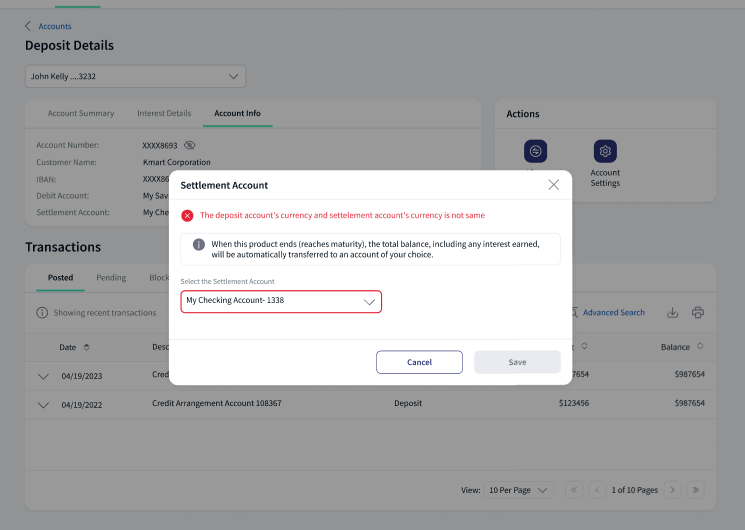
If the user is selecting None option from the dropdown, the application displays a warning message.
Error Messages
The following are the error scenarios that may occur when the user is facing issues with the application:
- When the user have API connection issues with core banking system or from the Transact.
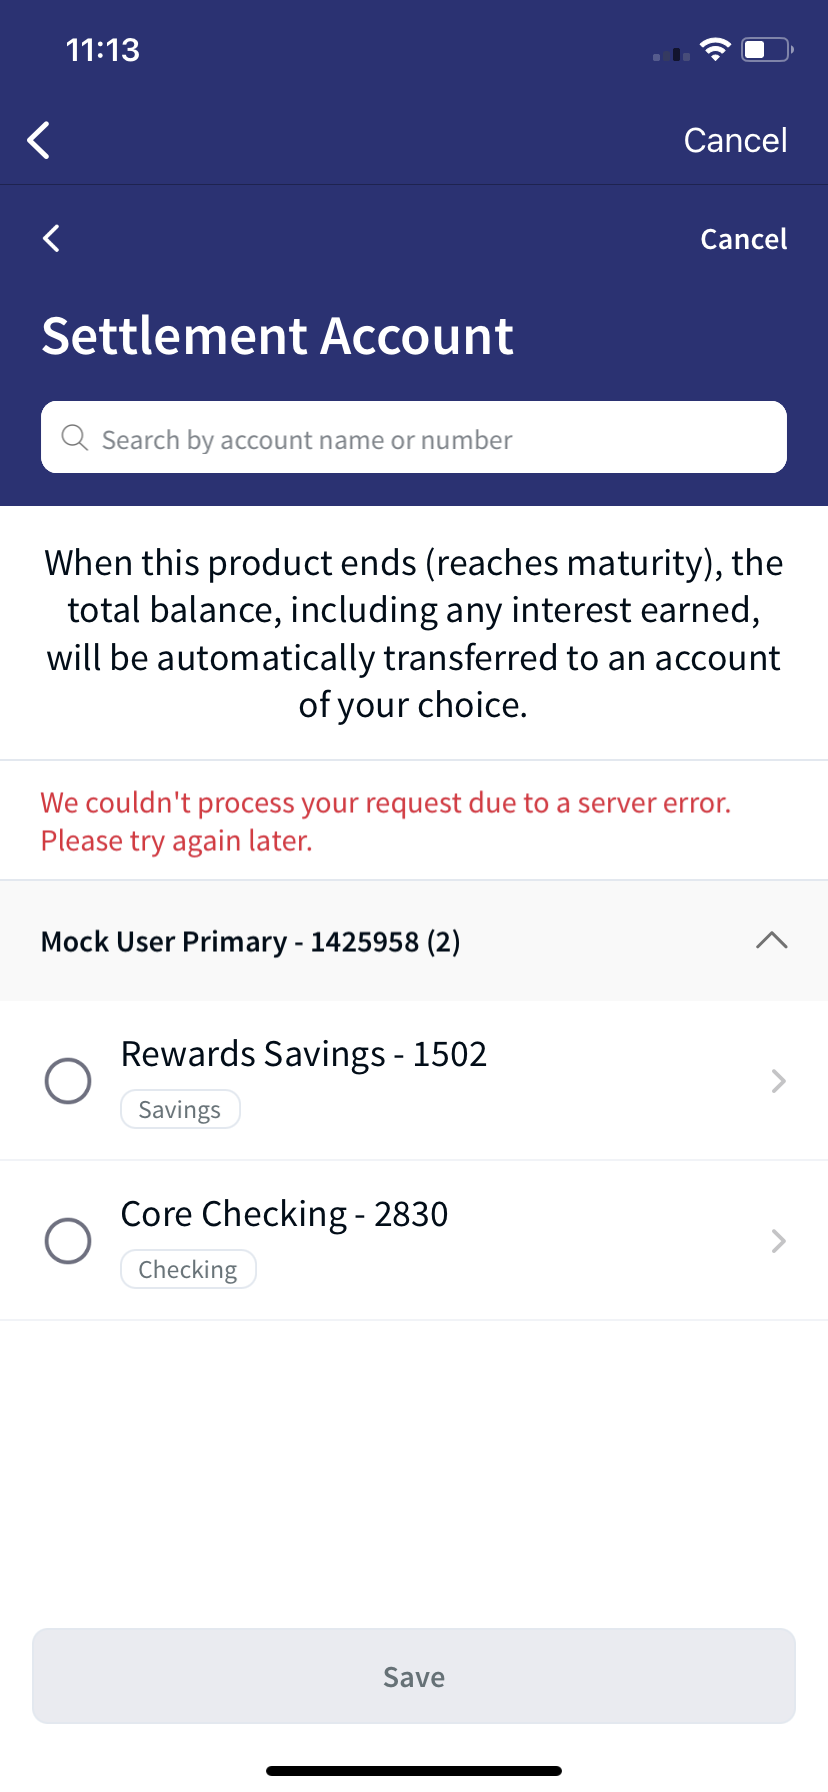
- When the user does not have Savings or Checking accounts.
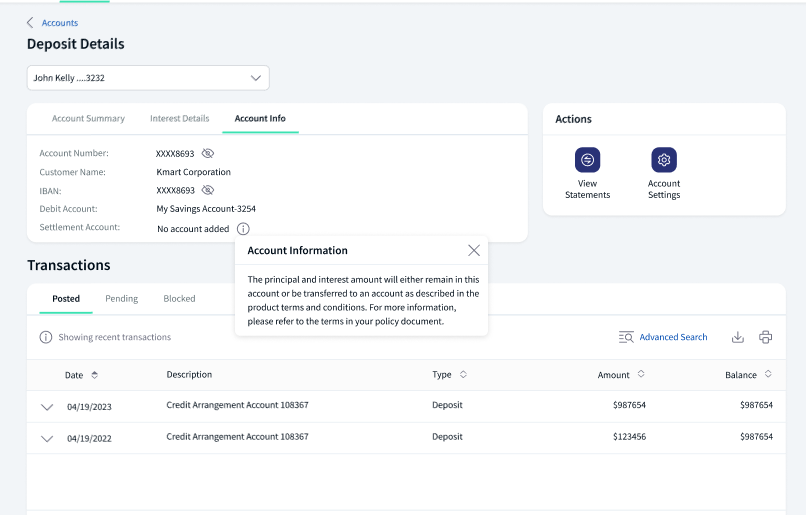
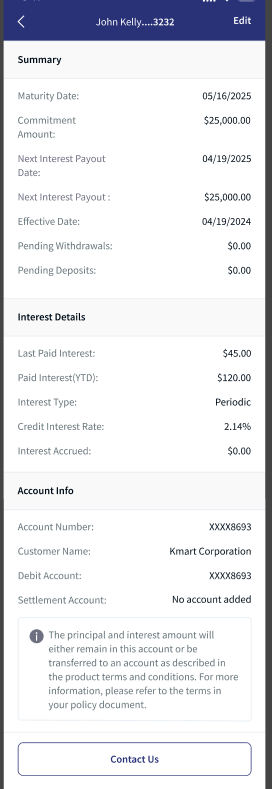
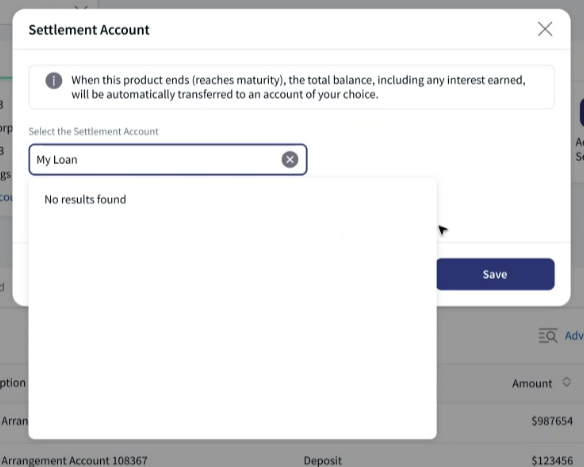
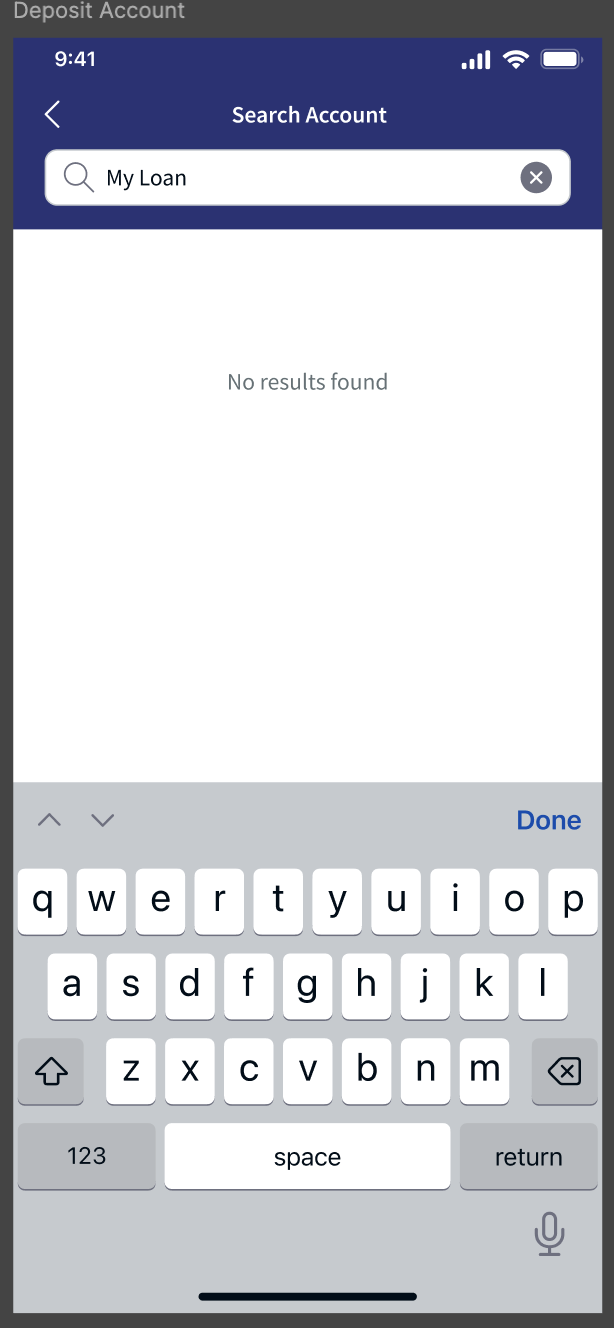
- When the user is searching with a different account number (example: loan account).
- When the user is selecting the option None from the dropdown or list.
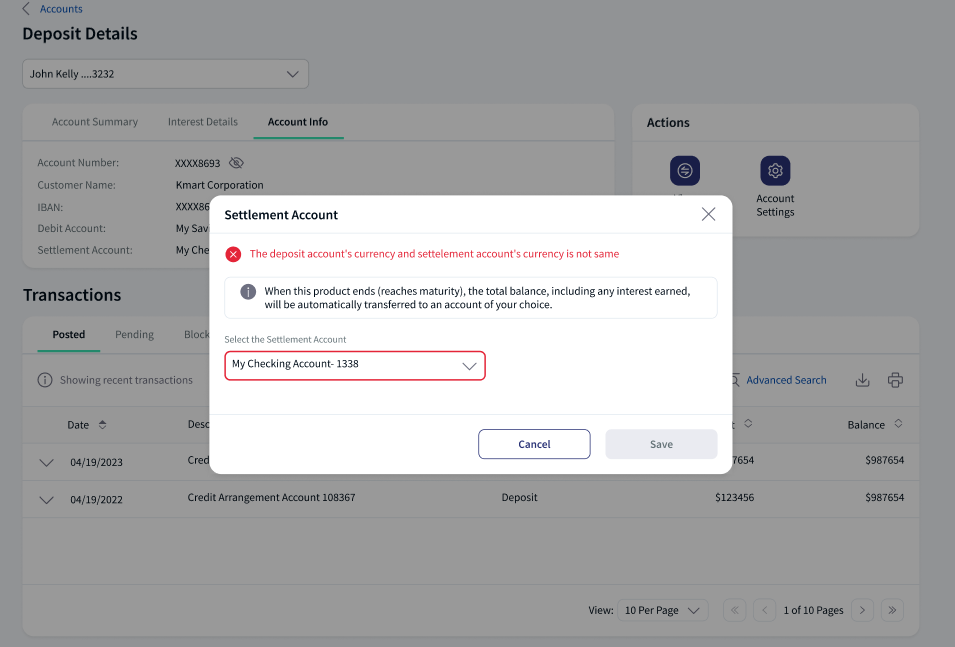
- When the deposit account currency and settlement account currency is not same.
- If the user does not have permissions to edit the account in settlement account, the bank user can enable the configurations in Spotlight. For more information, see Spotlight configurations.
The user will receive the alerts on creating, updating or removing of account in settlement account. The user can receive the alerts via Email, Notification Center, and SMS/Text. For more information see Alert Management.
The audit logs are captured when the user is creating, updating or removing of a settlement account. For more information see Audit logs in Spotlight.
Transaction Details
Posted and Pending Tabs
The users can see an icon with showing recent transactions. This displays the list of posted and pending transactions linked with the account, grouped by the transaction type ( date, description, type, transaction amount, and account balance details, reference number and actions). The list is sorted by date (most recent transaction on top) by default. User have an option to sort the date and amount fields. If the user has no transactions, a "No transactions found" message is displayed. The date format shown in the Account details screen can be configured in the Fabric app based on which the format can be changed between DD/MM/YYYY and MM/DD/YYYY.
Pending transactions are integrated with Transact using IRIS APIs for selected account to which the authorized user has access.
The number of transactions and list of transactions per page are maintained as a configuration and fetched from the backend system in the Spotlight. For more details, see Spotlight System Configuration.
The tabs change based on the selected account type.
View Details
| Account Type | Transaction Details |
|---|---|
| Savings |
|
| Checking |
|
| Credit Card |
|
| Loan/Mortgage |
|
| Deposits, IRA, Certificate Share/Deposits |
|
Upcoming Tab
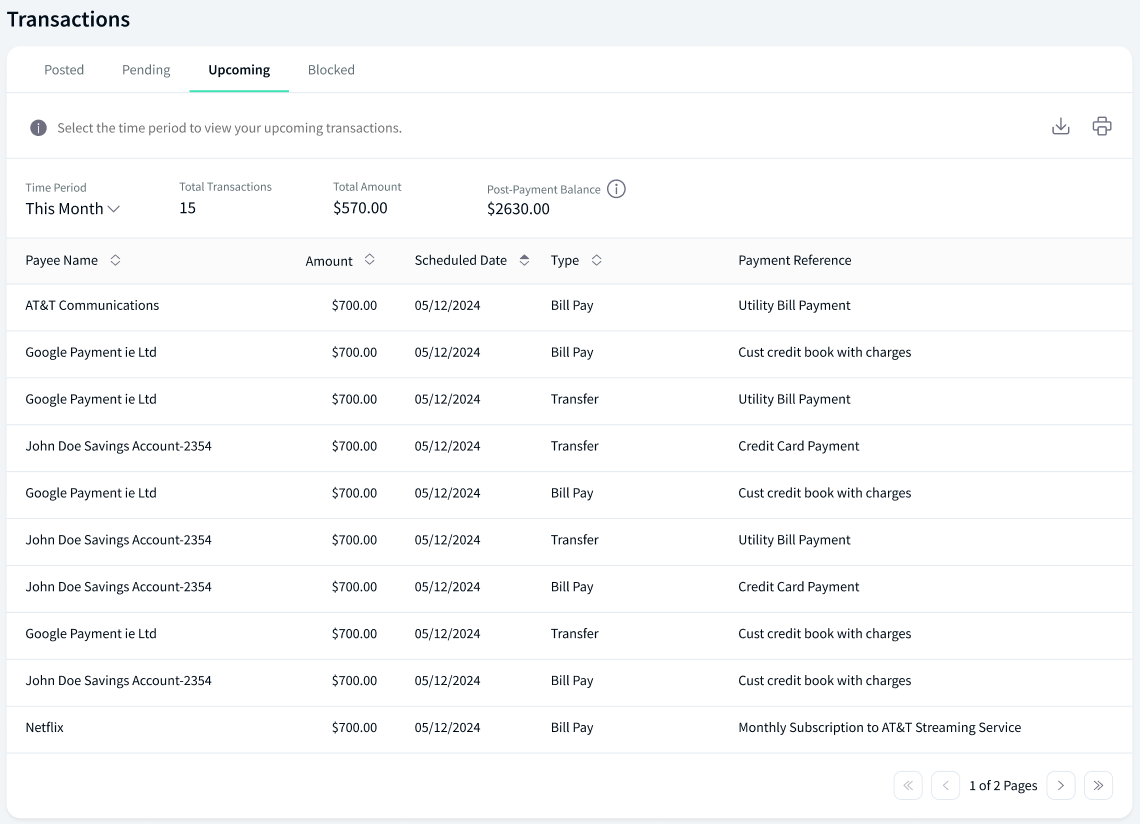
The application displays the upcoming transactions of the selected account. By default the applications shows the upcoming transactions(Internal, Domestic, and International) for this month. The list is sorted by date (closest date first) and displays the following details.
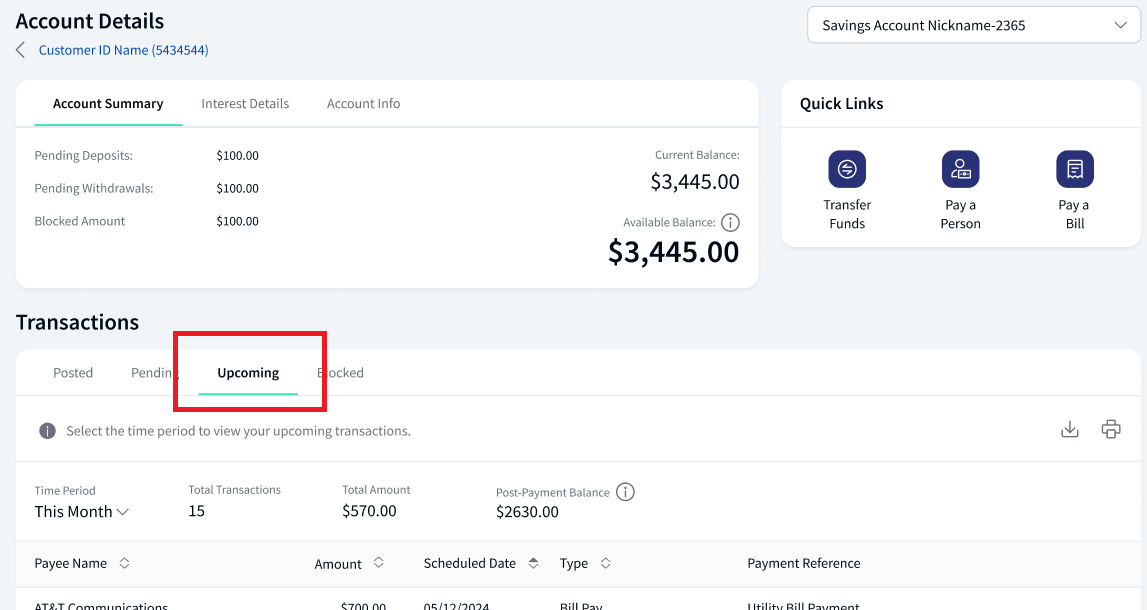
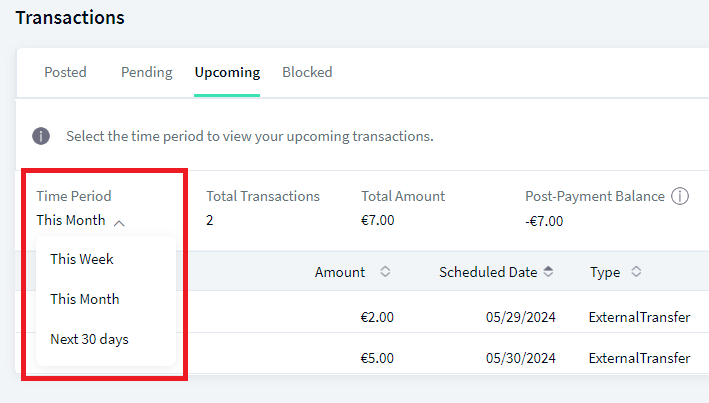
- Time Period. Specifies the time period for the upcoming transactions, the user can select the from any of the options, This week(Next 7 calender days), This month(Calender month), or Next 30 days(Next 30 calender days). By default the application selects This Month.
- Total Transactions. Specifies the number of transactions available for the selected time period. By the pagination value is set to 10, use the arrow buttons to span between pages with option as Next page, Prev page, First page, Last page. For more details, see Spotlight System Configuration.
- Total Amount. Specifies the total amount of upcoming Transactions for the selected period.
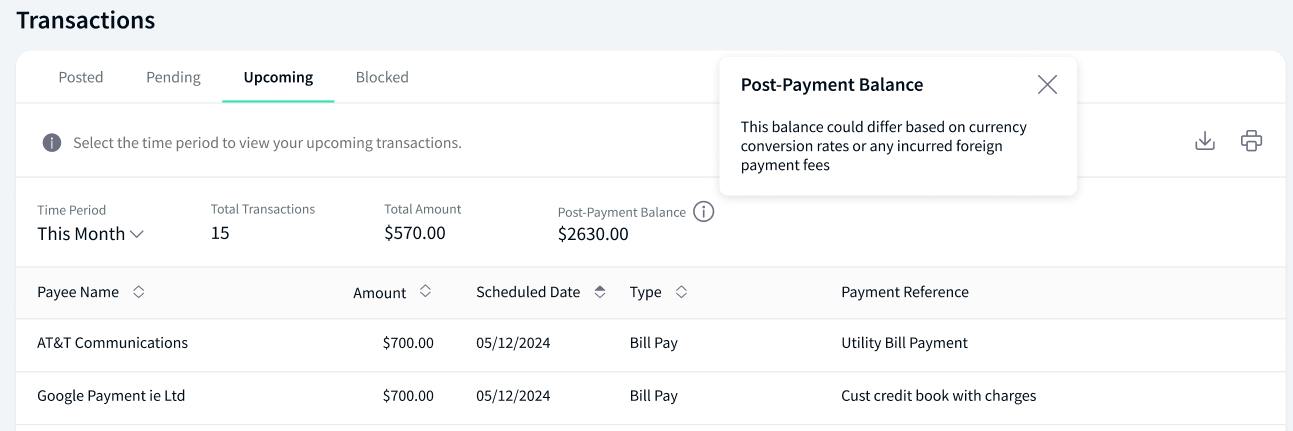
- Post Payment Balance. This is an indicative balance that will be available in the account after settling the upcoming transactions for the specific account for the defined time line. The indicative balance will differ based on currency conversion rate or any incurred crossed currency payment fees.
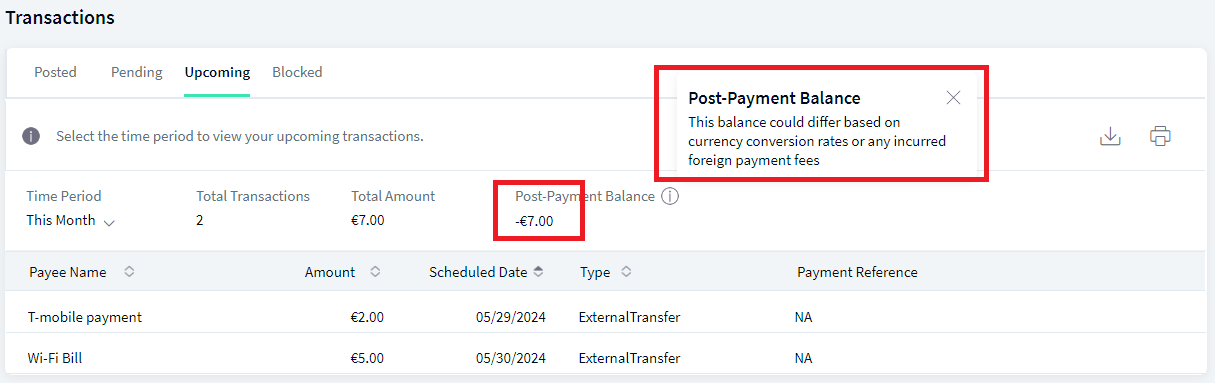
- Payee Name. Specifies the name of the beneficiary.
- Amount. The total amount to be paid.
- Scheduled Date. The scheduled transaction date of this record.
- Type. Specifies the type of payment. For example, Bill Pay, Transfer and many more.
- Payment Reference. Specifies the notes of this transaction.
Download Upcoming Transactions.
The user can download the upcoming transaction in the Upcoming tab. The downloaded file is password protected, click here to see more information.
The following is the procedure:
- From dashboard select the account. The application displays the Account Details page.
- Navigate to the Upcoming tab.
- Select the Time Period and click the download button.
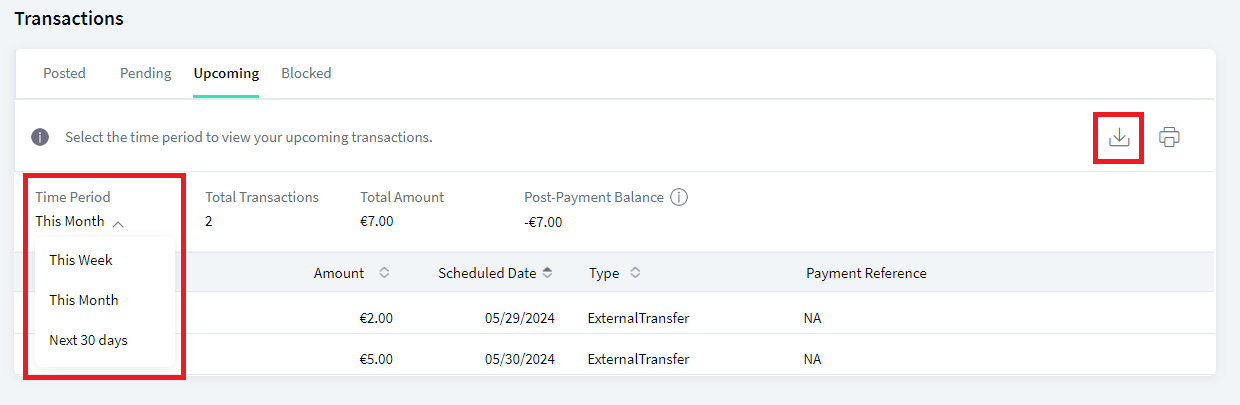
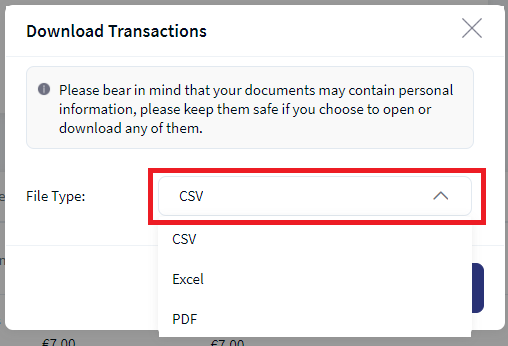
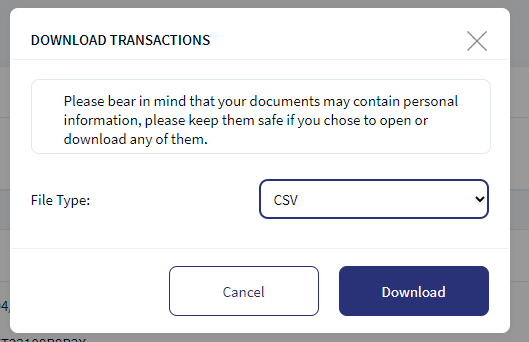
- In the pop up window select the file type. This available file types are CSV, Excel, and PDF.
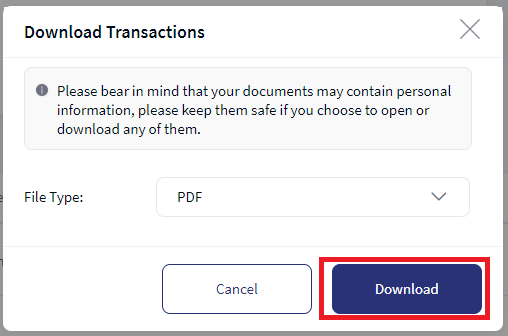
- click Download. This downloads the upcoming transaction in the selected format.
Print Upcoming Transactions.
The user can Print the upcoming transaction in the Upcoming tab. The print feature is available only for web browser(>1024 pixels) and not available for tablet and mobile screens(<1024 pixels).
The following is the procedure:
- From dashboard select the account. The application displays the Account Details page.
- Navigate to the Upcoming tab.
- Select the Time Period and click the Print button.
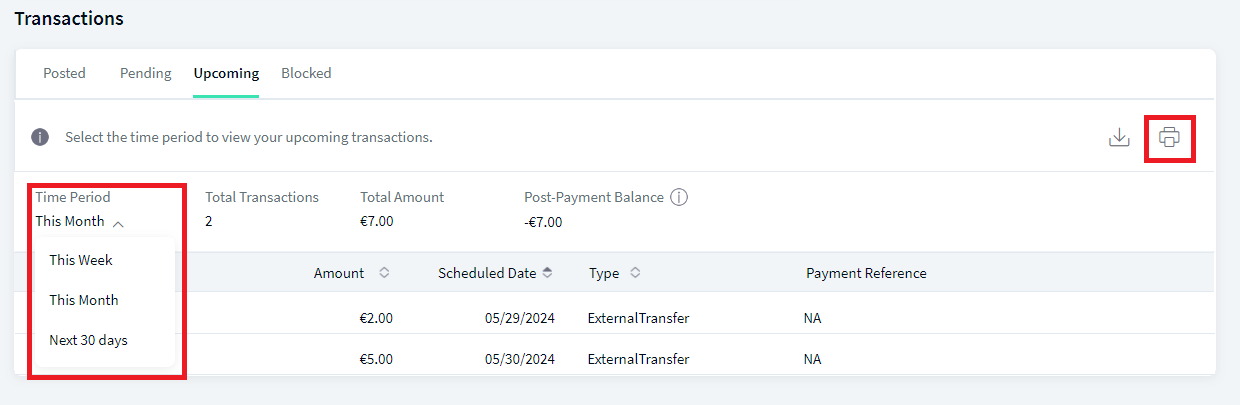
- The browser the displays the print dialogue box.
Blocked Funds
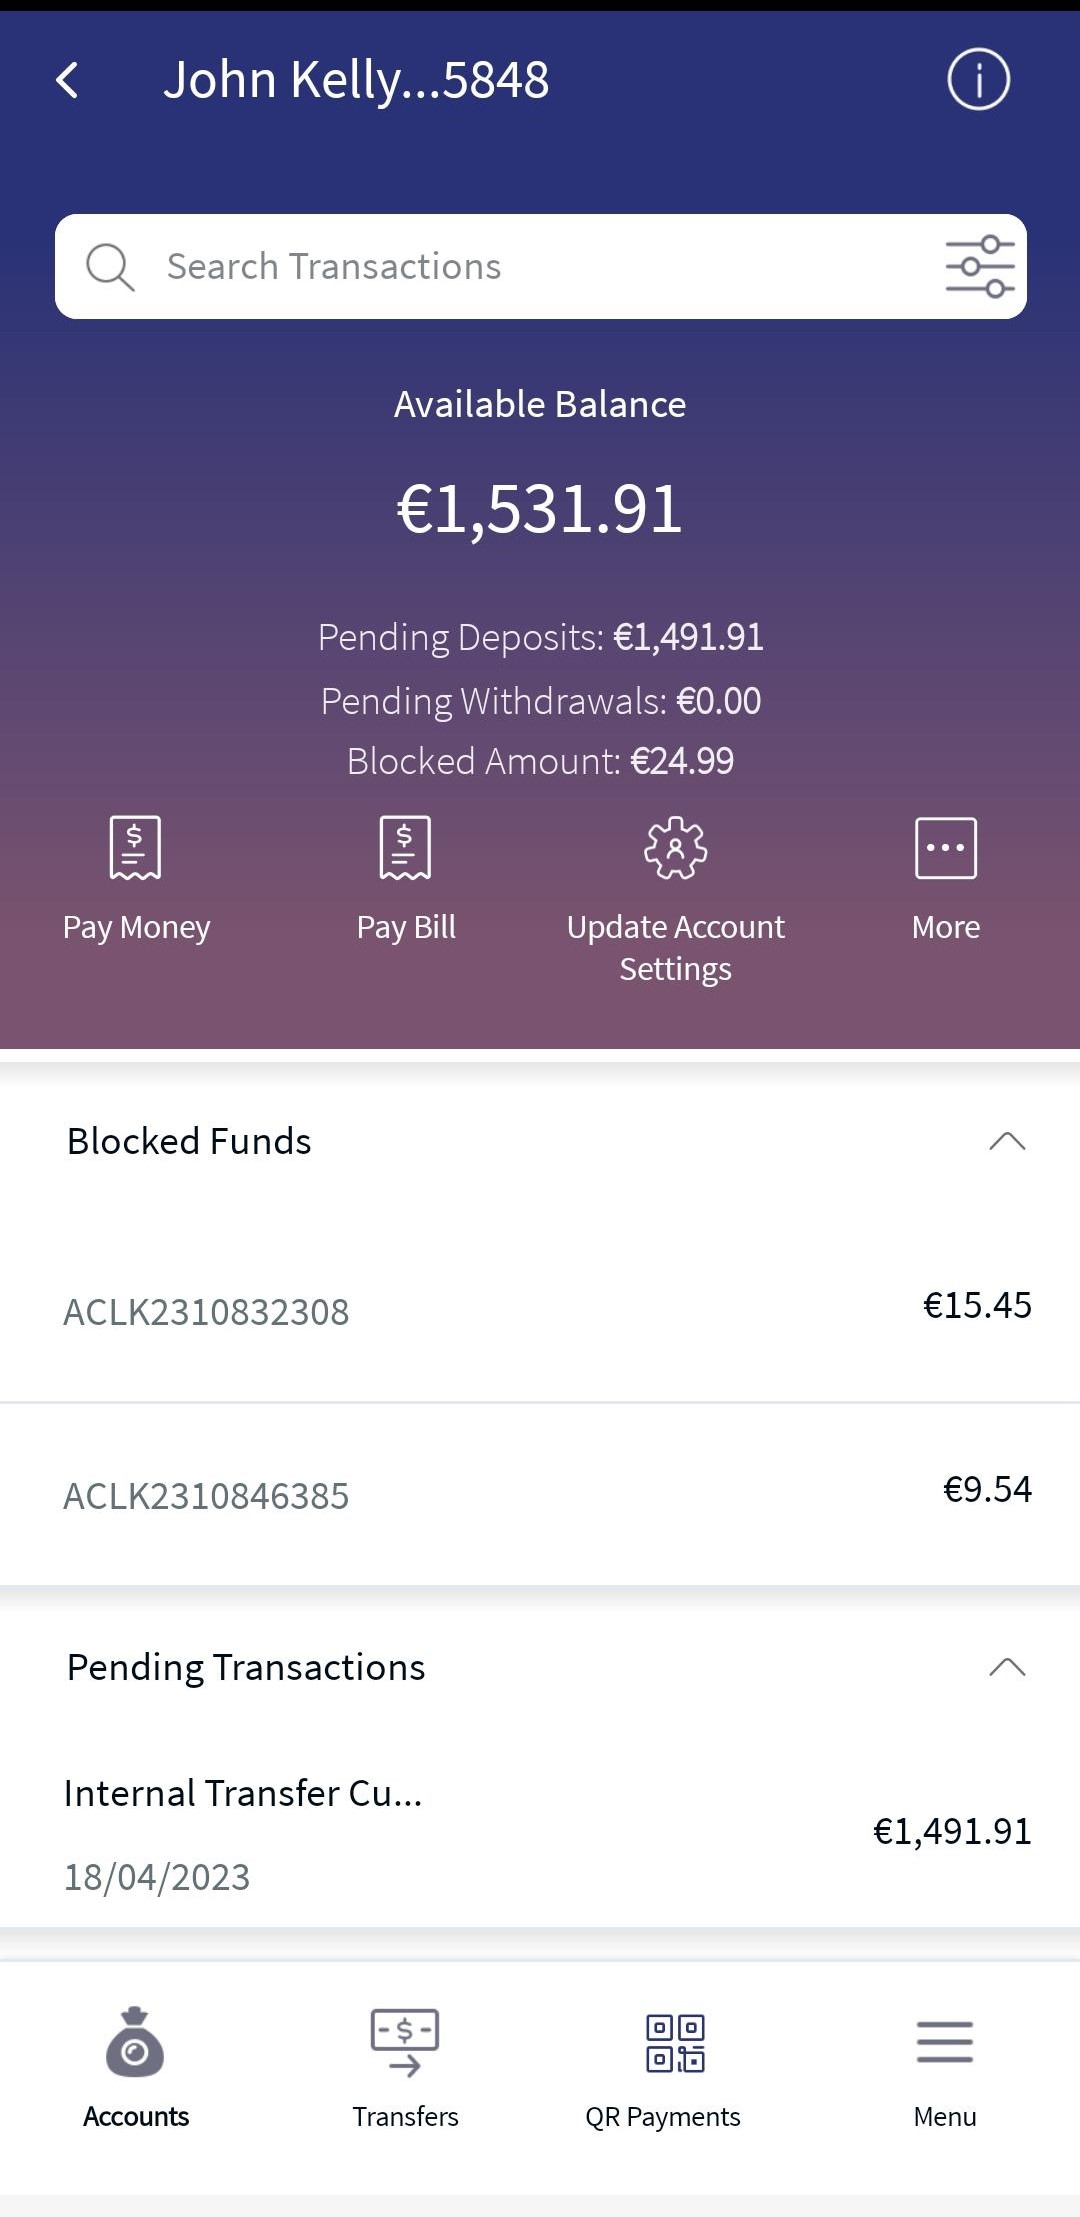
The users can see an icon with showing recent transactions. The blocked amount refers to the funds that are blocked by the government or external organizations in the customer's account. This amount cannot be accessed by the customer. The blocked amount can be lifted only by the external organization which placed it. The customer can only view the blocked amount. If there are no blocked funds, "no transactions found" message is displayed.
- Select a particular account from the accounts dashboard.
- Under Transactions list, click the Blocked Funds tab. The application displays the list of blocked transactions for the selected account.
The following details are displayed
- Reference Number
- Blocked Amount
- From Date
- To Date
- Description
Transaction Download
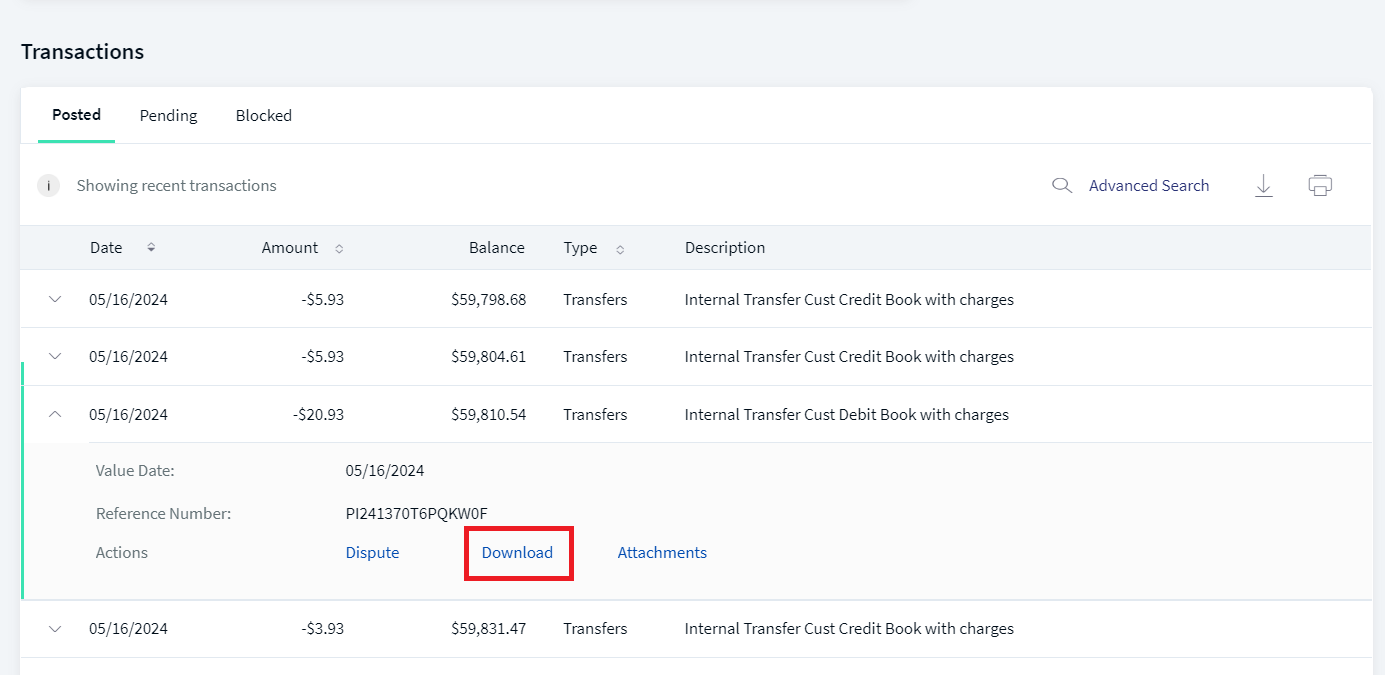
If the user needs to download the single transaction in the pending or posted tab, the user must click the drop-down and download button. The statement is downloaded in the PDF format. The downloaded file is password protected, click here to see more information.
The user have an option to download the transactions for the selected account. The downloaded transaction contains the list of transactions fetched from backend based on the configuration. The user can download the transactions from Posted, Pending and Blocked Funds. The date format shown in the Account details screen can be configured in the Fabric app based on which the format can be changed between DD/MM/YYYY and MM/DD/YYYY.
 View the transaction types and tabs for the selected account type
The following table shows the transaction description and transaction type displayed under posted and pending tab.
Example: If the Savings account is selected, the application shows the Transfers, Deposits, Checks, and Withdrawals tabs.
| Account Type | Transaction Description | Transaction Type |
|---|---|---|
| Checking | Outgoing Fund Transfer | Transfers |
|
|
Incoming Fund Transfer | Deposits |
|
|
Check Deposit to Account | Deposits |
|
|
Check issued from the account | Checks |
|
|
Cash Withdrawal | Withdrawals |
|
|
Debit Card Transactions | Withdrawals |
|
|
Fees /Charges debit | Withdrawals |
|
|
Interest Deposited | Deposits |
|
|
Outgoing P2P | Transfers |
|
|
Incoming P2P | Deposits |
|
|
Bill Payment | Withdrawals |
|
|
Online Payments (Amazon, etc.) | Transfers |
| Savings | Outgoing Fund Transfer | Transfers |
|
|
Incoming Fund Transfer | Deposits |
|
|
Check Deposit to Account | Deposits |
|
|
Check issued from account | Checks |
|
|
Cash Withdrawal | Withdrawals |
|
|
Debit Card Transactions | Withdrawals |
|
|
Fees /Charges debit | Withdrawals |
|
|
Interest Deposited | Deposits |
|
|
Outgoing P2P | Transfers |
|
|
Incoming P2P | Deposits |
|
|
Bill Payment | Withdrawals |
|
|
Online Payments (Amazon, etc.) | Transfers |
| Credit Card | Debits | Purchases |
|
|
Credits | Payments |
| Deposits | Interest Added | Interest |
|
|
Amount Deposited | Deposits |
|
|
Amount Withdrawn | Withdrawals |
| Loans |
|
Loan Schedule |
Advanced Search
User can do the following actions in the advanced search. User can perform advanced search for Transactions and Blocked funds.
- Click any of the tabs to view the corresponding transactions.
- Click the advanced search
 icon to search and filter transactions.
 Advanced Search for Transactions
User have an option to perform an advance search in the transactions with the following parameters:
- Click on advanced search and enter the required inputs in the fields.
- By Keyword
- By Account range
- By Transaction Type (All Transactions, Mandatory field)
- By Check Number
- By Time Period such as: (Mandatory Field)
Last 7 days (Default)
Last 14 days
Last 1 month
Last 2 months
Last 6 months
Last 12 months
Custom Date Range (calender widget is displayed to select the date).
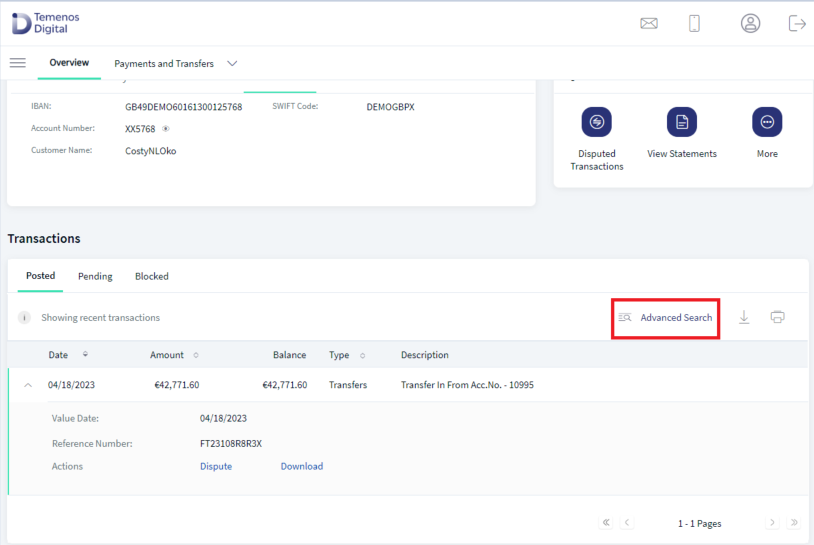
Advanced Search (AD) 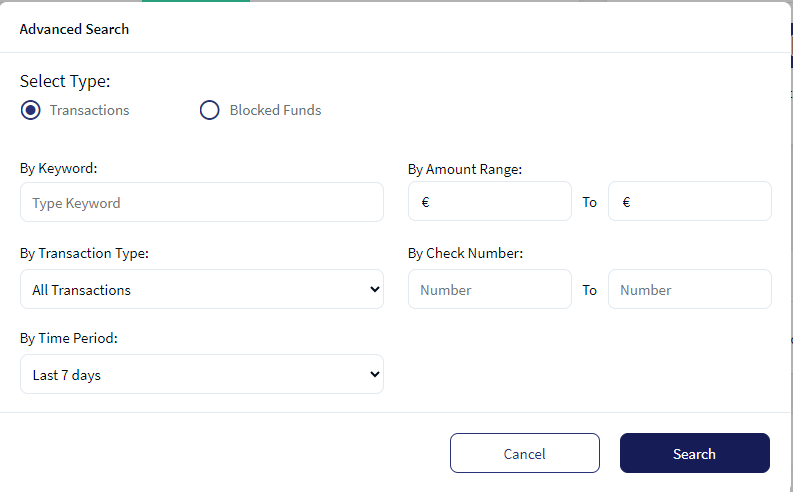
AD fields 
Transaction Types 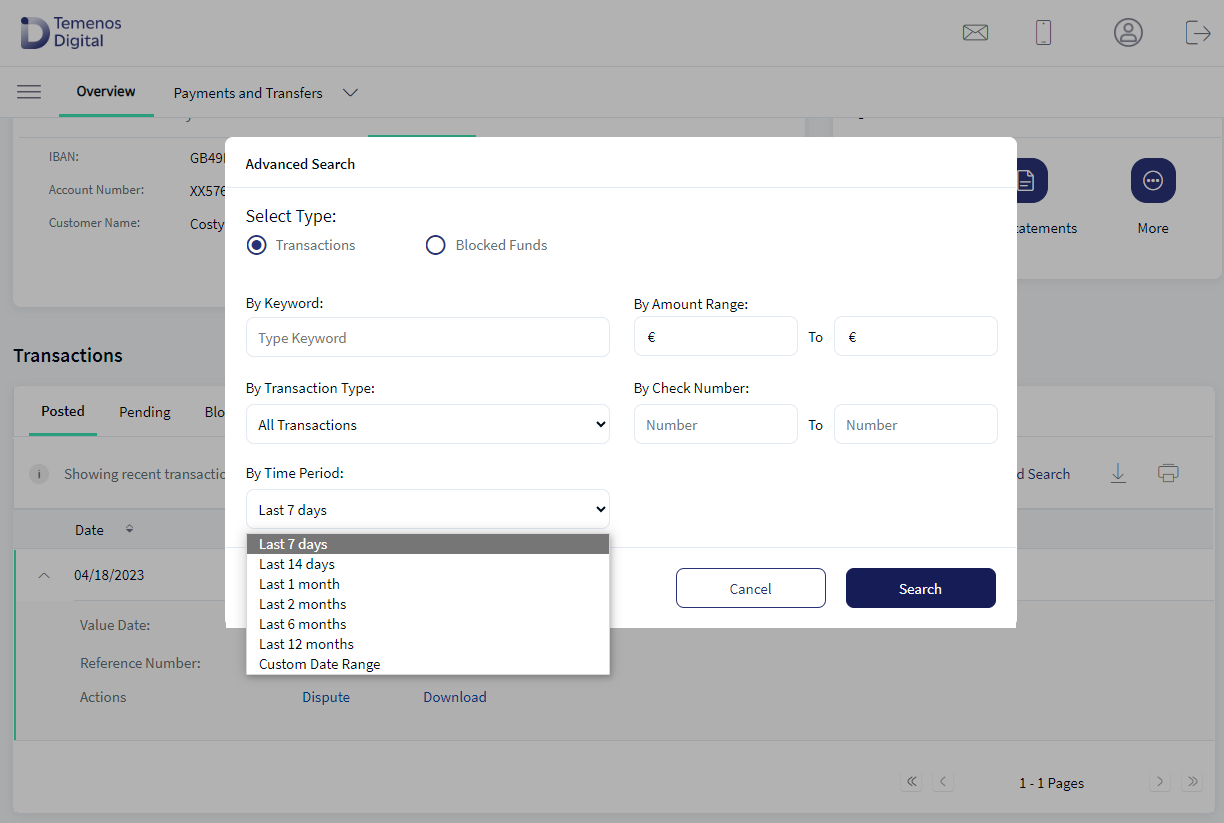
Time Period - Click on Search, the user will see the results on the screen based on pagination.
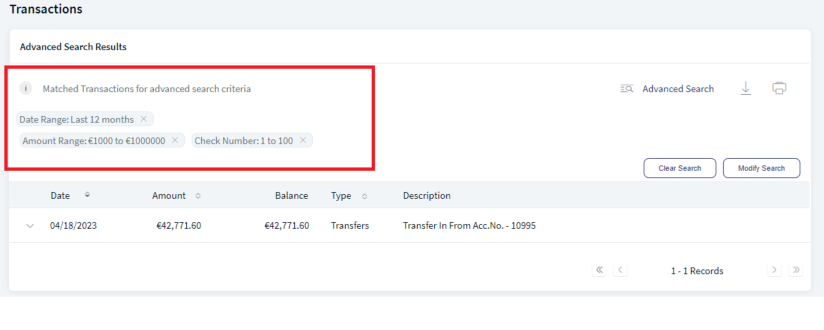
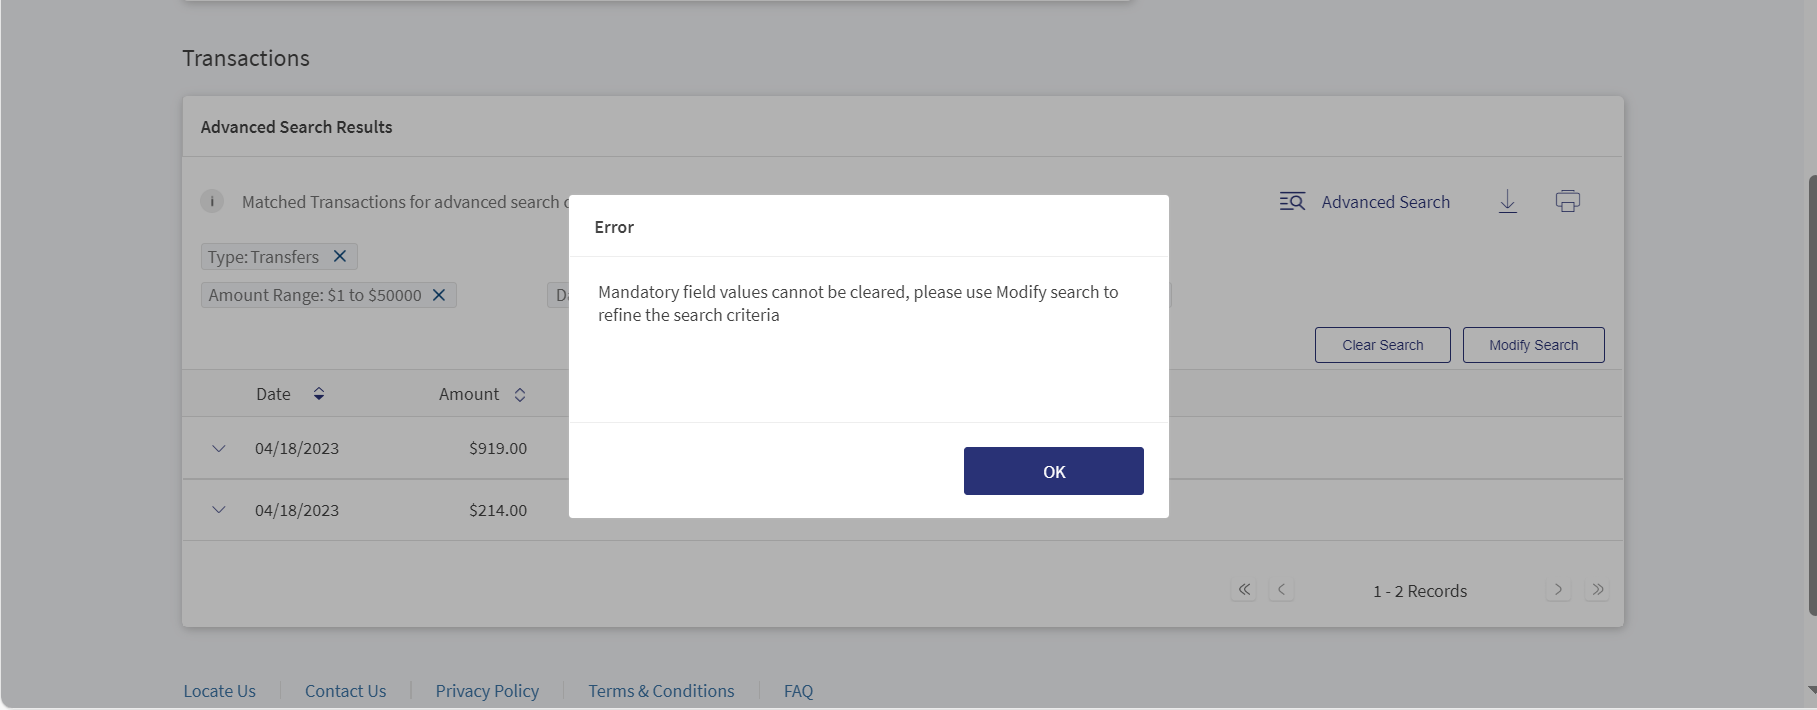
When the user performs an advanced search, the fields Transaction Type and Time Period are mandatory. After the search, if the user cancel these fields the application displays an error with the pop-up message Mandatory fields values cannot be cleared, please use Modify search to refine the search criteria.
- Click download and select the required format.
- Excel
- CSV
- QFX
- QBO
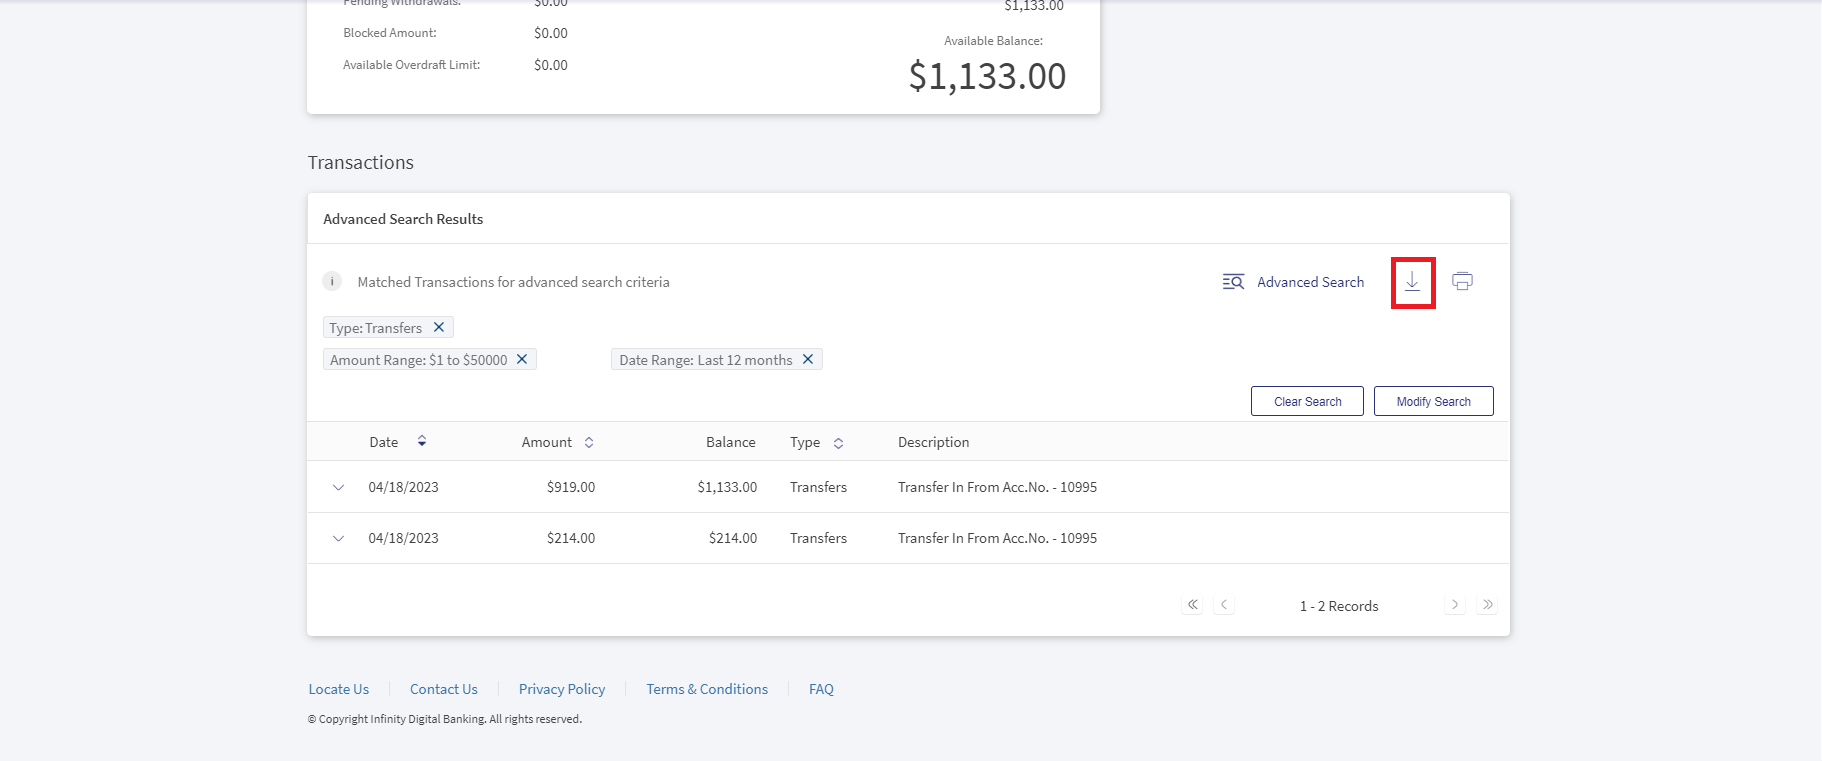
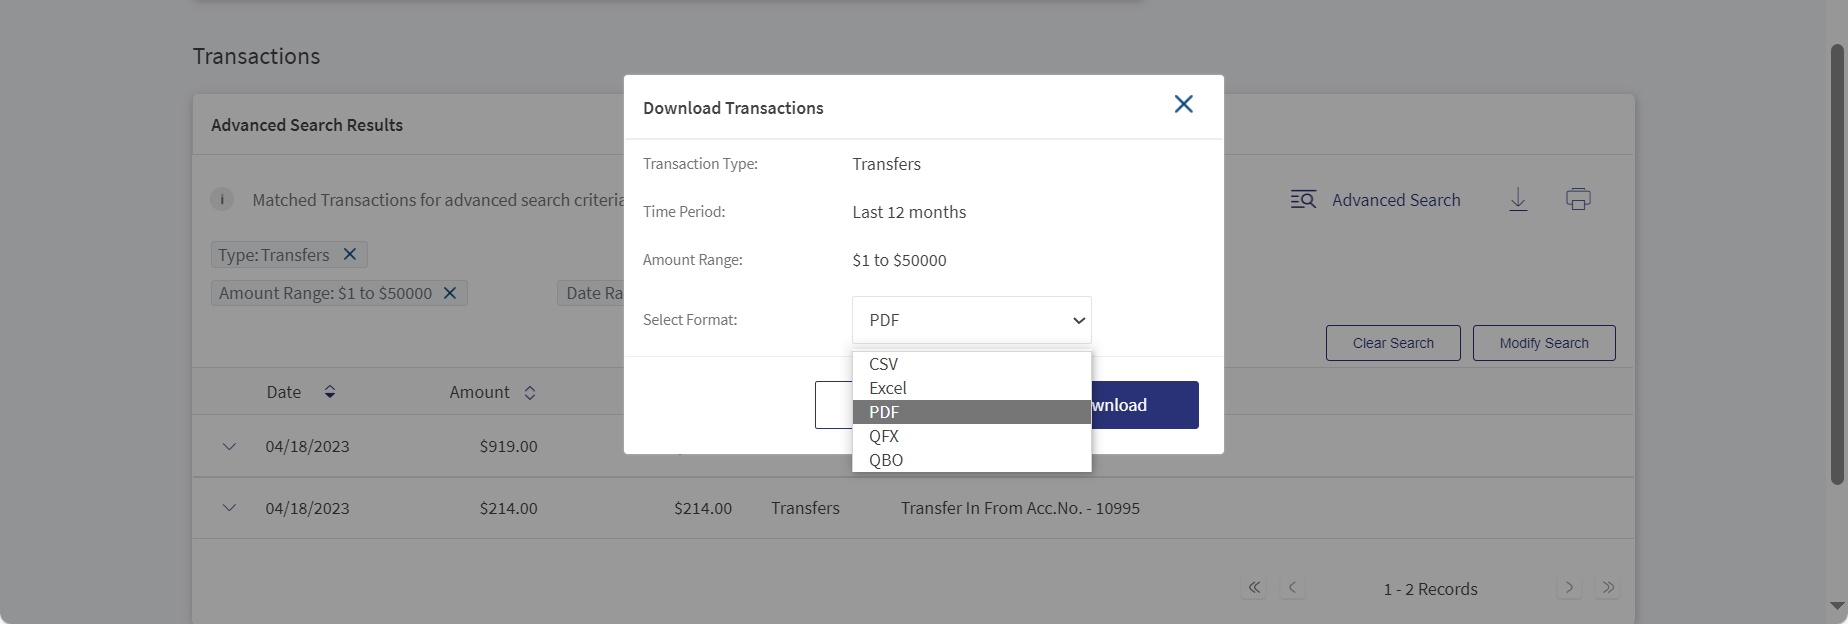
- Click Download.
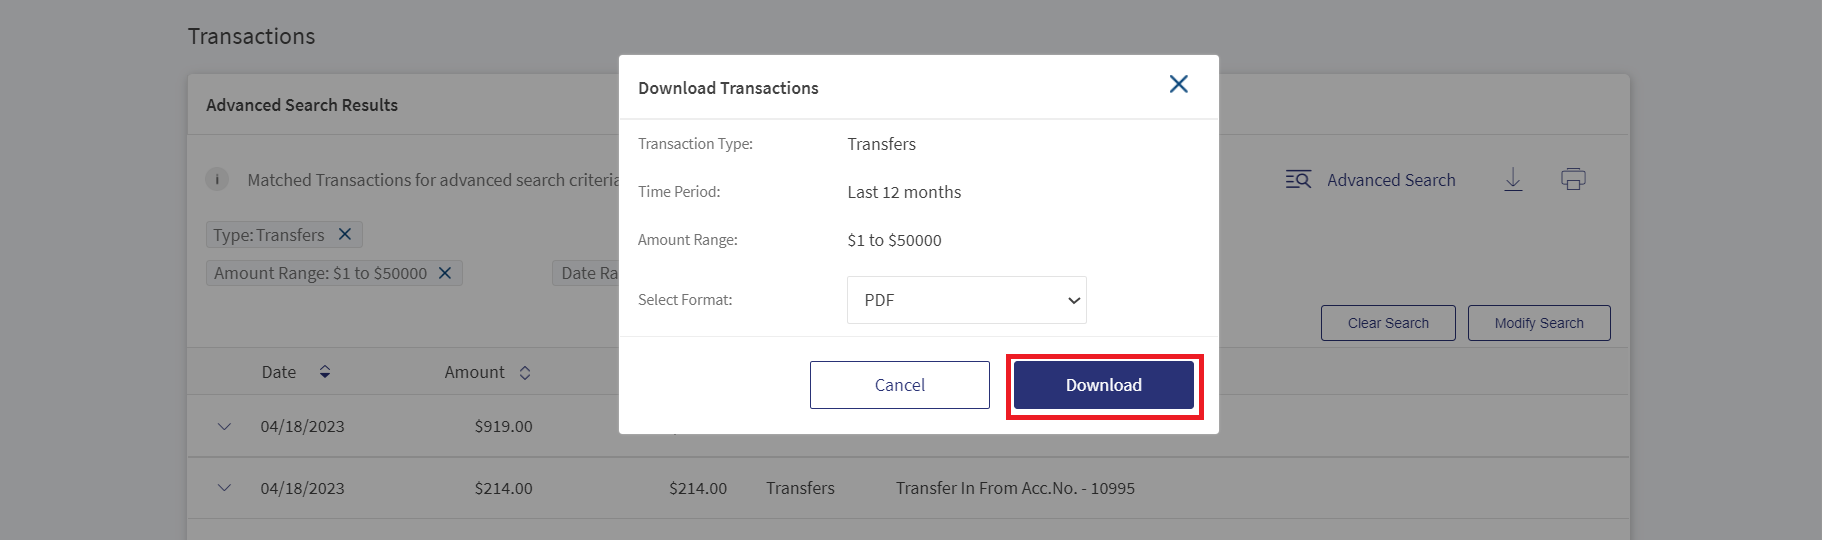
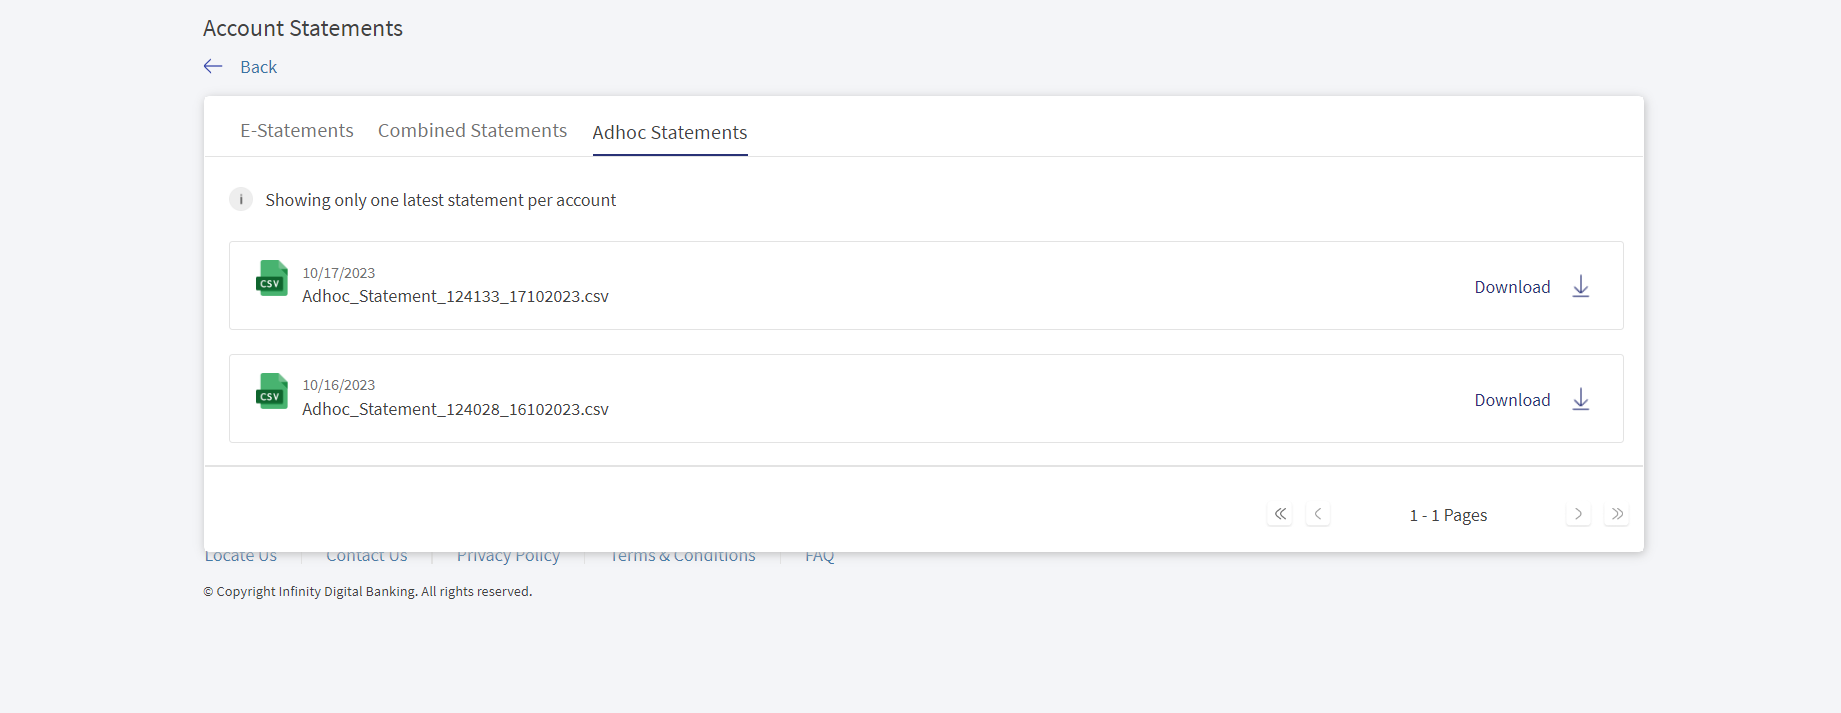
If the download time exceeds the configured time, the application displays a dialog box with a message.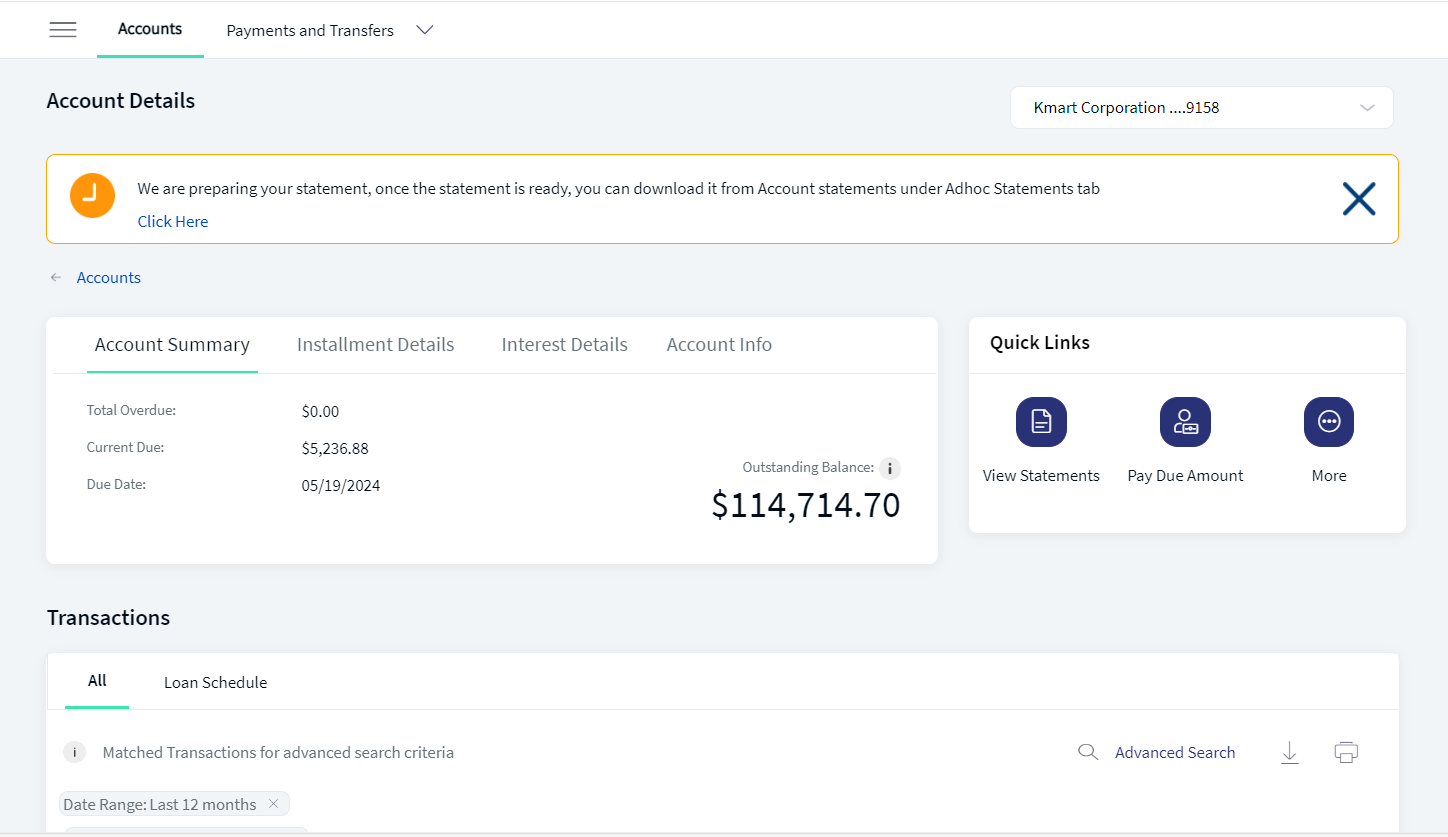
- When the user click on Click Here, the application navigates to the Adhoc Statement tab with the downloaded file. For more information see Adhoc Statements.
Advanced Search for Blocked Funds
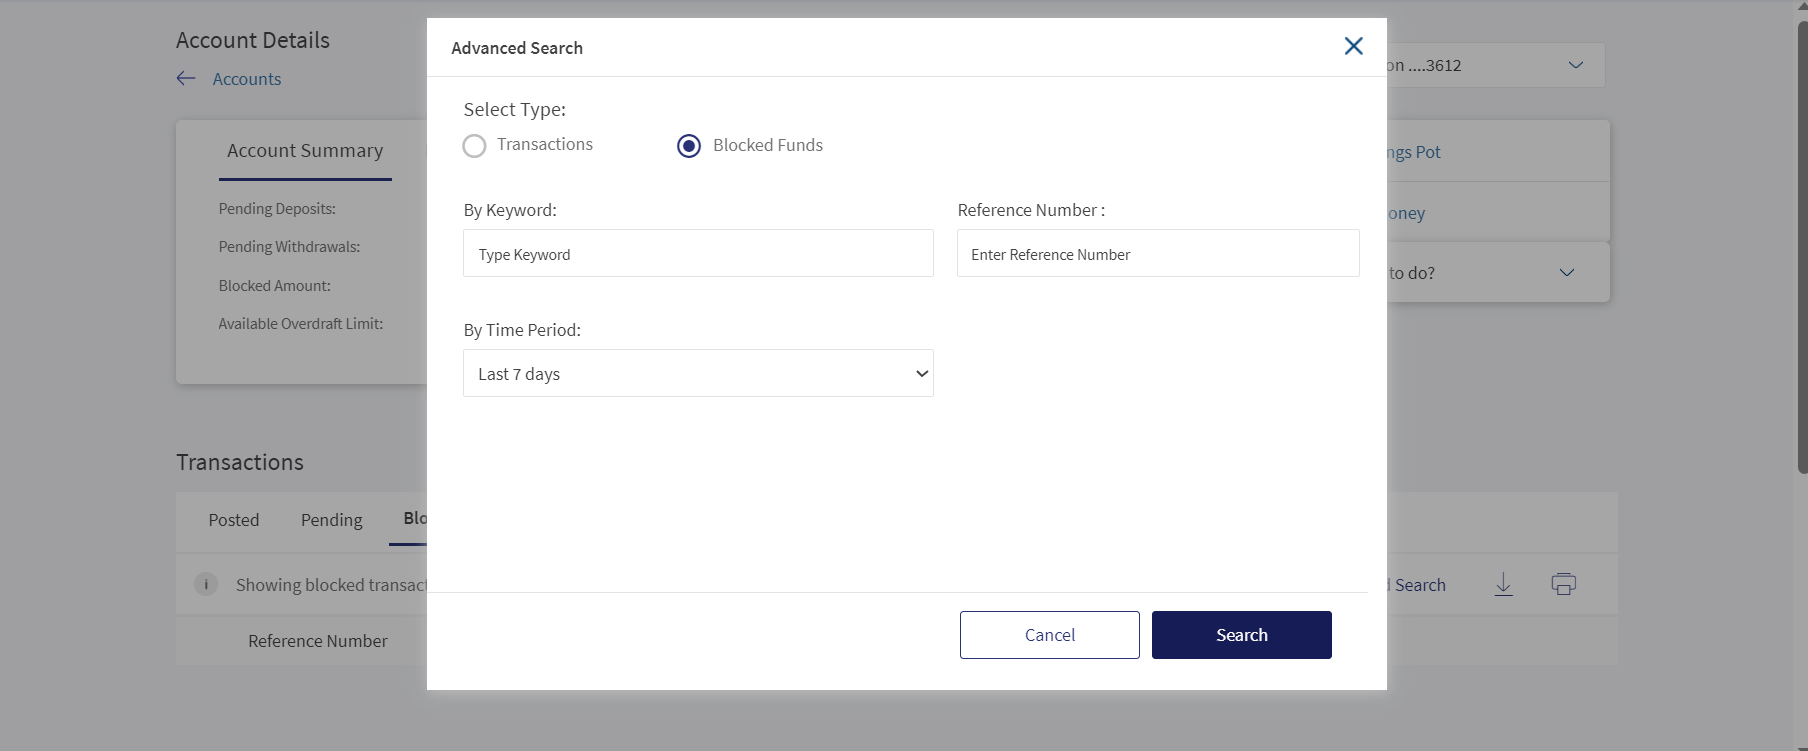
User have an option to perform an advance search in the blocked funds with the following parameters:
- By Keyword
- By Reference Number
- By Time Period such as:
Last 7 days (Default)
Last 14 days
Last 1 month
Last 2 months
Last 6 months
Last 12 months
Custom Date Range (calender widget is displayed to select the date).
- Click on advanced search and enter the required inputs in the fields.
Print Account Transactions
Use the feature to view and print the entire transaction details of an account. This feature is available only in online banking application. The downloaded file is password protected, click here to see more information.
Menu path: Accounts > Select an account > Account details and transactions > Print 
On the accounts details and transactions list screen, click the Print icon in the Transactions section.
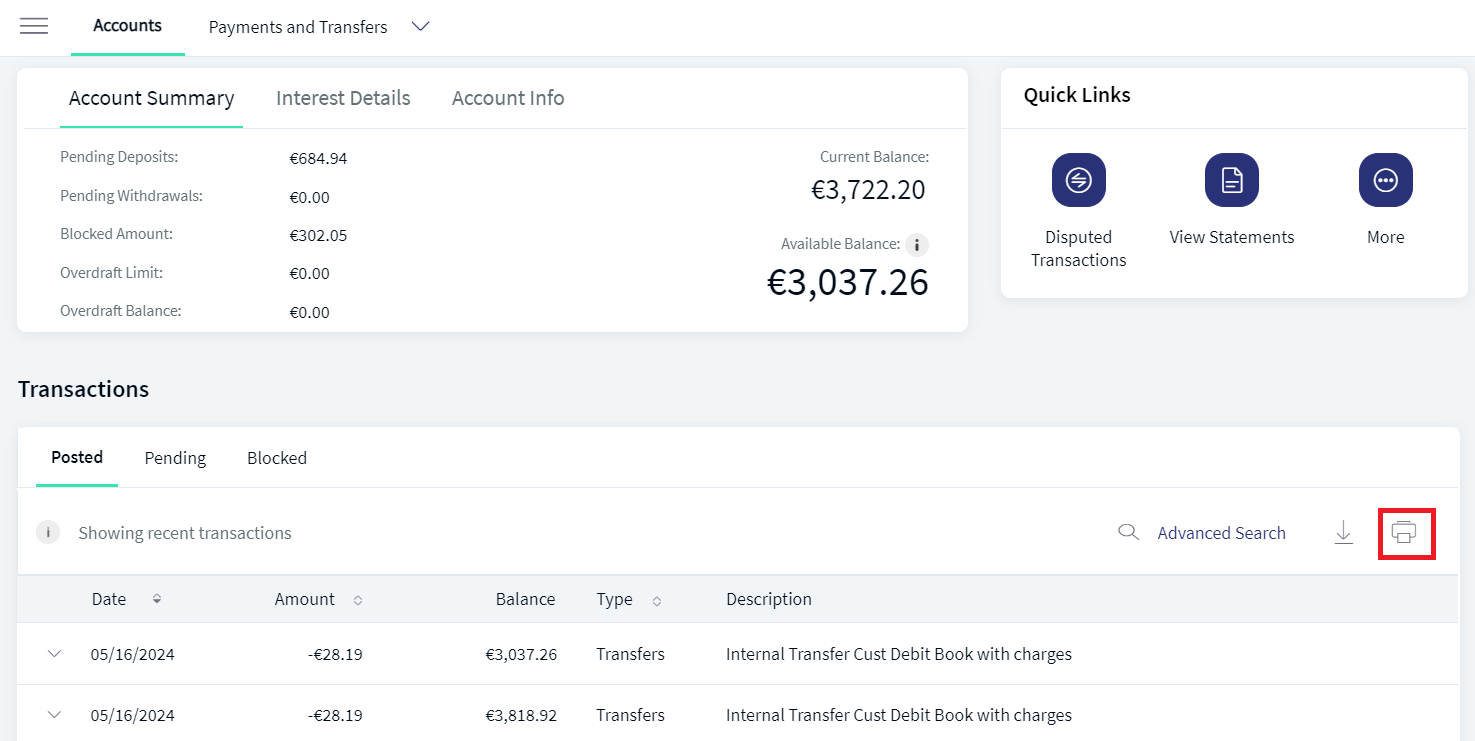
The application displays the print preview screen. Specify the required details and click Print. The application prints the transaction activity of the entire account.
Advanced Search Download
User can download the statements from advanced search downloads. In advanced search download, the user can provide the required information to download the statement such as:
- Keyword
- Amount Range
- Transaction Type
- Check Number
- Date Range
- File Type
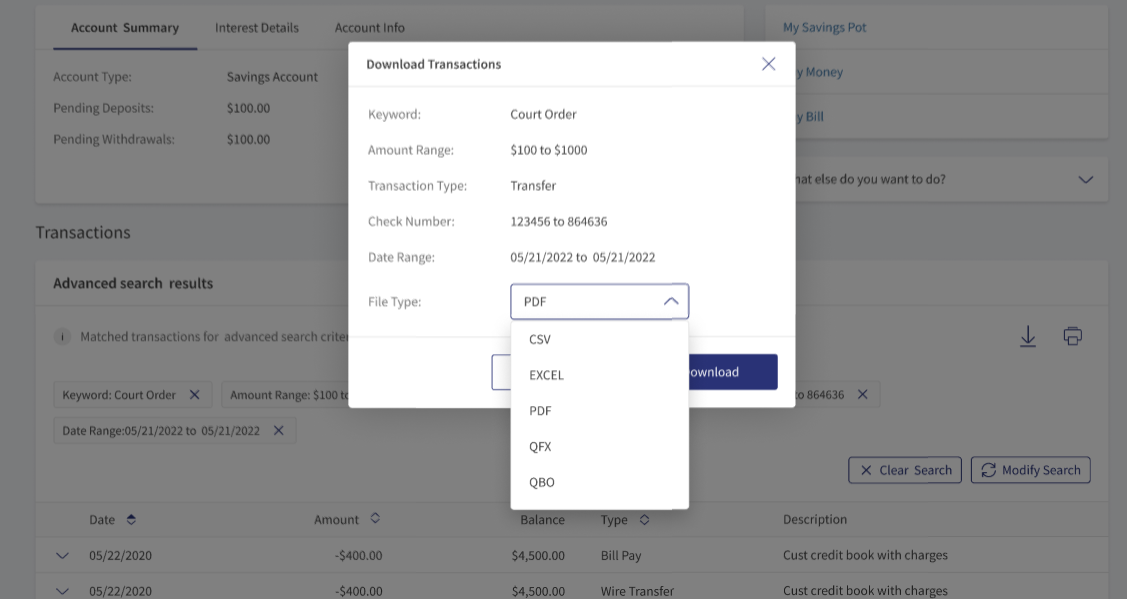
If the download time exceeds the configured time, the application displays a dialog box We are preparing your statement, once the statement is ready, you can download it from Account statements under Adhoc Statement tab Click Here.
From 23.09, the date selection in the Download pop-up screen has been removed. If the user need to download the statement of specific time period, the user need to use the Advance search option.
Loan Schedule
The transaction view for Loan Account types is categorized into two types.
- All (which lists every transaction posted to the Loan Account)
- Loan Schedule
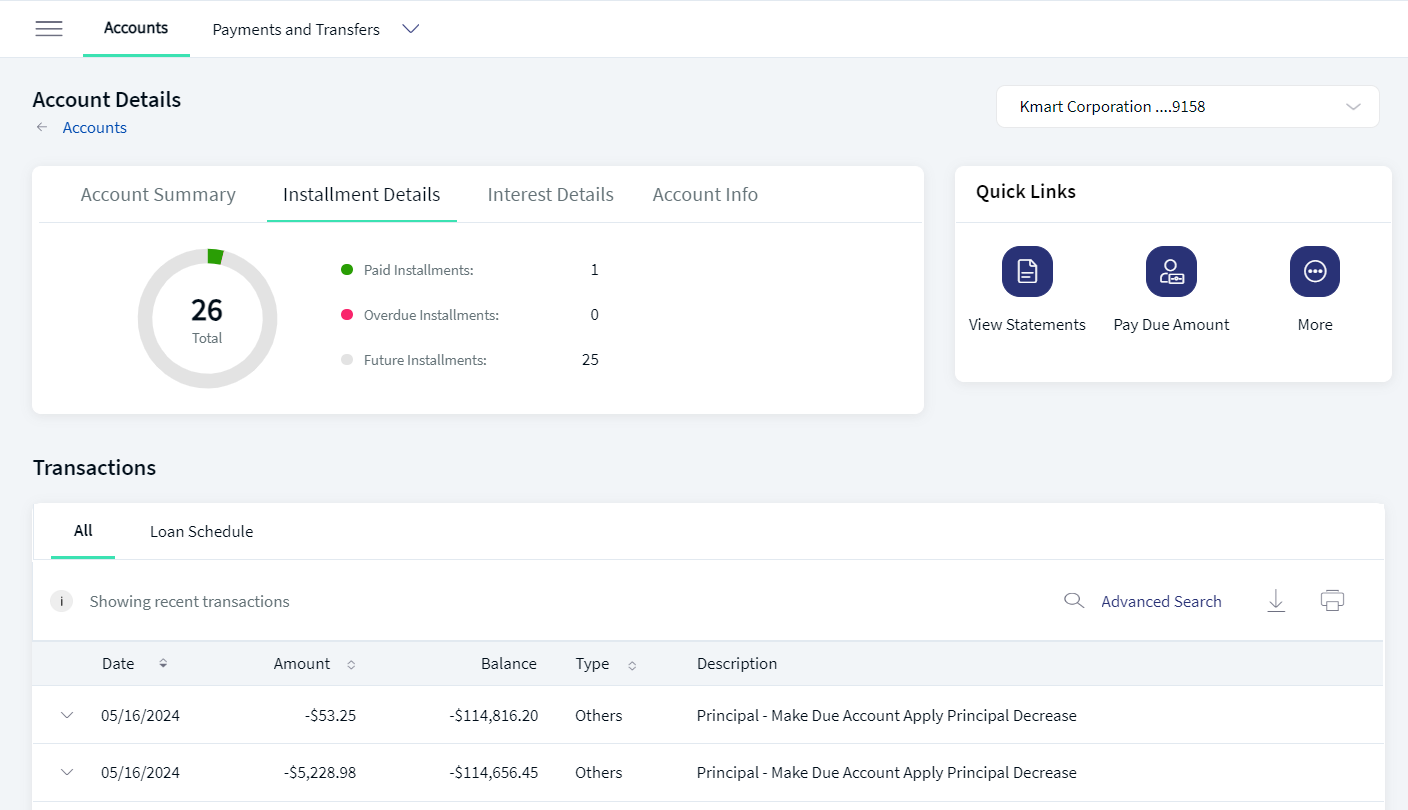
The loan schedule tab displays the loan/amortization schedule that includes the previously paid installments, past overdue installments, summary of the future payments. The advantage of the loan schedule feature is to provide the customers a clear view on past as well as future payments for the loan account.
You can view the following from the Loan schedule feature:
- The list of previously paid installments on your loan account to keep a track of the paid payments towards the principal, interest, tax, or charges.
- The list of installments that are overdue on my loan account to keep a track of payments that need to be paid and avoid further charges. You can also check how much money needs to be paid towards the principal, interest, tax, or charges.
- Summary of installments paid in the past, overdue Installments, and the installments to be paid in future to get a clear view on the status of your loan account.
You will not be able to view the loan schedule if you do not have the permissions enabled at the account level. These permissions are configured in Spotlight.
Paid Installments. You can view the list of installments (with the count) that are paid against the selected loan account. The paid installments are displayed in the descending order of the payment date.
The following details are displayed in the Loan Schedule for paid installments.
- Payment Date
- Amount paid
- Principal amount paid
- Interest amount paid
- Outstanding Balance
Click the down arrow displayed beside each row to view the additional details of an installment. The following additional details are displayed:
- Charges paid
- Property tax paid (applicable only for mortgage accounts)
- Property insurance paid
- Actions- Pay Overdue (with link)
Error Messages: If there are no paid installments to be displayed, a message is displayed as "No payment schedule available for the selected account".
Overdue Installments: You can view the list of installments (with count) that are overdue on your loan account. The following details are displayed:
- Payment Due Date
- Installment amount to be paid
- Pending principal amount to be paid
- Interest amount to be paid
- Outstanding Balance
The list is sorted by date (most recent transaction on top) by default.
Click the down arrow displayed beside each row to view the additional details of an installment. The following additional details are displayed:
- Charges - pending amount to be paid towards the charges of the loan
- Tax - pending amount to be paid towards property tax (applicable only for mortgage accounts).
- Insurance - pending amount to be paid towards the property insurance (applicable only for mortgage accounts).
You can perform the following actions in this screen:
- Click the Print icon to print the loan schedule that is currently displayed on the screen.
- Click the Download icon to download or export the loan schedule to CSV or PDF format.
- Download the complete list of paid and overdue installments.
- Download only the Overdue, Paid or Future Installments separately or All of them together.
- Configure the number of rows to view at a time.
- Click the drop-down list displayed on the top right corner of the transactions list.
- Select 10, 25, 50, or 100 rows to be displayed at once.
- Easily navigate to first, next, previous, and next pages.
If there is only page, the option to navigate between pages is not displayed.
Quick Links
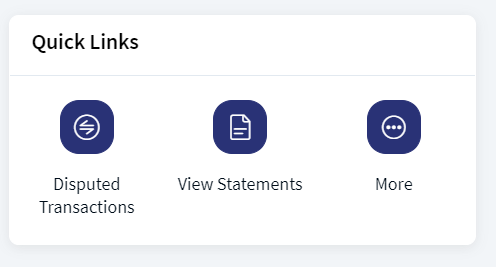
A one-stop section that contains logically grouped actions that you can perform from here. The actions change based on the selected account type. A few such actions are Disputed Transactions, View Statements, and More.
More
The list that contains actions that you can perform from this screen. The actions change based on the selected account type:
- Pay Money
- Cheque book request
- Update account settings
- Create Sweep
- Stop Check Requests
View the quick links and other actions available for each account type
| Account Type | Available Quick Links | Available Other Actions |
|---|---|---|
| Savings |
|
|
| Checking |
|
|
| Credit Card |
|
|
| Deposit |
|
|
| Loan |
|
|
Mobile Native
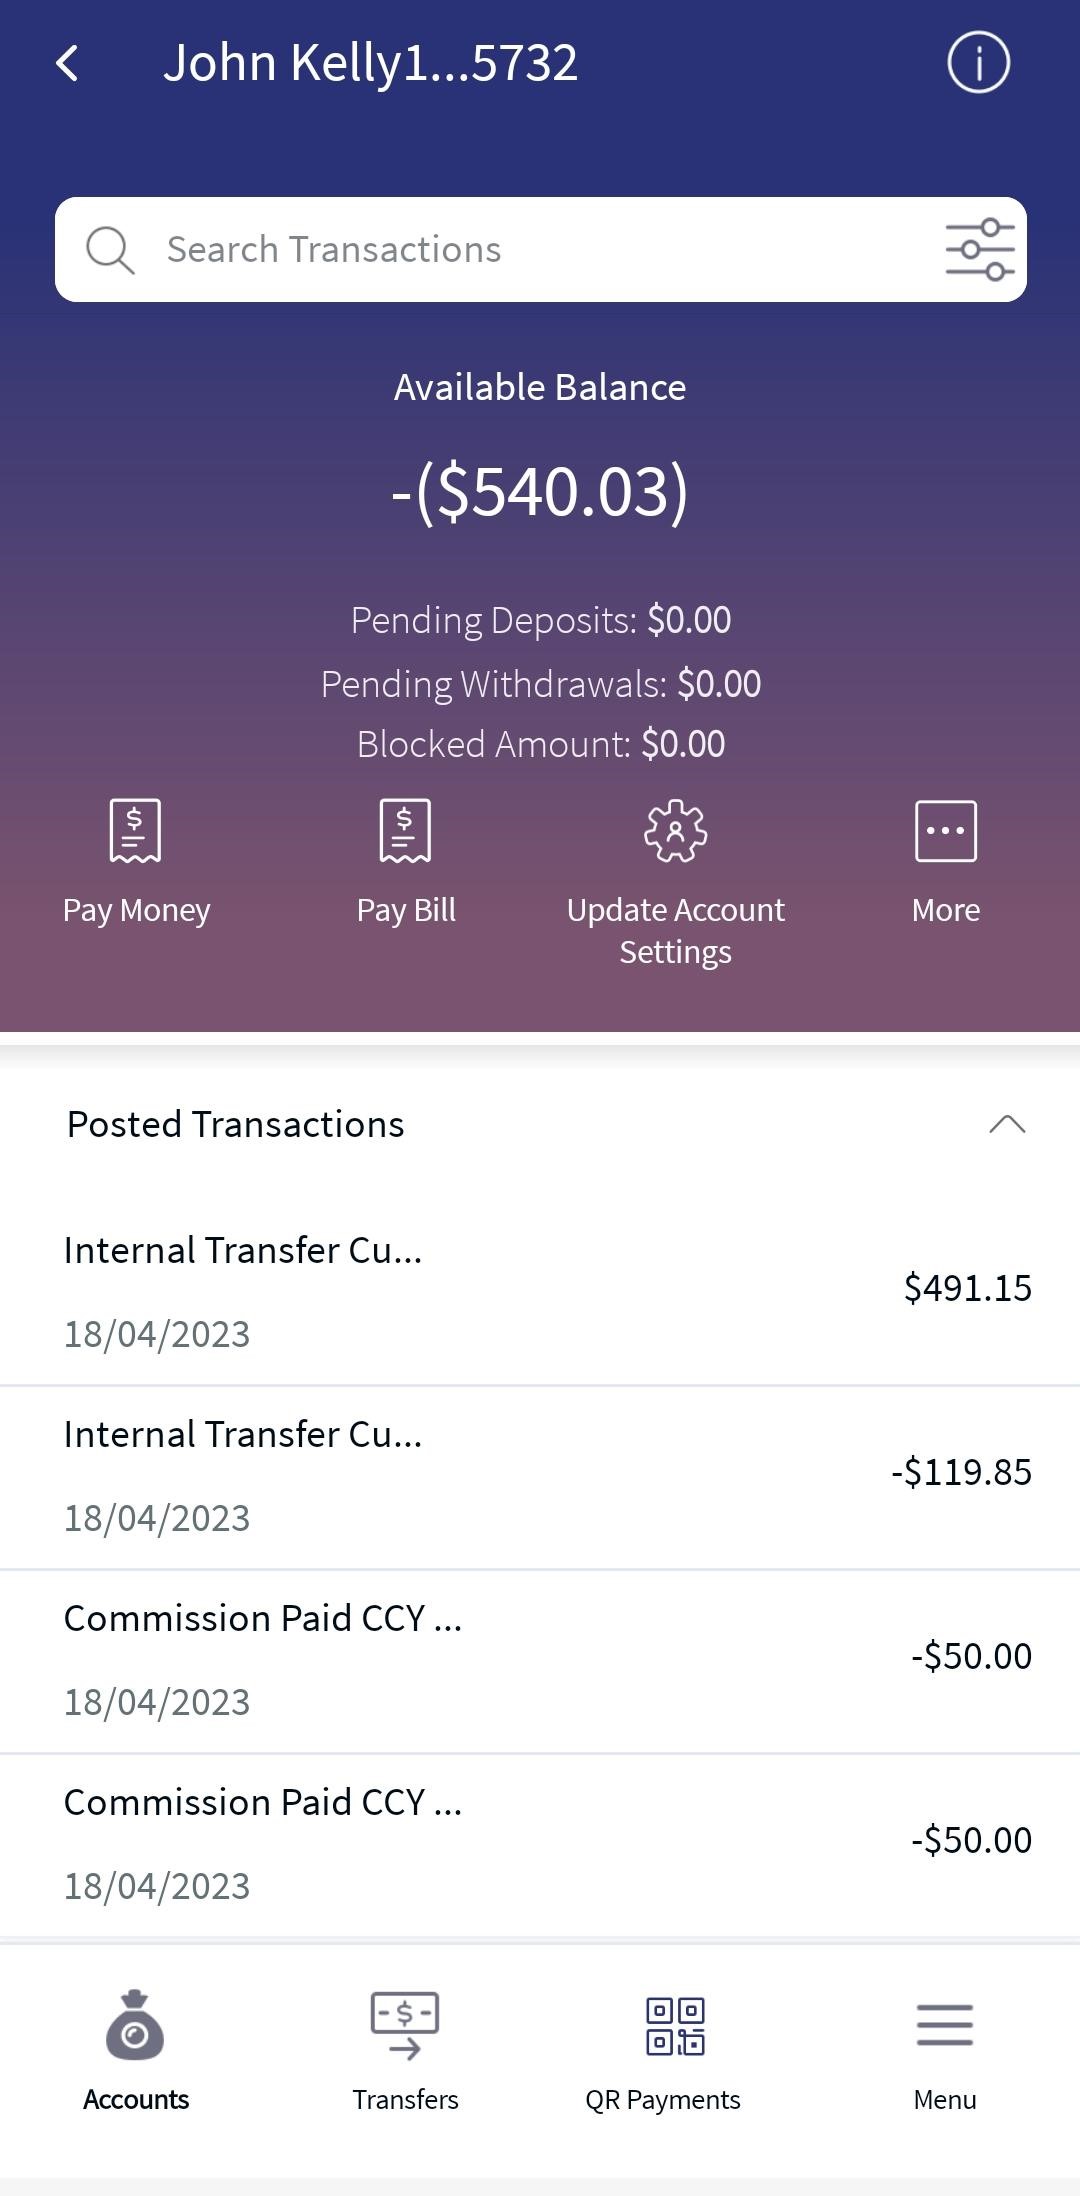
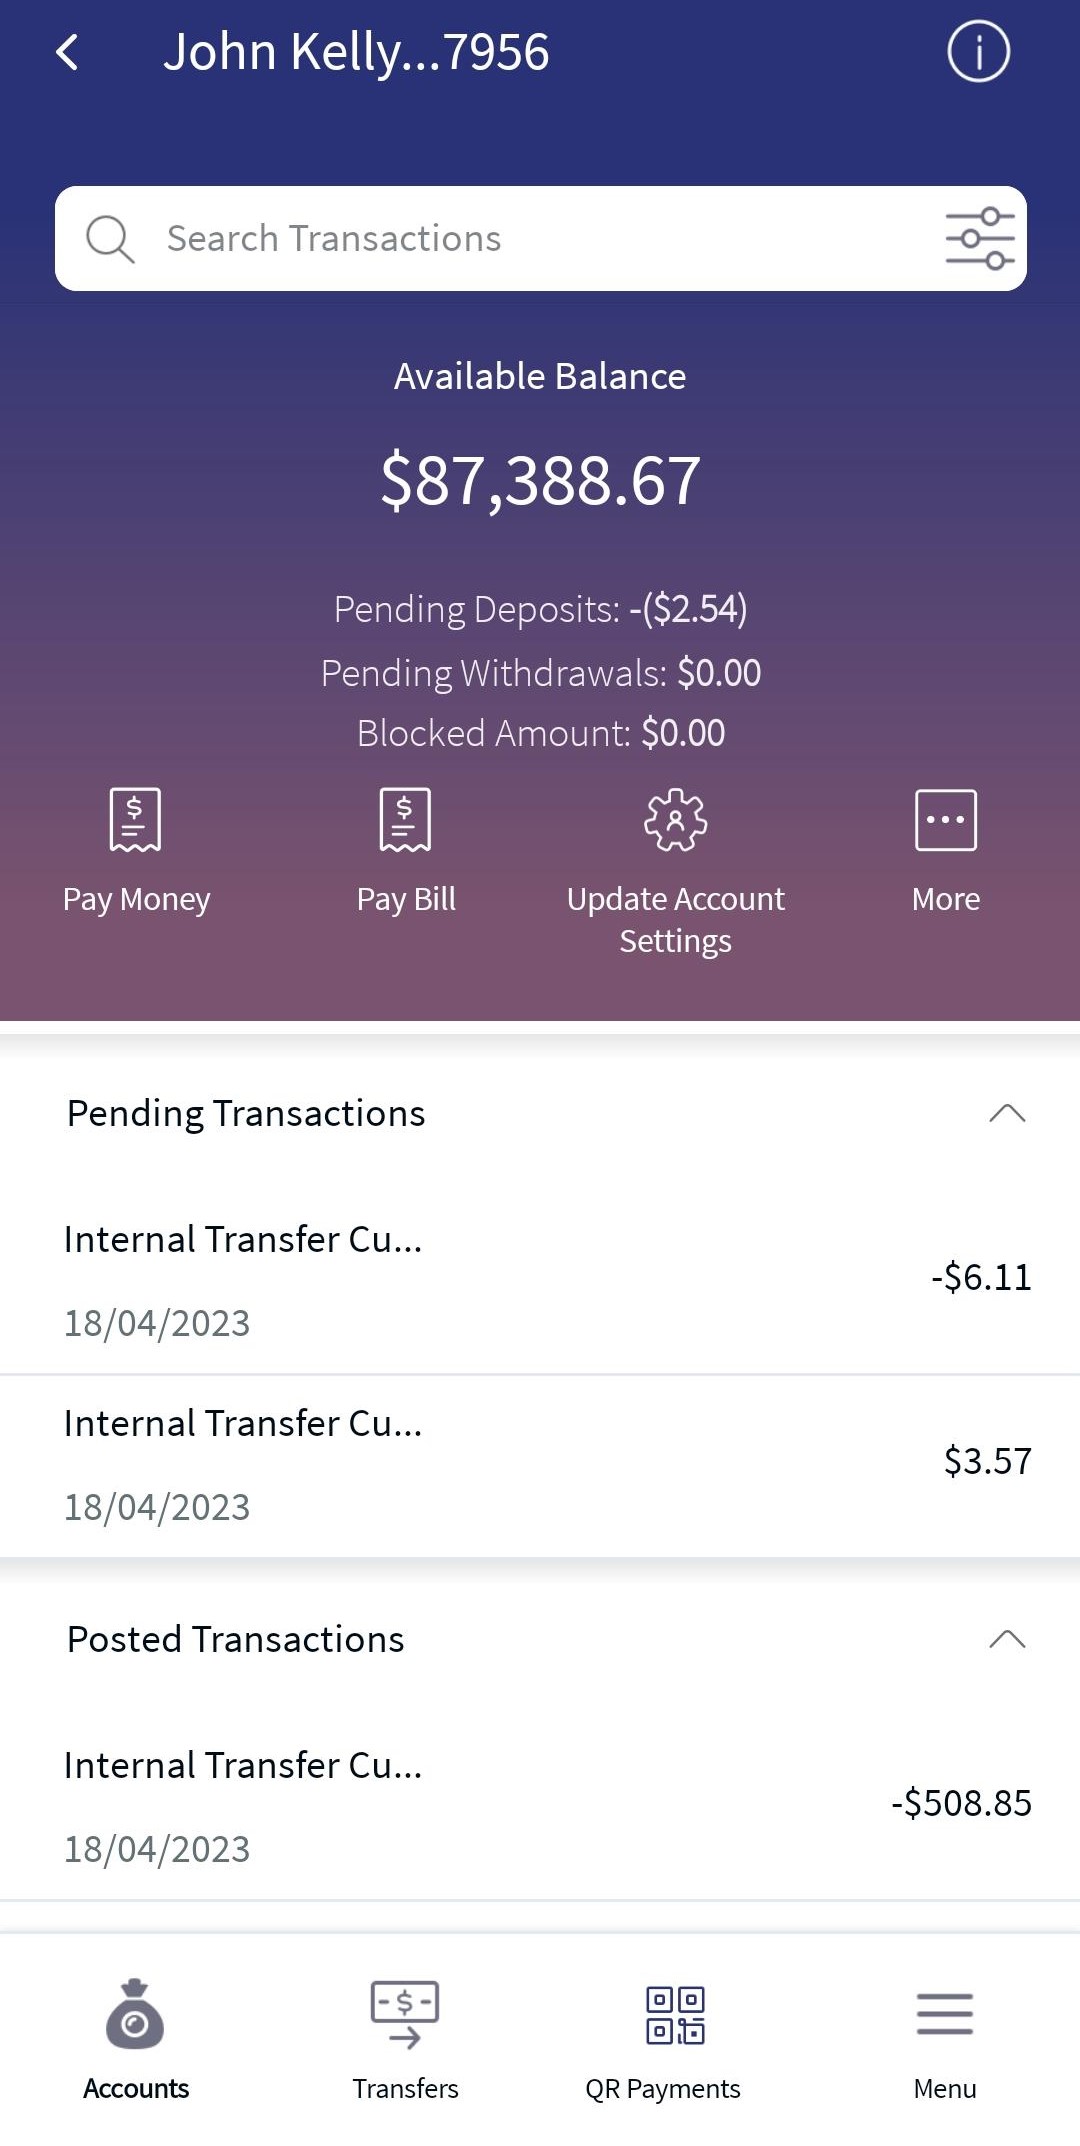
Use the feature to view the account summary of the selected account. From the accounts dashboard screen, tap any account row (for example, Savings account) to view the summary details.
The summary screen displays the balances or relevant details of the selected account, based on the account type. The accounts are segregated by personal and business type at all relevant places in the application.
You can do the following in the account summary screen:
- Tap < to return to the accounts dashboard.
- Tap Search to search for transactions using filter criteria in the selected account.
- Tap
 to view and edit the account details.
 - Tap the contextual menu to view the statements from the quick actions menu. The account statements are available for all account types (checking, savings, investment, credit card, and loan) except external accounts and does not have any restrictions in the product, but if a bank does not want to offer statements for a specific account type, the bank can do so by hiding the Statements button for that specific account type.
- Tap any recent or pending transaction row (record) to view the transaction details.
The summary screen displays the list of Recent and pending transactions in the selected account with date, transaction notes, and amount. The list is sorted by date (most recent transaction on top). Tap any row (transaction record) to view the transaction details.
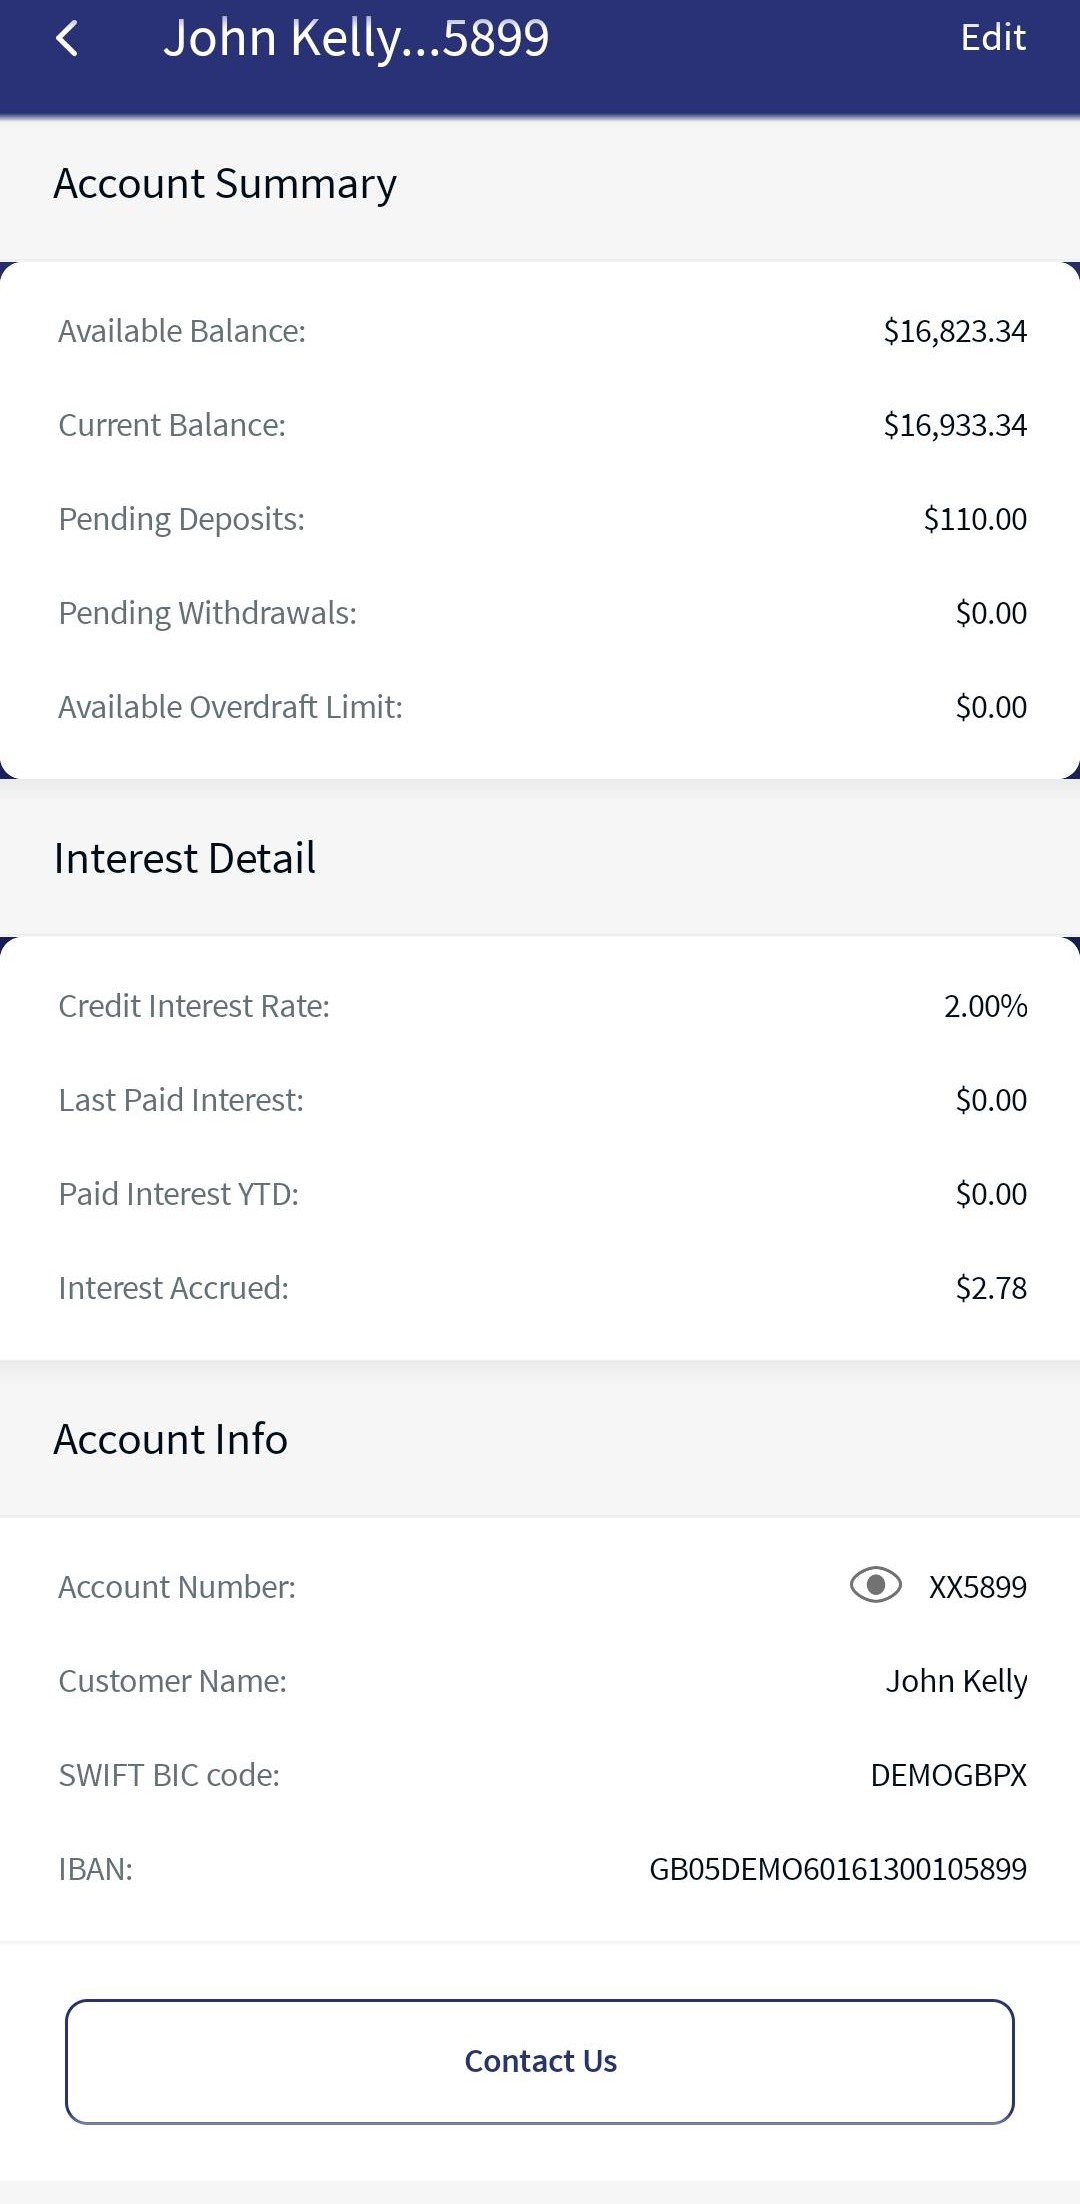
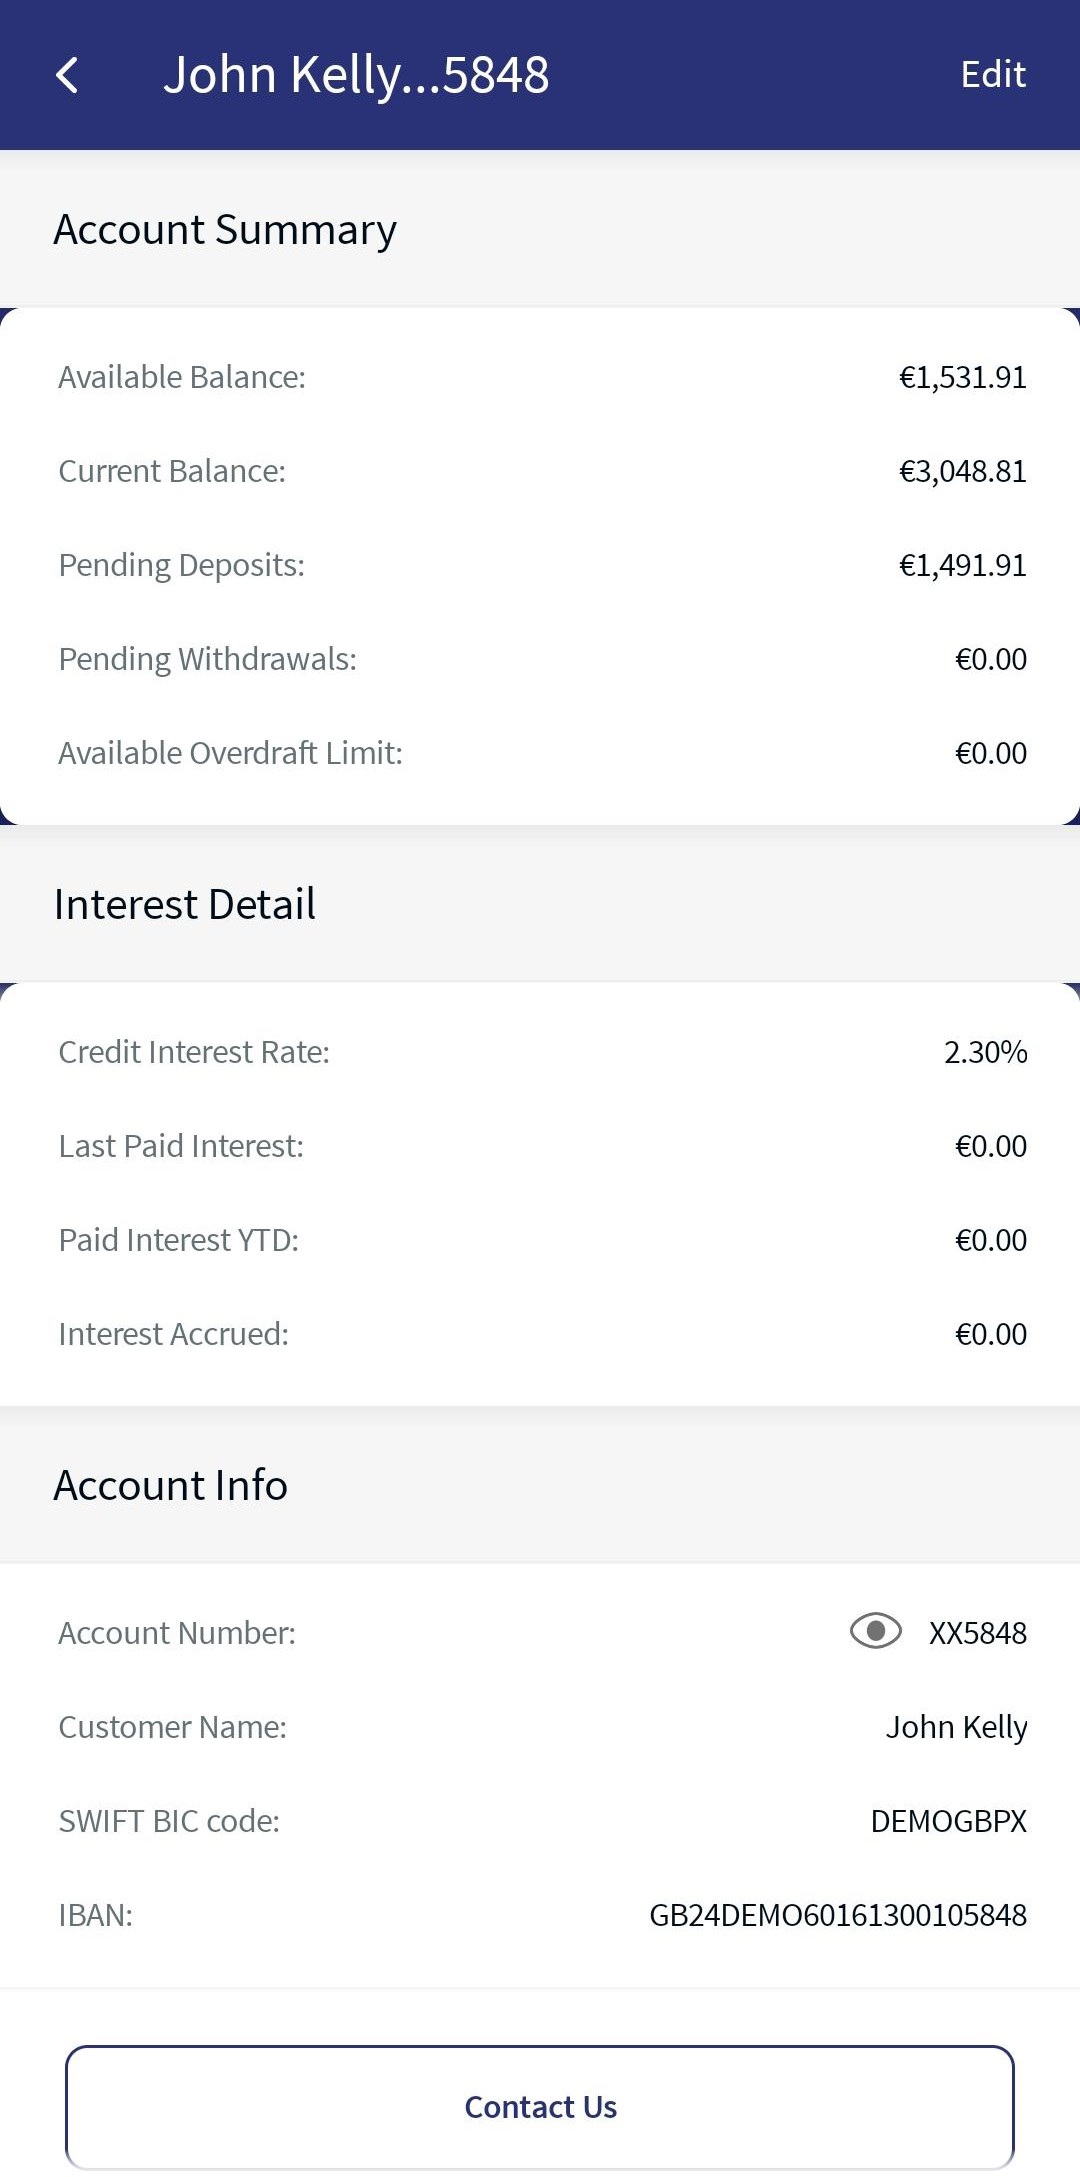
You can call the bank if you have the necessary permission to do so. The permission is tied up at user level. The Contact Us in the account info tab is visible if permission is enabled.
Account Summary screens for various Account Types
Account Details
Use the feature to view in-depth information of the selected account. This page also provides options to contact the bank if you want to clarify any queries.
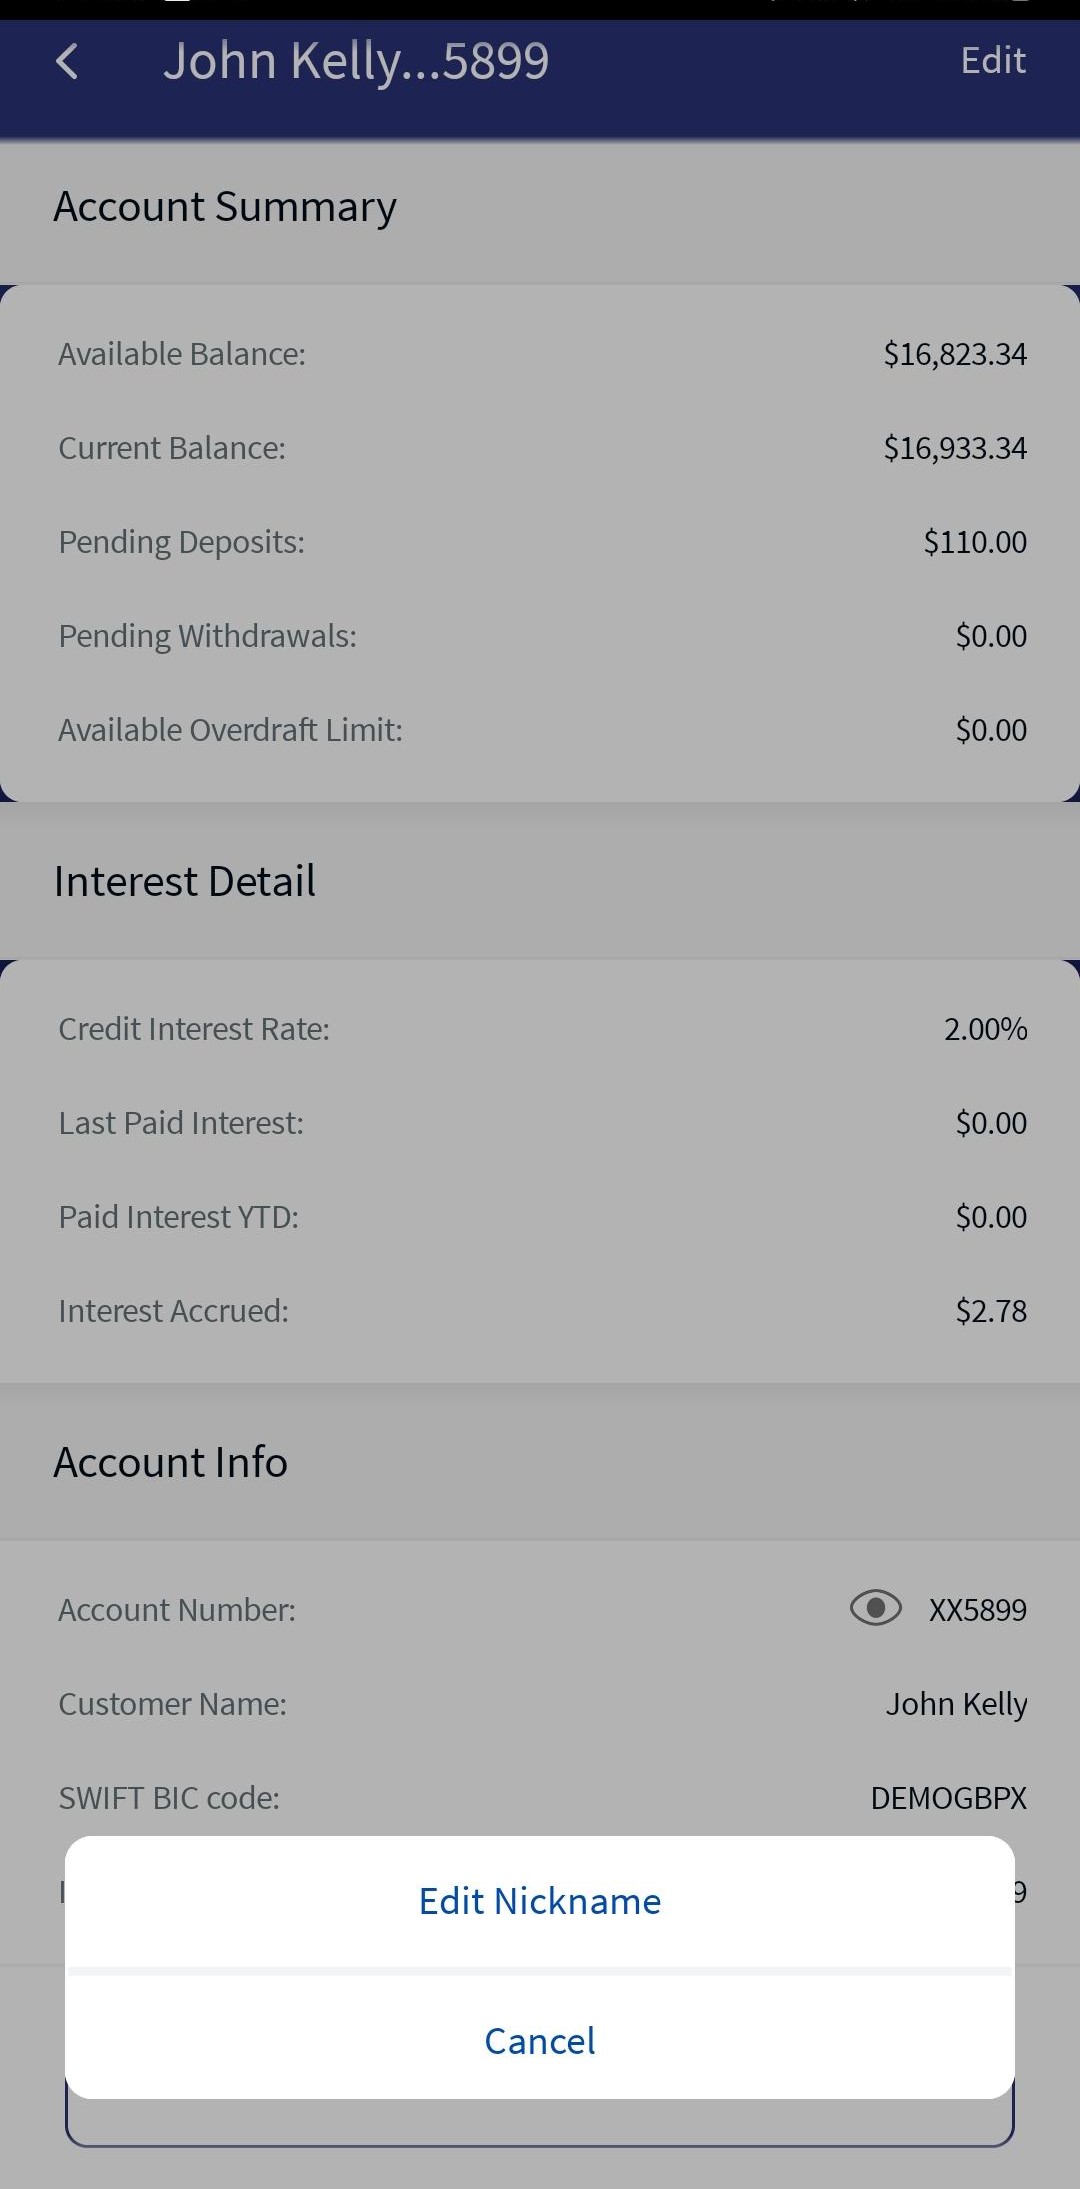
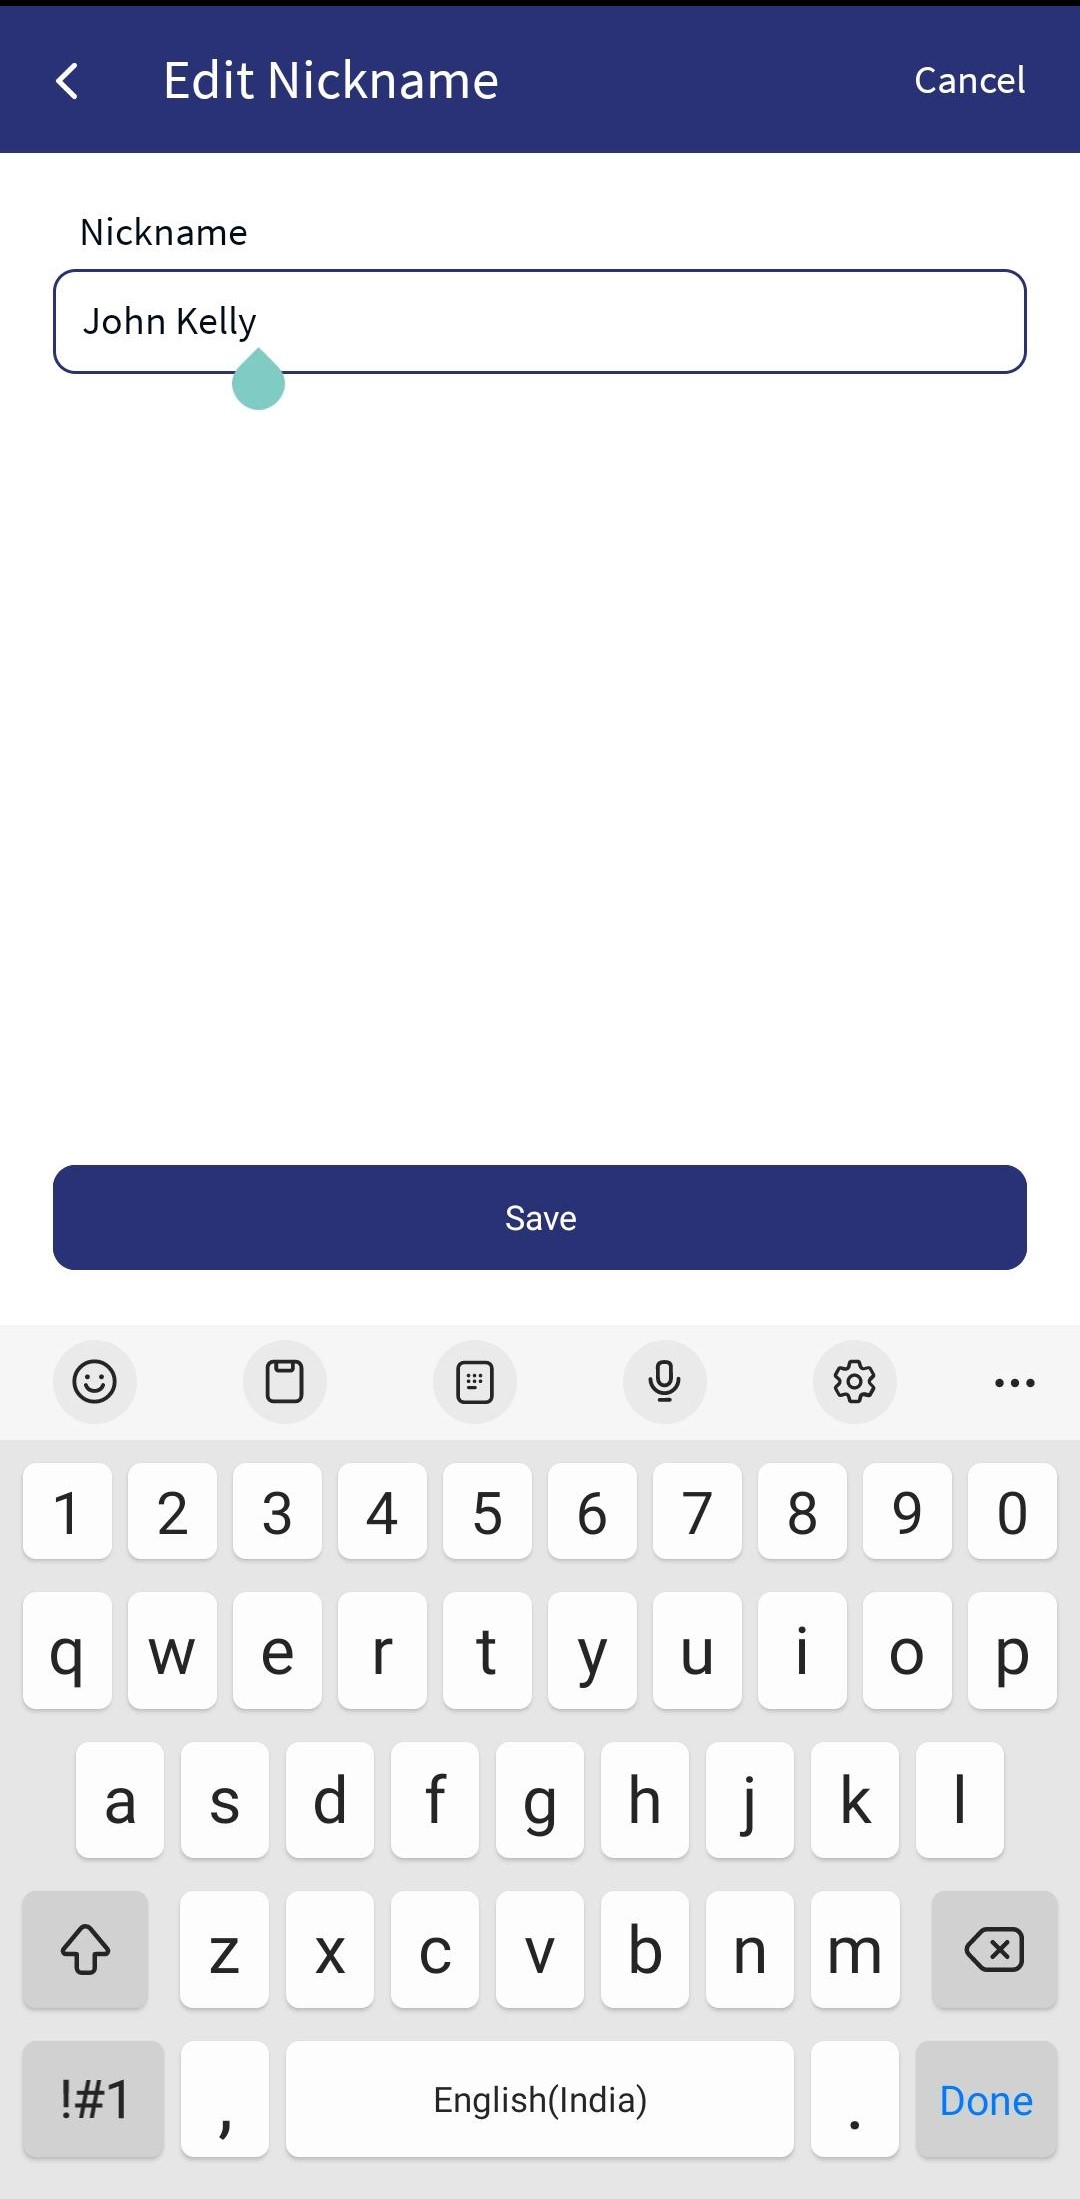
You can change the nickname to be used to identify the account. You can do the following:
- Tap Edit, and select Edit Nickname.
- Edit the nickname and Tap Save. The change will be reflected across all devices wherever the account name is displayed.
Tap < to return to the account summary.
Account Details
Edit Nick name
Recent Transactions
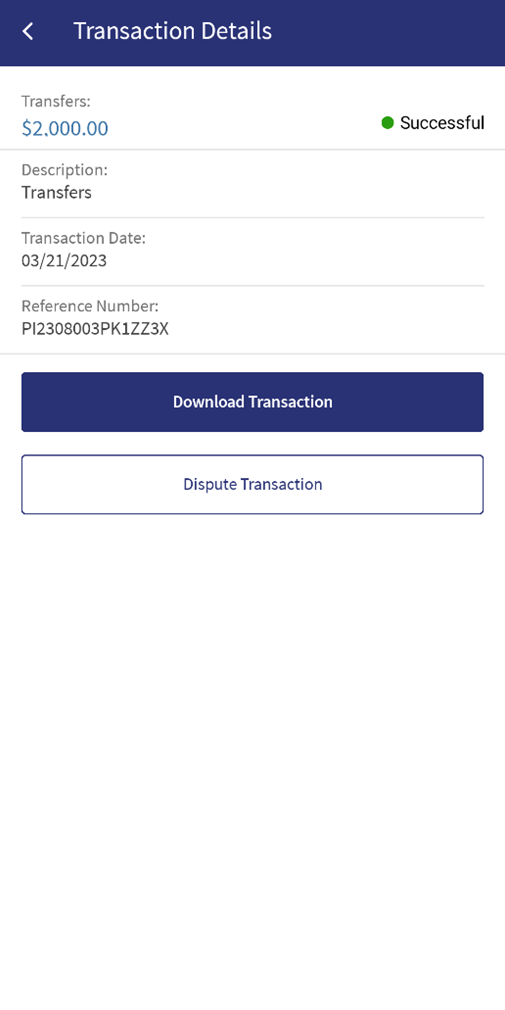
View the details, such as the transaction amount, transaction description, transaction date, reference number and type of transaction.
For transactions where a check is involved (check deposit or check issued to a beneficiary), the app displays the check images in the Transaction Details screen. Tap the respective check images (front and back) as part of the transaction.
You can perform the following actions on this screen:
- Download Transaction. Tap the button to download the transaction. The transaction report is downloaded in PDF format, by default. The downloaded file is password protected, click here to see more information.
- Dispute Transaction. Tap the button to dispute the transaction.
- Tap the back button to navigate to the previous screen.
Blocked Funds
The blocked amount refers to the funds that are blocked by the government or external organizations in the customer's account. This amount cannot be accessed by the customer. The blocked amount can be lifted only by the external organization which placed it. The customer can only view the blocked amount.
The user sees a pop-up message warning that the session is about to expire before the application logs out. This is applicable to web channel and mobile native. The user can then choose to either sign out or extend the session.
Protecting Your Downloaded PDF Files with a Password
The Temenos Digital application allows you to download documents in PDF format. To ensure your data remains secure, all downloaded PDF files is now protected with password. For enhanced security, the password for your downloaded PDF files will follow this format:
[First 4 letters of your lastname] + [Date of birth in the pattern "MMDDYYYY"]
The following are two examples:
| Name (First Name + Last Name) | Date of Birth | Password | Notes |
|---|---|---|---|
| Justin Alexander | 01/Jan/1980 | ALEX01011980 | |
| John Doe | 25/Mar/1990 | Doe03251990 | Since the last name is less than 4 characters, the logic will consider all the available characters in last name. |
Also see Spotlight Configuration.
Configuration
Spotlight Configurations
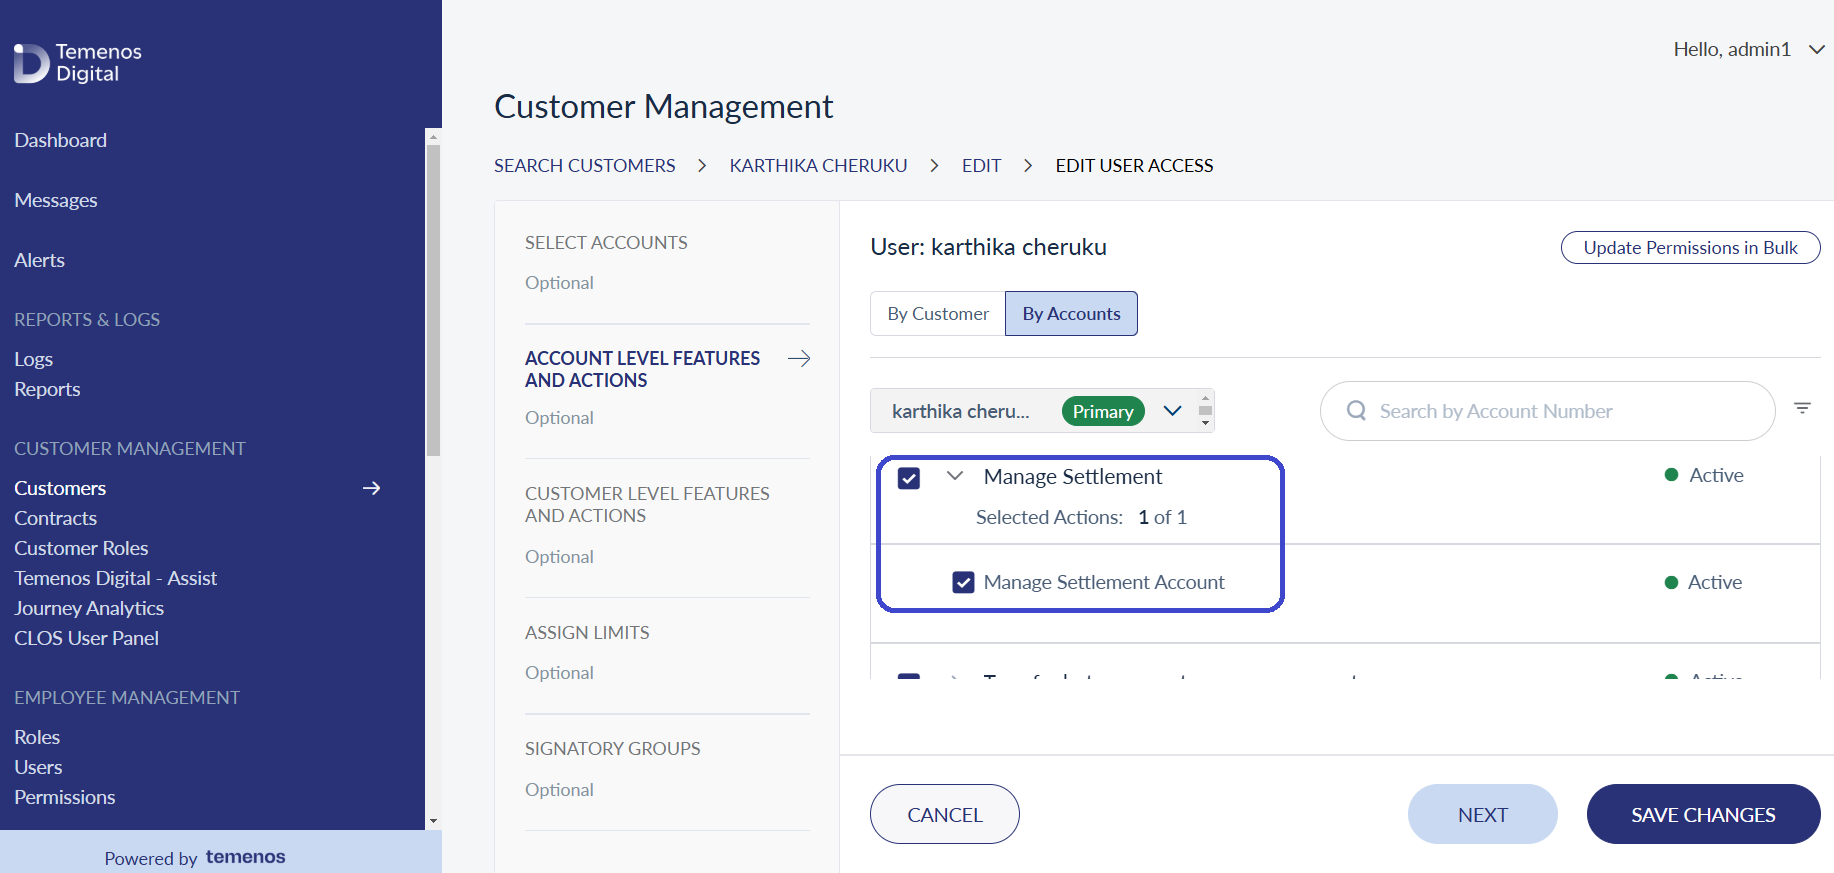
User should have MANAGE_SETTLEMENT_ACCOUNT permission in spotlight to add, remove or update the settlement account.
Permissions
- The visibility of each feature is controlled through the permissions defined for the user. The permission are defined in the Spotlight application.
- The elements on the screen depends on the user account type and the permissions to access features and perform associated actions.
- The capability to revoke or restore the features is available in the Spotlight application.
Integration with Transact using IRIS APIs
The following are integrated with Transact using IRIS APIs to pull and display the information:
- Account Summary tab: To pull and display the details of a selected account (includes Savings, Checking, Loans, and Deposits) to which the authorized user has access.
- Interest Detail tab: To pull and display the details of a selected account (includes Savings, Checking, Loans, and Deposits) to which the authorized user has access.
- Account Info tab: To pull and display the details of a s elected account (includes Savings, Checking, Loans, and Deposits) to which the authorized user has access.
- Transaction Details: To display the list of posted and pending transactions of a selected account to which the authorized user has access.
- Pending Transactions: To display the upcoming and recurring transactions of accounts to which the authorized user has access and updating the modified date in Transact for business and combined users.
Backend Integration - Transact/MS/Mock
Using the runtime configurable parameter (Arrangements_Backend server property) at the Micro App level, an implementation team can configure the backend integration endpoint as HMS/AMS/SRMS, Transact, or Mock as per customer needs for the following. The Arrangement Fabric MA supports the integration.
- The backend integration for all the APIs is mocked (DBX DB) or SRMS based on customer needs.
- The validations are avoided if the module is directly integrated with Transact endpoints.
- When records are created, use these options: Use the DBX DB table records that already exist, or use the Fabric Java layer to build a stubbed or JSON data response directly.
Follow these steps:
- Sign-in to your Fabric console.
- From the left pane, select Environments.
- For your Fabric run-time environment, click App Services.
- Navigate to Settings > Configurable Parameters.
- On the Server Properties tab, go to
Arrangements_BackendField Name and set the Field Value depending on the integration (for example,Possible Values for Arrangments_Backend : MOCK, t24, MS).If Arrangments_Backend is set to MS, the Pending Transactions will return from transact.
- Click Save.
| Modules | Integration |
|---|---|
|
SRMS or Mock (DBX DB) |
| Pre-login accounts preview (Native) | Mock, AMS and HMS, or Direct Transact integration |
| Cheque Management | Transact via SRMS |
| Account Setting | Transact via SRMS |
| Service Request History | SRMS |
| Dispute Transaction | Mock (DBX DB) via SRMS |
| Remote Deposit Capture | Mock (DBX DB) |
| Cardless Cash Withdrawal | Mock (DBX DB) |
| Bill Pay Registration | Mock (DBX DB) |
| Person to Person Registration | Mock (DBX DB) |
PDF Password Protection
In the Spotlight, a new DBP bundle configuration added. This logic helps the file to generate the password for the PDF file.
| Key | Value | Description |
|---|---|---|
| PDF_PASSWORD_CONFIG | {"USER":{"PART1":{"FIELD":"lastname","NUM_OF_CHARS":4} , "PART2":{"FIELD":"dateOfBirth","PATTERN":"MMDDYYYY"}}, "OWNER":"TEMENOSDIGITAL" } |
In PART1, The FIELD can be 'lastname' or 'firstname'. In PART2, the PATTERN can be any valid part like MMDD, DDMM, MMDDYYYY, YYYY, or MMDDYY. The generated password is the concatenated string of PART1 and PART2. |
System Configurations
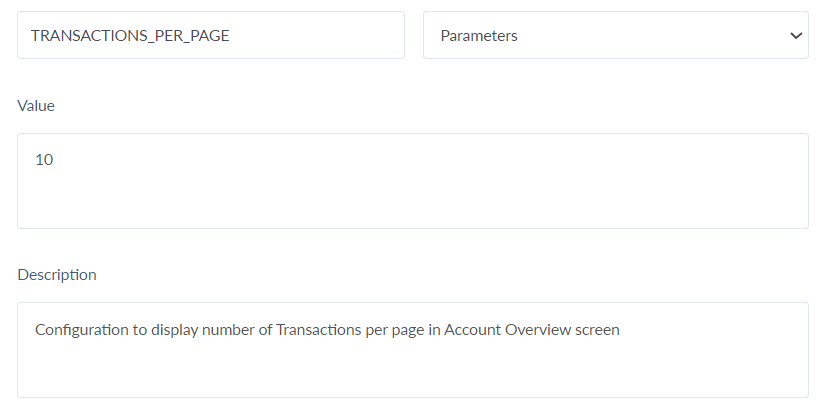
System configuration (Bundle-: DBP) is available in the Spotlight application to define the number of transactions(Posted, Pending, and Blocked funds) fetched from the backend and determine the number of transactions to be listed per page.
Transaction Per Page
Transaction per page defines the number of transactions to be listed per page. This configuration is applied when the user views the Recent Transactions and Advance search results.
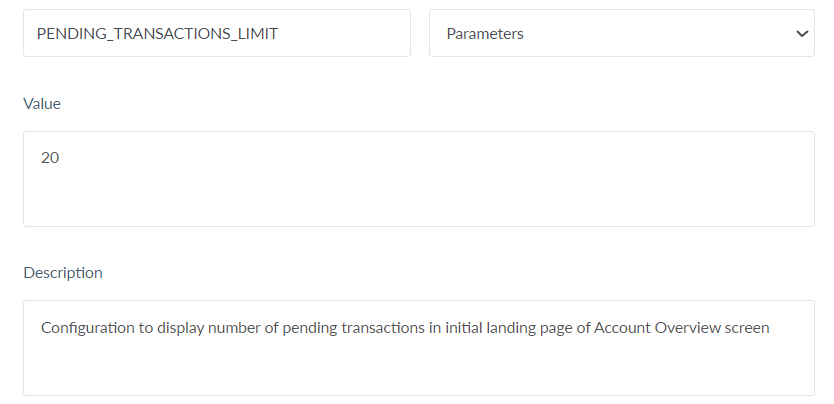
Pending Transaction
This defines the number of pending transactions to be fetched from the backend system. This configuration is applied when the user views the Recent Transactions.
The configuration for the number of pending transactions is fetched from the backend system when the user view the recent transactions.
If the system configuration is set has 30, and transactions per page is set as 15, the user can see 15 records on page 1 and other 15 transactions on page 2.
- If the user has no pending transactions, it shows no transaction found.
- If the user has 25 records, the user can see 15 records on page 1, and 10 records on page 2.
Posted Transactions
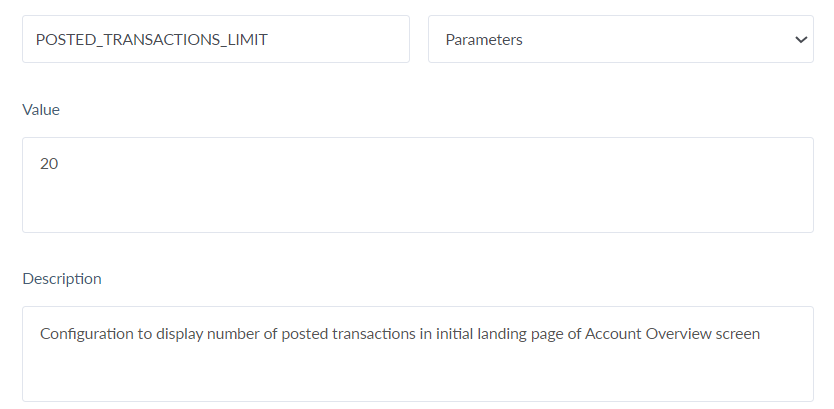
The configuration for the number of posted transactions and advance search is fetched from the backend system when the user view the recent transactions. However, in advance search, paginated calls, number of transactions, and other information is fetched as per the configuration for the defined time period.
If the system configuration is set has 30, and transactions per page is set has 15, the user can see 15 transactions on page 1 and other 15 transactions on page 2.
- If the user has no posted transactions, it shows no transaction found.
- If the user has 25 records, the user can see 15 records on page 1, and 10 records on page 2.
API
For the complete list of APIs shipped as part of this feature, see Experience APIs documentation.
In this topic