Alert Settings
Alerts is a notification service that detects the modifications and sends alerts to the customers when an activity is performed. Alert settings can be used to manage your preferences for different alert types and the channels through which the bank or credit union should send alerts to a customer. Alerts can be enabled or disabled as per your requirement.
Menu path: Web Channel> Hamburger menu > Settings > Alert Settings
Menu path: Web Channel > Profile Image > Alert Settings
Menu path: Mobile Native > Menu > Settings > Alerts
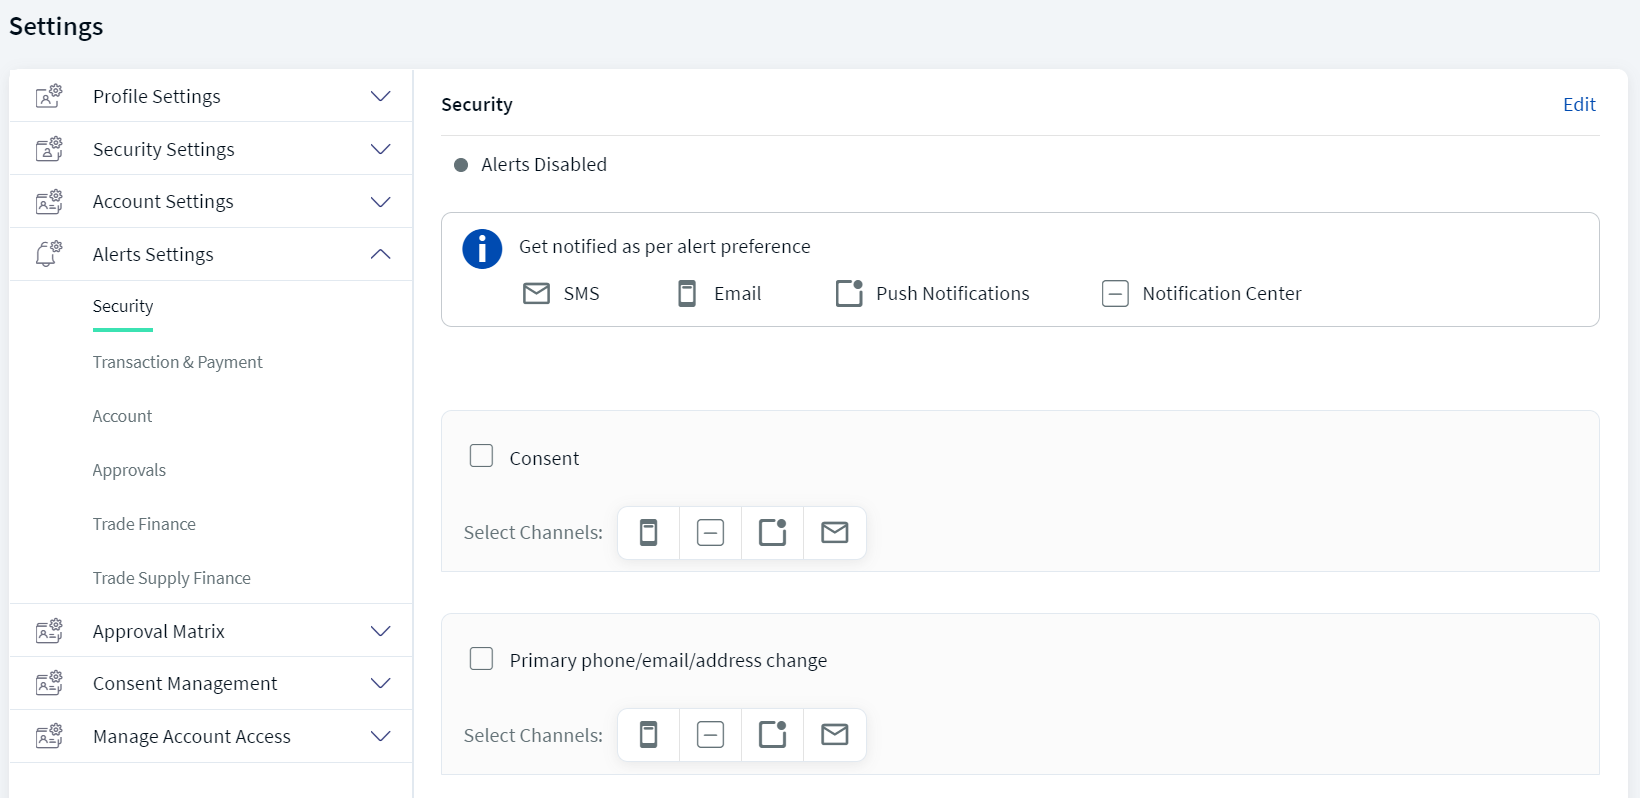
The application displays the Alert Communication screen by default.
Alert communication
You can manage alerts by adding or selecting the contact details for alert communication. You can set your preferred email ID or phone number from the list of your existing contact details.
You can also add the new contact details specific to alert communication. This option will be enabled only when your FI enables the alert communication specific configuration (separate contact details for alerts) in Spotlight. You can enable this configuration from Spotlight > Business Configurations > Alert Configurations.
The contact details are pre-filled with your primary email address and phone number by default.
To select the preferred contact details or alert communication, follow these steps:
- Click Alert Communication under Alert Settings.
- Click Edit to modify the existing alert communication details.
- Click and select a phone number from the list of existing contact numbers.
- Similarly, click and select an email ID from the list of existing email IDs.
- Click Save to save the settings.
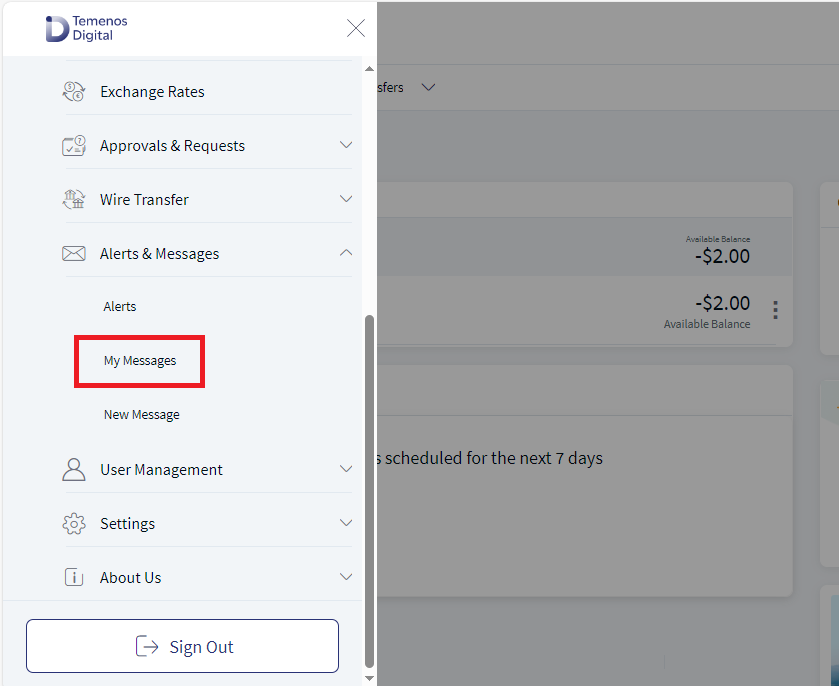
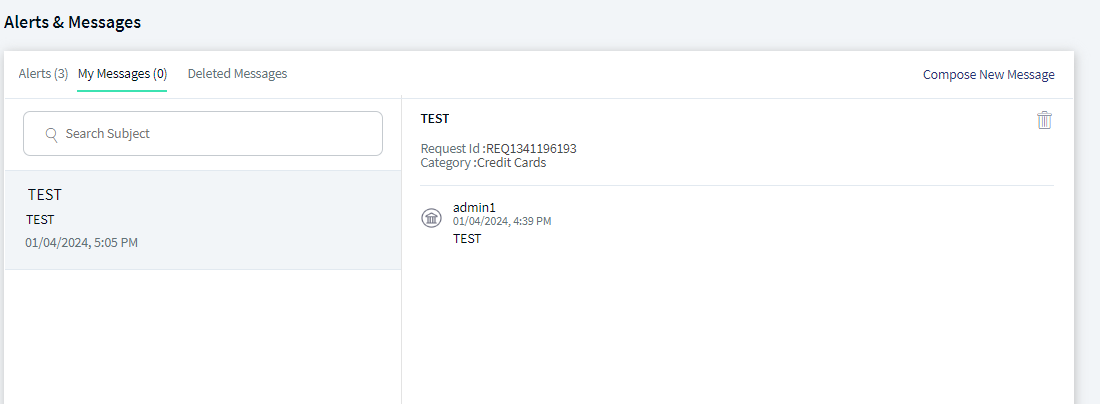
Alert Preferences
The alerts can be set at three levels:
- Category level
- Group level
- Alert level
The alert preferences must be set by your FI under Alert Configurations module in Spotlight.
Category Level
You can manage the alerts at category level only when your FI selects the user alert Preferences at alert category level in alert configuration module.
You can configure the following preferences at category level:
- Select or deselect default channels for each alert category.
- Modify the default frequency for each applicable alert category.
- If the category or group has multiple alerts and only a subset has frequency defined at alert level, then the frequency selected by user at group or category level would be applicable only to the set of alerts which have frequency defined at alert level and is not applicable to remaining alerts.
- Modify default attributes for each applicable alert under respective alert category.
- Enable or disable each alert category
- Select an account to manage preferences for each alert category for account specific alerts.
Group Level
You can manage the alerts at group level only when your FI selects the user alert Preferences at alert group level in alert configuration module.
You can configure the following preferences at group level:
- Select or deselect default channels for each alert group.
- Modify default frequency for each alert group
- If a category or group has multiple alerts and only a subset has frequency defined at alert level, then the frequency selected by user at group or category level would be applicable only to the set of alerts which have frequency defined at alert level and is not applicable to remaining alerts.
- Modify the default attributes for each applicable alert under respective alert group.
- Enable or disable each alert group.
- Select an account to manage preferences for each alert group for account specific alerts.
Alert Level
You can manage the alerts at alert level only when your FI selects the user alert preferences at alert level in alert configuration module in Spotlight.
You can configure the following preferences at alert level.
- Select or deselect default channels for each alert.
- Modify default frequency for each applicable alert.
- Modify default attributes for each applicable alert under respective alert.
- Enable or disable each alert.
- Select an account to manage preferences for each alert for account specific alerts.
Currently, the alerts are categorized into three types. However, the banks/SFIs will configure the categorization of alert types.
Only account level alerts are shown under the account level category and the remaining other categories can be configured by banks/FIs.
- Transaction and Payment - These alerts are sent when an activity is performed such as Bill Payments, adding or updating a Bill Payee, and payment related alerts.
- Security - These alerts are sent when there is a change in Profile Status and Credentials.
- Account - These alerts are specific to each account of the customers.
You can do the following:
- View Alert Settings for different types of alerts
- Edit Alert Settings
- Set Alert Communication
View Alert Settings
Use the feature to edit the existing alert settings of each category.
Menu path: Alert Settings > select a category
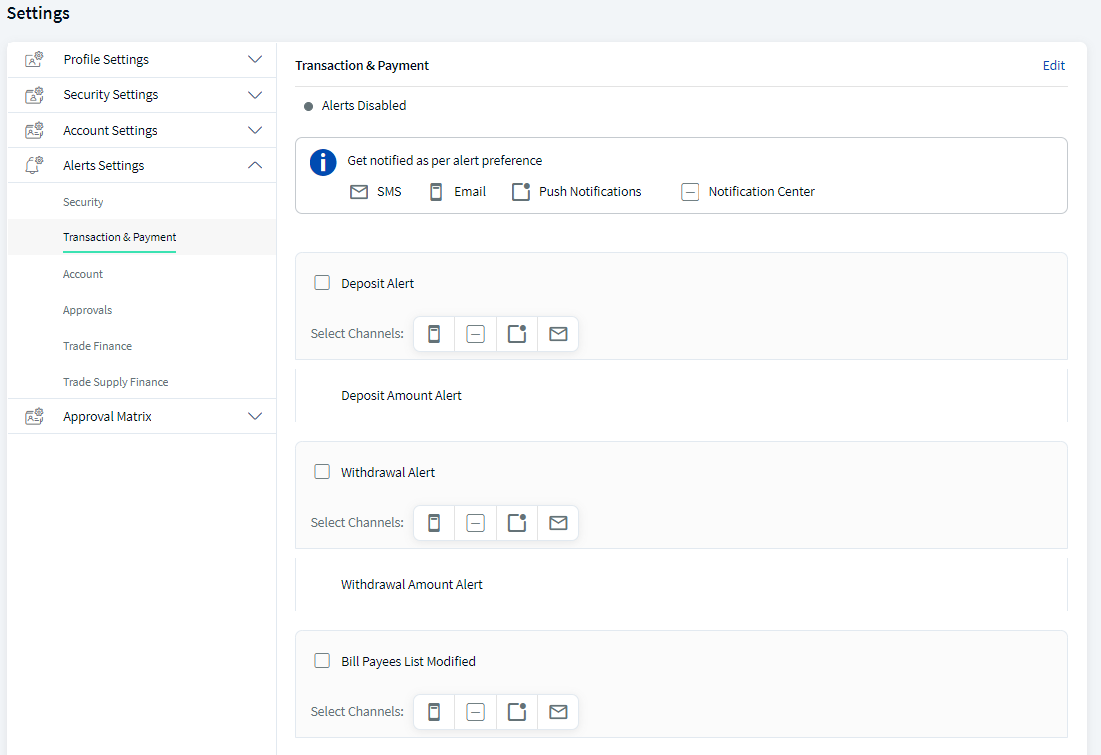
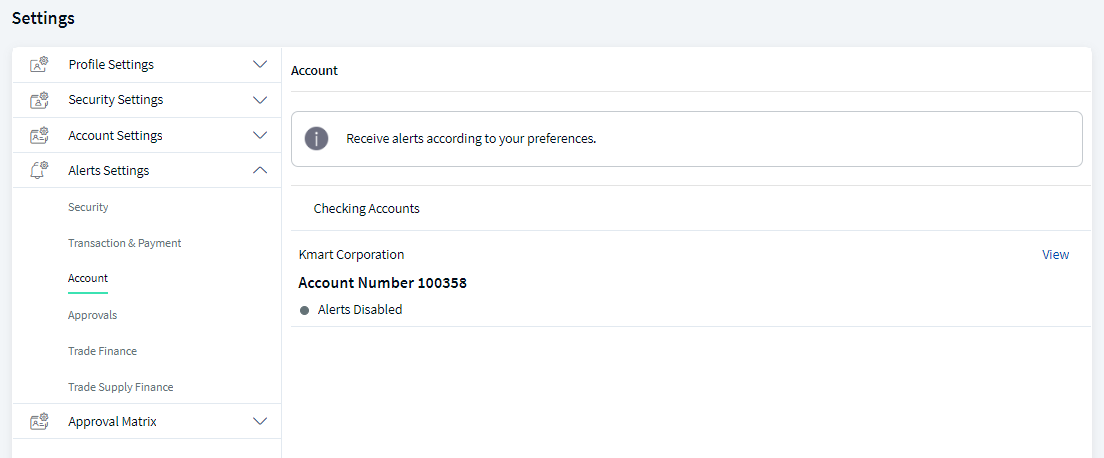
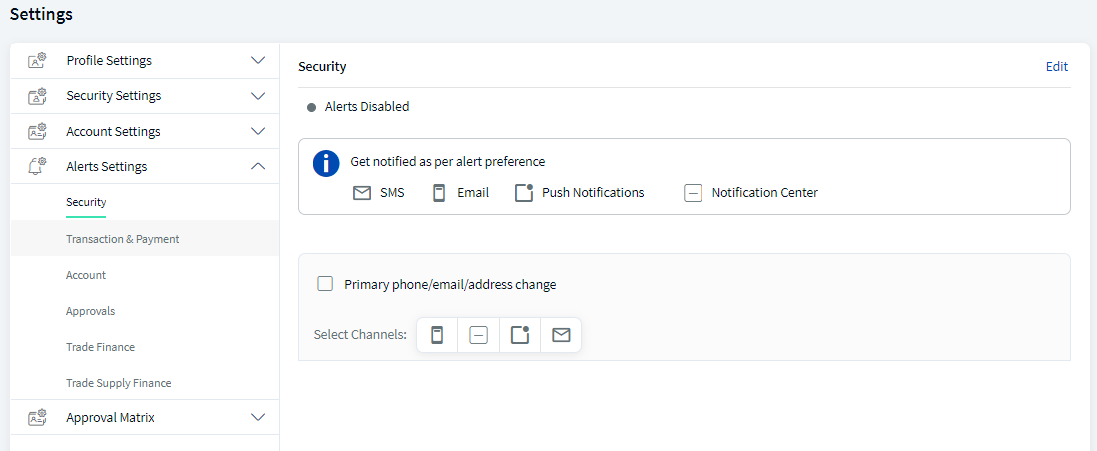
The alerts are categorized as Security alerts, Account Alerts, and Transaction and Payment Alerts. Click on a category to view the alert settings.
You can view the following settings from this screen.
- Status of the alert (enabled/disabled)
- Select Methods: Available methods are:
- SMS/Text
- Notification Center
- Push Notification
- Categories - Click the checkbox under each category to receive an alert when an action is performed.
| Alert Type | Categories |
|---|---|
| Security | Primary Phone/Email/Address change |
| Transaction and Payment | Deposit Alert |
| Withdrawal Alert | |
| Bill Payees List Template | |
| Bulk Payment Template | |
| P2P Recipients List Modified | |
| Transfer Recipients List Modified | |
| Transfer Made | |
| Accounts | List of account types with the account number. This page layout will be differ based on total number of accounts, and also differ for single and multi customers. |
| Approvals | Approval Cheque Book Requests |
Accounts Alert Setting Overview
In Alert Settings > Accounts section page, the user can view all accounts to set alert preferences. Based on the user contracts architecture, a user can belong to the following categories.
- User having access to only one Customer ID which could be business or retail, can see all own accounts.
- User having access to own personal accounts and multiple Customer IDs, can see own personal, business, and retail accounts distinctly.
- User having access to multiple Customer IDs, can see the accounts grouped by customer name/ID and whether they belong to retail or business IDs distinctly.
The application displays different screen to the user based on the contract. See Account listing and Customer listing dashboard for more information on users having large number of accounts and contracts. In Spotlight, the bank needs to configure the system configurations(Bundle DBP - ACCOUNTS_COUNT_COMPACT_DASHBOARD, Bundle DBP - ACCOUNTS_PER_PAGE) to enable the different views.
The following are the different scenarios on how the applications behaves:
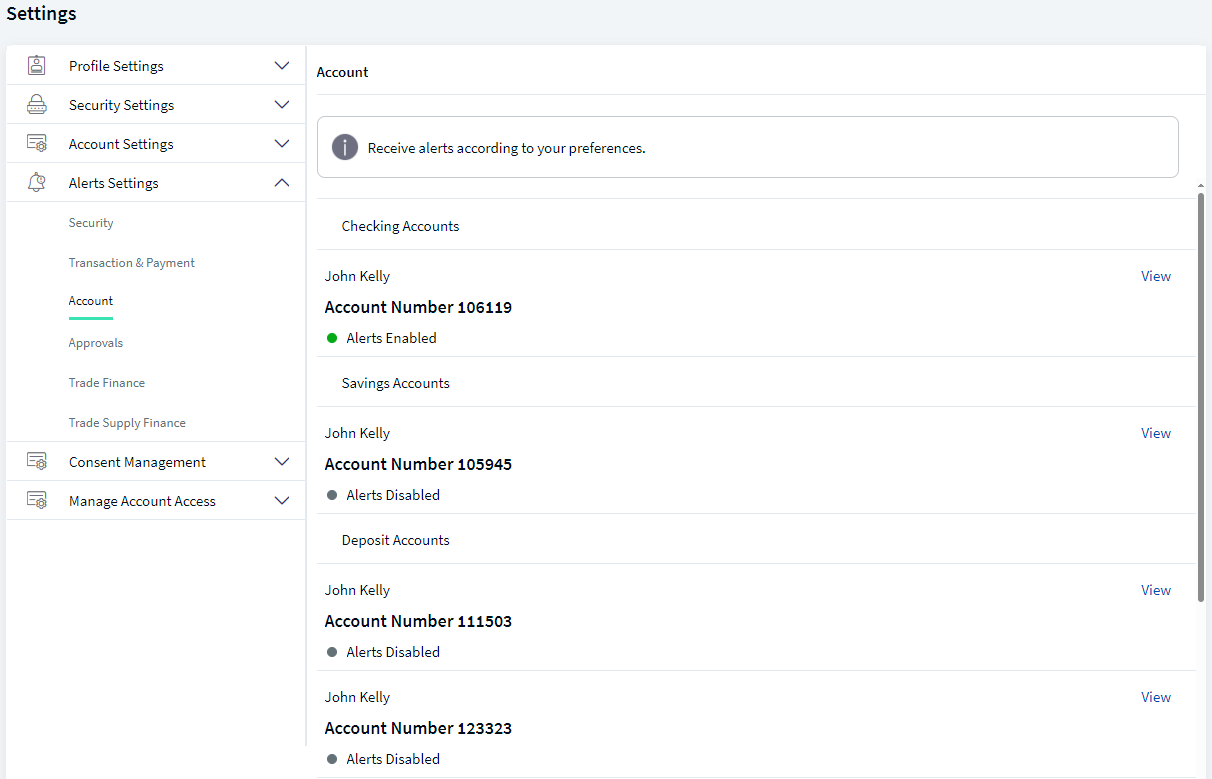
Scenario 1: The user having access to single customer ID and have less than or equal to 10 accounts
For the users having access to a single customer ID with less than or equal to 10 accounts. The application displays all the accounts grouped by account types (Savings, Current, and many more). Here, number 10 is a configurable number and has to configured in spotlight.
Scenario 2: The user having access to single customer ID and have more than 10 accounts
For the users having access to a single customer ID with more than 10 accounts. The application displays Account Type filtering and search options, and all the accounts are grouped by account types (Savings, Current, and many more). The application displays pagination to span between pages. By default, the pagination value is set to 10, and this value can be configured in Spotlight.
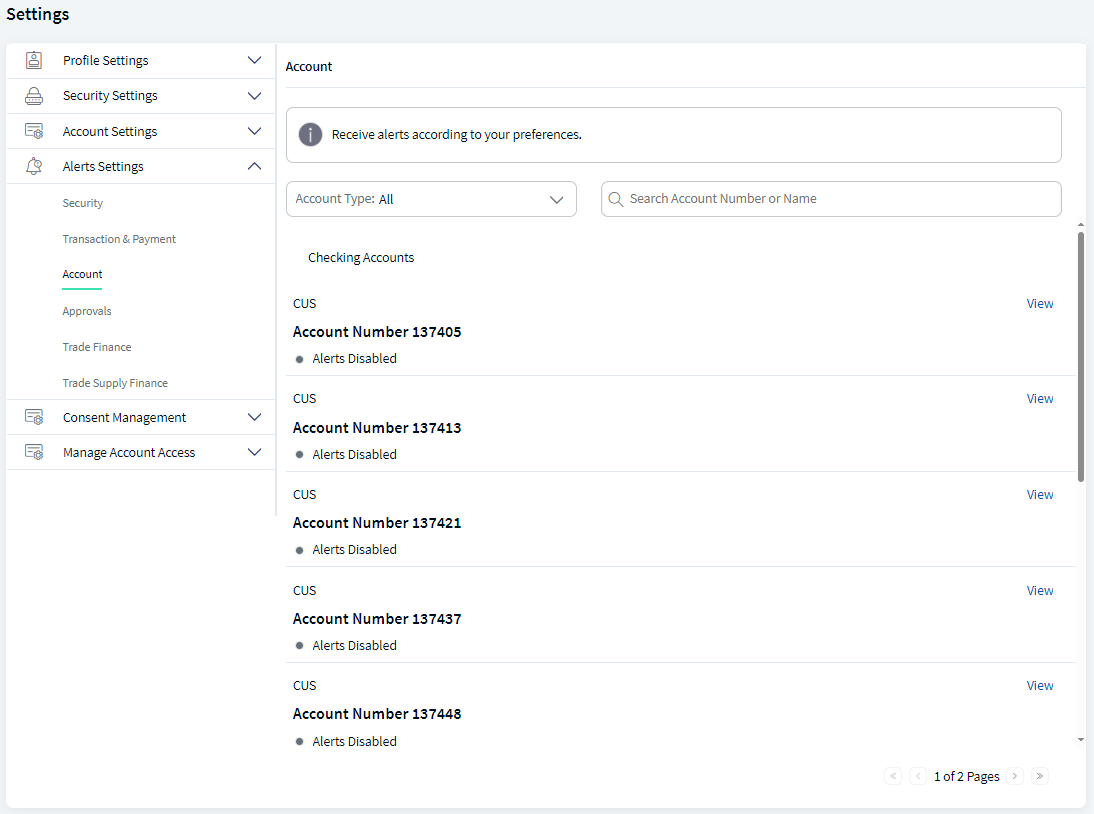
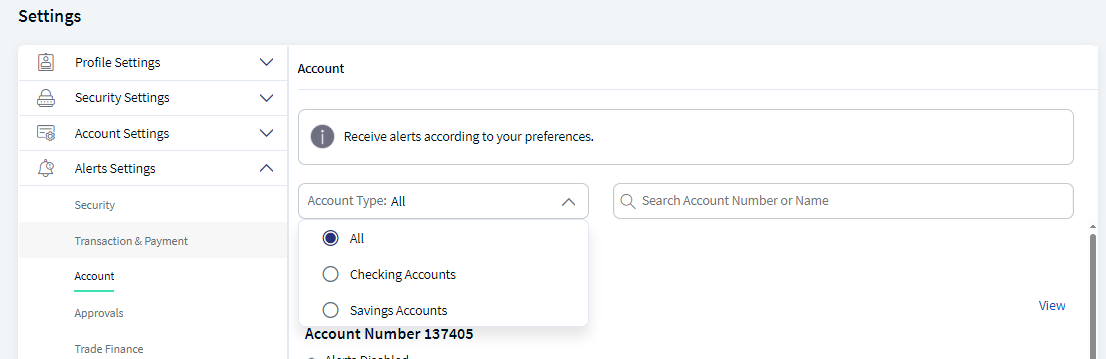
- The Account types filter option displays all the types of account the user has, which the user can use it to narrow down the results. By default, All Accounts is selected and the available drop down values are All, Preferred Accounts, Checking Accounts, Savings Accounts, and Loan Accounts.
- Search option, the user can search using account number or account name to narrow down the results. If the search does not retrieve any matching results, the application displays a No Accounts Found message.
Scenario 3: The user having access to multiple customer IDs
For users having access to multi-customer IDs, the application displays a filter option(View by and Account Type) and combo box (which the user can use to search or select from the drop-down list). The application displays pagination to span between pages. By default, the pagination value is set to 10, and this value can be configured in Spotlight.
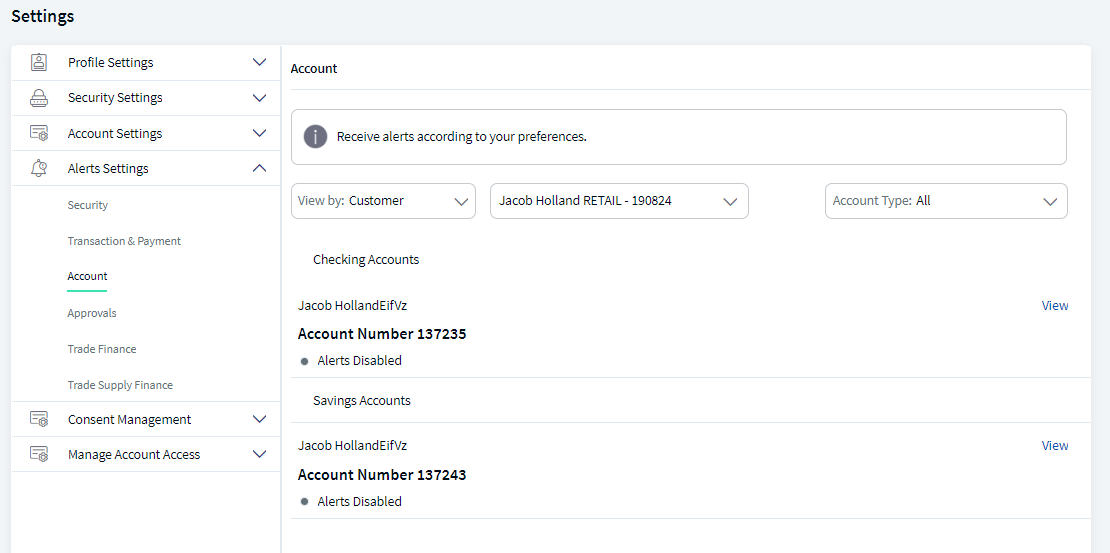
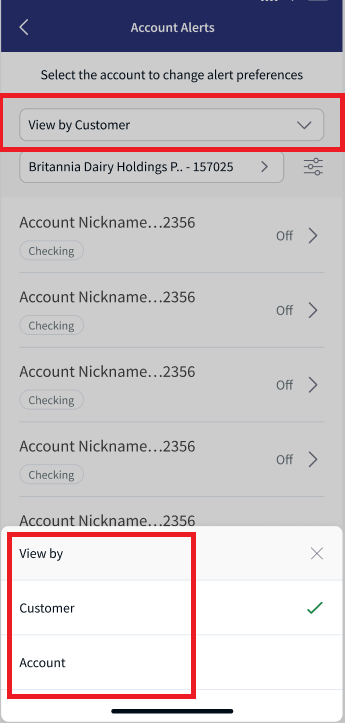
- The View By filter has two values Customer and Account. By default, View by is selected as Customer.
- When View By is selected as Customer. The application will display
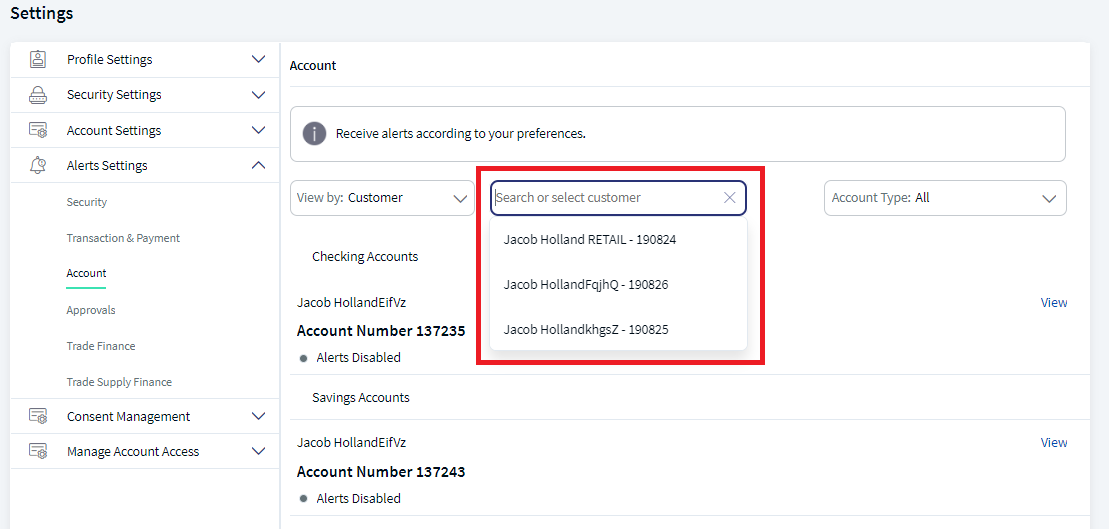
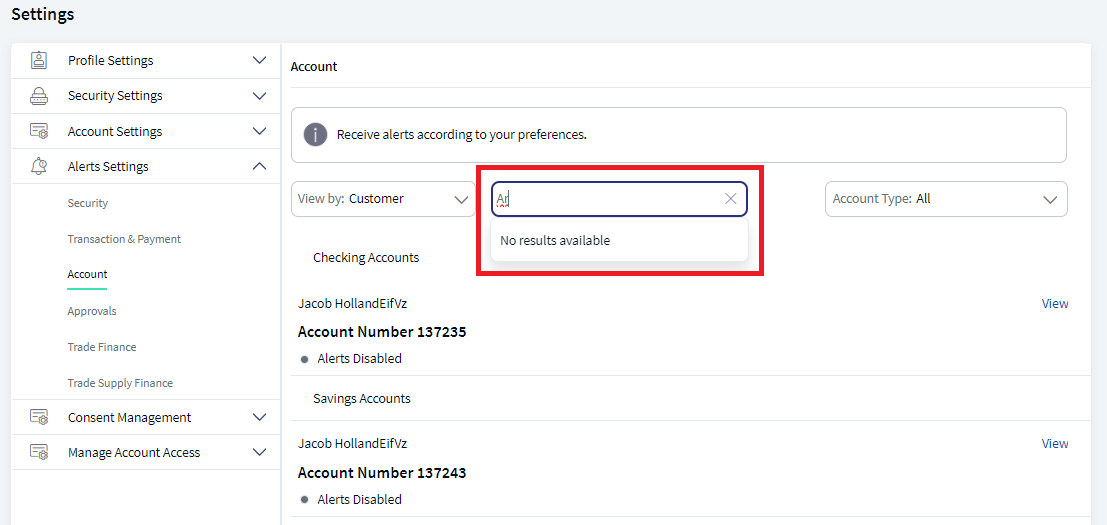
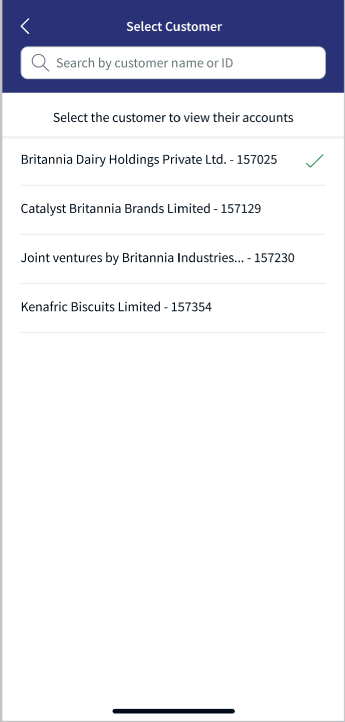
- Combo box (which the user can use to search or select from the drop-down list) field with first customer selected as default. The search can happen using customer name and customer ID or select the customer from the drop-down fields. If the search does not retrieve any matching results, the application displays a No Results Available message in the drop-down box.
- Account Type filter option dropdown field with values - All, Preferred Accounts, Checking Accounts, Savings Accounts, Deposit Accounts, Loan Accounts, (with Account Type - All accounts option displayed as default).
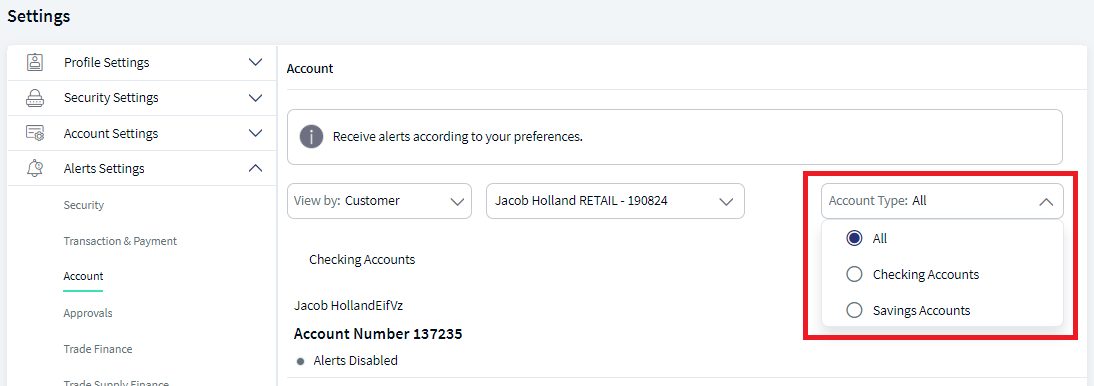
- Pagination for navigation with default value as 10 to span between pages with option as Next page, Prev page, First page, Last page.
- To view alert settings, the user needs to select the Customer, filter the Account Type, and click View the details of each account.
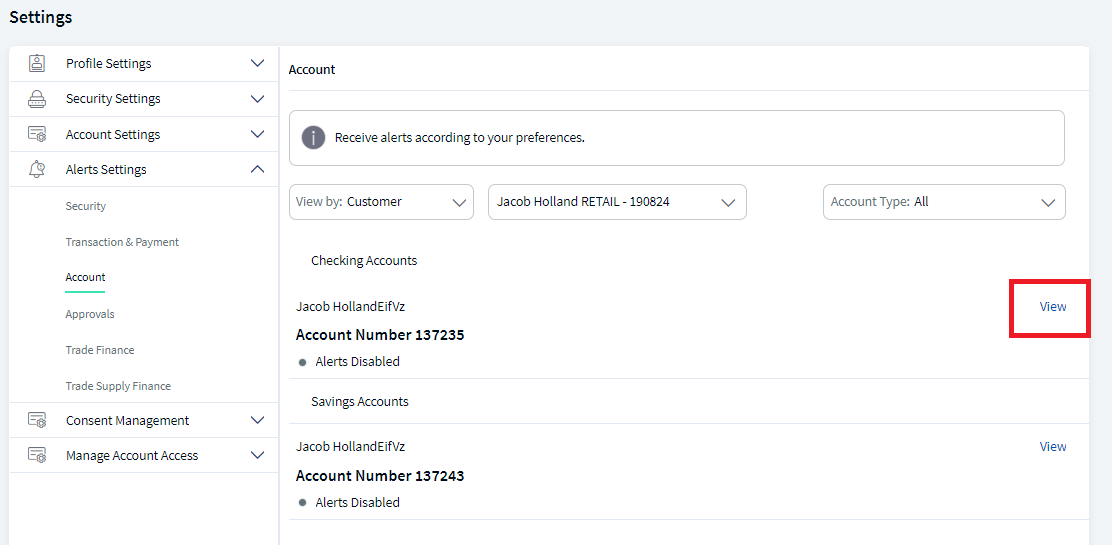
- Combo box (which the user can use to search or select from the drop-down list) field with first customer selected as default. The search can happen using customer name and customer ID or select the customer from the drop-down fields. If the search does not retrieve any matching results, the application displays a No Results Available message in the drop-down box.
- When View By is selected as Account. The application will display
- Combo box (which the user can use to search or select from the drop-down list) field with place holder as Search or Select Account . The user can search for an account using account number or account name or select the account from the drop-down list. If the search does not retrieve any matching results, the application displays a No Results Available message in the drop down box.
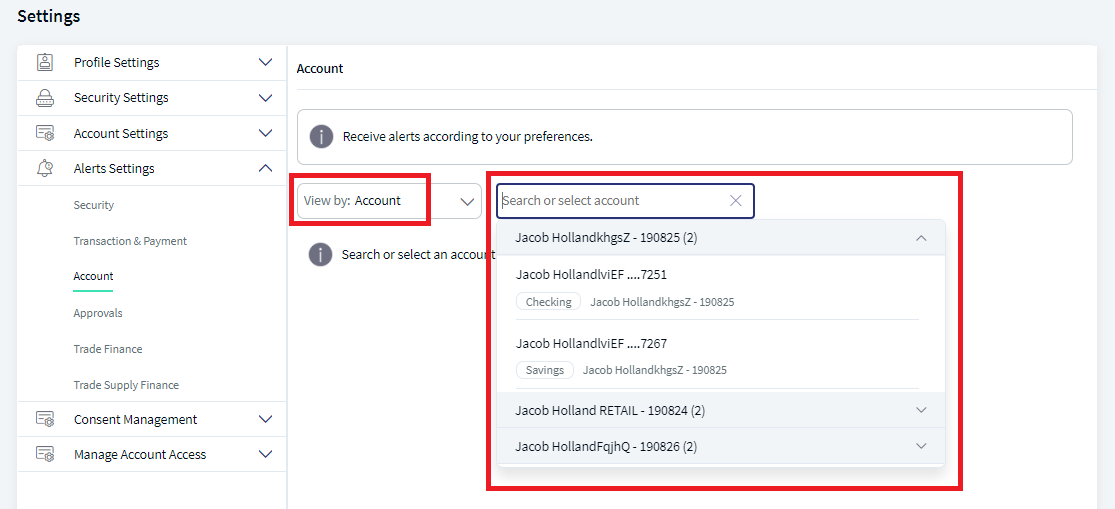
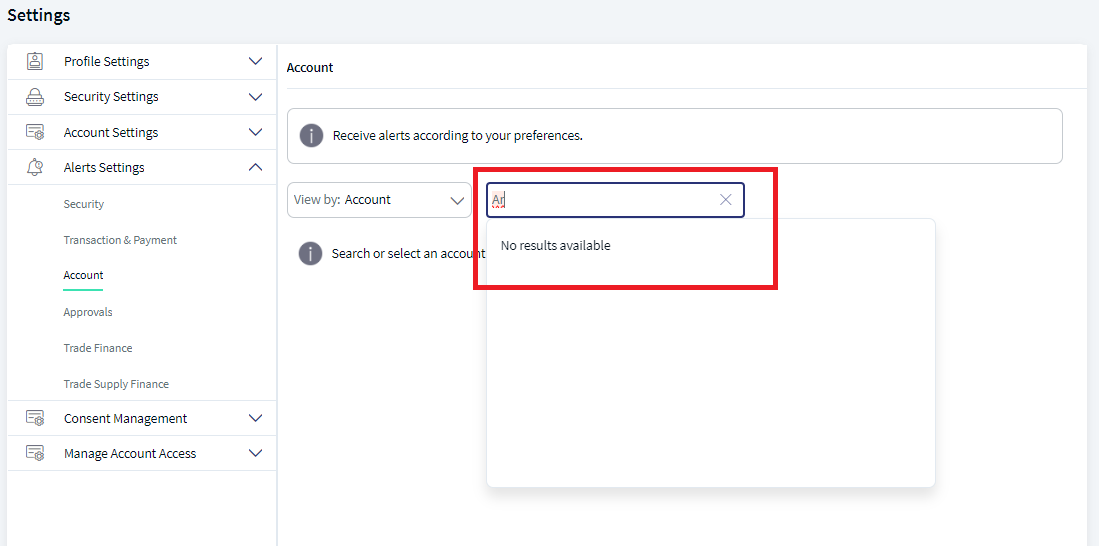
- To view alert settings, the user needs to select the Account from the drop-down values.
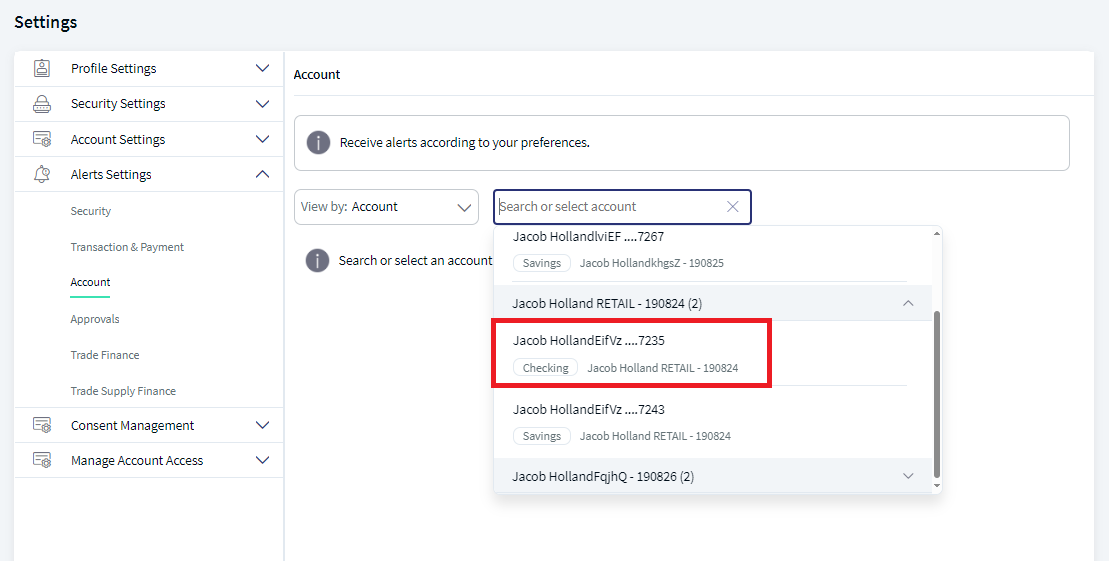
- Combo box (which the user can use to search or select from the drop-down list) field with place holder as Search or Select Account . The user can search for an account using account number or account name or select the account from the drop-down list. If the search does not retrieve any matching results, the application displays a No Results Available message in the drop down box.
- When View By is selected as Customer. The application will display
Edit Alert Settings
Use the feature to edit or customize the alert settings.
Menu path: Alert Settings > Edit
For Accounts: Alert Settings > Account > View/Modify
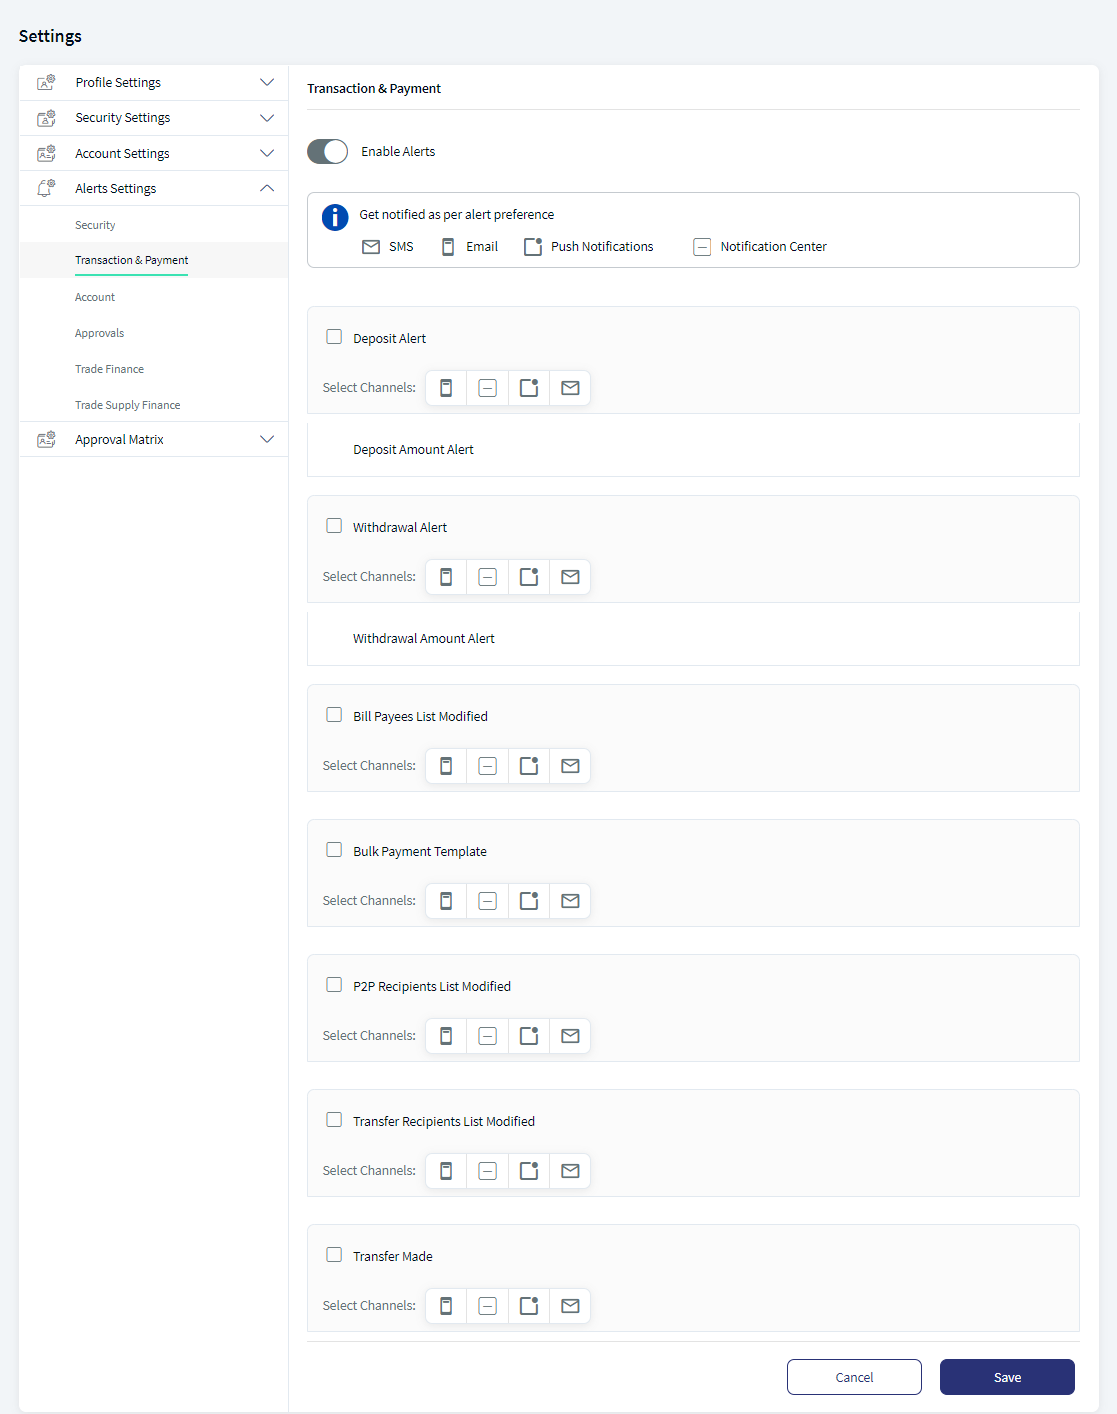
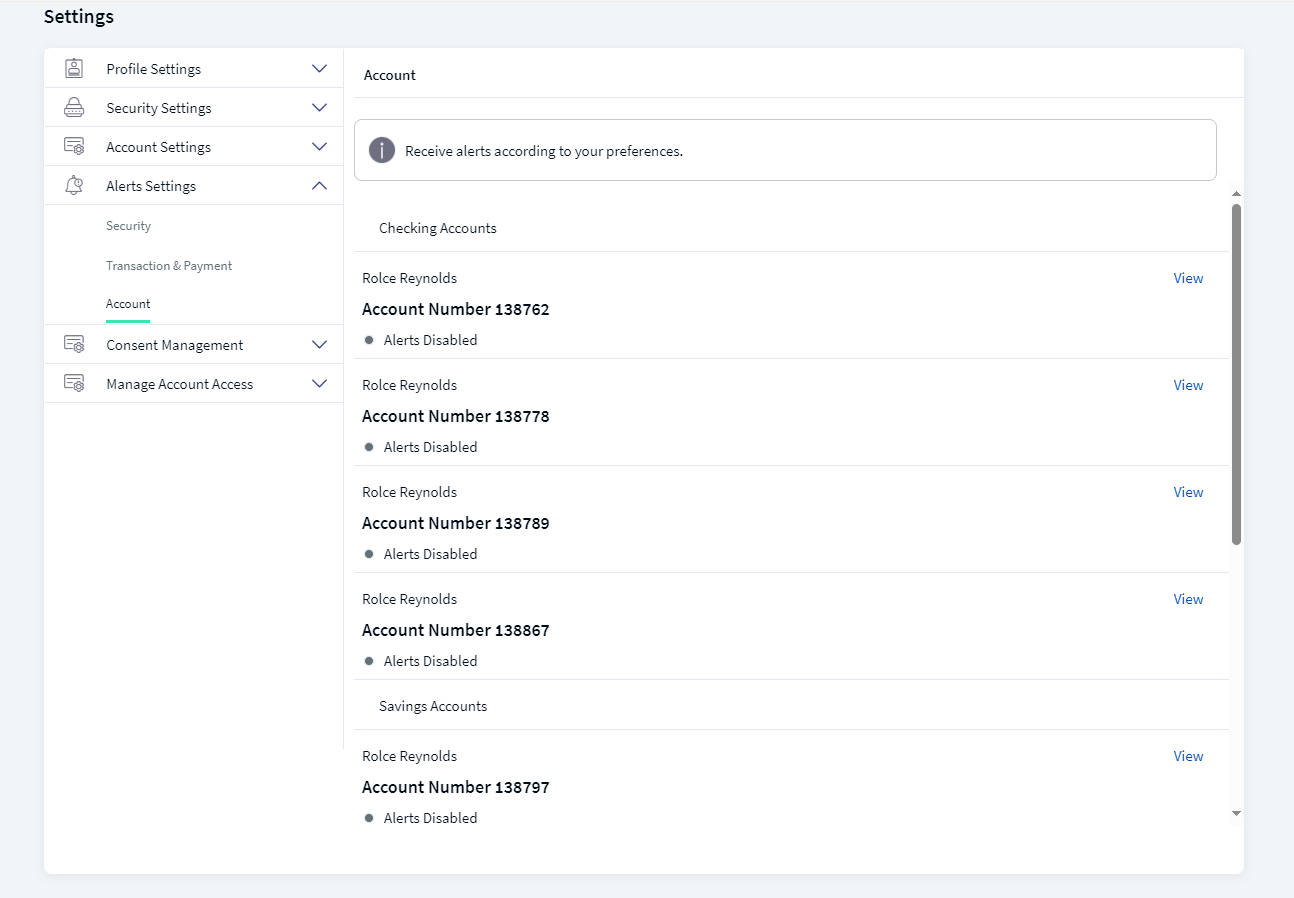
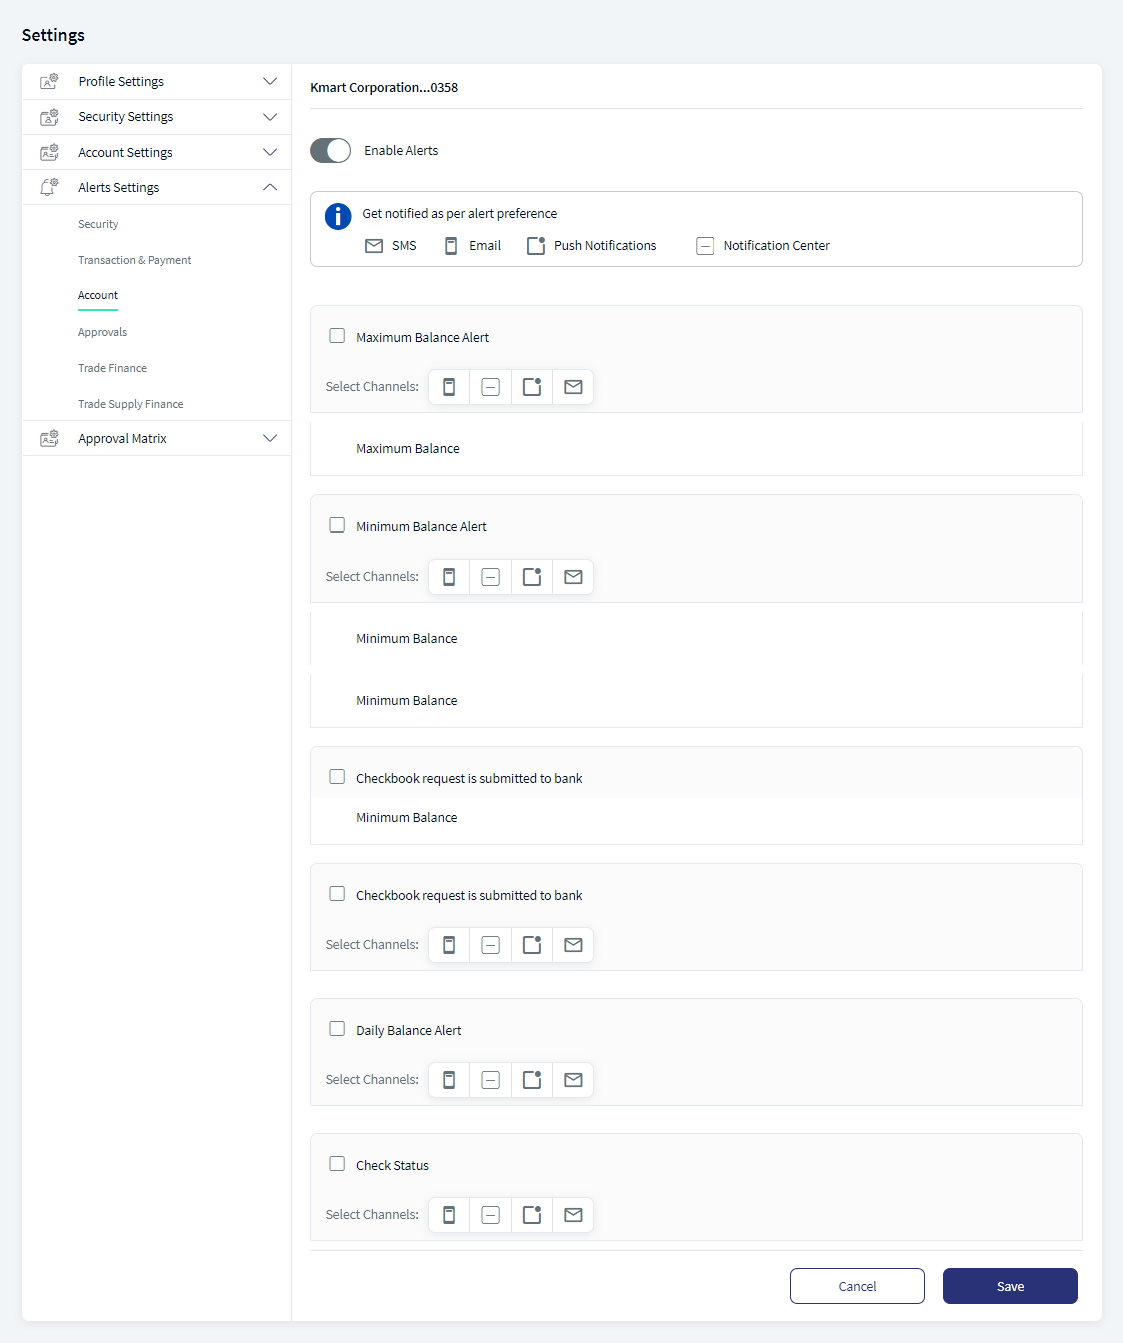
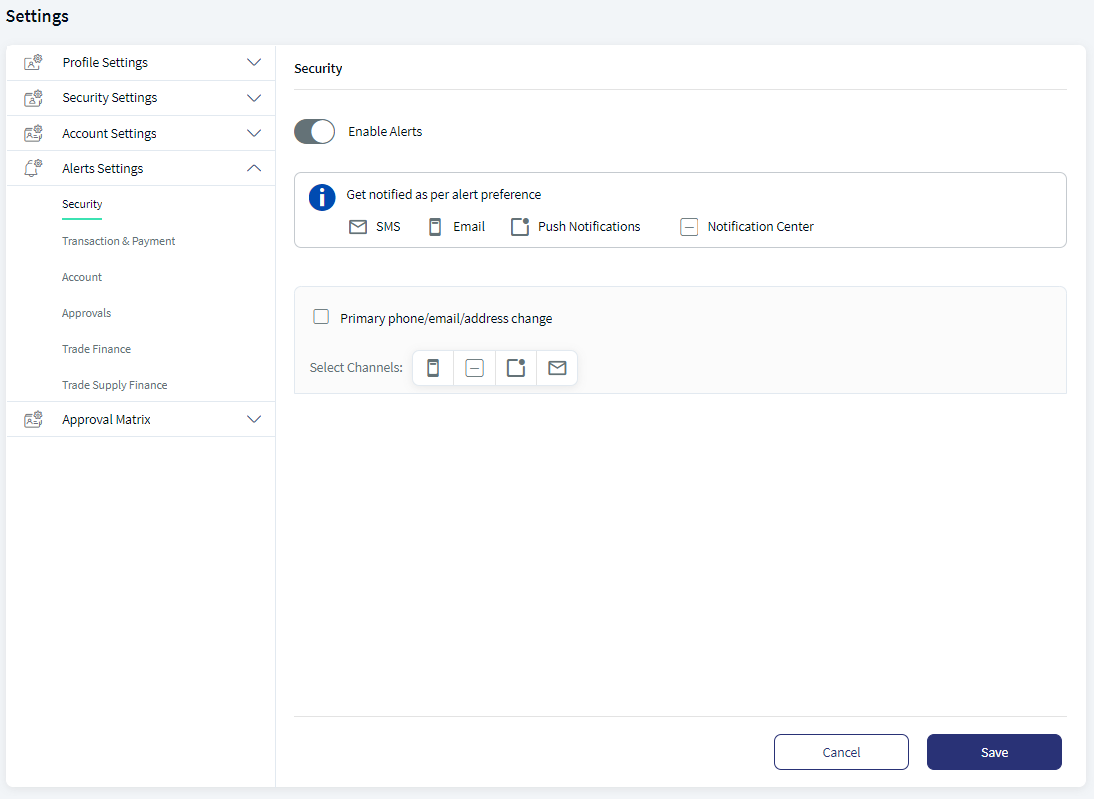
Click an alert type and click Edit to edit the alert settings.
For Account alerts, the page layout will be differ based on total number of accounts, and also differ for single and multi customers ID. See Account Alerts Overview for information. After filtering the account details, click View and click Edit to edit the alert settings.
The edit screen has a provision to modify the details. Make the changes as required:
The user can perform the following:
- Move the slider to enable or disable alerts.
- Select the alert preference method. The available methods are:
- SMS/Text
- Notification Center
- Push Notification
- Set the frequency and time to receive the alerts.
- Daily
- Weekly
- Monthly
- Yearly
- If you select Weekly, Monthly, or yearly, the day list is enabled. You can select the day and time to receive the alerts.
- For Category level alert settings, click the check box next to each category to receive an alert when an action is performed against the selected category.
The available categories are:
| Alert Type | Categories |
|---|---|
| Security | Primary Phone/Email/Address Change |
| Transaction and Payment | Deposit Alert |
| Withdrawal Alert | |
| Bill Payee list modified | |
| Bulk Payment Template | |
| P2P Recipients List Modified | |
| Transfer Recipients List Modified | |
| Transfer Made | |
| Account | Maximum Balance Alert. Enter the maximum balance amount in the text box. |
| Minimum Balance Alert. Enter the minimum balance amount in the text box. | |
| Checkbook request submitted to bank. | |
| Daily Balance Alert | |
| Check Status |
- For group level alert settings, perform the following:
- Select the group from the list of groups available to receive an alert when an action is performed.
- Select the alert preference method for the selected groups. You can select different alert preference methods or channels for each group.
- Set the frequency.
You will receive alerts to the selected channel(s) with the selected frequency.
- For alert level settings, perform the following:
- Select the group from the list of groups available to receive an alert when an action is performed.
- Select the alert preference method for each alert under the selected group.
You can select different channels for each alert. You will receive alerts to selected channels.
- Click Save to receive alerts when you perform any of these activities.
- To disable an alert, move the enable alerts slider.
- Cancel the process at any time. The changes are not saved.
- For account alerts, the edit settings or options differ based on the selected account type.
Mobile Native
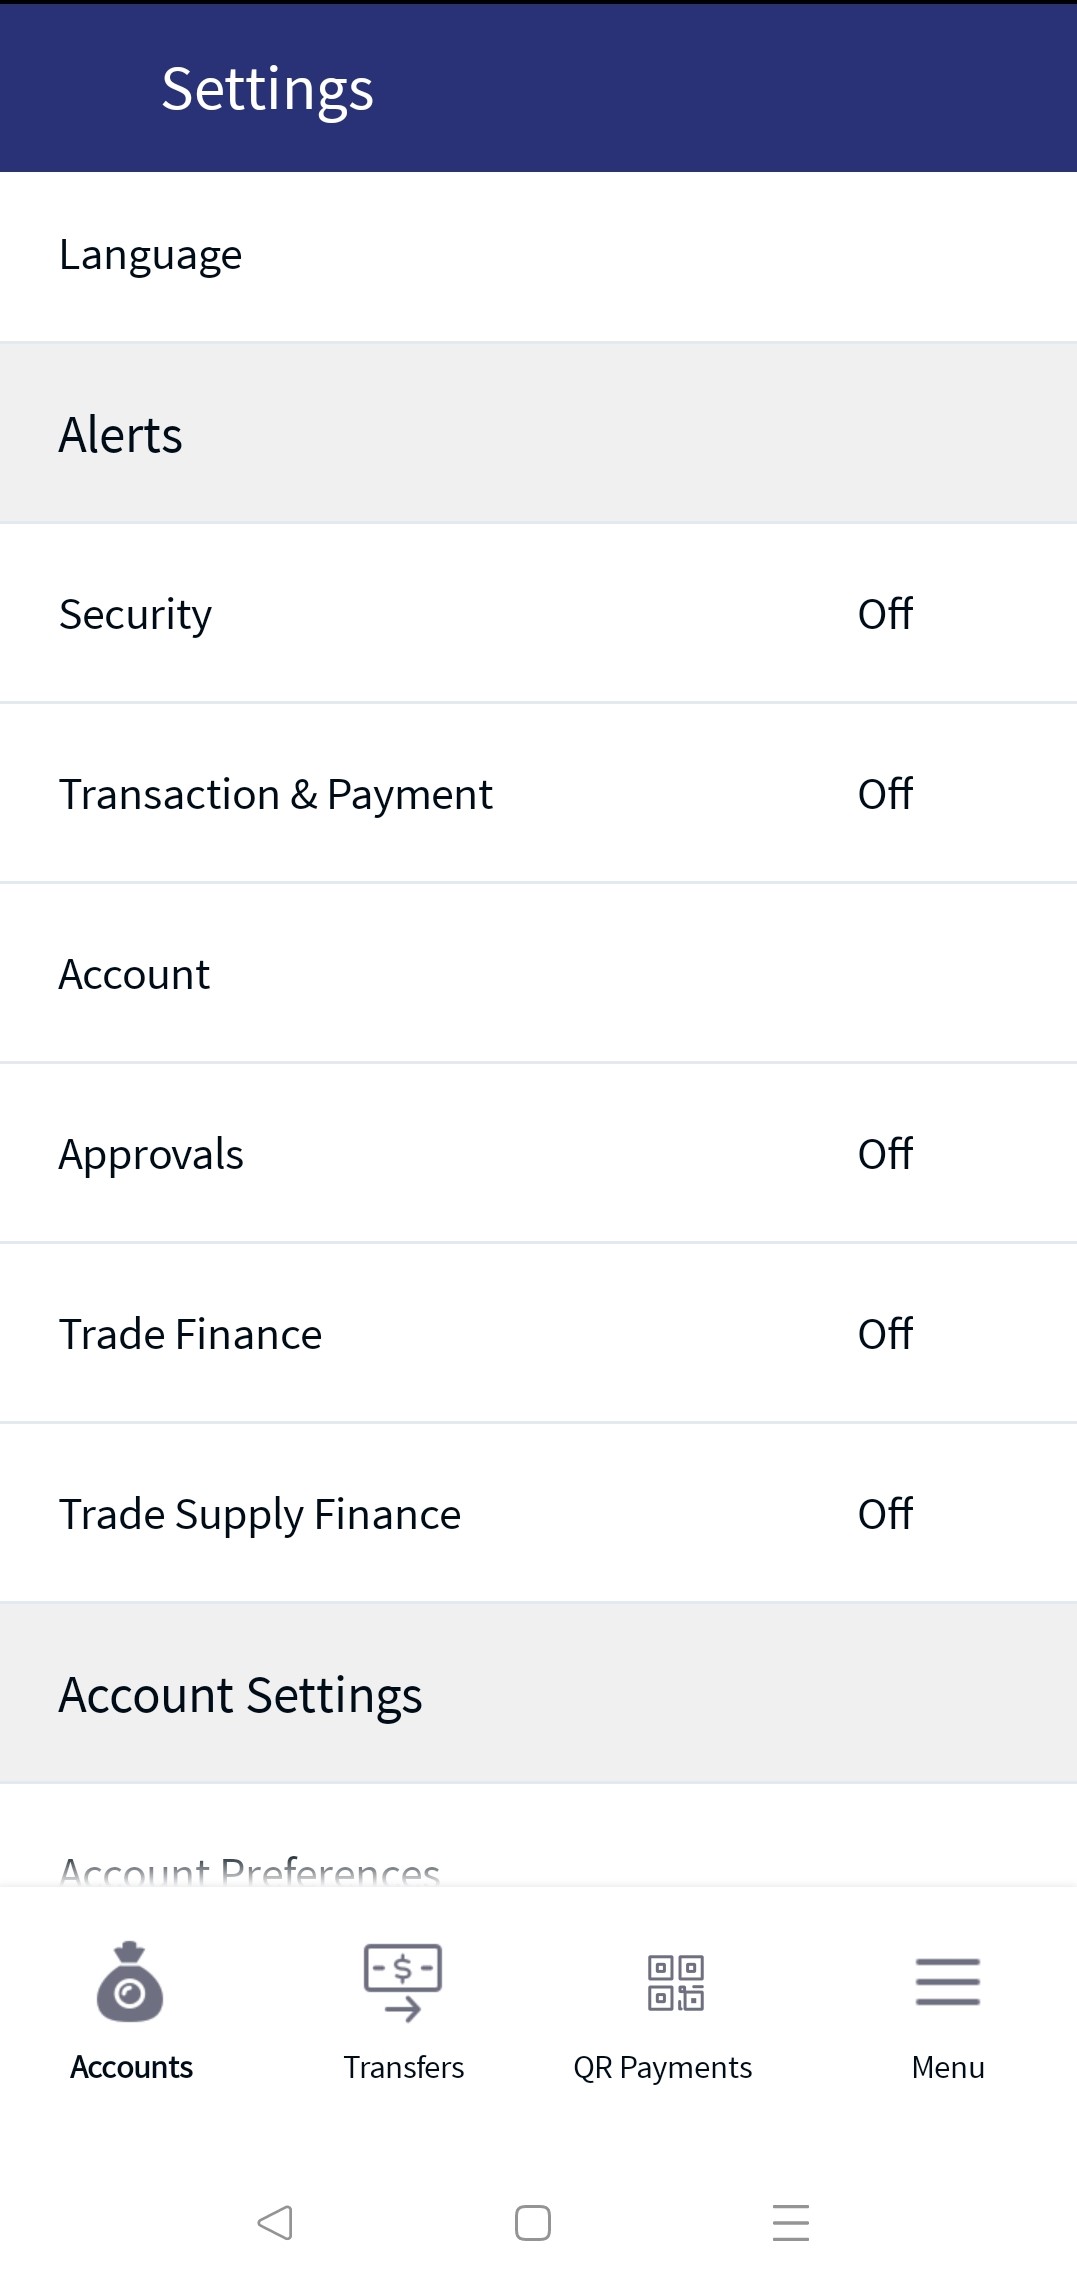
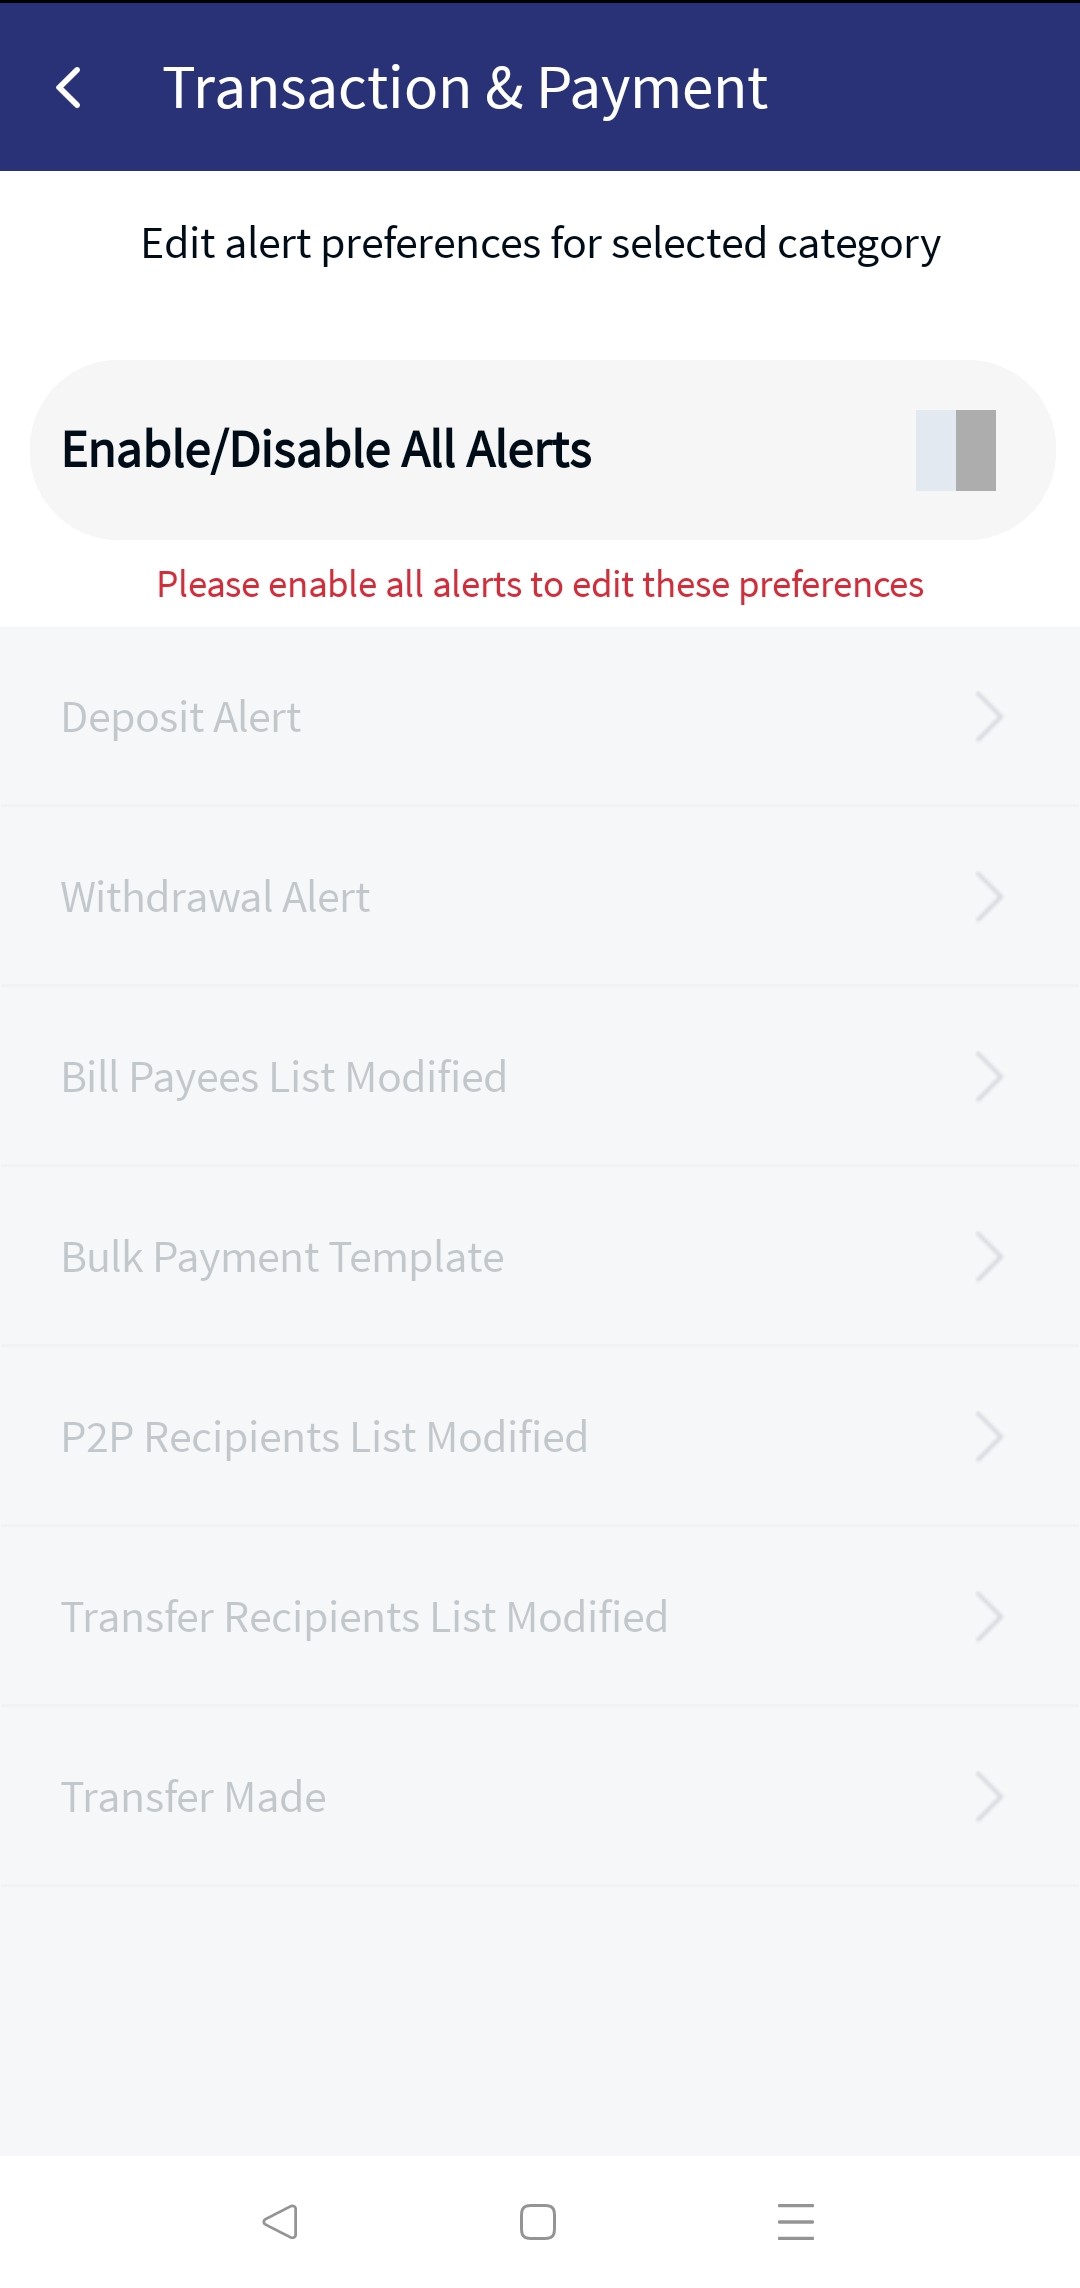
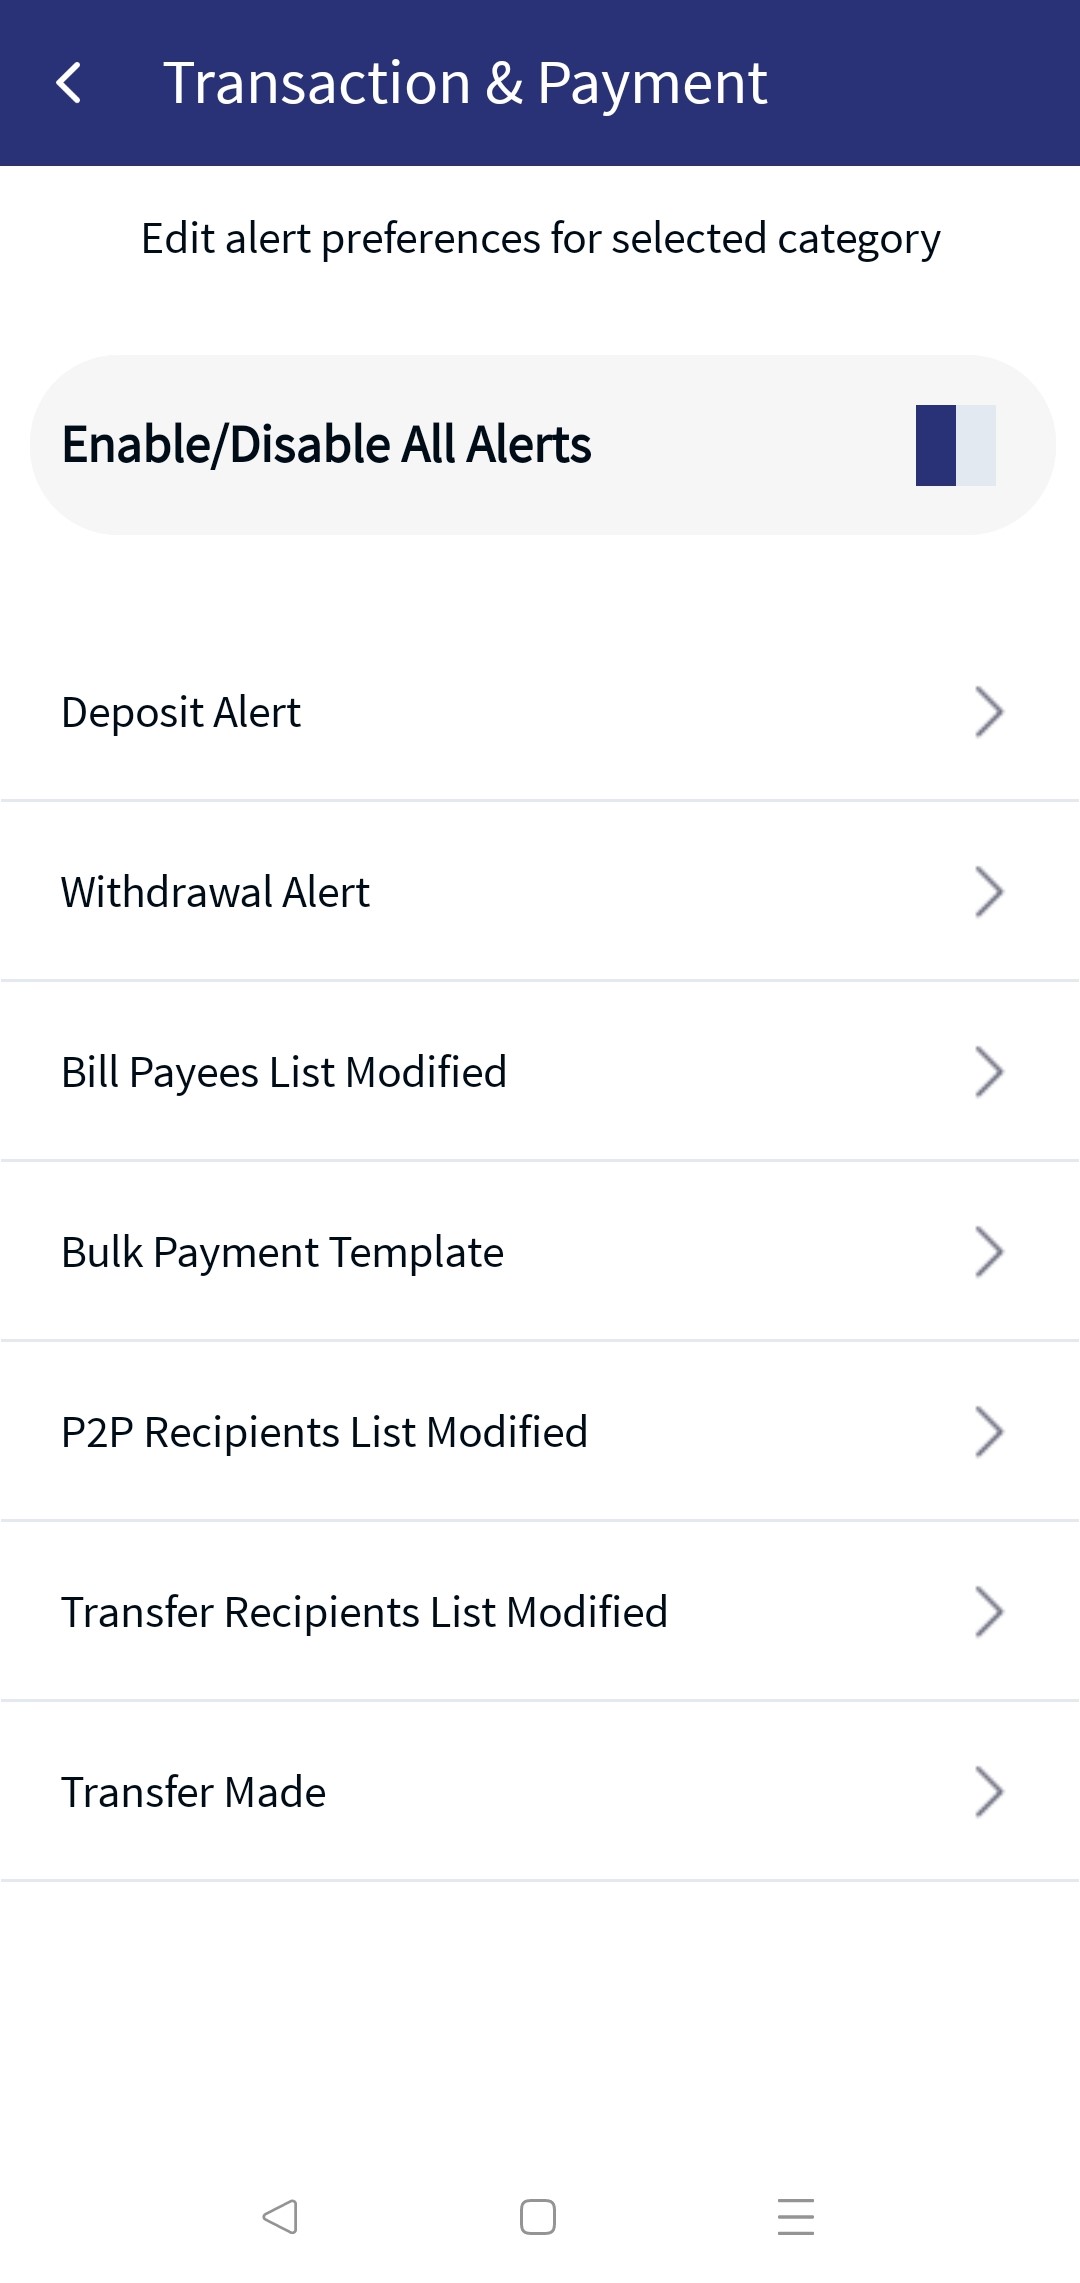
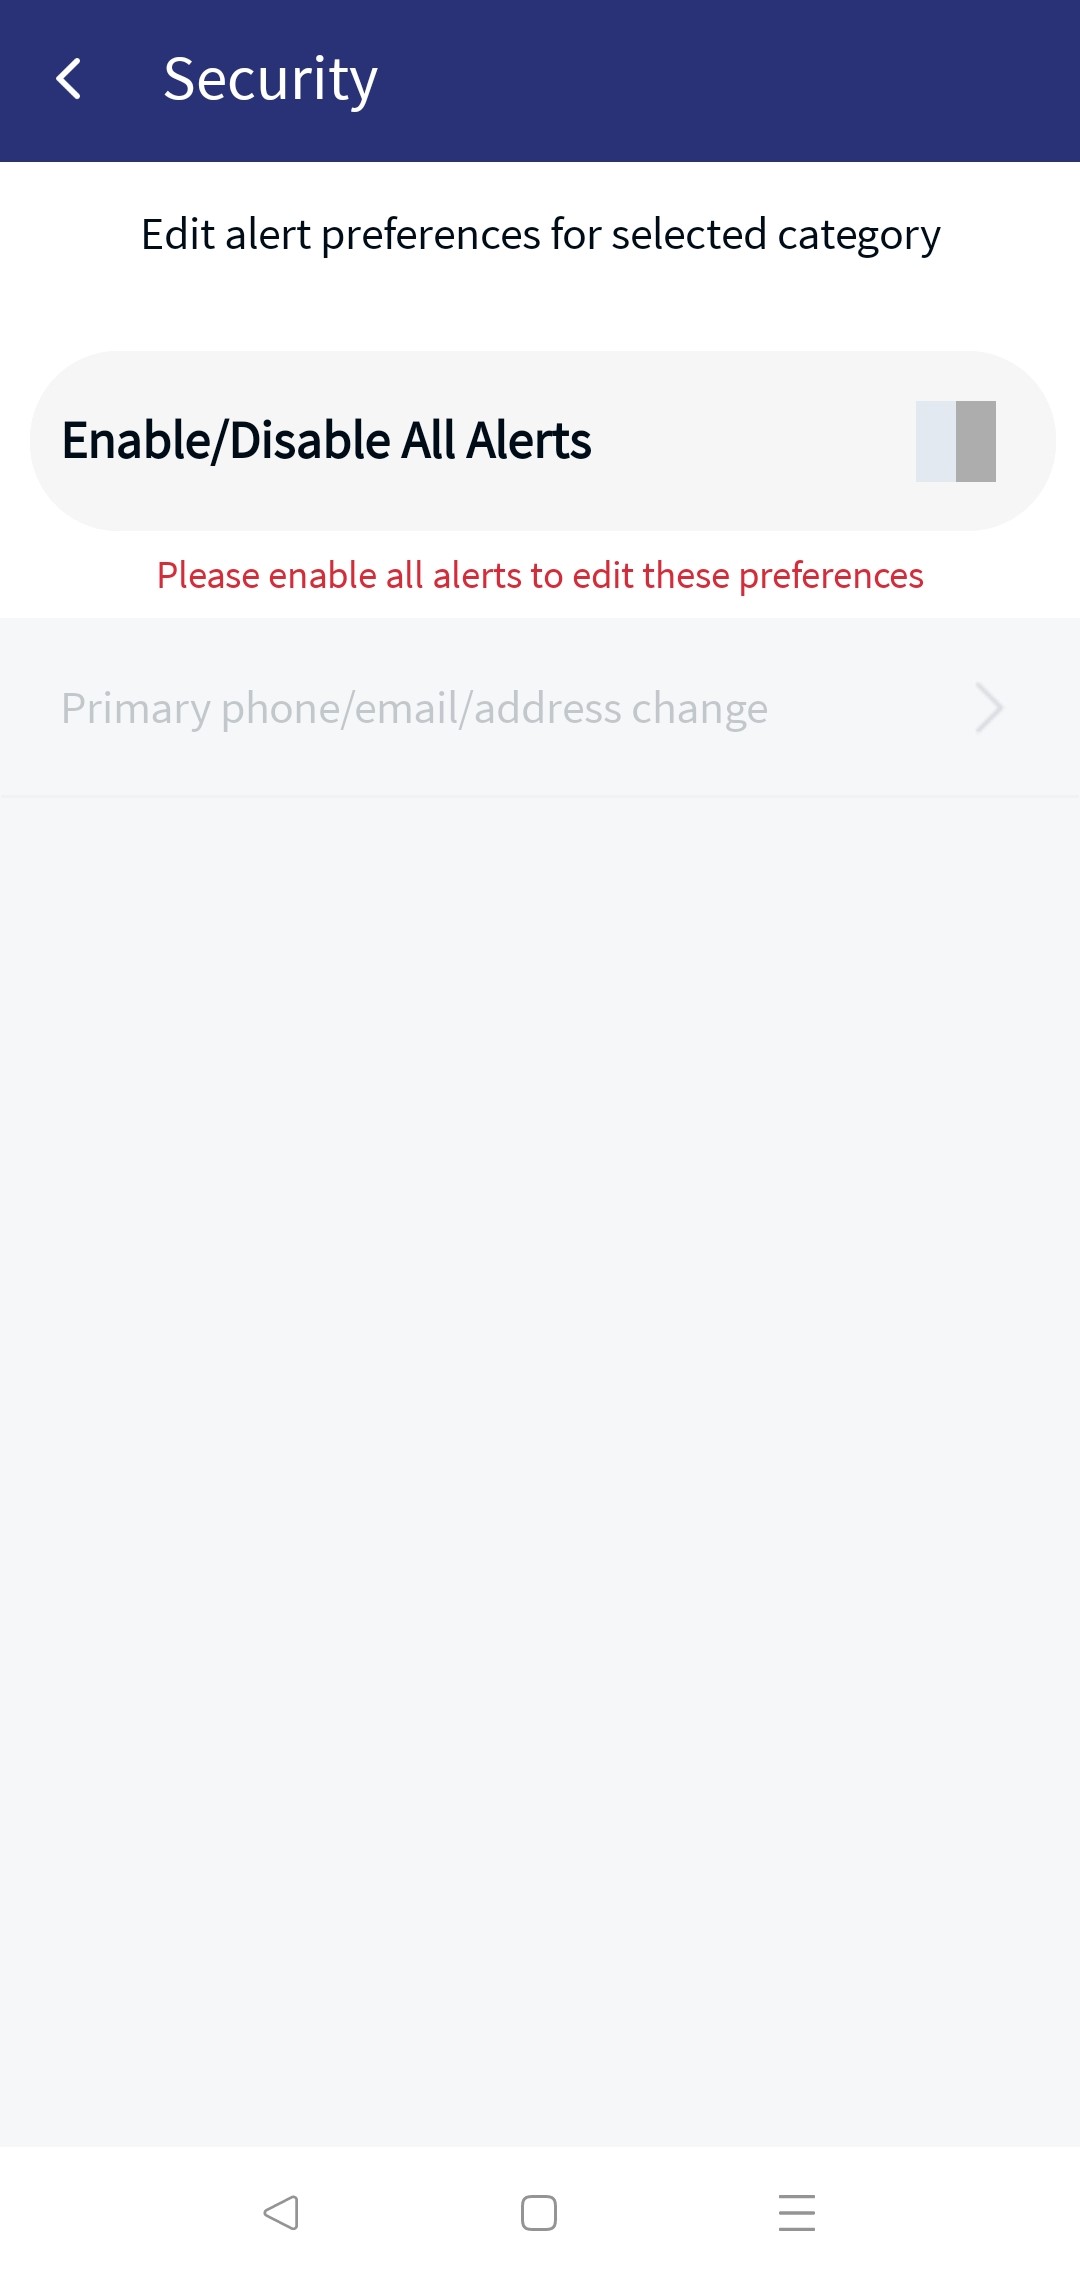
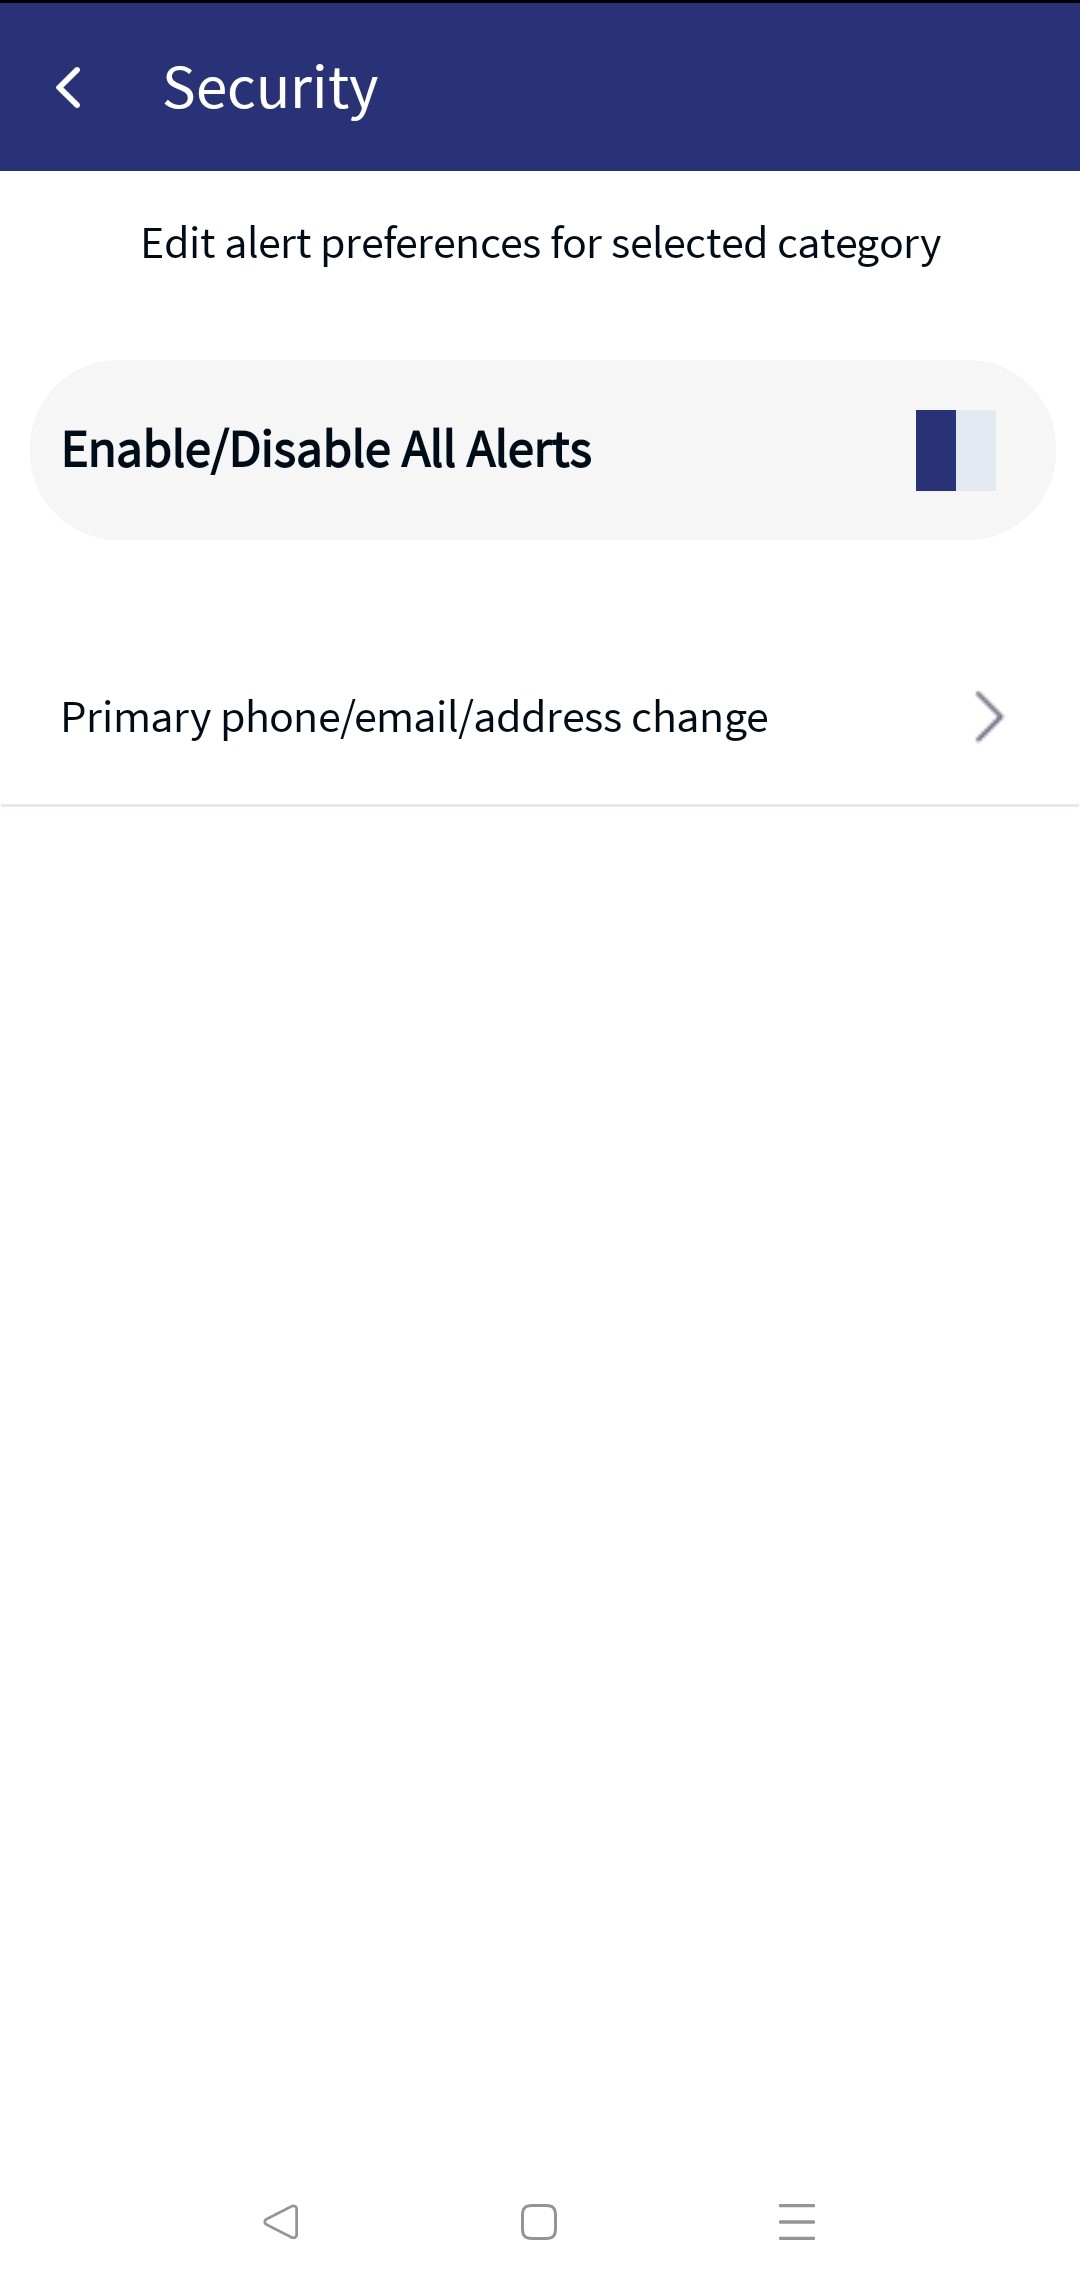
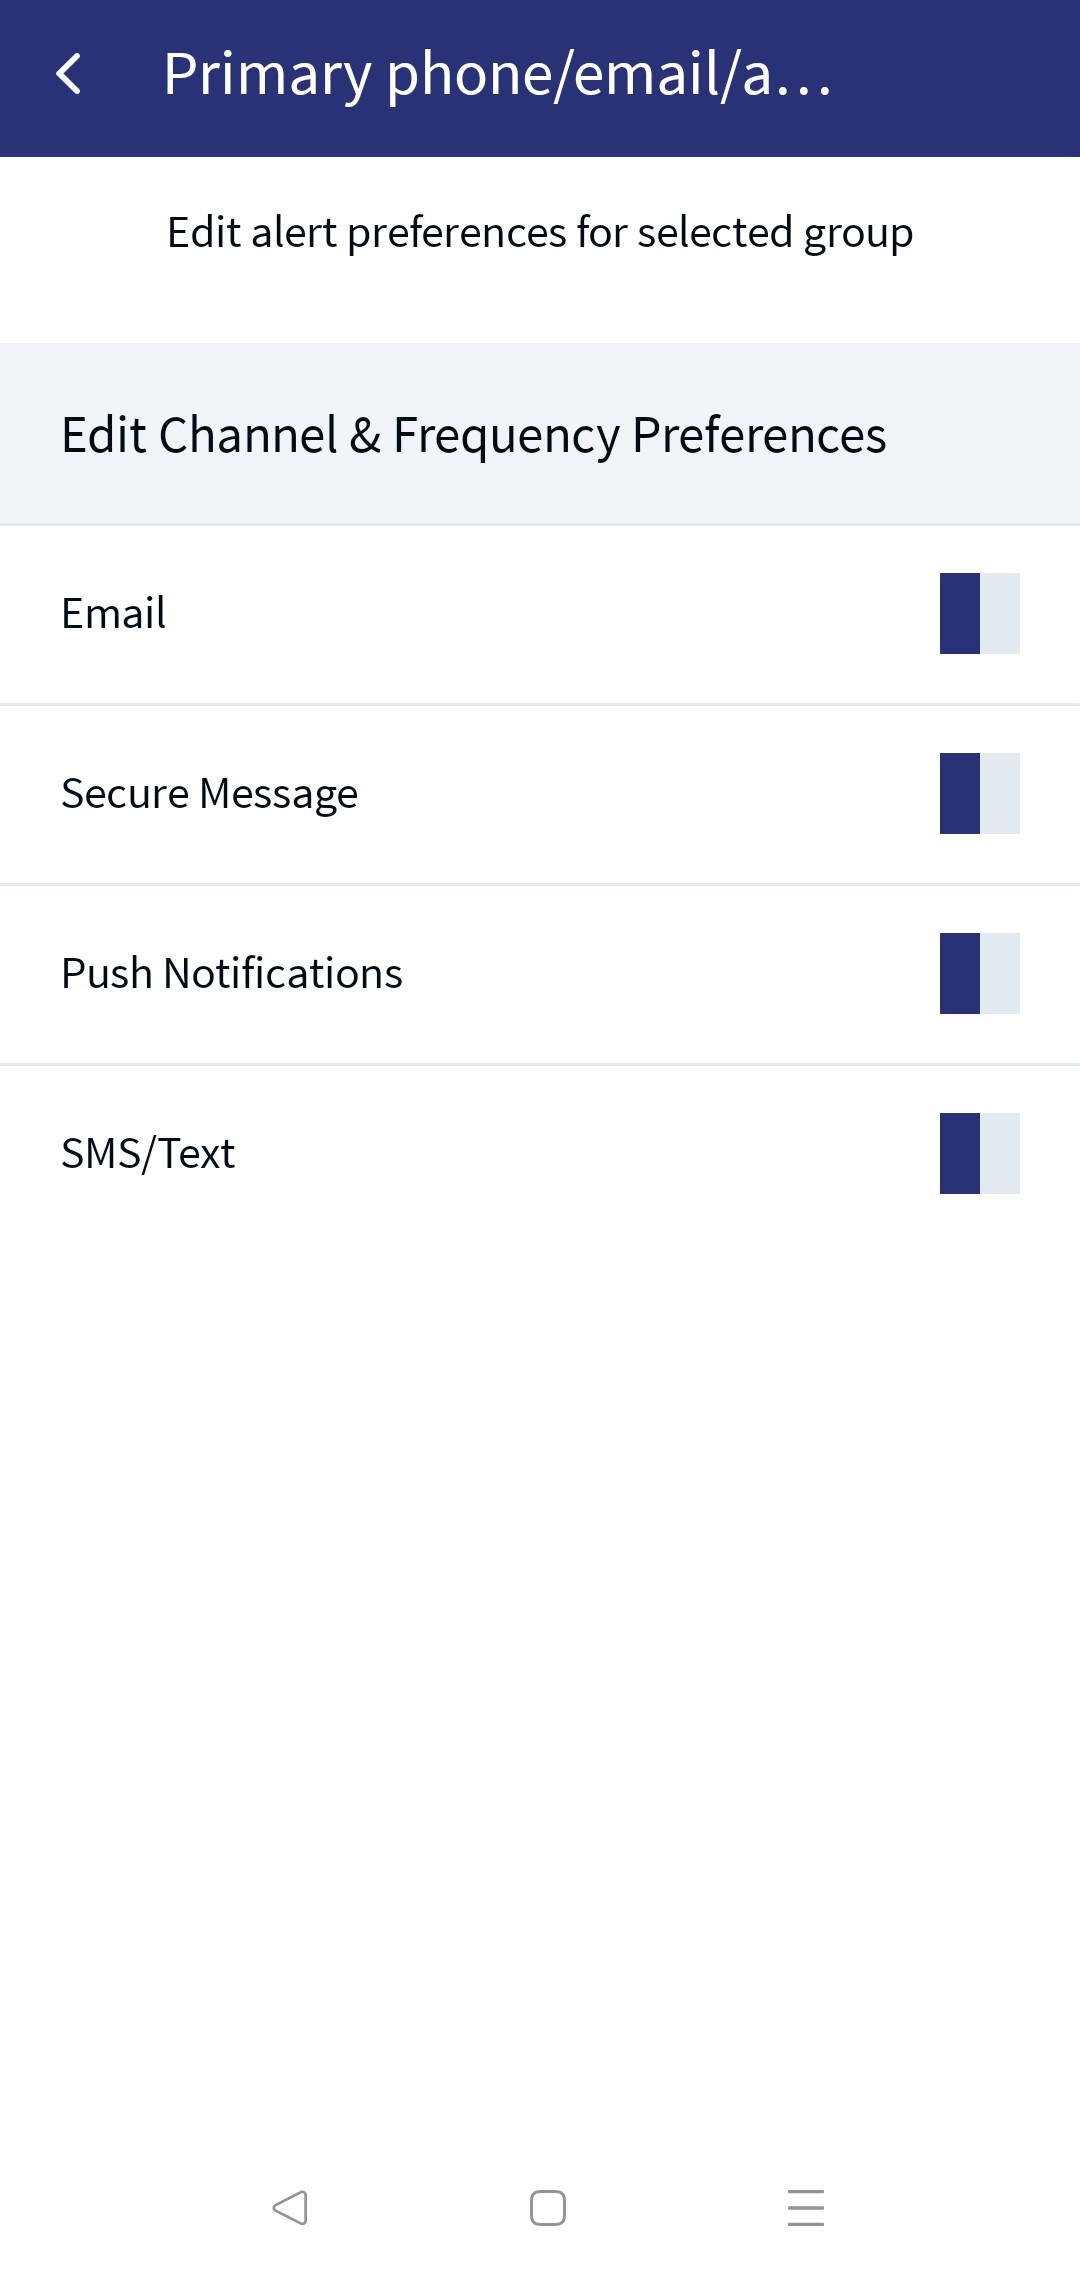
Slide to activate or deactivate the alerts from the Settings screen.
When you activate an alert feature, the app displays a list for which you can configure the alerts. Select the required category and enable the applicable alerts for the selected category. You can enable, modify, or disable the alerts.
Accounts Alerts Setting Overview
The application displays different screen to the user based on the contract. See Account listing and Customer listing dashboard for more information on users having large number of accounts and contracts. In Spotlight, the bank needs to configure the system configurations(Bundle DBP - ACCOUNTS_COUNT_COMPACT_DASHBOARD, Bundle DBP - ACCOUNTS_PER_PAGE) to enable the different views.
The following are the different scenarios on how the applications behaves:
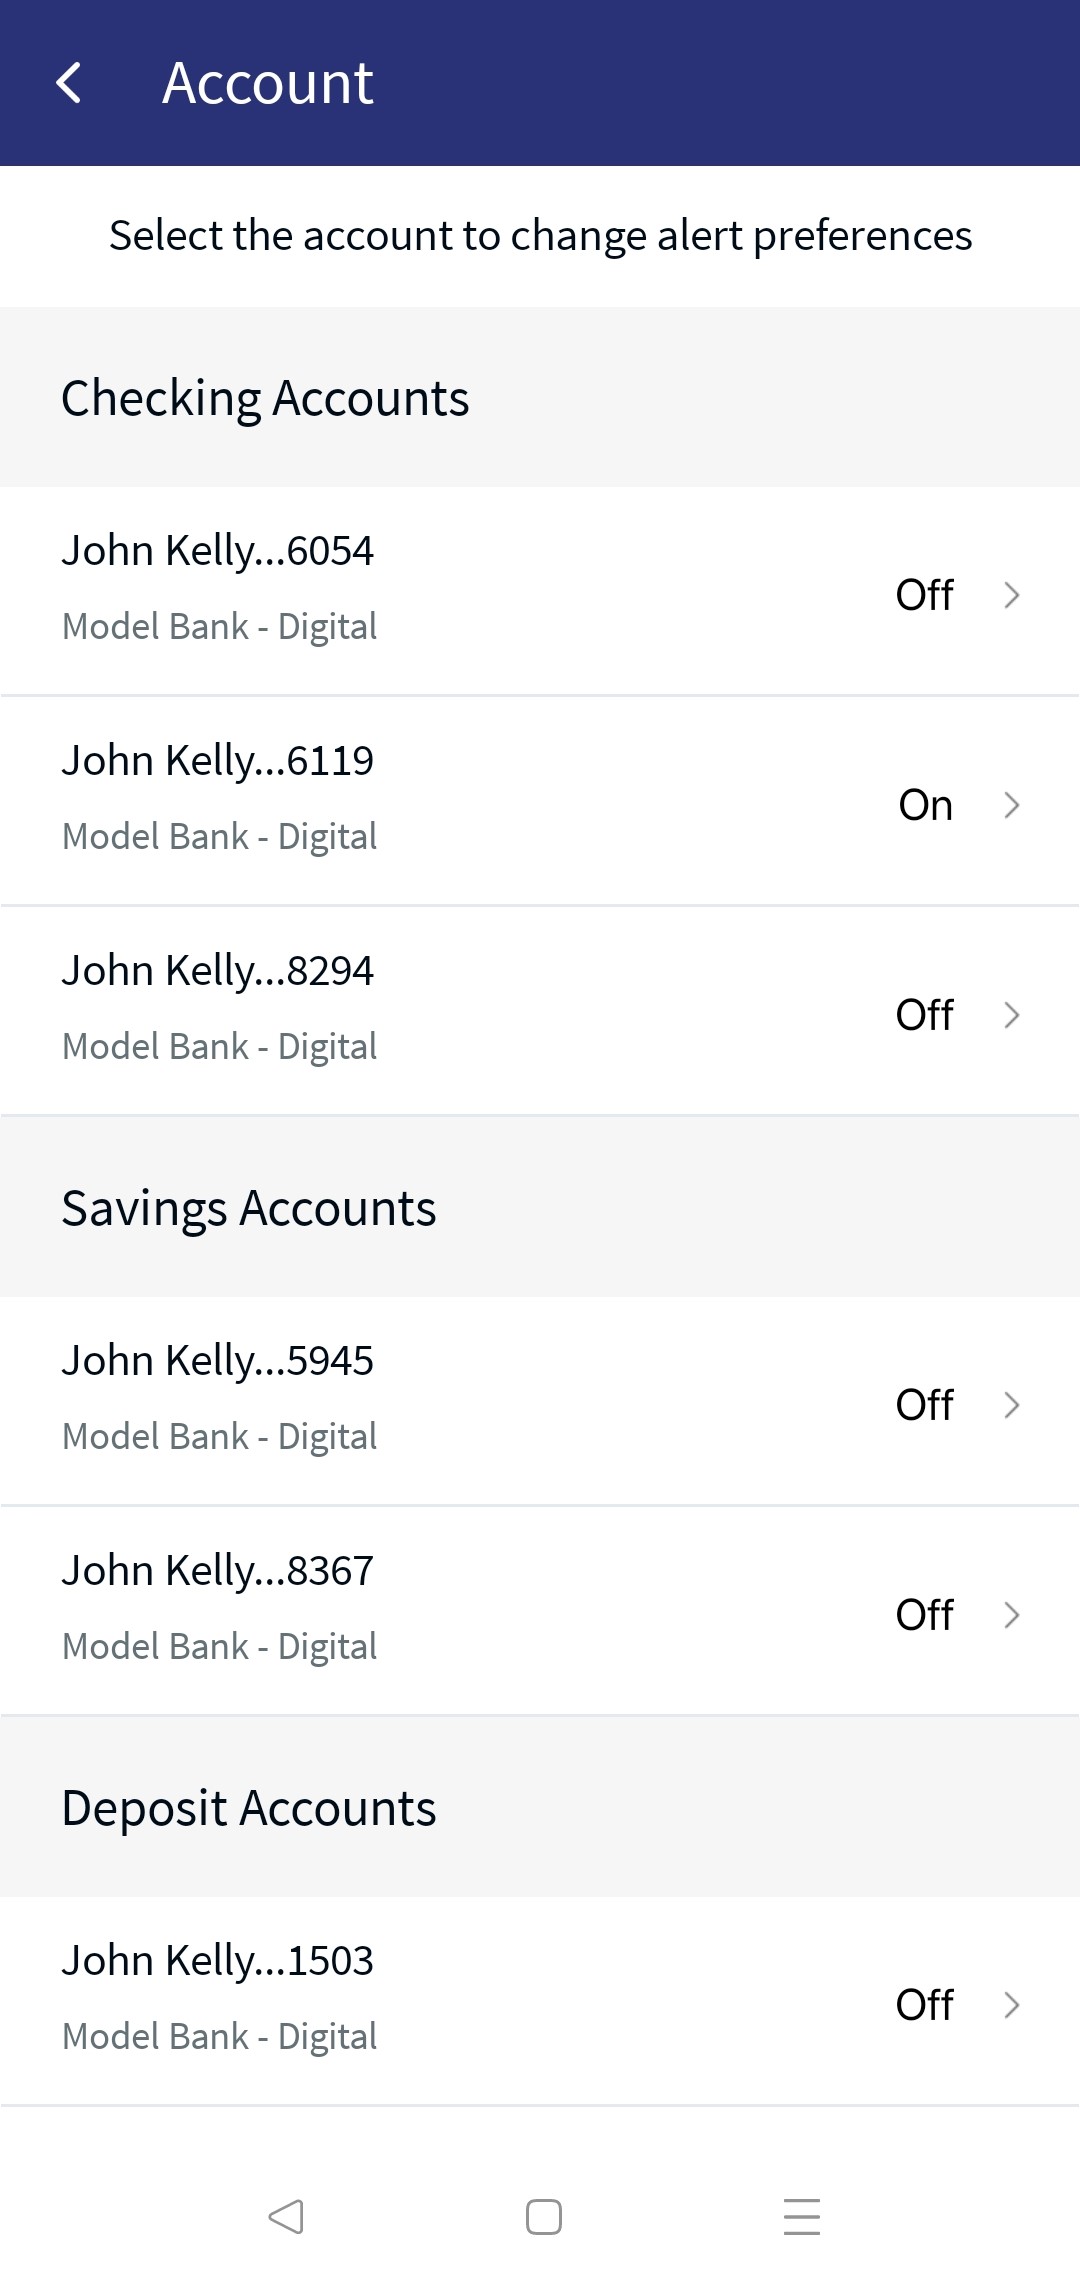
Scenario 1: The user having access to single customer ID and have less than or equal to 10 accounts
For the users having access to a single customer ID with less than or equal to 10 accounts. The application displays all the accounts grouped by account types (Savings, Current, and many more).
Scenario 2: The user having access to single customer ID and have more than 10 accounts
For the users having access to a single customer ID with more than 10 accounts. The application displays filtering and search options, and all the accounts are grouped by account types (Savings, Current, and many more)
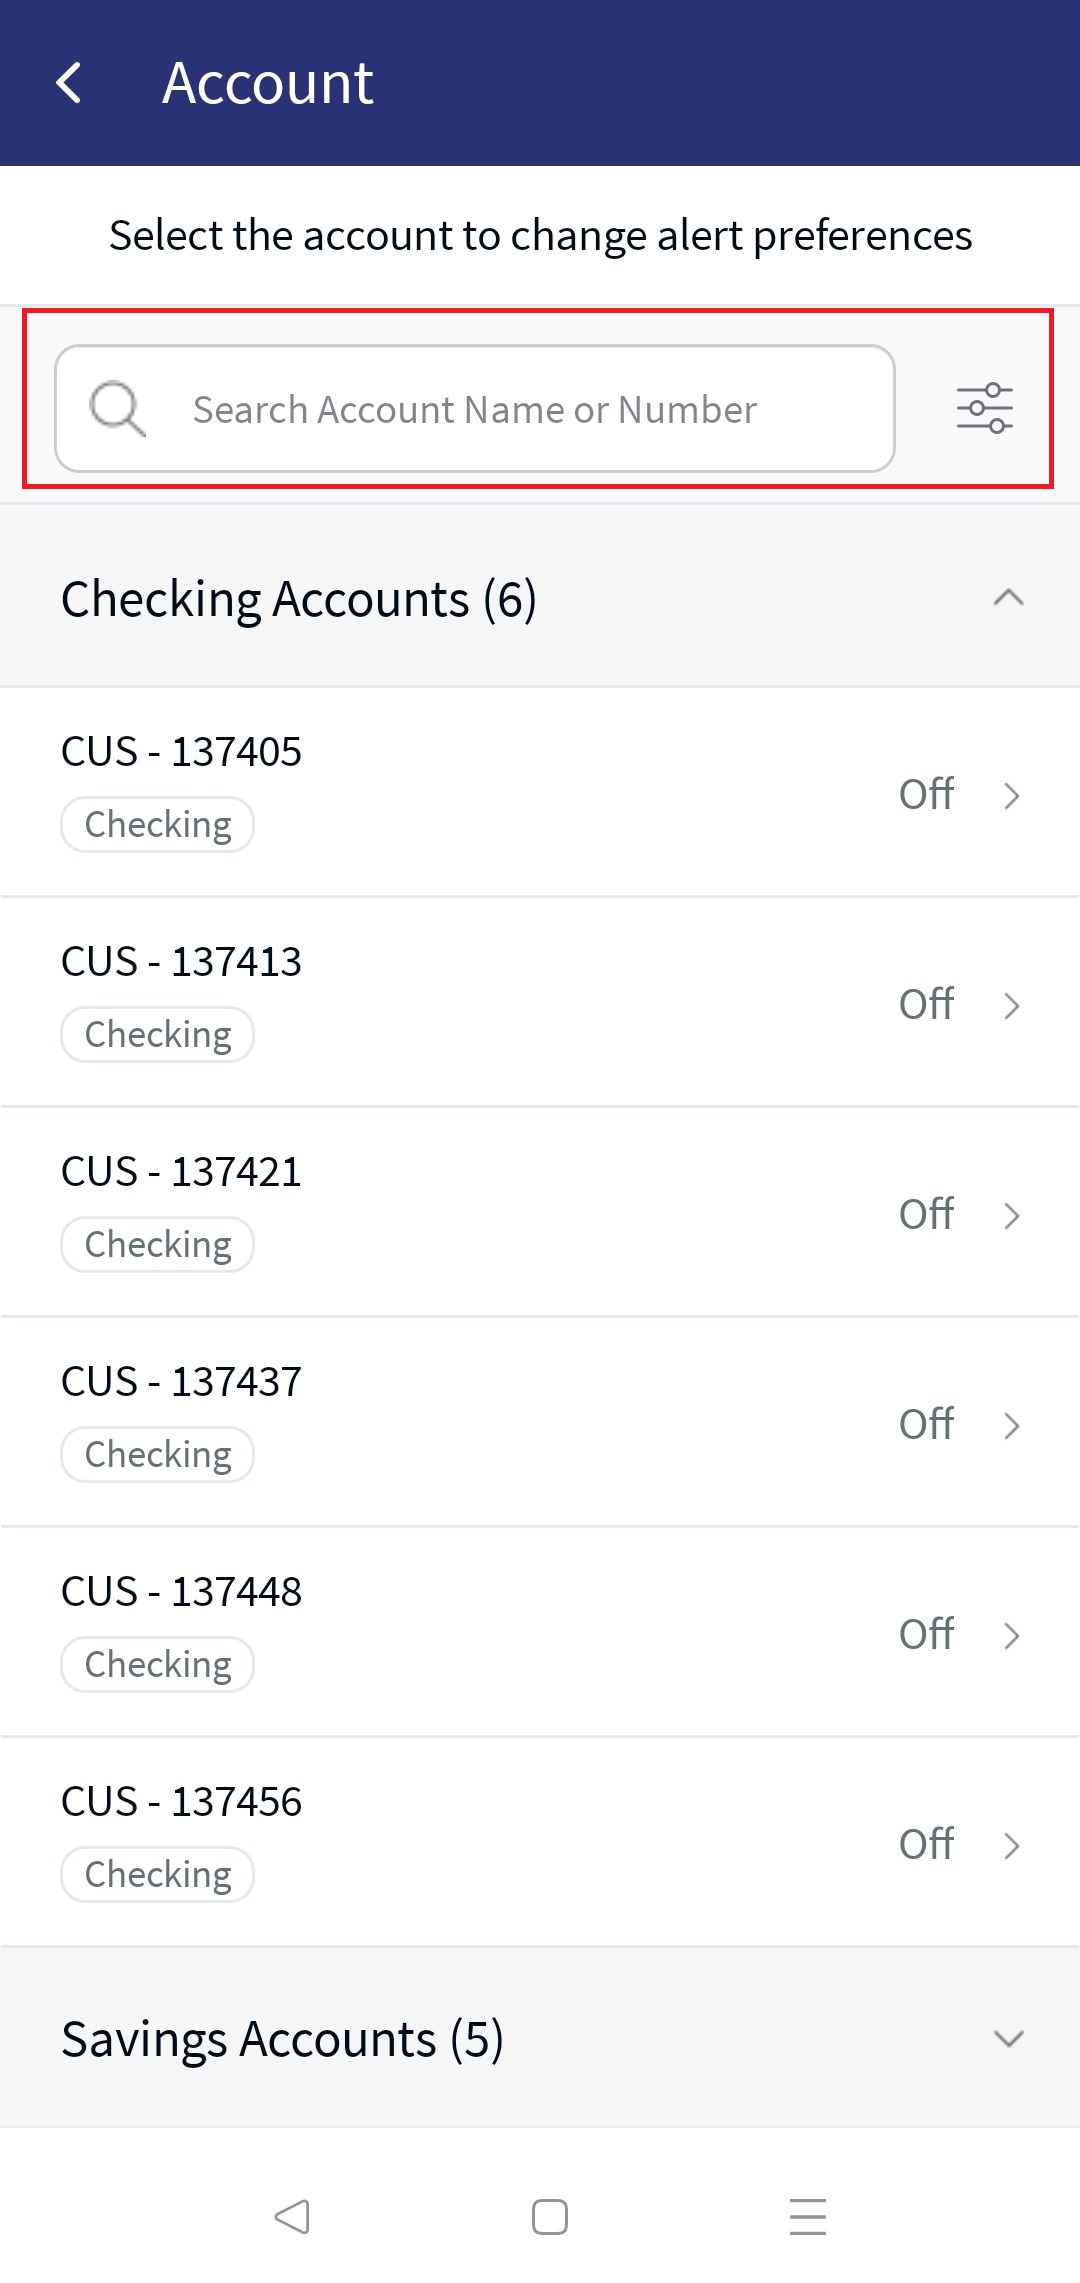
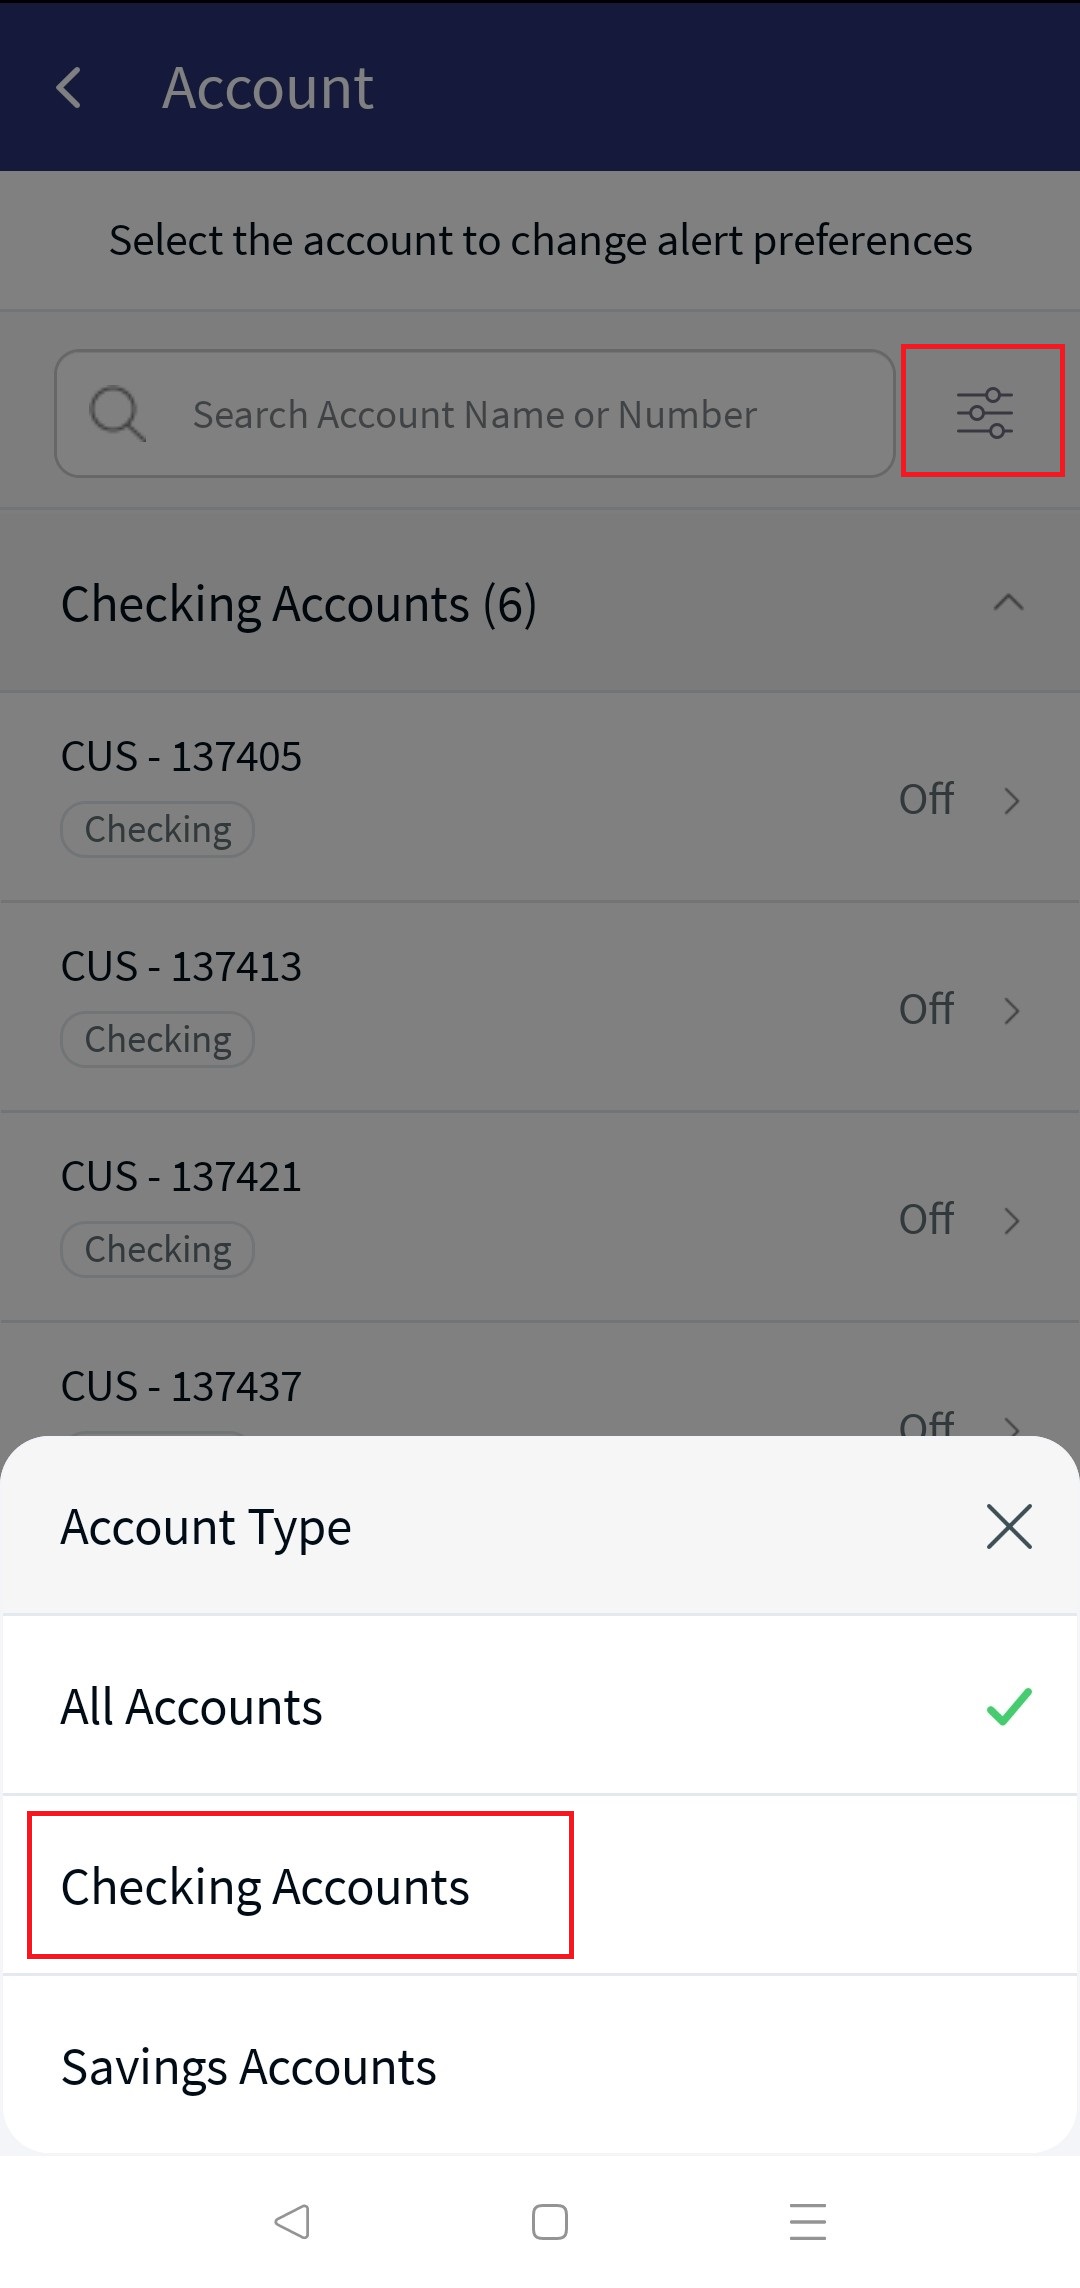
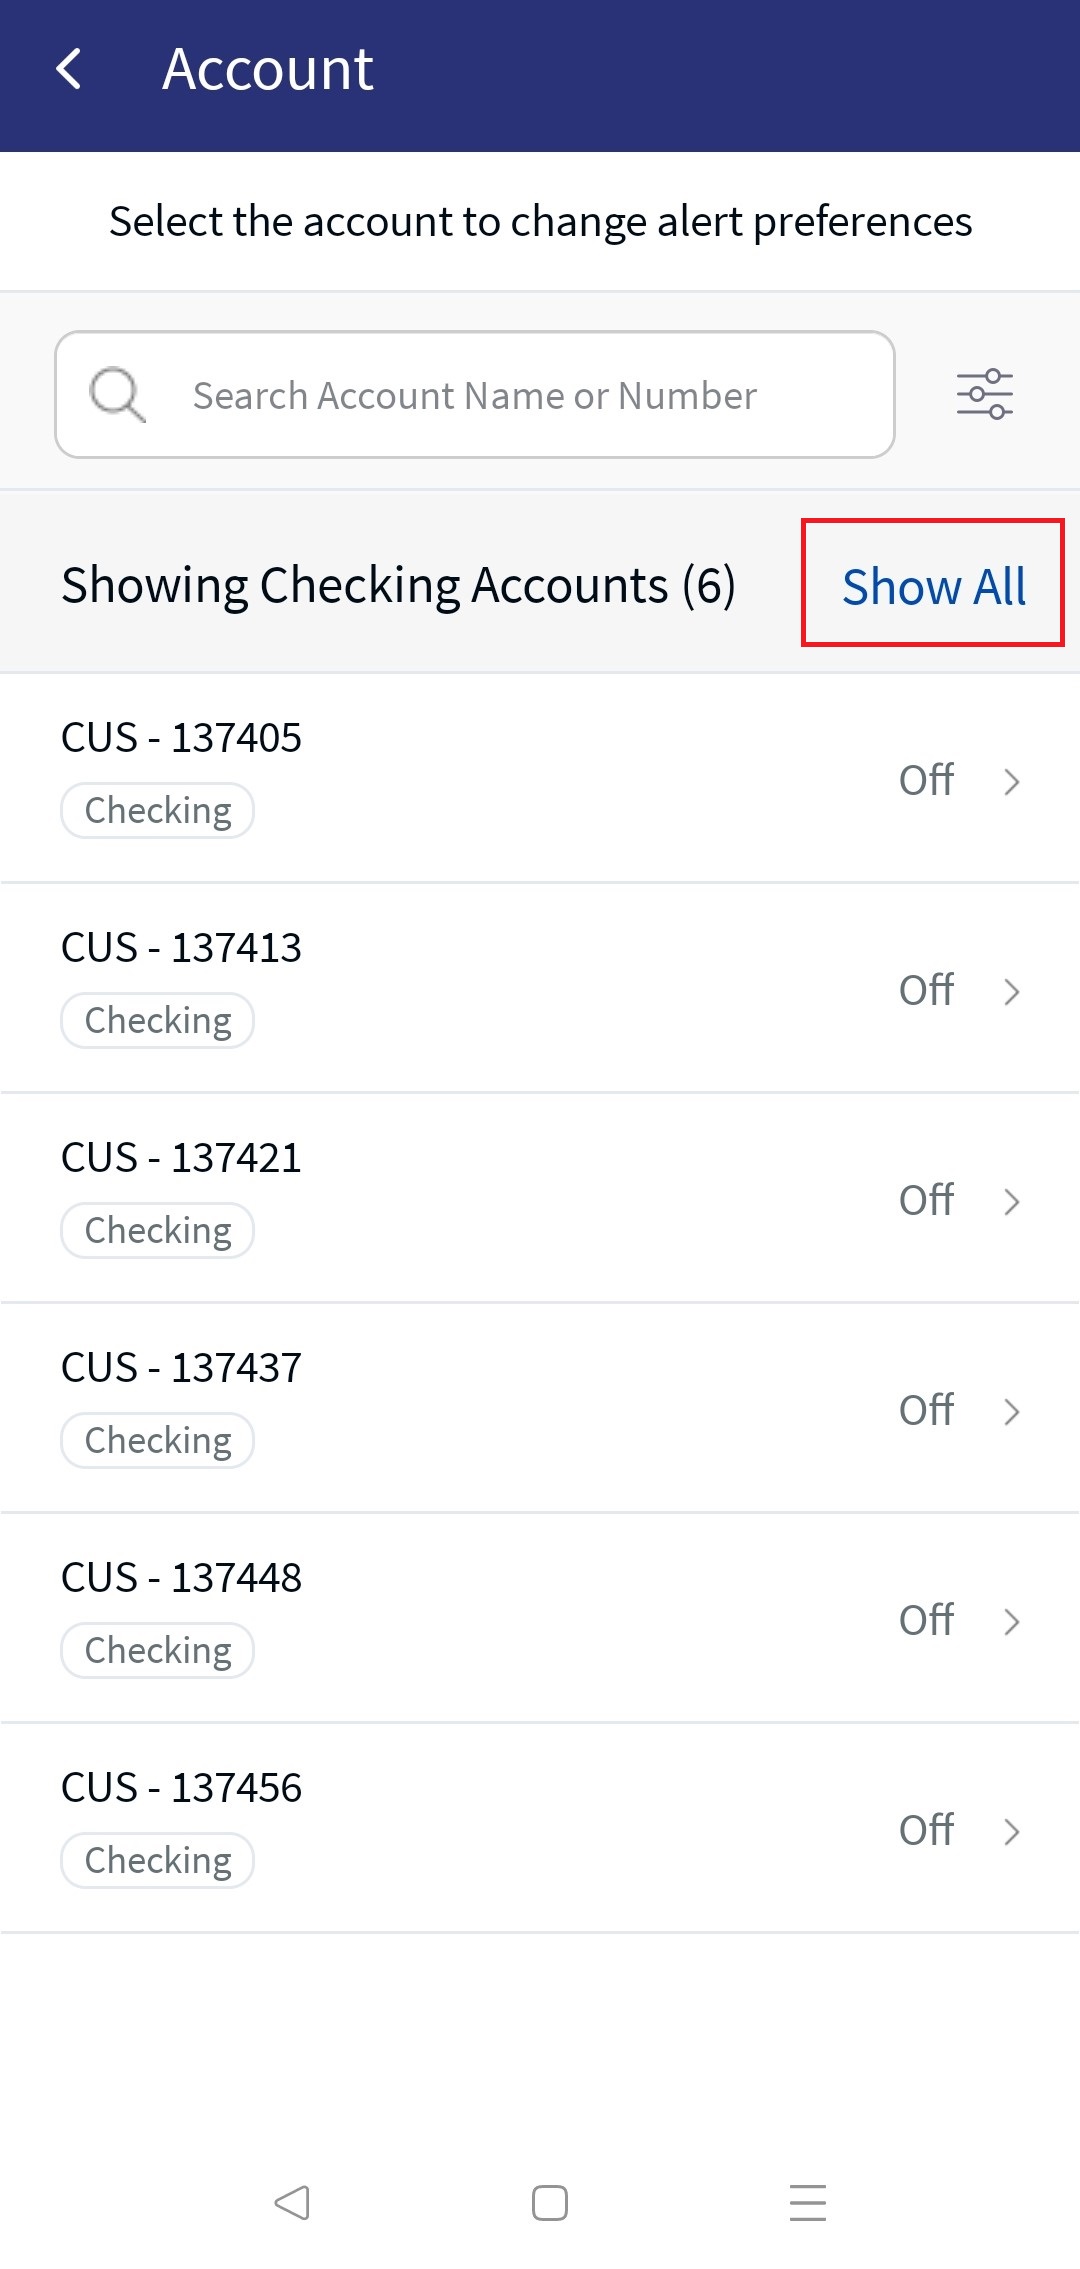
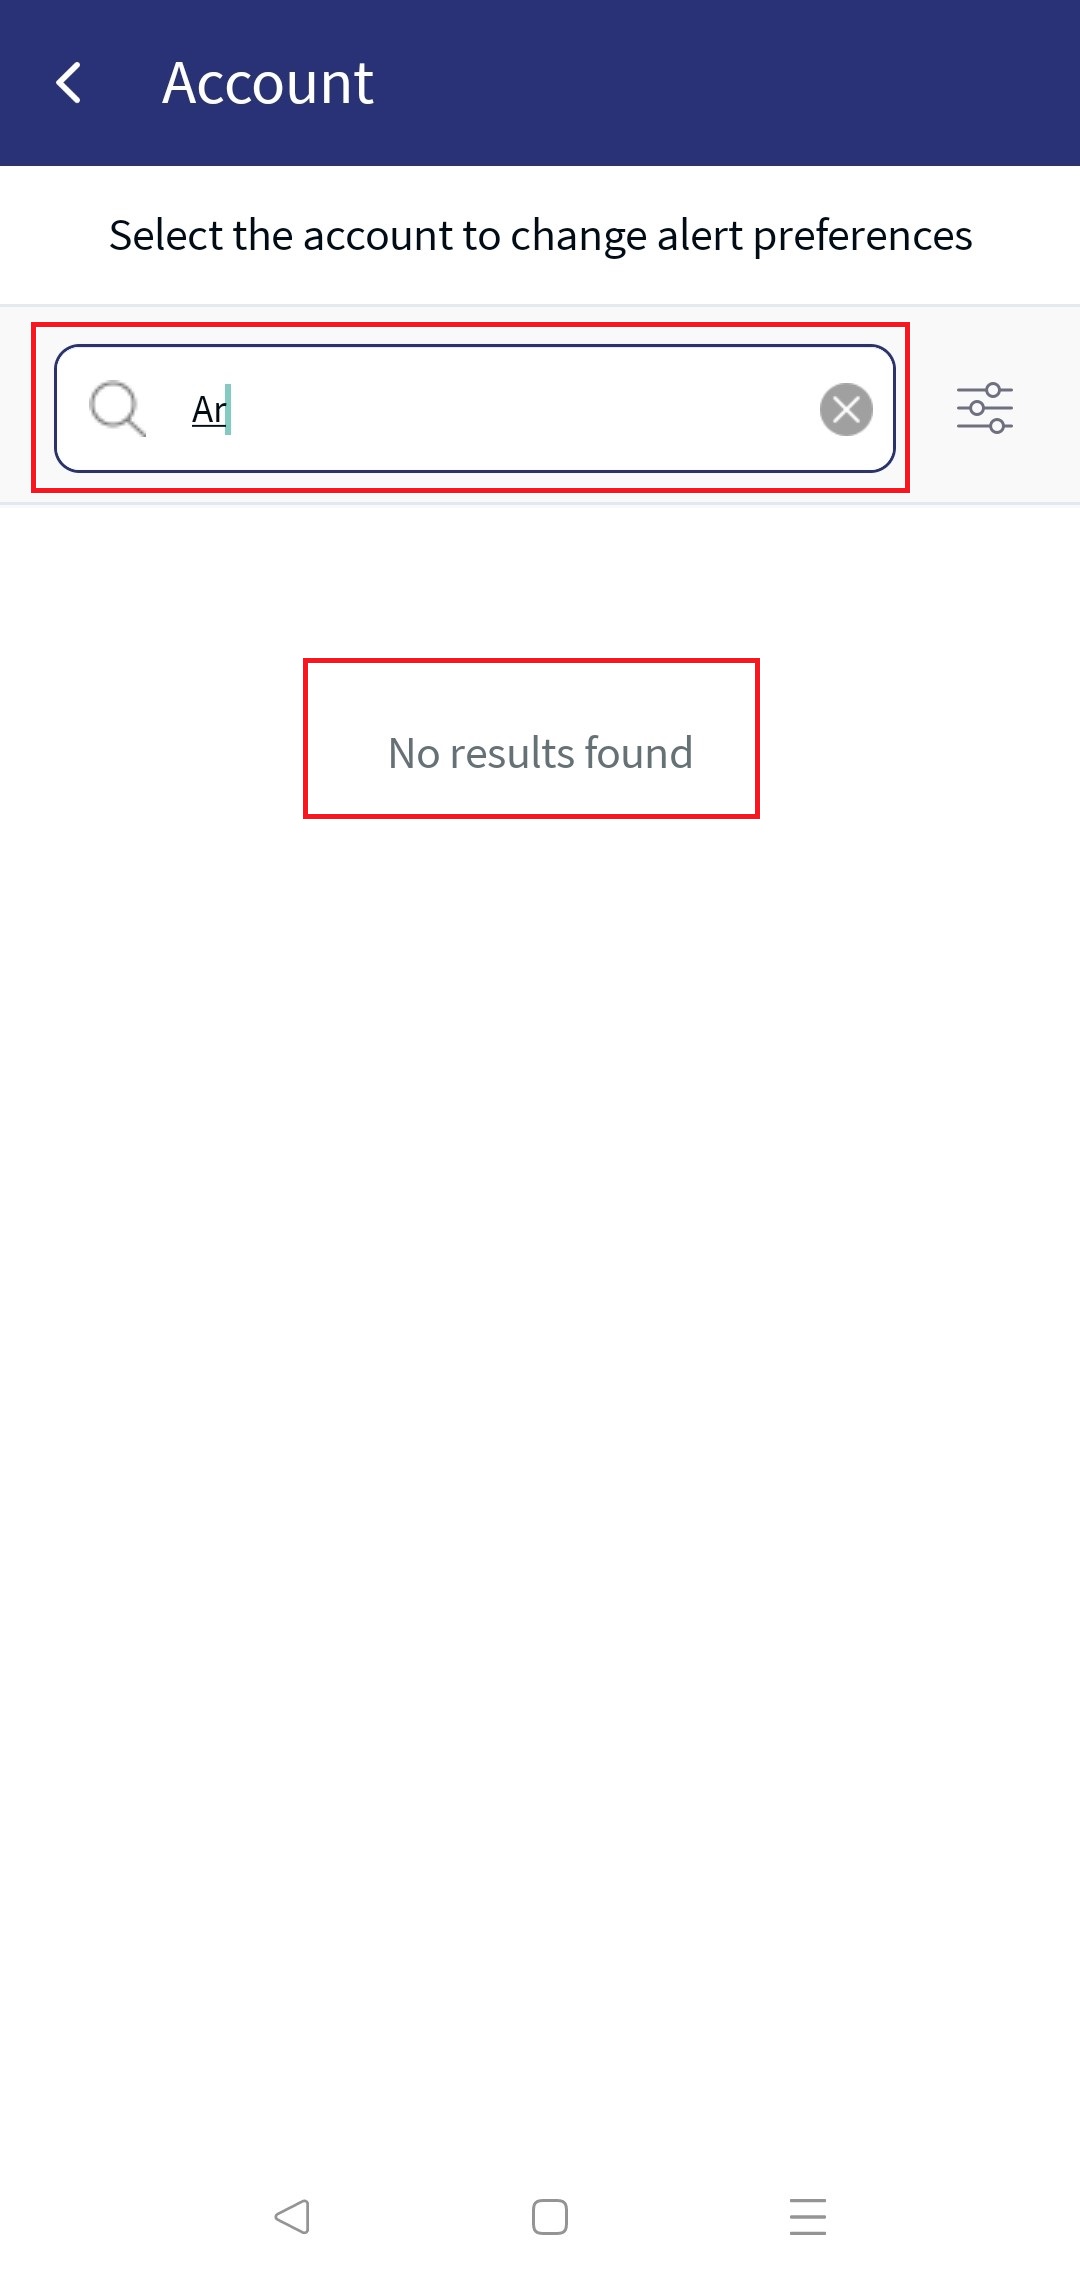
Scenario 3: The user having access to multiple customer IDs with less than or equal to 10 accounts
For users having access to multi-customer IDs with less than or equal to 10 accounts, the application displays all the accounts grouped by customer ID and account types (Savings, Current, and many more).
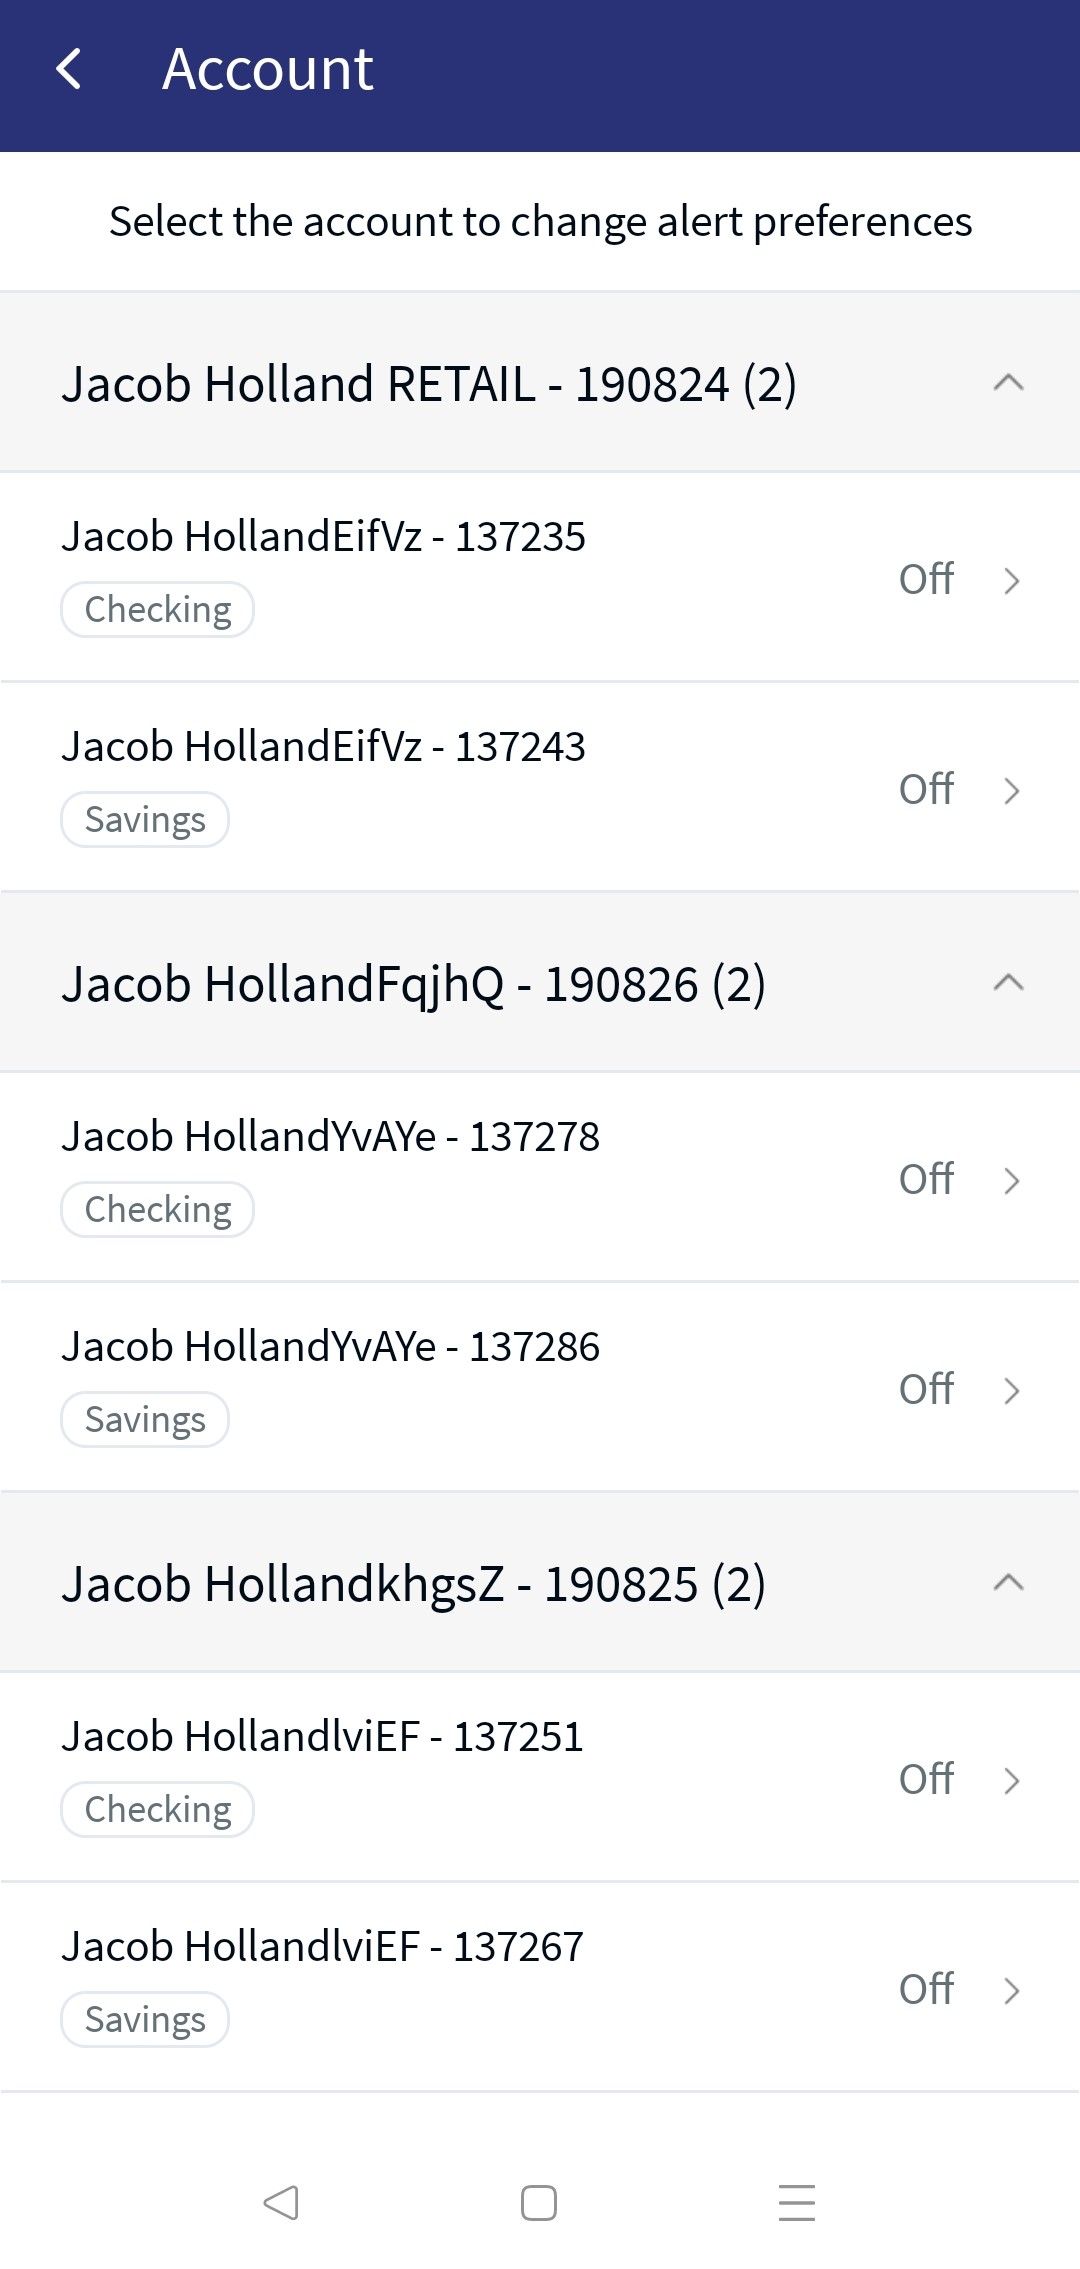
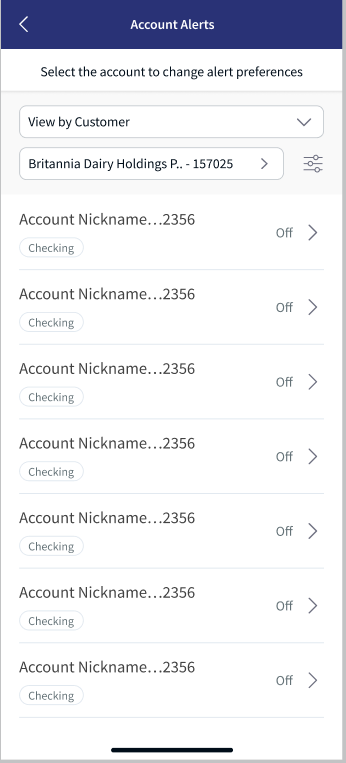
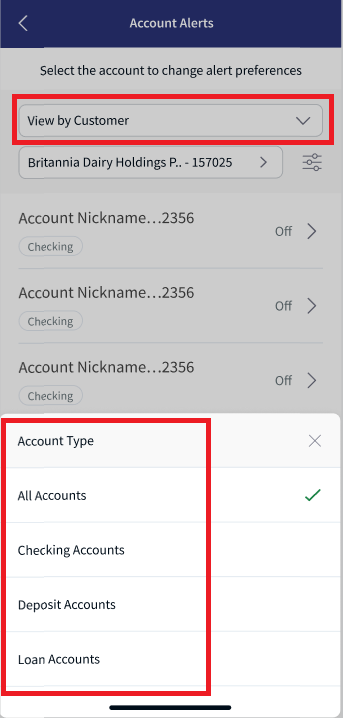
Scenario 4: The user having access to multiple customer IDs with more than 10 accounts
For users having access to multi-customer IDs, the application displays a filter option(View by and Account Type) and search box.
Configuration
Spotlight Configurations
The following are the spotlight configurations for the Account Alert Settings.
Configuration to View Account Compact Dashboard
System configuration (Bundle DBP - ACCOUNTS_COUNT_COMPACT_DASHBOARD) is available in the Spotlight application to drive the visibility of Account Compact Dashboard. Based on the bank configuration, number of accounts are displayed on the screen.
For example, the configuration is set as 10. The following are the scenarios:
| Configuration is set as 10. | ||
| Scenario 1 | User with less than or equal to 10 accounts |
The user can see all the accounts in single page.
|
| Scenario 2 | User with more than 10 accounts | The user can see account type filtering options, search bar, and max of 10 accounts per page. |
Configuration for Pagination
System configuration (Bundle DBP - ACCOUNTS_PER_PAGE) is available in the Spotlight application to drive visibility of account per page. This configuration is the number of accounts displayed per page.
For example, the configuration is set as 10.
- When this configuration is enabled,
- The pagination option (Next page, Prev page, First page, Last page) visible only when a minimum of 10 accounts are displayed per page.
- If the user is in the second page, user can navigate to previous page.
- Only lazy loading configuration is maintained for mobile native app.
| For example, configuration is set as 10. | ||
| Scenario 1 | User with ten or more accounts and multiple account type | If the user has ten or more accounts, then the user can move to Next page, Prev page, First page, Last page. |
In this topic