Manage Payees
In the digital banking application, the list of Payees inside the Make Payment module, is displayed using the Payee Management component. The bank users with required permissions can only add, edit, or remove a Payee and it is controlled in Spotlight. This component displays the list of Payees based on the Payee type such as same bank account, Pay a Person, Business, and International.
In Manage Payees, confirmation of payee is also available. The bank application verifies new payee account details with central system or the third-party system. The confirmation of the payee will be validating during payee creation and payment initiation.
Use this feature to manage the Payees added to your account.
Web Channel: Accounts Dashboard > Payments and Transfers > Manage Payees
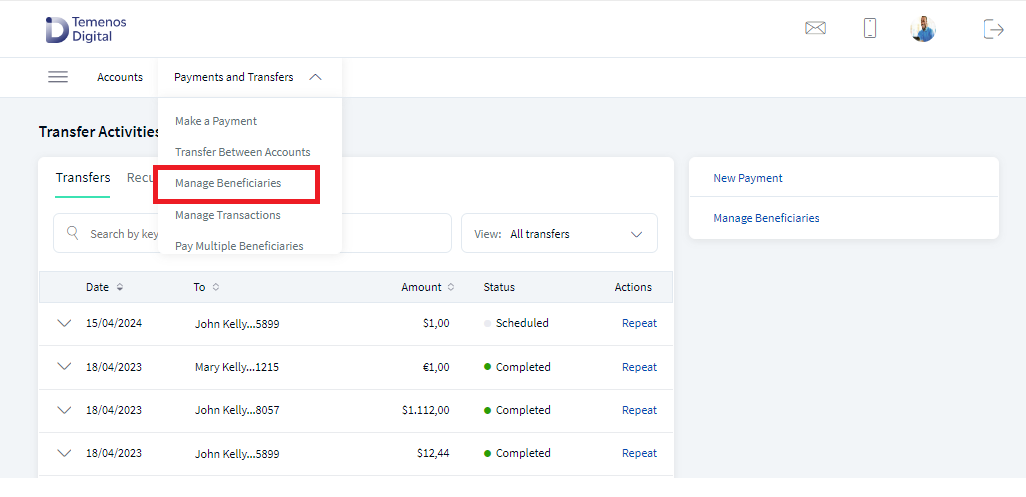
The Manage Payees screen appears. The application displays different screen to the user based on the contract.
Scenario 1: The user having access to single customer ID
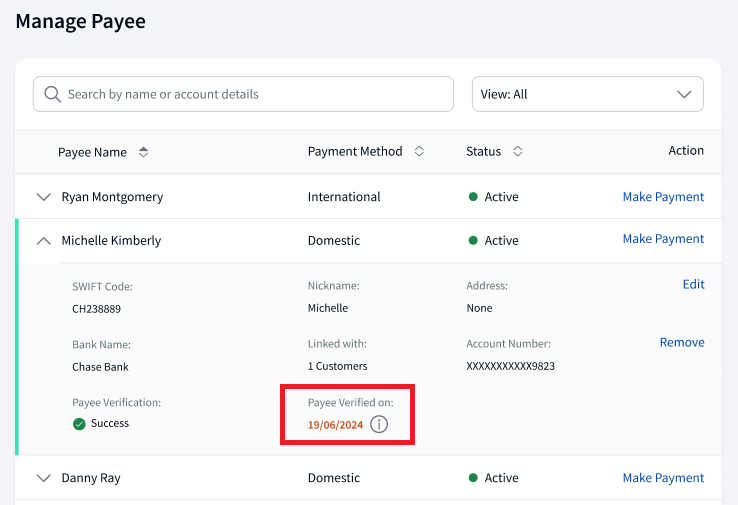
For the users having access to a single customer ID, the application displays search functionality, and Payee details.
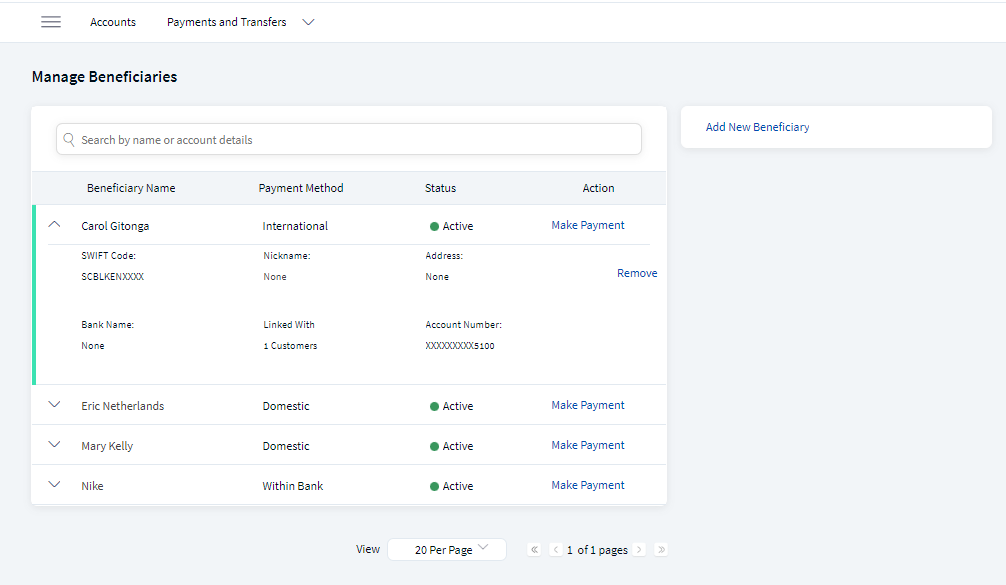
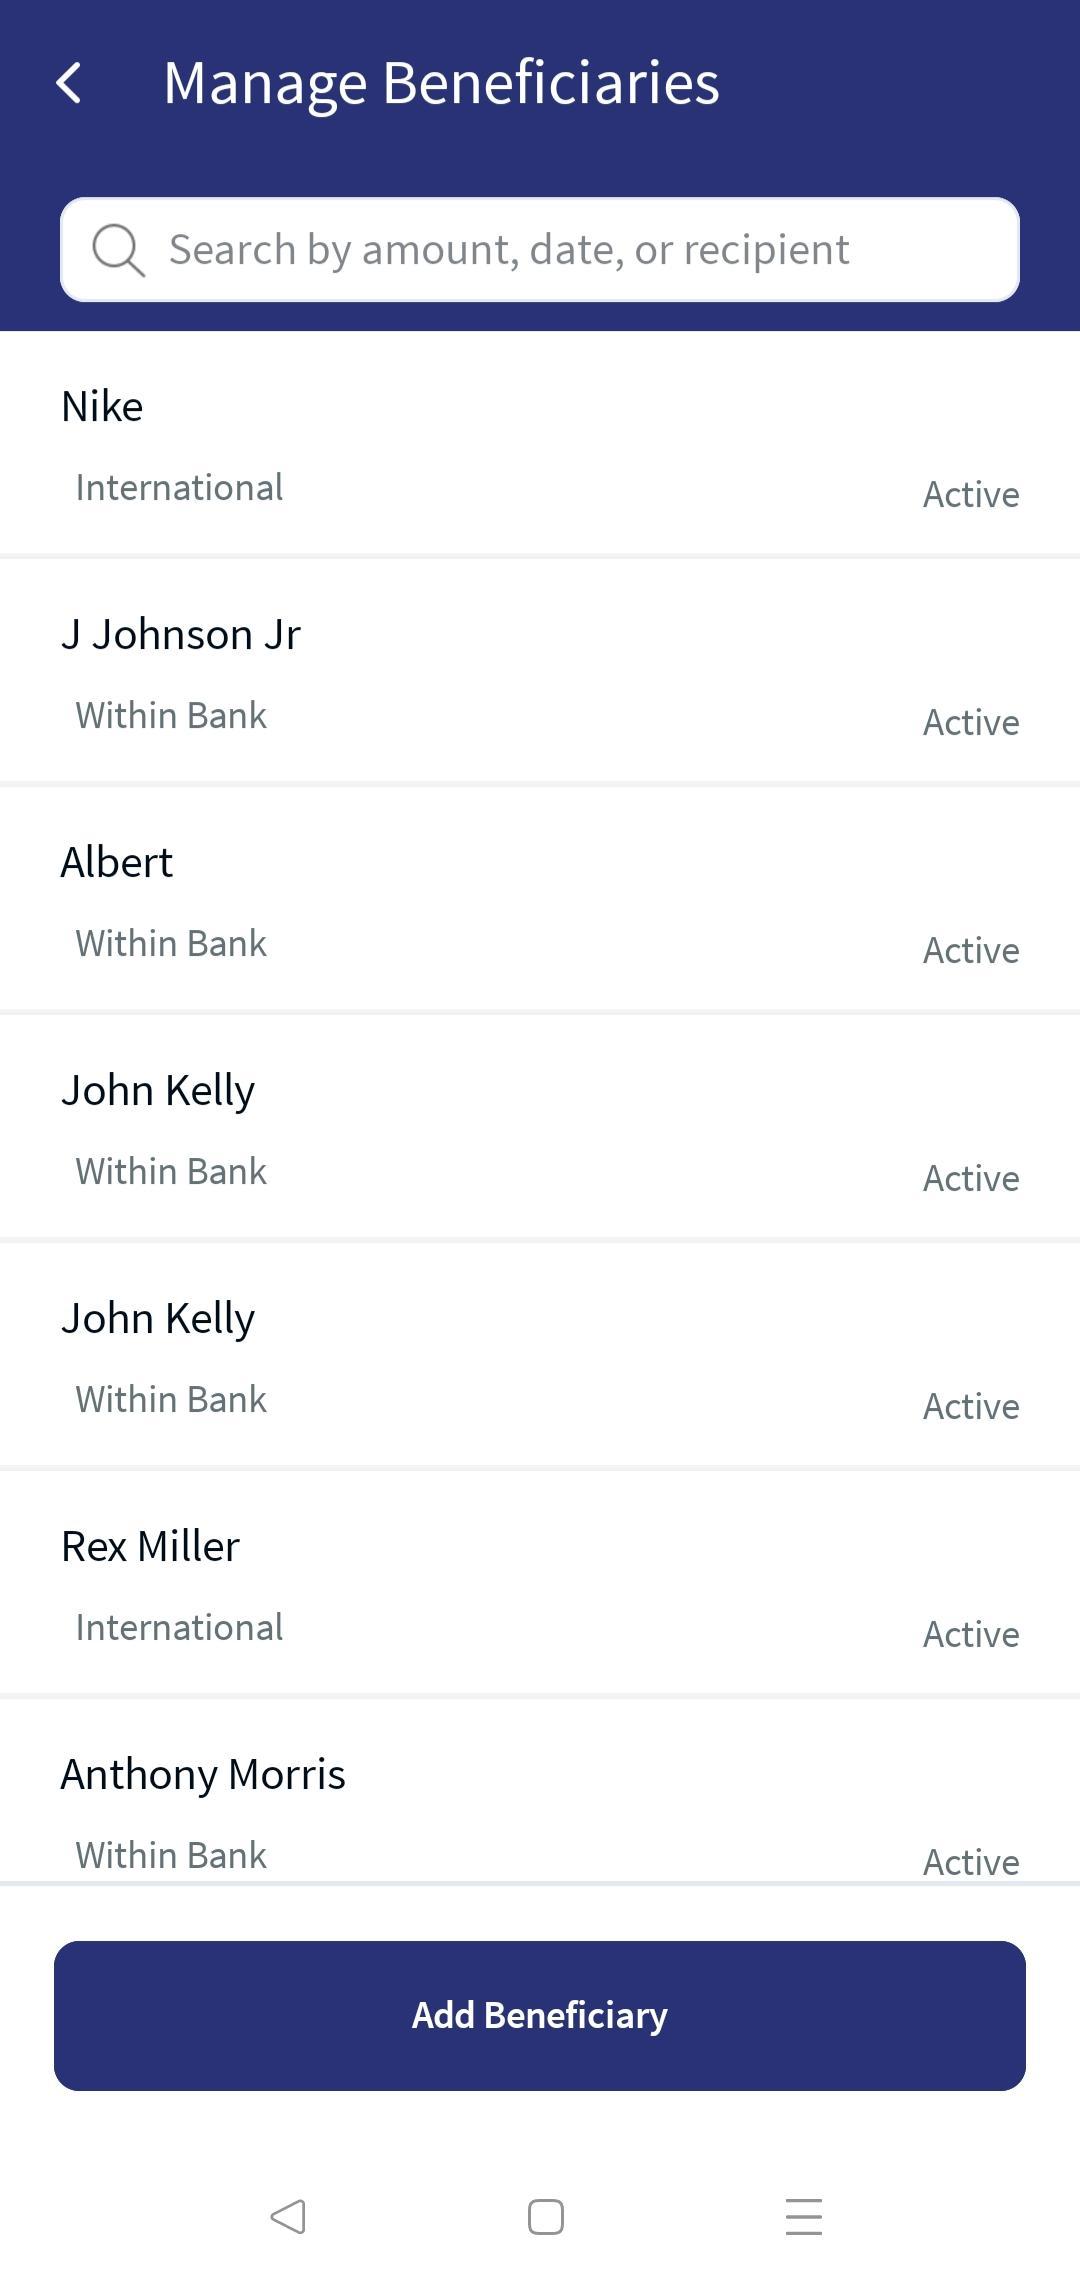
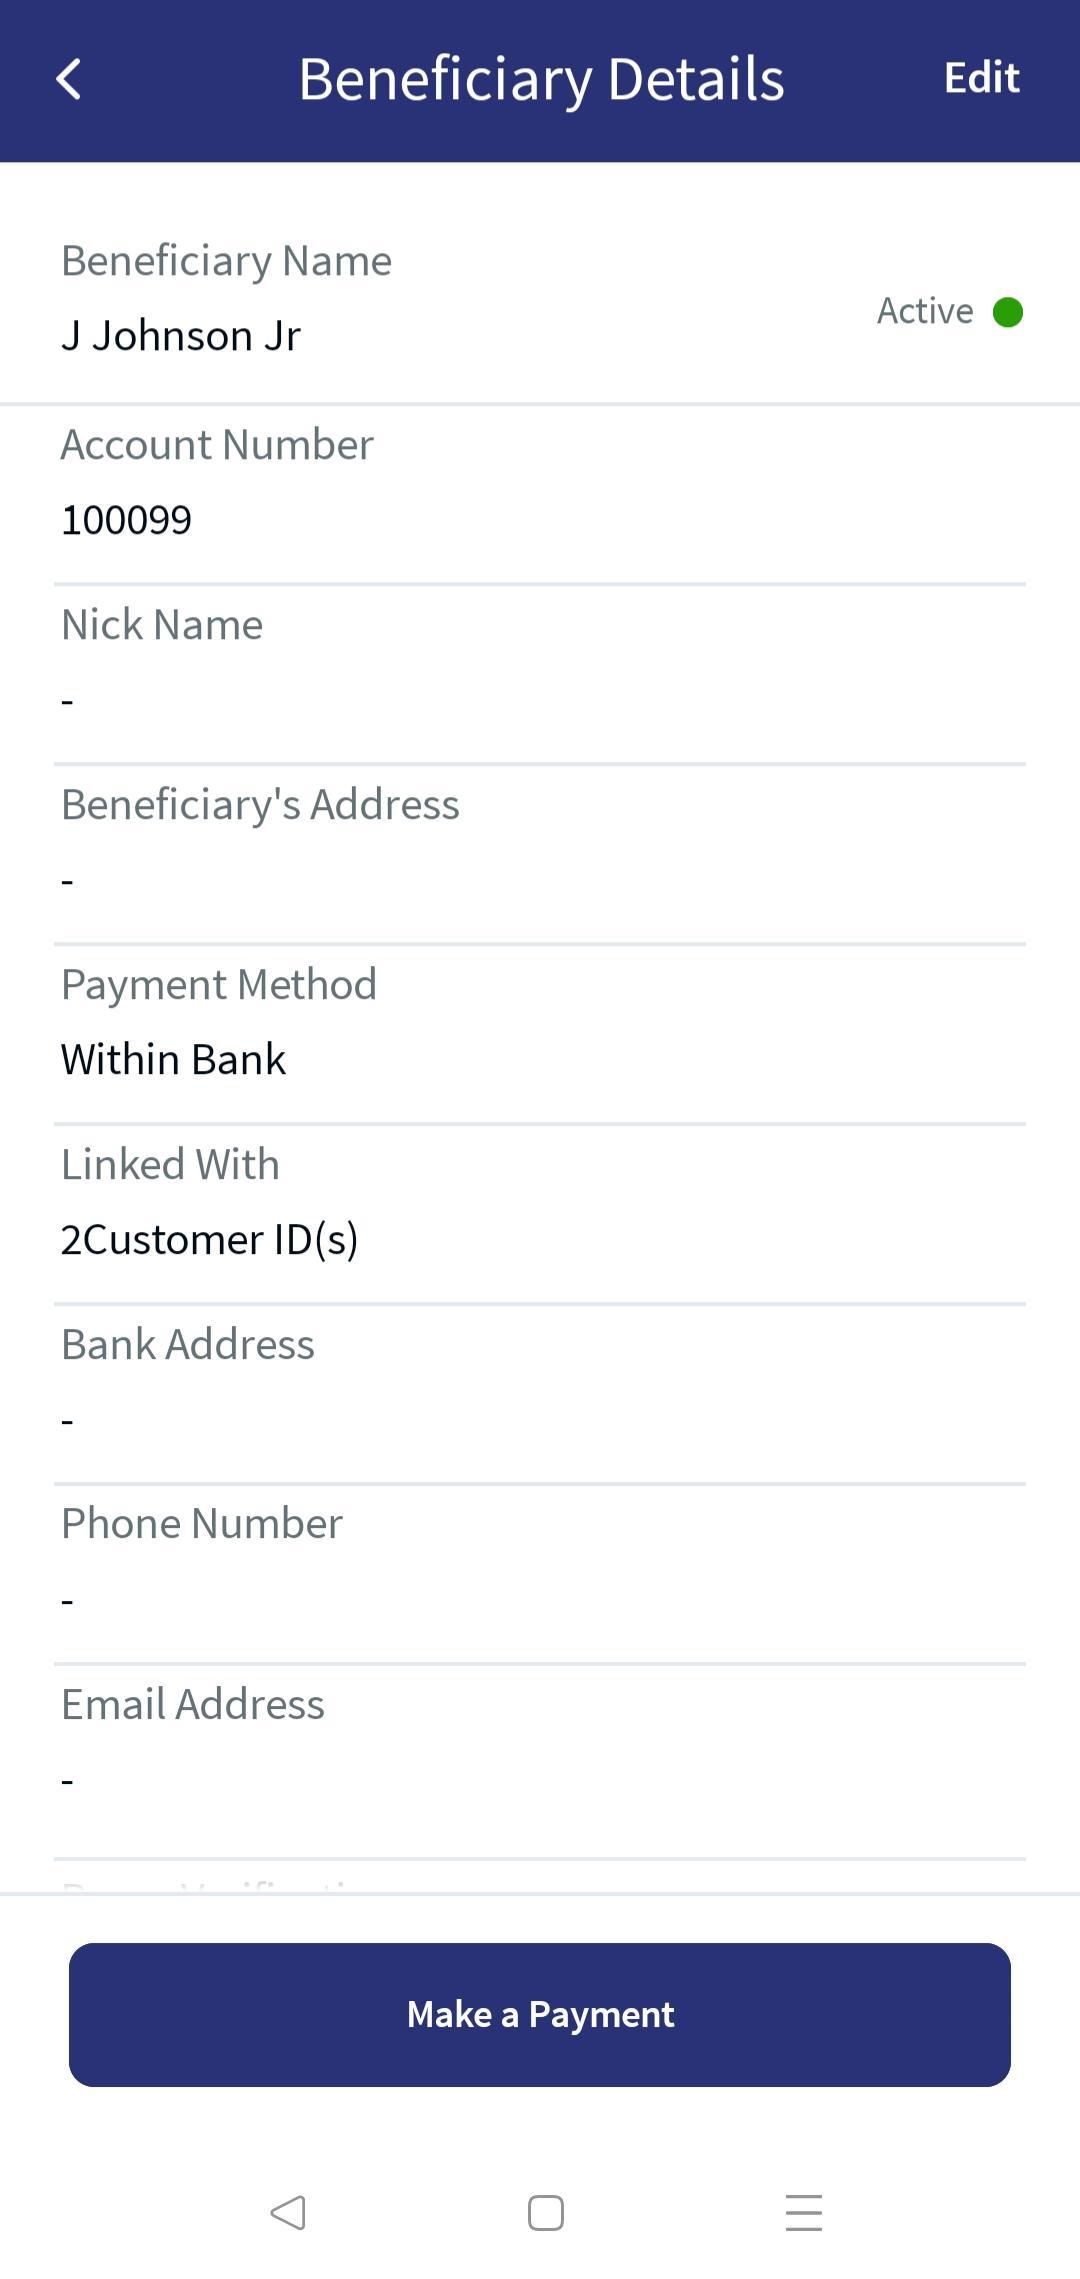
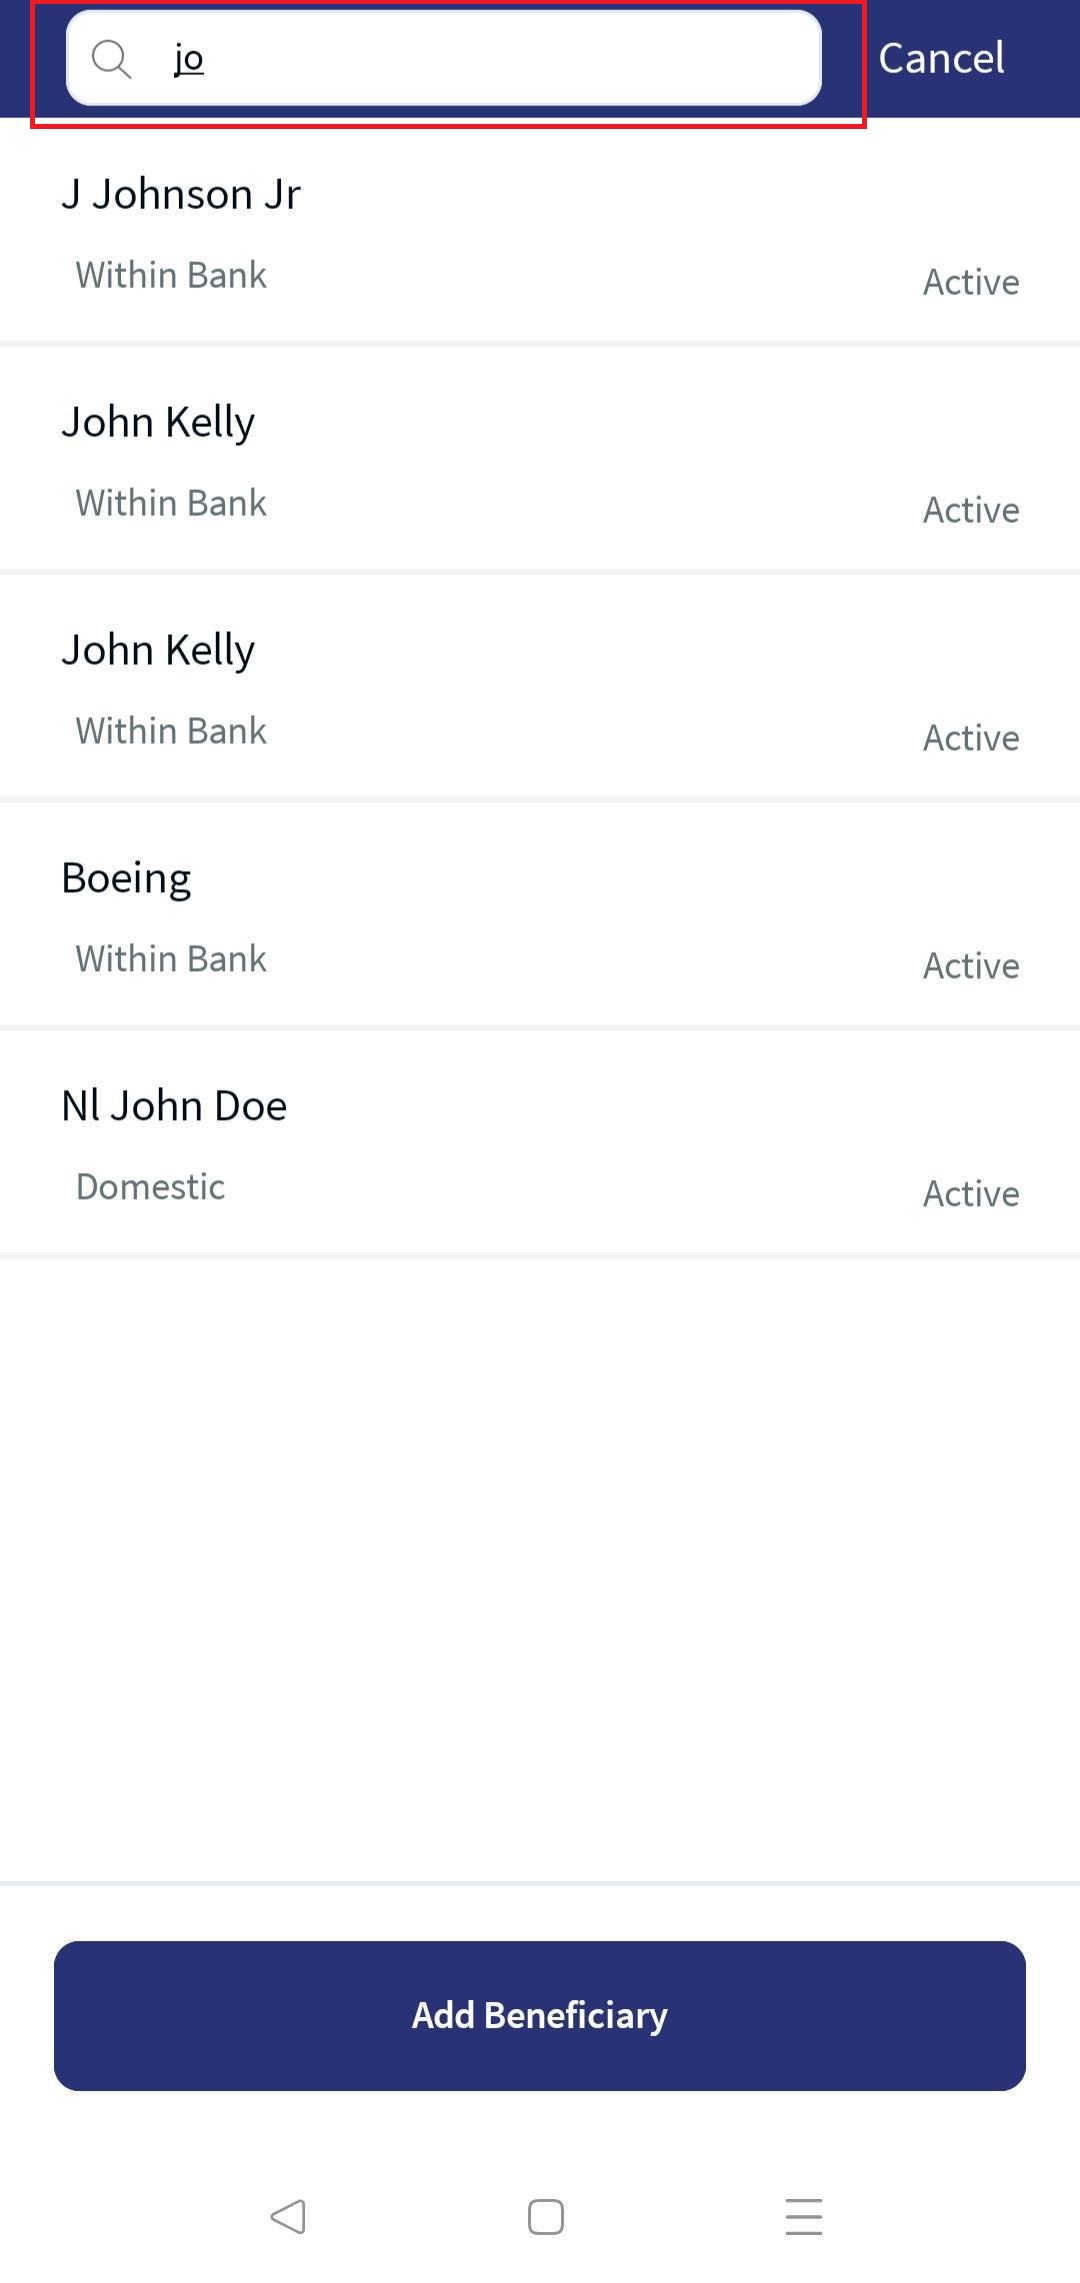
Scenario 2: The user having access to multiple customer IDs
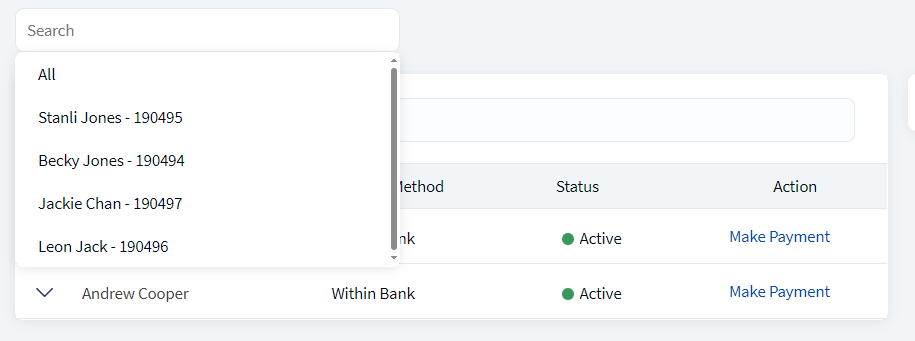
For the users having access to multiple customer IDs, the application displays combo box field(with a place holder value as Customer), search functionality, and Payee details. By default, the application selects All(combo box field) and display all the Payee details.
In combo box field, the user can use to search or select customer from the drop-down list. The search can happen using customer name and customer ID or select the customer from the drop-down list. If the search does not retrieve any matching results, the application displays a No results found message in the drop-down box.
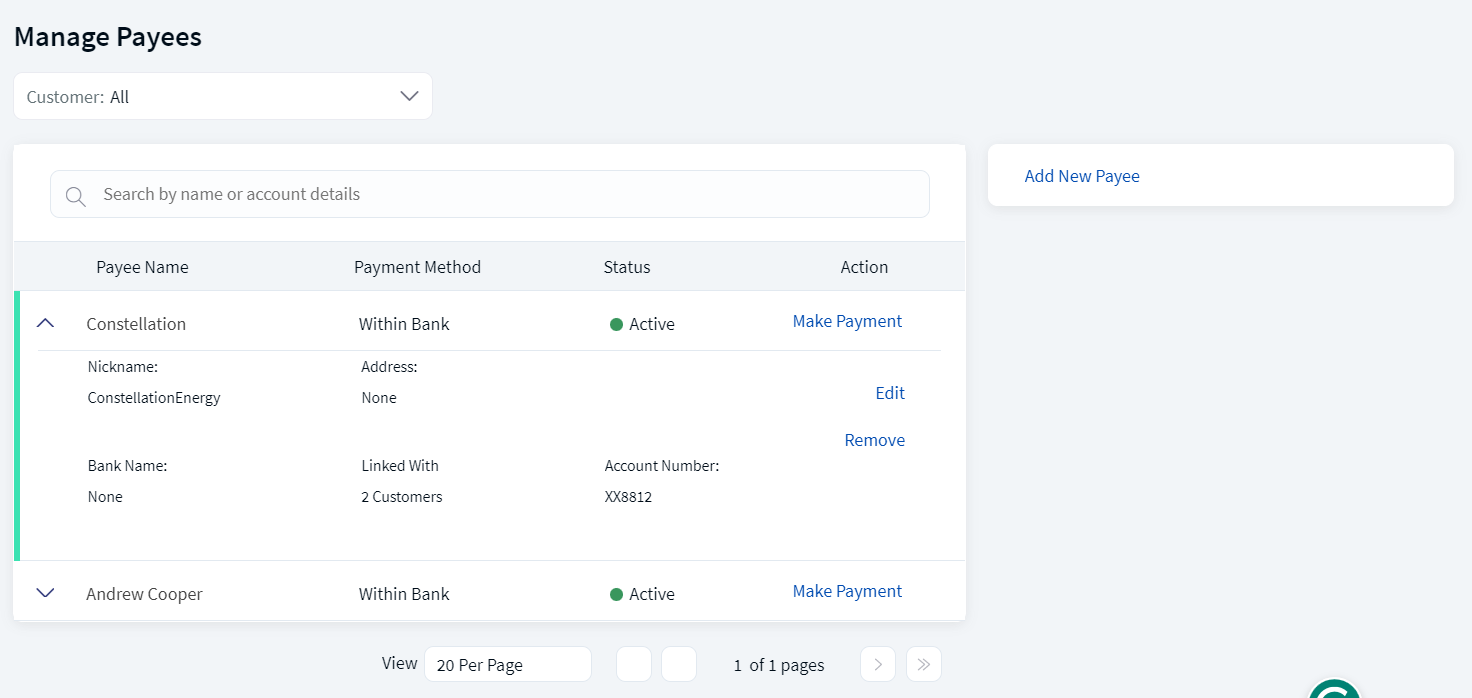
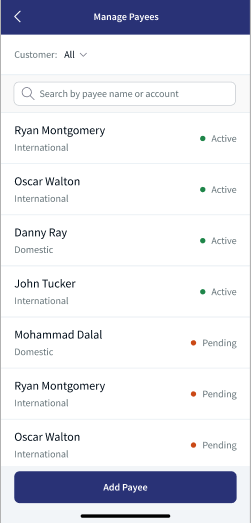

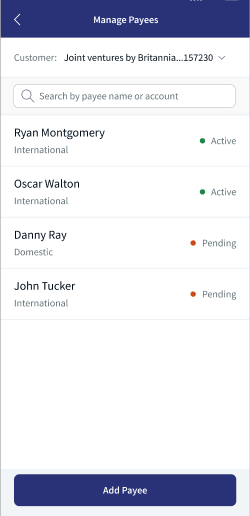

The following primary details are displayed in this screen:
- Payee name
- Payment Method (International, Domestic, or Within bank)
- Status
- Actions that can be performed - Make Payment
Click the arrow displayed besides each row to view the additional details such as
- Bank Code
- Nick Name
- Address
- Bank Name
- Linked With (Contracts)
- Account Number
- Payee Verified on. If the Payee Verified on time stamp is displayed in orange color, see Expiry Period for more information.
- Actions that can be performed such as
- Edit
- Remove
You can perform the following actions in this screen:
- Search for the Payee
- Make Payment to the existing Payees
- Edit a Payee
- Remove a Payee
- Add a Payee
The approval is introduced in the Manage Payee feature. As per the approvals the changes like add, edit, and remove needs to approved for further processing. See Approval and Requests for more information.
The Status column shows the current status of the record Active or Pending for Approval. The record is non-editable if the status of the record is Pending for Approval. If the user withdraws the request, the notification of withdraw request with reason is sent to all the approvers.
If the changes are rejected by the approver then
- the notification center displays a notification as declined.
- the payee is not added in case of the Add Payee.
- the changes are reverted in case of Edit.
- the payee exists in case of Remove.
 Multi entity support
Multi Entity Support: Customers can view the dashboard, perform transfers, or view any request summary and submit requests against the entity associated with the customer during login. The feature is enhanced with Experience APIs to retrieve and post based on the Entity ID of the signed-in user.
- The Entity ID selected by the signed-in user flows through the application through the respective Experience API.
- For all fetch (GET) API calls, the system retrieves the results based on the Entity ID of the signed-in user.
- For all add/update/delete calls, the system passes and posts requests against the Entity ID of the signed-in user.
The feature supports the following modules:
| Authentication | Dashboard | Account Overview |
| Credit Card overview | Cheque Management | Card Management |
| Statements | Dispute Transactions | Service Requests |
| PFM | Account Settings | Consent Management |
| Sign In Settings | Profile Settings | Manage Beneficiaries |
| Unified Transfers | Manage Transfers | Foreign Exchange |
| Bulk Payments | Bill Payments | Approval Matrix |
| Portfolio Management | WealthOrder |
Business Process Diagram
Add Payees
The list of Payees added in the UTF is displayed under Manage Payees module. This screen displays the list of Payees added based on the Payee type such as same account, domestic, Pay a Person, and International.
Menu path:
- Web Channel: Main Menu > Unified Transfers Flow
- Mobile Native: Hamburger menu > Unified Transfers Flow
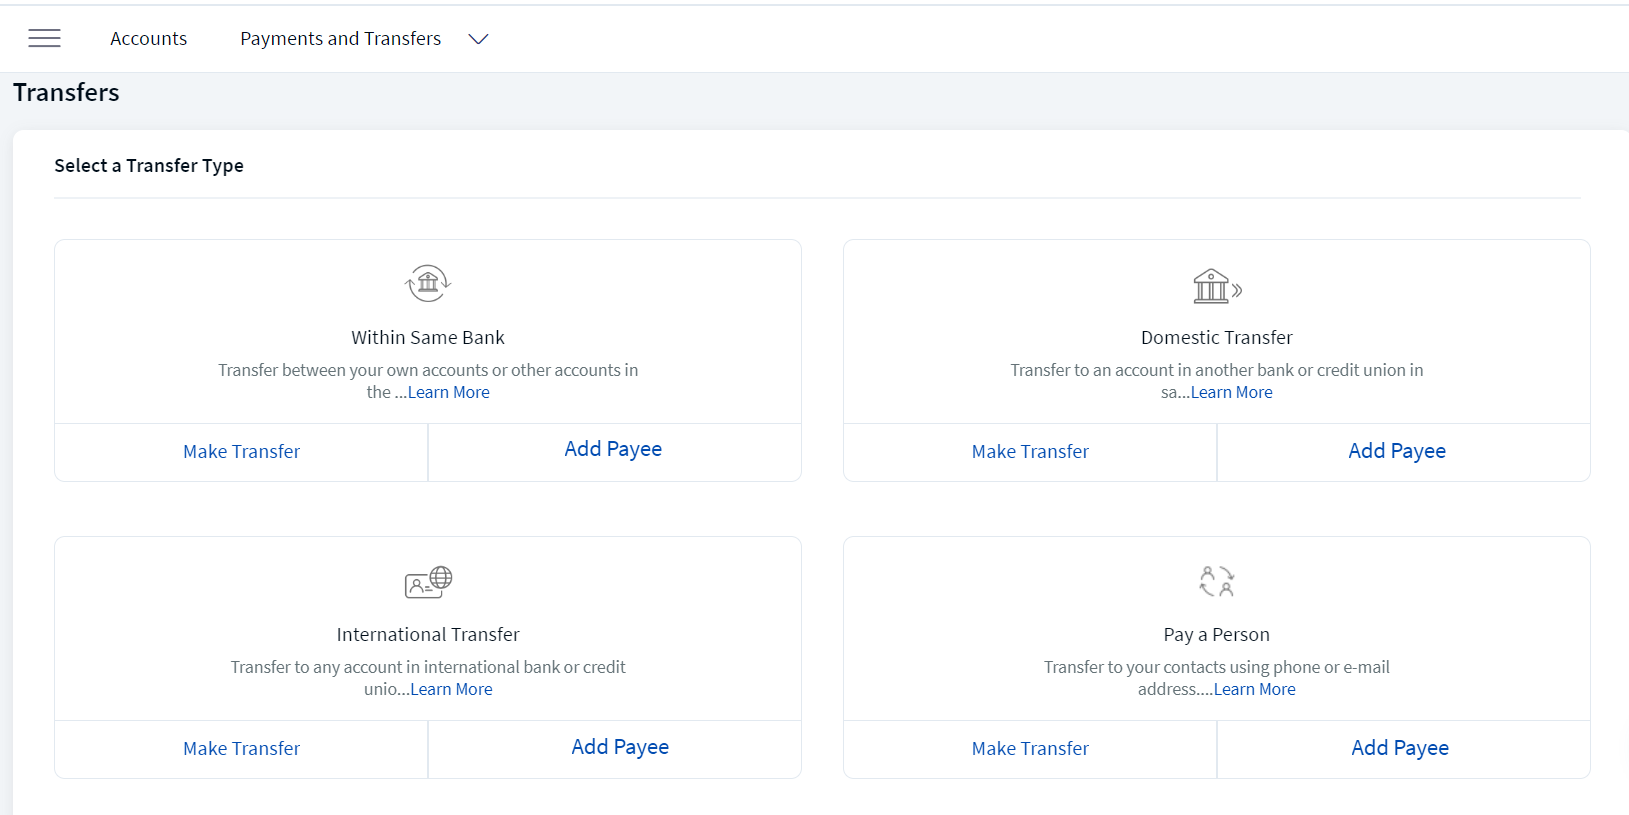
The Unified Transfers Flow screen appears with the list of transfer types and actions that can be performed against each transfer type. Click Add Account displayed against each transfer type to add a Payee for the selected account type
You can add the following Payee accounts:
- Same Bank Payee who has an account in the same bank.
- Domestic Payee who has a domestic account in another bank.
- International Payee who has an account in an international bank.
- Pay a Person Recipient to transfer money using the person's email ID, mobile number, or National ID.
The user with required permissions can create, edit, and delete the Payee. For SME users, the Approval flow is enabled.
Add Same Bank Payee
Use the feature to add a Payee who has an account in the same bank. Click Add Payee under Within Same Bank on Unified Transfers screen.
For Same bank transfer the application behavior depends on the Spotlight bundle configuration CREDITOR_NAME_ENRICHMENT, Confirmation of Payee and close match scenario.
- If the application is not configured with Confirmation of Payee, then the payee name enrichment depends on the bundle configuration CREDITOR_NAME_ENRICHMENT.
- is enabled then payee name will be automatically updated/generated after entering the account number and re-enter account number. Even though the entered account name is different, the application enriches the name based on the account number.
- is disabled then payee name will not be updated/generated after entering the account number and re-enter account number.
- If the application is configured with Confirmation of Payee and close match scenario and bundle configuration VERIFY_PAYEE_CONFIG
- is mandatory or optional, payee name enrichment will not happen.
- is no configuration, then the payee name configuration CREDITOR_NAME_ENRICHMENT
- is enabled then payee name will be automatically updated/generated after entering the account number and re-enter account number. Even though the entered account name is different, the application enriches the name based on the account number.
- is disabled then payee name will not be updated/generated after entering the account number and re-enter account number.
The following is the procedure to add same bank account.
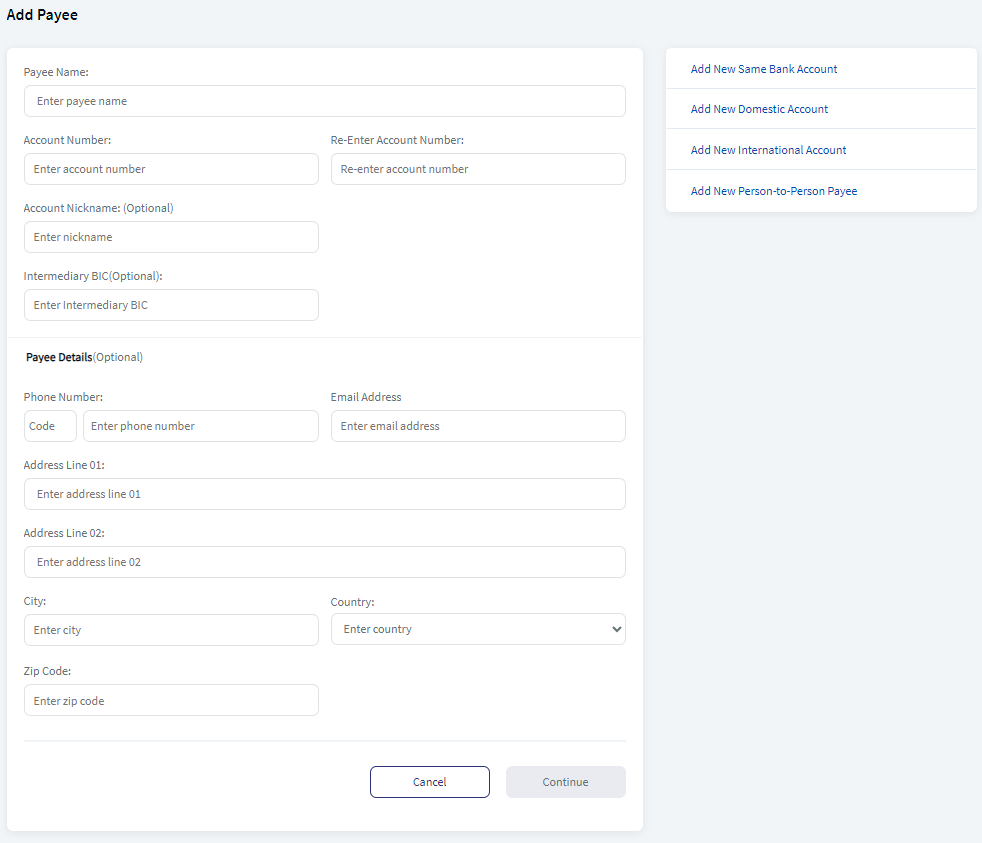
- Enter the following required information.
- Payee Name. Enter the name of the payee.
Once you enter the account number in the two fields, the correct payee name is fetched from the core and displayed. The back-end service verifies the account number against the payee name. In case they do not match, the app displays an error message Entered account number is incorrect. Please enter the valid account number.
- Account Number. Enter the account number of the recipient.
- Re-Enter Account Number. Re-enter the account number provided in the previous field.
- Account Nickname. Enter a nickname for the payee. This is an optional field.
- Intermediary BIC. Enter the Intermediary BIC details. This is an optional field.
- Payee Details (Optional). Enter the payee details. This section includes the following details:
- Phone Number
- Email Address
- Address details that includes Address Line 01, 02, City, State, Country, and Zip Code.
- Payee Name. Enter the name of the payee.
- Click Continue. This displays Link Payee screen.
This screen is displayed only if the user have access to at least two Customer IDs.
- Select the contract from the list of contracts to link the payee. This page displays the list of contracts available. The following information is displayed:
- Contract
- Identity Number
- Selected CIF
You can do the following:
- Click the check box to select a contract.
- Click Select All to select all the contracts.
- Click the down arrow beside a contract to view the additional details such as:
- Customer Name
- Customer ID
The user can click Cancel to cancel the operation and click Back to go back to previous screen.
- Click Continue after selecting the contract(s). This displays the Confirmation screen.
Continue button will be enabled only after selecting a contract.
- Verify the entered details and click Confirm to add the payee.
- Click Cancel to cancel the operation. In the pop-up that appears, confirm the cancellation to return to Unified Transfers screen.
- Click Modify to modify the details before adding the account. You can also navigate to adding other recipient accounts by clicking the required option from the right pane of the screen.
The app displays the acknowledgment screen with an acknowledgment message and account details confirming that the payee has been added or sent for approval. Also an approval notification is sent to all the approvals across contracts in the approval matrix under non-monetary transactions
The acknowledgment screen displays the transaction details, unique reference number to the transaction, and provision to do the following:
- Transfer Activities
- New Transfer
The link payee screen is only SME bank users.
Add Domestic Payee
Use the feature to add a payee who has an account in another bank (domestic account) or add your own account available in another bank by providing the required information. Click Add Payee under Domestic Transfer on Unified Transfers screen.
The app displays the domestic account tab with a form to enter the account details. The following is the procedure to add Domestic bank account.
- Enter the following required information.
- Payee Name. Enter the name of the payee.
- Account Number. Enter the account number of the recipient.
- Re-Enter Account Number. Re-enter the account number provided in the previous field.
- Any BIC (Optional).
- Legal Entity Identification(LEI) (Optional).
- Bank BIC: If the provided account number is part of cross border or international payment, then you must enter the Bank BIC number that contains alphanumeric characters. Bank BIC field does have a format and structure validations.
BIC must be either 8 or 11 characters only.
- Bank code (A-Z): 4 letter code
- Country code (A-Z): 2 letter code
- Location Code (0-9 or A-Z): 2 digit code – either letters or numbers
- Branch Code (0-9 or A-Z): optional 3 digit code – either letters or numbers
BIC is non-editable if it is derived from IBAN.
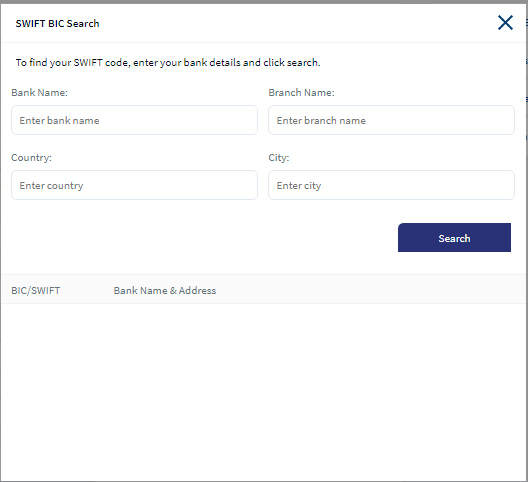
- Click on Look Up to automatically detect the Bank BIC. Clicking on Look Up will display a pop up with the privilege to search the Bank BIC details. Search by providing the following details to pick the right Bank BIC:
- Bank Name
- Branch code
- Country
- City
The Lookup feature is place holder which is to be integrated.
- Bank Name
- Bank Clearing Code. Enter the clearing code.
- Clearing code is the bank code that is used to perform the domestic transfer.
- The user need to enter either the Clearing code with clearing identifier code or Bank BIC.
- Click on Look Up to automatically detect the Clearing code. Clicking on Look Up will display a pop up with the privilege to search the Clear code details. Search by providing the following details to pick the right Clearing code:
- Bank Name
- Branch code
- Country
- City
- The Lookup feature is place holder which is to be integrated.
- Clearing Identifier Code. select the option from the drop down.
- Account Nickname (Optional). Enter a nickname for the payee.
- Payee Address details (Optional). Enter the personal information (such as Phone, Email) and address details (such as Address, Country, City, State, and Zip/ postal code).
- Payee Identification details (Optional). Enter the payee identification details such as Other ID Type (Organization or Individual), Other ID, Issuer, Scheme Code, and Scheme Proprietary.
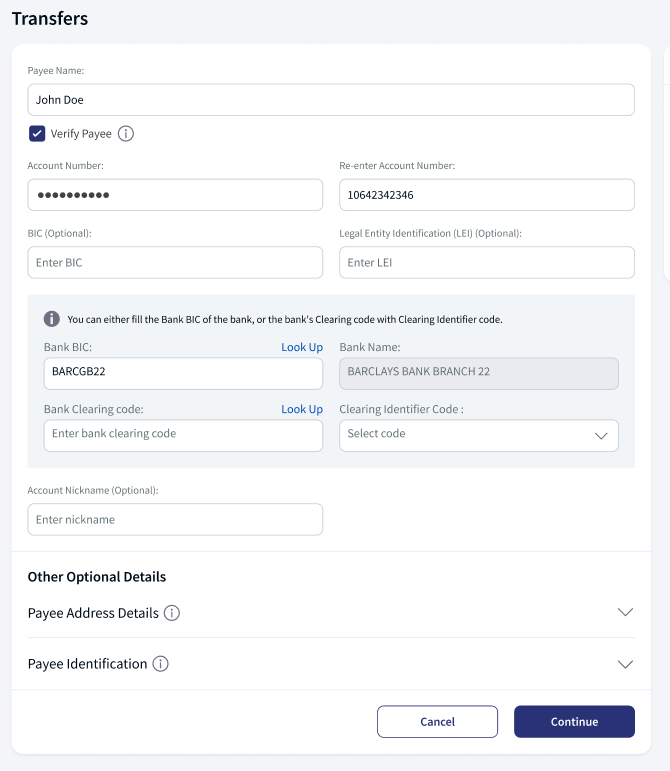
- Click Continue. The application performs payee verification and then displays Link Payee screen.
This screen is displayed only if you have access to at least two Customer IDs.
- Select the contract from the list of contracts to link the payee. This page displays the list of contracts available. The following information is displayed:
- Contract
- Identity Number
- Selected CIF
You can do the following:
- Click the check box to select a contract.
- Click Select All to select all the contracts.
- Click the down arrow beside a contract to view the additional details such as:
- Customer Name
- Customer ID
The user can click Cancel to cancel the operation and click Back to go back to previous screen.
- Click Continue after selecting the contract(s). This displays the Confirmation screen.
Continue button will be enabled only after selecting a contract.
- Verify the entered details and click Confirm to add the payee.
- Click Cancel to cancel the operation. In the pop-up that appears, confirm the cancellation to return to Unified Transfers screen.
- Click Modify to modify the details before adding the account. You can also navigate to adding other recipient accounts by clicking the required option from the right pane of the screen.
The app displays the acknowledgment screen with an acknowledgment message and account details confirming that the payee has been added or sent for approval. Also an approval notification is sent to all the approvals across contracts in the approval matrix under non-monetary transactions
The acknowledgment screen displays the transaction details, unique reference number to the transaction, and provision to do the following:
- Transfer Activities
- New Transfer
The link payee screen is only SME bank users.
Add International Payee
Use the feature to add a payee who has an International account in another bank or add your own International account available in another bank by providing the required information. Click Add Payee under International Transfer on Unified Transfers screen.
The app displays the International account tab with a form to enter the account details. The following is the procedure to international bank account.
- Enter the following required information.
- Payee Name. Enter the name of the payee.
- Account Number. Enter the account number of the recipient.
- Re-Enter Account Number. Re-enter the account number provided in the previous field.
- Any BIC (Optional).
- Legal Entity Identification(LEI) (Optional).
- Bank BIC: If the provided account number is part of cross border or international payment, then you must enter the Bank BIC number that contains alphanumeric characters. Bank BIC field does have a format and structure validations.
BIC must be either 8 or 11 characters only.
- Bank code (A-Z): 4 letter code
- Country code (A-Z): 2 letter code
- Location Code (0-9 or A-Z): 2 digit code – either letters or numbers
- Branch Code (0-9 or A-Z): optional 3 digit code – either letters or numbers
BIC is non-editable if it is derived from IBAN.
- Click on Look Up to automatically detect the Bank BIC. Clicking on Look Up will display a pop up with the privilege to search the Bank BIC details. Search by providing the following details to pick the right Bank BIC:
- Bank Name
- Branch code
- Country
- City
The Lookup feature is place holder which is to be integrated.
- Bank Name
- Bank Clearing Code. Enter the clearing code.
- Clearing code is the bank code that is used to perform the domestic transfer.
- The user need to enter either the Clearing code with clearing identifier code or Bank BIC.
- Click on Look Up to automatically detect the Clearing code. Clicking on Look Up will display a pop up with the privilege to search the Clear code details. Search by providing the following details to pick the right Clearing code:
- Bank Name
- Branch code
- Country
- City
- The Lookup feature is place holder which is to be integrated.
- Clearing Identifier Code. select the option from the drop down.
- Street Name
- Town
- Country
- Account Nickname (Optional). Enter a nickname for the payee.
- Intermediary BIC.
- Payee Address details (Optional). Enter the personal information (such as Phone, Email) and address details (such as Address, Country, City, State, and Zip/ postal code).
- Payee Identification details (Optional). Enter the payee identification details such as Other ID Type (Organization or Individual), Other ID, Issuer, Scheme Code, and Scheme Proprietary.
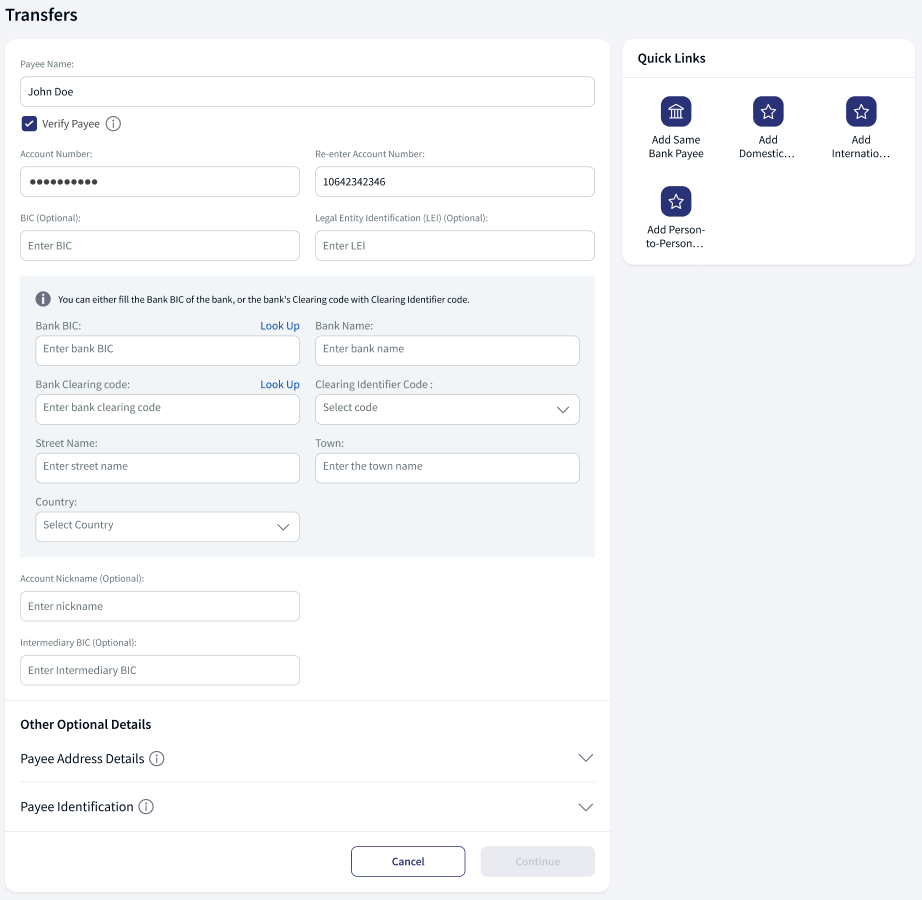
- Click Continue. The application performs payee verification and then displays Link Payee screen.
This screen is displayed only if you have access to at least two Customer IDs.
- Select the contract from the list of contracts to link the payee. This page displays the list of contracts available. The following information is displayed:
- Contract
- Identity Number
- Selected CIF
You can do the following:
- Click the check box to select a contract.
- Click Select All to select all the contracts.
- Click the down arrow beside a contract to view the additional details such as:
- Customer Name
- Customer ID
The user can click Cancel to cancel the operation and click Back to go back to previous screen.
- Click Continue after selecting the contract(s). This displays the Confirmation screen.
Continue button will be enabled only after selecting a contract.
- Verify the entered details and click Confirm to add the payee.
- Click Cancel to cancel the operation. In the pop-up that appears, confirm the cancellation to return to Unified Transfers screen.
- Click Modify to modify the details before adding the account. You can also navigate to adding other recipient accounts by clicking the required option from the right pane of the screen.
The app displays the acknowledgment screen with an acknowledgment message and account details confirming that the payee has been added or sent for approval. Also an approval notification is sent to all the approvals across contracts in the approval matrix under non-monetary transactions
The acknowledgment screen displays the transaction details, unique reference number to the transaction, and provision to do the following:
- Transfer Activities
- New Transfer
The link payee screen is only SME bank users.
Add Pay a Person Account
Use the feature to add a Pay a Person account by using the payee's mobile number or email ID.
Activate Pay a Person
To perform a Pay a Person transfer, you must activate the Pay a Person feature.
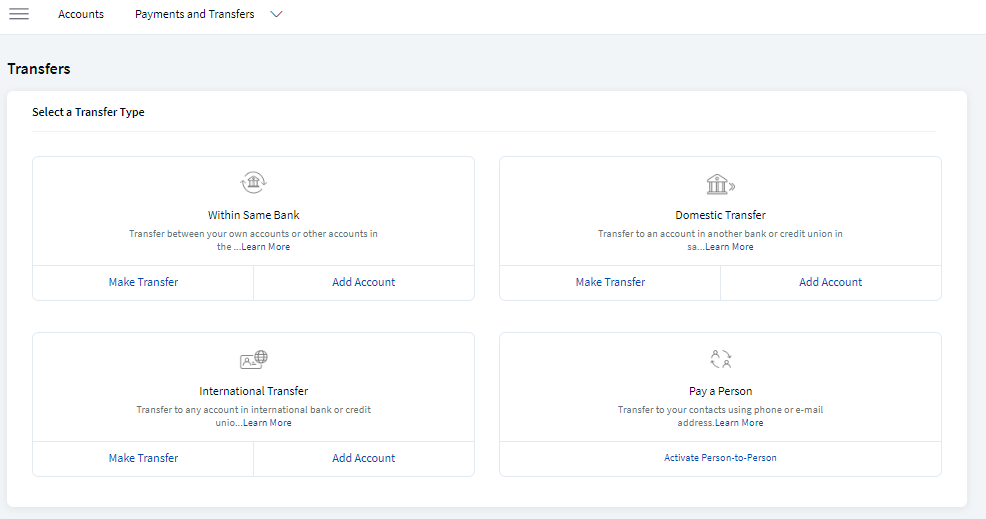
To activate Pay a Person feature, perform the following steps:
- Click Unified Transfers Flow from the side menu. The Unified Transfers screen appears with the list of account types.
- Under Pay a person, click Activate Pay a Person.
- When you open the Pay a Person screen for the first time, the app displays the terms and conditions for you to activate the Pay a Person payment service.
- Click Proceed. The Pay a Person screen appears with your account details.
- The app displays the following details:
- Your name
- Registered Phone
- Registered Email
- National ID with text box for your input
- Default account for sending the amount
- Confirm the details to activate Pay a Person payments, but you can also edit them if required.
If you have multiple eligible accounts, you can select the preferred account for using the Pay a Person payment service (for sending and receiving money).
- Once Pay a Person is activated, a confirmation message is displayed with your details. You can send and receive money via your email ID or mobile number.
Add Pay a Person Account
Click Add Account from Unified Transfers screen under Pay a Person in Unified Transfers screen. The app displays the Pay a Person account tab with a form to enter the account details.
The following is the procedure to add Pay a Person Account
- Enter the following details.
- Payee Name. Enter the name of the payee.
- Contact Information Type (Phone Number, Email ID, or National ID):
- Phone Number. Enter the phone number of the payee.
- Email Address. Enter the email ID of the payee.
- National ID. Enter the National ID of the payee.
- Account Nickname (optional). Enter the nickname of the payee.
- Click Continue. This displays Link Payee screen.
This screen is displayed only if you have access to at least two Customer IDs.
- Select the contract from the list of contracts to link the payee. This page displays the list of contracts available. The following information is displayed:
- Contract
- Identity Number
- Selected CIF
You can do the following:
- Click the check box to select a contract.
- Click Select All to select all the contracts.
- Click the down arrow beside a contract to view the additional details such as:
- Customer Name
- Customer ID
The user can click Cancel to cancel the operation and click Back to go back to previous screen.
- Click Continue after selecting the contract(s). This displays the Confirmation screen.
Continue button will be enabled only after selecting a contract.
- Verify the entered details and click Confirm to add the payee.
- Click Cancel to cancel the operation. In the pop-up that appears, confirm the cancellation to return to Unified Transfers screen.
- Click Modify to modify the details before adding the account. You can also navigate to adding other recipient accounts by clicking the required option from the right pane of the screen.
The app displays the acknowledgment screen with an acknowledgment message and account details confirming that the payee has been added or sent for approval. Also an approval notification is sent to all the approvals across contracts in the approval matrix under non-monetary transactions
The acknowledgment screen displays the transaction details, unique reference number to the transaction, and provision to do the following:
- New transfer
- Transfer Activities
Edit Payee
The bank user with required permissions can only edit payee. The edit option is available in the Manage Payees page. The Manage Payees page displays all Within bank, Domestic, and International bank account details. Expand any record and click Edit to edit the details.
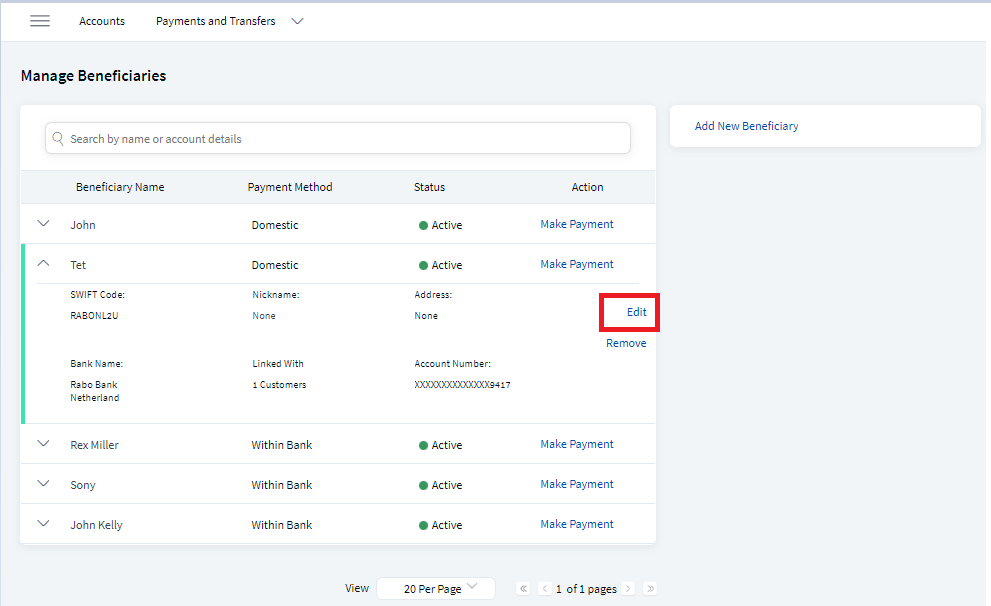
The procedure for editing the payee is similar like creating payee with all the fields filled as per the payee details. See the following details for more information.
- Same Bank Account who has an account in the same bank.
- Domestic Account who has a domestic account in another bank.
- International Account who has an account in an international bank.
- Pay a Person Recipient to transfer money using the person's email ID, mobile number, or National ID.
Remove Payee
The bank user with required permissions can only remove payee. The Remove option is available in the Manage Payees page. The Manage Payees page displays all Within bank, Domestic, and International bank account details.
The following is the procedure to remove payee.
- In the Manage Payee page, use the search option to narrow down the results.
- Expand the record and click Remove.
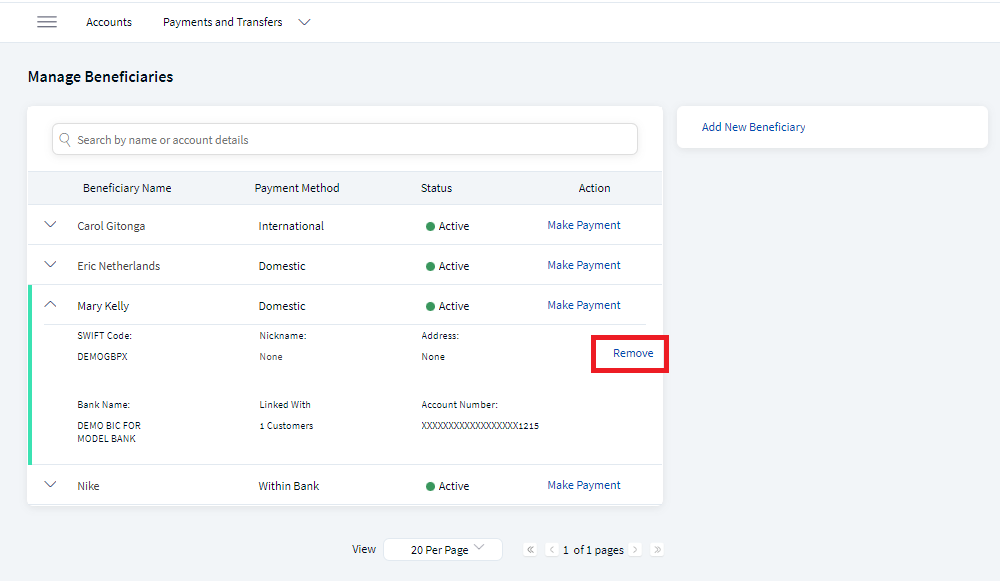
- In the pop-up box, click Yes to remove the Payee.
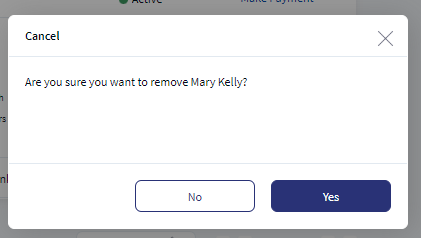
- A success message displays on the top Payee successfully removed or Payee remove is sent for approval. Also an approval notification is sent to all the approvals across contracts in the approval matrix under non-monetary transactions
Confirmation of Payee
The feature Confirmation of Payee is an account name-checking service offered by the central authorities to help reduce misdirected payments and provide greater assurance that payments are being sent to the intended account holder. Application allows the user to validate the payee account name check. The bank application verifies these details with the central system or the third-party system. This feature is available while adding a new payee and performing a transaction.
The bank admin user have to configure the Verify Payee. The admin user is also allowed to configure this Verify Payee at the entity level, payment type level, and country level. The following are the options available for the admin user. See Configuration section for procedure to activate Confirmation of Payee.
The following are the Confirmation of Payee validations:
| Type of Transfer | Account Number Matched | Account Names Matched | Validation Outcome |
|---|---|---|---|
| Same Bank or Domestic or International |
Yes | Yes | Payee Verification Success |
| Yes | No | Payee Verification Failed | |
| No | Yes | Payee Verification Failed | |
| No | No | Payee Verification Failed |
Error Scenario - Payee Name Close Match
Based on the spotlight configuration(VERIFY_PAYEE_NAME_AUTO_UPD), when account number is matched and account names are closely matched, the application will enrich the name.
When the user is performing the Payee confirmation check, the application displays an error message Account Name does not match in a pop up box with following options.
- When Spotlight configuration is enabled, the application displays Update and Cancel options.
- Click Update, the payee name will be automatically enriched by the application.
- Click Cancel, the application aborts the payee verification process and the status is set to failure.
- Click Update, the payee name will be automatically enriched by the application.
- When Spotlight configuration is disabled, the application displays Modify and Cancel options.
- Click Modify, the application allows the user to modify the name and go for payee confirmation.
- Click Cancel, the application aborts the payee verification process and the status is set to failure.
- Click Modify, the application allows the user to modify the name and go for payee confirmation.
Manage Payee
The user can view, add, and edit the bank account Payees.
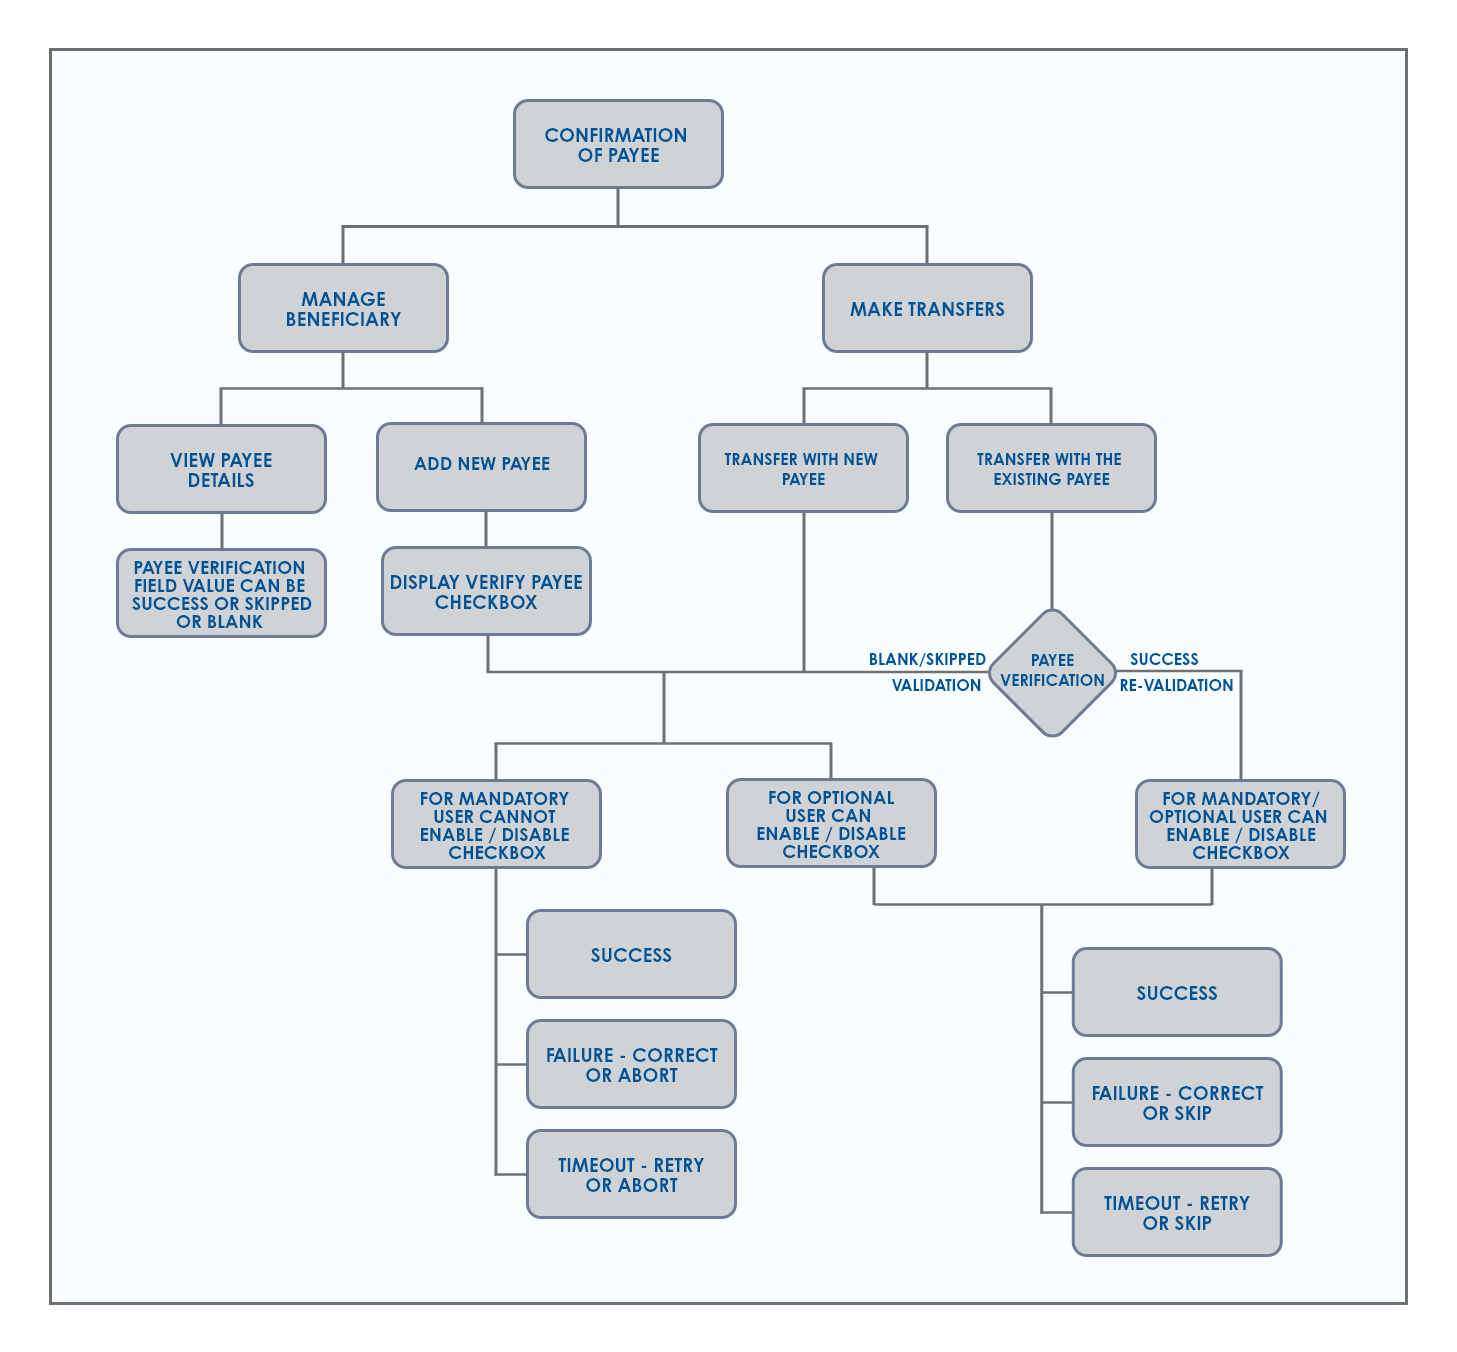
- View Payee Details. Expand the Payees and the application displays a field Payee Verification as Success or Skipped or Empty. Success means the Payee details are validated and correct; skipped means the details could not be verified or user skipped to validate the payee details; and empty is no attempt made to validate the payee.
After enabling the configuration the payee verification field can be seen for the newly added Payees, the application will not display payee verification field for existing Payees.
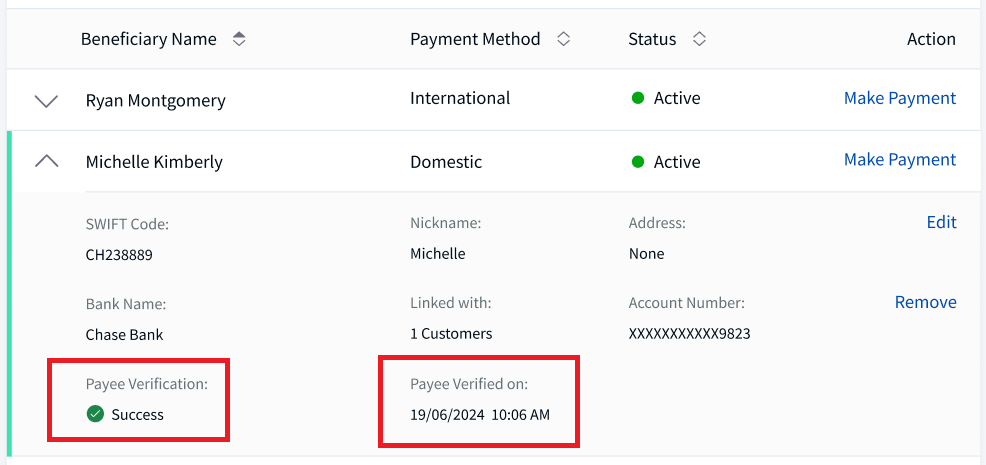
Payee Verification for New Payee 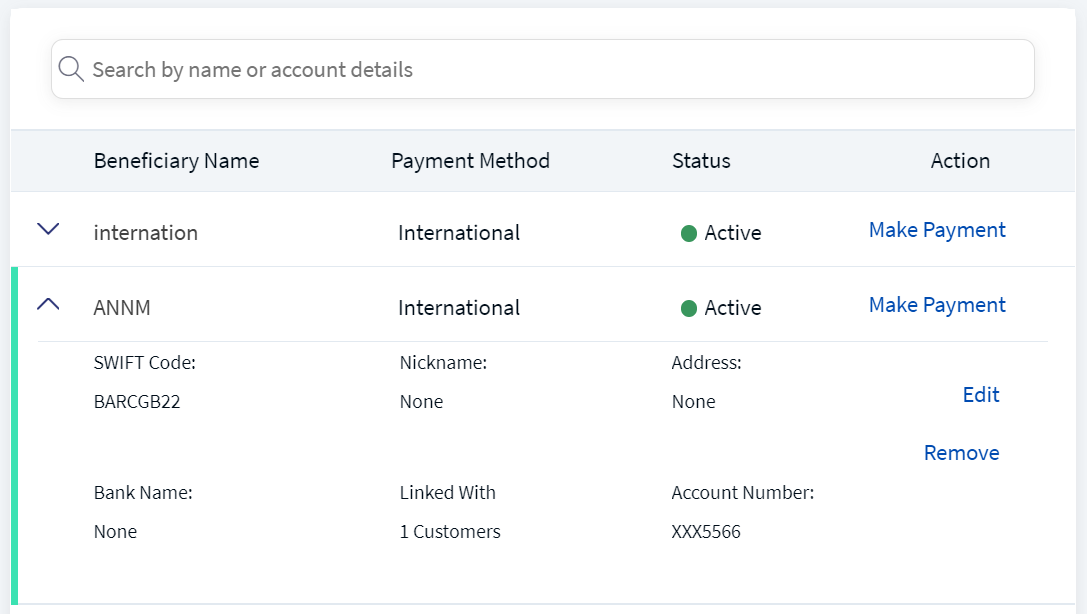
Existing Payee Verification is not available - Add New Payee Details. While adding a new payee, the application displays the check box Verify Payee. The following is the application behavior for various configurations (Mandatory/ Optional/ No Configuration):
- Mandatory. By default, Verify Payee field is checked and the users cannot enable or disable the check box. The following are the expected responses after the validation.
- Success. Entered fields are correct.
- Failure. The user either corrects the details and performs the validation again or aborts the procedure.
In case of a close match, the correct name along with the error reason will be displayed.
- Application timeout. The user either retries with the same details and performs the validation, or aborts the procedure.
- Optional. By default, Verify Payee field is unchecked and the users can enable or disable the check box. The following are the expected responses after the validation.
- Success. Entered fields are correct.
- Failure. The user either corrects the details and performs the validation again or skips the procedure.
In case of a close match, the correct name along with the error reason will be displayed.
- Application timeout. The user either retries with the same details and performs the validation, or skips the procedure.
- No Configuration. The application does not display the Verify Payee field.
- Mandatory. By default, Verify Payee field is checked and the users cannot enable or disable the check box. The following are the expected responses after the validation.
- Edit Payee Details. The user can edit only optional fields, mandatory fields cannot be edited.
- Payee Verified. This is a timestamp(date and time) field. The timestamp shows when the payee verification was successful.
- Payee verified on field will not be displayed till the payee verification is success.
- The field will be updated the current system timestamp only after the payee verification is successful.
- For the Payees with payee verification is success, if the bank user is re-validating the details and
- re-validation is a failure, the timestamp value will not updated in the payee verified field.
- re-validation is a success, the timestamp value will be updated in the payee verified field.
By default, the application has a timeout available and configurable by the bank user. If the verification time has elapsed, the application displays a timeout message.
Make Transfer
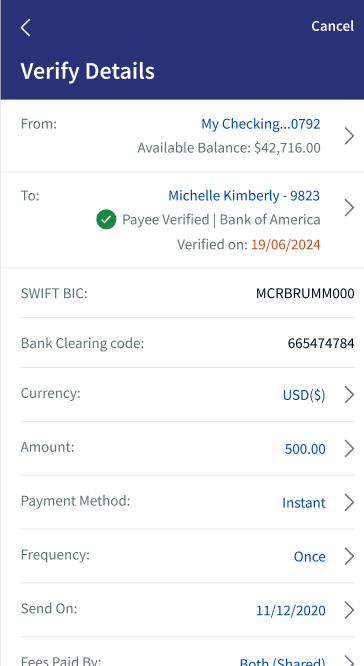
The confirmation of the payee will be validated during payment initiation. Based on the response, the user can proceed with payment initiation.
Make Transfer with New Payee
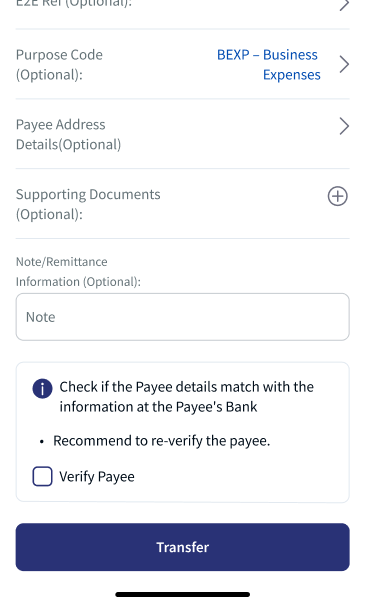
In the Make transfer page when the user selects New Payee. The following is the application behavior for various configurations (Mandatory/Optional/No Configuration):
- Mandatory. By default, Verify Payee field is checked and the users cannot enable or disable the check box. The following are the expected responses after the validation.
- Success. Entered fields are correct.
- Failure. The user either corrects the details and performs the validation again or aborts the procedure.
In case of a close match, the correct name along with the error reason will be displayed.
- Application timeout. The user either retries with the same details and performs the validation, or aborts the procedure.
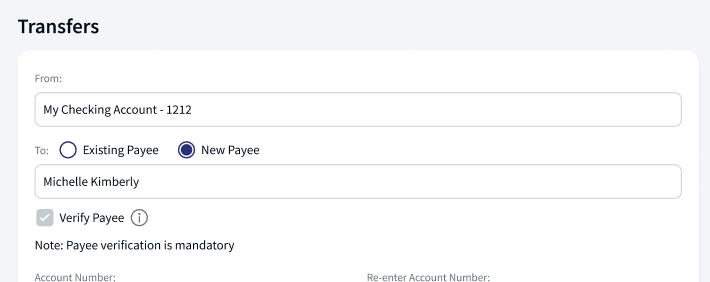
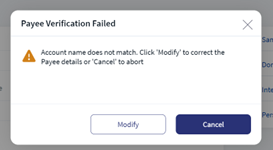
- Optional. By default, Verify Payee field is unchecked and the users can enable or disable the check box. The following are the expected responses after the validation.
- Success. Entered fields are correct.
- Failure. The user either corrects the details and performs the validation again or skips the procedure.
In case of a close match, the correct name along with the error reason will be displayed.
- Application timeout. The user either retries with the same details and performs the validation, or skips the procedure.
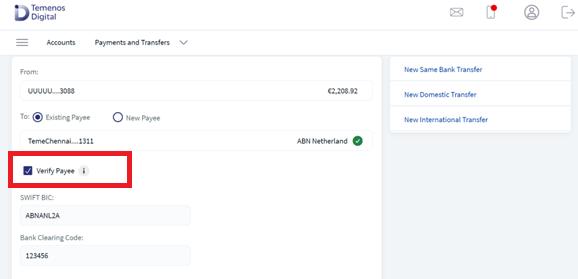
- No Configuration. The application does not display the Verify Payee field.
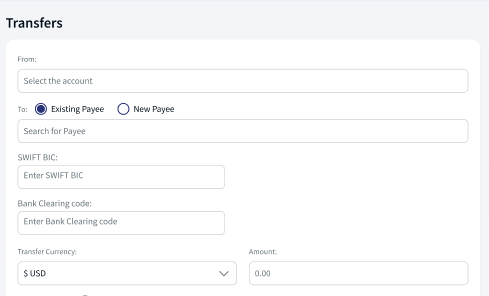
Make Transfer with Existing Payee
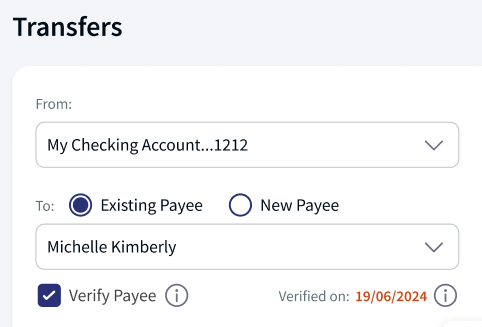
In the Make transfer page when the user selects Existing Payee where the status of the payee verification is success. The following is the application behavior for various configurations (Mandatory/Optional/No Configuration):
- Mandatory/ Optional. By default, Verify Payee field is unchecked and the users can enable or disable the check box for re-validation. The following are the expected responses after the validation.
- Success. Entered fields are correct.
- Failure. The user either corrects the details and performs the validation again or skips the procedure.
In case of a close match, the correct name along with the error reason will be displayed.
- Application timeout. The user either retries with the same details and performs the validation, or skips the procedure.
- No Configuration. The application does not display the Verify Payee field.
Expiry Period - Confirmation of Payee
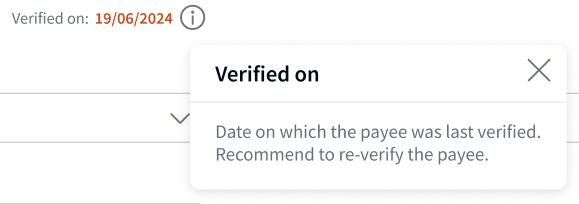
This Payee verification Expiry period is a warning for the banking user. This is to show the user that the beneficiary's last payee verification has crossed the threshold day limit set by the bank. The day limit is as per the Spotlight bundle configuration. The following are the changes the user can see after the expiry period.
- The payee verification time stamp color changes to orange after crossing the threshold day limit.
- The user can still proceed with the transaction without re-validating the confirmation of the payee check.
Configuration
Backend Integration - Transact/MS/Mock
Using the runtime configurable parameter (Payment_Backend server property) at the Micro App level, an implementation team can configure the backend integration endpoint as Transact, or Mock as per customer needs for the following. The Payments Fabric MA supports the integration.
- The backend integration for all the APIs is mocked (DBX DB) or SRMS based on customer needs.
- The validations are avoided if the module is directly integrated with Transact endpoints.
- When records are created, use these options: Use the DBX DB table records that already exist, or use the Fabric Java layer to build a stubbed or JSON data response directly.
Follow these steps:
- Sign-in to your Fabric console.
- From the left pane, select Environments.
- For your Fabric run-time environment, click App Services.
- Navigate to Settings > Configurable Parameters.
- On the Server Properties tab, go to
PAYMENT_BACKENDField Name and set the Field Value depending on the integration (for example, MOCK or SRMS or SRMS_MOCK. - Click Save.
Fabric Server Properties
Current Transfers is via SRMS, as per the requirement, configuration name and configuration values should be as following:
| Module | Configuration name | Configuration Possible Values |
|---|---|---|
| Payments | PAYMENT_BACKEND (Existing) | SRMS/STUB/T24 |
| Standing Orders | PAYMENT_BACKEND (Existing) | SRMS/STUB/T24 |
Spotlight Configuration
The following are the spotlight configuration:
|
Key |
Value |
Description |
|---|---|---|
| CREDITOR_NAME_ENRICHMENT | Enable/Disable | To enable or disable the payee name enrichment on entering the account number while initiating a same bank transfer or adding a new payee and also in the Bulk Payment - Internal transfer. |
Confirmation of Payee
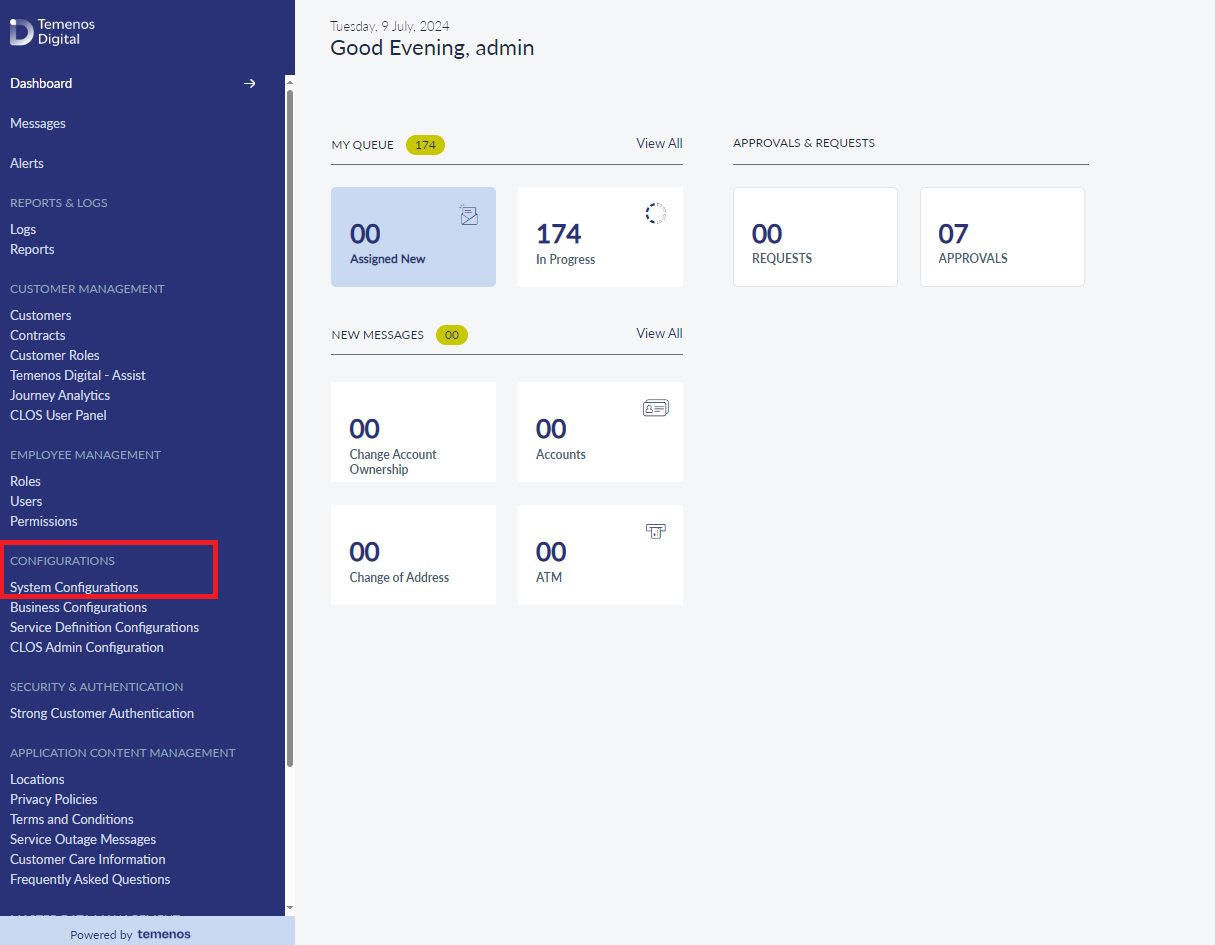
To enable the confirmation of payee, the bank user must have access to the spotlight application and perform the following steps.
- Sign-in to the Spotlight application, navigate to Configurations > System Configuration.
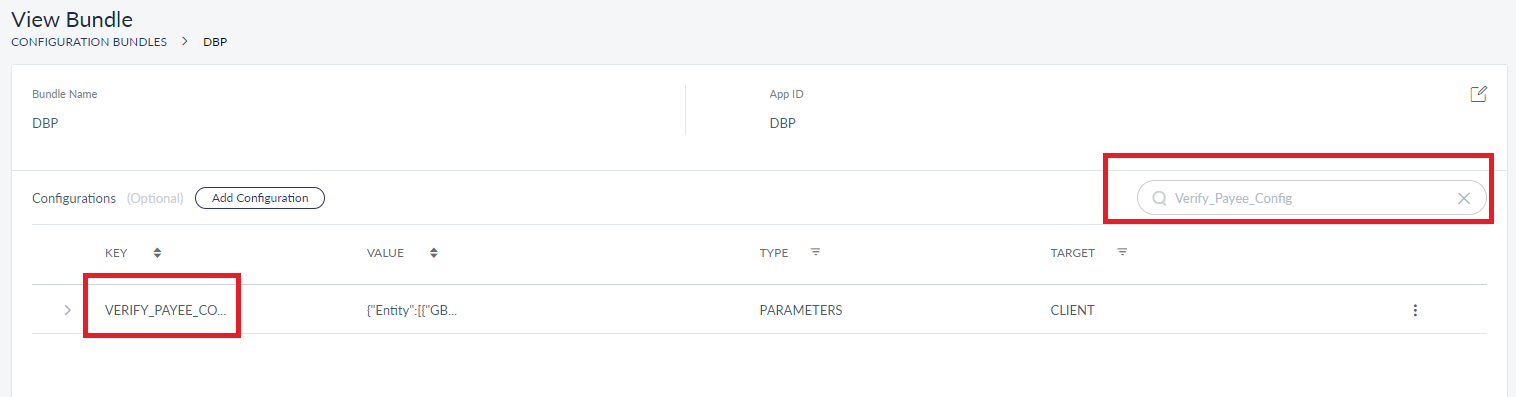
- Select DBP bundle, and search for VERIFY_PAYEE_CONFIG.
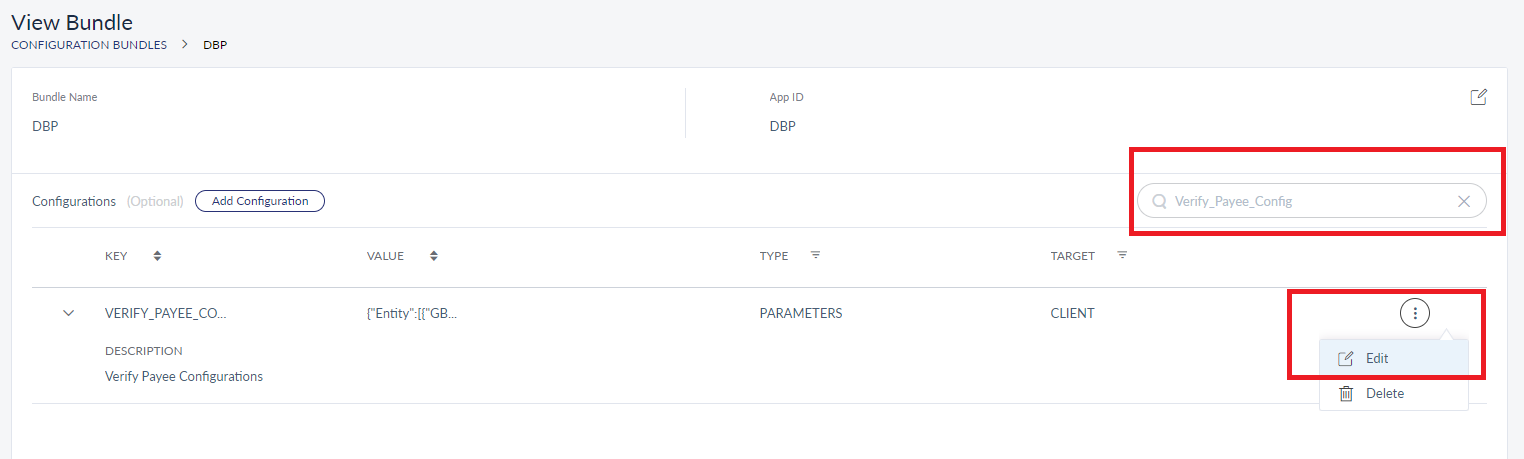
- Click ellipses and select Edit.
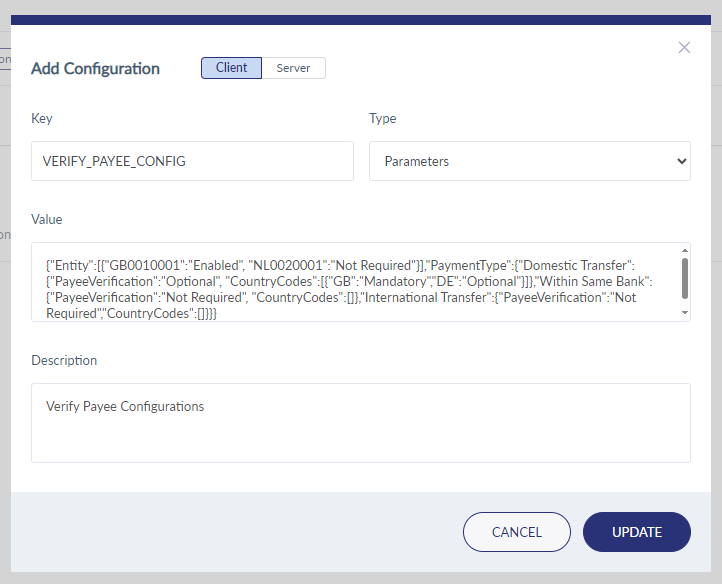
- Edit the configurations accordingly and select Update.
Configuration to Expiry Period
System configuration (Bundle DBP - VERIFY_PAYEE_EXPIRY_PERIOD_IN_DAYS) is available in the Spotlight application to set the threshold day limit for expiry period. The Expiry period is banks decision to set the threshold day limit. The bank can decide if the payee is validated once and remains the status for ever or set expiry period threshold value to display warning to the user.
- Default value is 180.
- Applicable values are 1 to 99999.
The following are the scenarios:
| Scenario 1 | Value is 180 | The application displays the orange color time stamp after the crossing 180 days from the last payee verification. |
| Scenario 2 | Other than values range 1 to 99999 | Any values other than 1 to 99999 considered as no expiry period. For example, 0 or null will be defined as no expiry period. |
System configuration (Bundle DBP - VERIFY_PAYEE_EXPIRY_PERIOD_IN_DAYS) is available in the Spotlight application to set the threshold day limit for expiry period. The Expiry period is banks decision to set the threshold day limit. The bank can decide if the payee is validated once and remains the status for ever or set expiry period threshold value to display warning to the user.
- Default value is 180.
- Applicable values are 1 to 99999.
The following are the scenarios:
| Scenario 1 | Value is 180 | The application displays the orange color time stamp after the crossing 180 days from the last payee verification. |
| Scenario 2 | Other than values range 1 to 99999 | Any values other than 1 to 99999 considered as no expiry period. For example, 0 or null will be defined as no expiry period. |
In this topic